

2

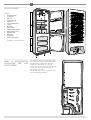
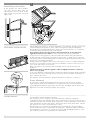
CAPTION
A Refrigerator zone
B Freezer zone
C Base trim
D Thermostat knob
E Light box
F Super / Winter button
G Shelves
H Door trays
I Bottle holders
L Salad/vegetable drawers
M Water drainage outlet
N Adjustable feet
P Condenser
Q Compressor
R Water collecting tray
Drawing is purely illustrative
3
YOUR APPLIANCE
This appliance has been designed and built
so as to avoid condensation forming within
the refrigerator. Condensation dispersal is
carried out automatically by a specific
device. The ensuing water will flow through
a small pipe into a collection tank from
where it will evaporate.
"NO FROST": You are not required to carry
out any defrosting operation.
WHAT IS REFRIGERATION
VENTILATION AND HOW
DOES IT WORK?

The doors normally open on the left
(with the hinge on the right). If instead
you wish to revert the process, you may
proceed as shown on the illustration on
the following pages. Your appliance may
have different types of hinges. Please
refer to the drawings which correspond
to your model.
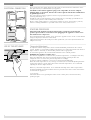
1. Lay the device gently down at the
back (with the doors facing
upwards).
2. Extract the base trim (by pulling it
towards the top) (fig. 3) or if you
have type X (fig. 3A), remove the
base trim by inserting your hands
below it. Pull the tongues which are
found in the middle of the base trim
towards the bottom, in order to
release them from the pivots. Rotate
the base trim towards the top to
release it.
3. Remove tongue R (fig. 3B) from the
left seat of the base trim and
re-insert it into the right seat.
4. Unscrew the two lower hinges L
and M (fig. 4/5) or unscrew hinge A
(fig. 4A).
5. Remove the pivot from hinge L and
place in into hinge M (fig. 6), or
unscrew the pivot on the right and
re-screw it on the left (fig. 5A).
6. Remove the freezer door from the
intermediary hinge P (fig. 7).
4
REVERSIBILITY OF THE
DOORS
7. Unscrew hinge (fig. 8/8B) and close
the holes with the caps which have
been removed from the left (fig. 9).
8. Remove the refrigerator door from
the upper hinge D (fig. 10).
9. Unscrew hinge D (fig. 11) and
assemble it on the left (fig. 12).
10. Insert the refrigerator door into the
pivot of hinge D (fig. 13).
11. Rotate hinge 8 by 180° and
assemble it (fig. 14). Re-insert the
freezer door (fig. 15).
12. Remove the P pin from the 8B
hinge, which is now on the
right-hand side, and insert it on the
left-hand seat (fig 16).
13. Screw the 8B hinge on the left-hand
side and insert the freezer door
again (fig. 15).
14. Re-screw hinges L and M, already
modified at point 4, (fig. 17) or
hinge A (fig. 18).
15. Re-insert the base trim and bring the
device back into a vertical position
(fig. 19).

If the appliance has vertical handles,
you must unscrew them from the
left-hand side and screw them on the
right moving the protection caps from
right to left.
After installing your appliance, check that nothing has been damaged. Should you detect any
possible damage to the appliance, please contact your appliance salesman immediately.
Do not disperse packaging material such as plastic bags, polystyrene strips, etc., around the
environment. Keep such material away from children.
If the appliance has been transported in a horizontal position, do not plug in the
appliance but wait for a few hours in order to allow the oil to flow back into the
compressor. Place the appliance in a dry and aerated environment, duly protected from
weather elements. Avoid placing your appliance on balconies, verandas, terraces. Excessive
heat during summer and cold during winter could alter the good functioning operation of the
appliance or even damage it altogether.
Do not position your appliance near a source of heat like an oven or a central heating plant.
Do not place your appliance next to other pieces of furniture, but leave at least a 3 to 5 cm
space on the sides and 10 cm on the top.
Keep your appliance away from the wall by inserting spacers at the back of the said
appliance.
Adjust the front legs so that the appliance will lean slightly backwards, to allow the
door to close properly.
Clean your refrigerator compartment with a solution of sodium bicarbonate dissolved in water
(1 spoon for every 4 litres of water). Do not use alcohol, abrasive powders or detergents, as
these could ruin the surface.
This appliance works best when the ambient temperature is between 10 °C and 32 °C.
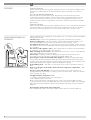
Hinges Adjustment
In case of any accidental bumps during transport, the upper door may not be perfectly
aligned with the frame panel. Should this occur, lightly loosen the screw which fastens the
pivot-holding plate (A) to the upper hinge. Close the door and align it with the frame panel.
Tighten the screw and check that the gasket closes properly.
A
The first way to save electricity is to select the correct place for appliance installation as
specified above under installation instructions.
The second way to save electricity is to prevent heat from entering the refrigerator
compartments. Keep the refrigerator doors open for as little time as possible and never store
hot food inside, like soups or similar dishes in particular, as these will produce a great deal of
steam. Periodically check the door gaskets. Ensure the perfect closure of the doors. Should
this not be the case, please contact the Service Centre.
The third way to save electricity is to maintain the heat exchange parts in good condition.
Prevent condensation from accumulating in the refrigerator. Defrost the appliance whenever
the frost thickness exceeds 1-2 cm. This is not necessary with NO-FROST appliances. Clean
the condenser periodically as specified below in this Booklet.
5
Reversibility of the handles
APPLIANCE INSTALLATION
SAVING ENERGY

Please ensure that the voltage (Volt, V) of the mains socket matches the indications on the
data plate which you will find inside your appliance.
Should the socket and the appliance plug not be compatible, do not use adapters,
multiple plugs or extensions, but have the socket replaced with another suitable kind
by qualified personnel.
The socket which feeds the appliance must be kept operational for future operations
(cleaning, defrosting, etc.).
Should the cable become damaged, replace it timeously by contacting specialized Service
Centres for the purchase and assembly of the said cable.
Electric safety of this appliance is assured only when it has been connected to a perfectly
effective earthing installation as specified in the electric safety norms in force.
Thermostat Adjustment
To adjust the internal temperature, turn the thermostat KNOB positioned on the controls
section. Position 1 corresponds to milder temperatures. For colder temperatures turn knob to
higher numbers. Normally, an intermediate position will be appropriate.
To switch the appliance off, turn the thermostat knob to the 0/STOP position.
WARNING: the appliance remains "live"!
The internal temperatures are influenced by ambient temperatures, according to how many
times the refrigerator door has been opened and the quantity of food placed in the
refrigerator. You can choose the perfect temperature accordingly.
In extreme ambient conditions, it is best to use the thermostat differently.
When the room temperature is very hot (e.g. in summer) we recommend adjusting the knob
to the lower numbers. On the other hand, with cold room temperatures, we recommend
adjusting the knob to higher numbers.
Packaged foodstuffs and other food that has been packed on the shelves must not touch the
back wall of the appliance.
6
Important: if the appliance has been transported to your house in a horizontal
position, please wait for a few hours before plugging in the appliance to allow oil to
flew back into the compressor.
Proceed with the Internal cleaning , then connect the appliance to the electric socket without
using an adaptor (see Electrical connection).
Adjust the thermostats to the food preservation position of your choice (see Instructions for
fridge-freezer use).
STARTING PROCEDURE
ELECTRICAL CONNECTION
USE OF THE APPLIANCE
With very cold room temperatures, we recommend switching on the winter/super button.
FAST FREEZE
Switch Fast Freeze on by pushing the button on the control panel, and switch it off by
pushing it again.

In order to preserve foodstuffs properly,
store them in the correct refrigeration
compartment, as there are areas in the
refrigerator where the temperature is
colder than in others .
BEWARE!
before closing the freezer
door, ensure that every container flap
and/or drawer be perfectly closed
within the appliance.
Freezing
Ensure that your freezing operations are carried out under the most hygienic conditions as
freezing alone does not sterilise the food. It is advisable to freeze the food by packing it into
separate meal portions and not in bulk form. Never put hot or even warm foodstuffs into the
freezer! Prior to storing the frozen food, pack it in plastic bags, polyethylene sheets,
aluminium foil or freezing containers (this material is found on the market and is labelled
“suitable for freezing”). Each pack or container, etc. which you will store into the freezer must
follow the instructions below:
• freezing date and expiry date;
• number of portions;
• the glass containers must be of the Pyrex type and MUST NEVER be filled to the brim:
(freezing expands liquids);
• the packs must be pressed down for air elimination within and must be as flat as possible;
• all frozen food packs, whatever the type, must be closed in order to protect the food.
The maximum quantity of food which can be stored within a period of 24 hours is shown on
the data table. Never store a higher quantity of food than indicated.
Do not place fresh foodstuffs next to frozen food. This would cause an increase in the
temperature of the frozen foodstuffs.
The fast freezing compartment is the first compartment at the top.
The maximum amount of food that can be frozen is stated on the information plate under the
heading " "Capacità di congelazione/Freezing capacity (kg/24h)". Never place larger amounts
inside all at the same time. It is better that you turn the switch off as soon as the freezing is
completed (max 24 hours)
Defrost foodstuffs for immediate use only. Defrosting can be carried out in the following four
manners:
• inside the refrigerator;
• in ambient temperatures;
• inside an oven at 40/50° or in a micro-wave oven;
• directly by cooking.
Defrosting in the refrigerator is a slower but safer operation and allows you to save electricity.
The freezing temperature of the foodstuff is released into the refrigerator during defrosting.
Important notice
If you purchase frozen foodstuffs verify that:
• the packing has boon well sealed and
not mishandled or damaged;
• there are no iced lenses (this means that
the product has already been oven
partially thawed);
• the processing date and dates relevant to
the type of freezer have boon clearly
marked (yours is * * * * );
• in the meantime the products have not
thawed, not oven partially;
Never put into your mouth frozen products
that have just been taken out of the freezer
(ice-cream, ice-blues, ice cubes, etc.), where
the low temperature to which they have
been subjected may cause ice burns and
possible tongue damage.
In case of prolonged current absence transfer
the frozen foodstuffs into another working
freezer.
If the food stuffs have been thawed, even
partially, you may re-freeze them only
after having cooked them!
7
In order to obtain maximum freezing capacity, turn on the fast-freeze switch (see
Caption) 24 hours before putting in food to be frozen.
FREEZING
DEFREEZING
In order to maintain maximum capacity,
remove any drawers found in the
freezer except the first one at the
bottom.

8
Internal cleaning
Before carrying out any other operation, unplug the freezer. Clean both the refrigerator and
the freezer by using sodium bicarbonate dissolved in water (1 spoonful every 4 litres of
water).
DO NOT USE ABRASIVE DETERGENTS.
Rinse off with water and dry with a cloth. Plug into the socket. Turn the knob to the
conservation temperature position. Wait 3-4 hours before placing food inside. To use the
freezer activate fast freeze and wait 3-4 hours before placing deep frozen and/or fresh
products into the respective compartments of the freezer. Remove the fast freeze operation
after 24 hours.
External cleaning
Before carrying out any other operation, unplug the freezer. Use the same delicate method for
external cleaning as you did for the internal cleaning. Remember to dust off the condenser
placed at the back of the appliance. Use a dry brush or better still, a vacuum cleaner.
CLEANING
Before calling the Service department, check whether you can solve the problem through the
following check-points:
Unusual noises - You haven't regulated the base properly and so the freezer vibrates.
Reduced cooling power - You have placed a larger quantity of food than advisable. You
have opened the door too many times. The door has not been properly closed.
The appliance does not cool - Check that the plug and socket are making contact. You may
have blown a mains fuse. The main light switch has tripped. The thermostat is off, the knob is
on "0" position.
The exterior of the appliance is hot - This is NOT a defect, but helps to prevent formation
of condensate on the external parts of the appliance.
White streaking on frozen meats - The temperature is too low or you have not heeded the
expiry dates indicated on the freezing chart.
Part-freezing - Normally, products containing lots of sugar, fats and alcohol such as
ice-creams or juices, do not freeze completely and remain partially soft.
Water droplets on the external walls of the appliance - During the Spring and Autumn
seasons, when the house heating is turned off, it may happen that the external walls of the
appliance show some water droplets (condensate). This phenomenon does not interfere with
the good functioning of the appliance and is not dangerous to people.
Frost build up inside - The doors are not properly shut. You have opened the doors too
often.
Water or ice droplets on the back vertical wall of the refrigerator compartment - This
is not a defect.
The door opens with difficulty - It is normal for the door to offer some resistance to
opening after being closed. This is to ensure a perfect seal of the doors. Wait a few minutes
before opening once again.
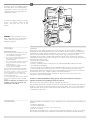
Water droplets at the bottom of the refrigerator
The water drainage outlet is obstructed. Clean it with the help of a small wire (fig. L3).
The light inside the refrigerator is off
• Check the points detailed under “No cooling power”
• The refrigerator light is burnt out.
Replace bulb in this manner: unplug the electric current, prise open the light box with a
screwdriver (it has been pressure fitted), (fig. L1); replace bulb with a similar one (10 WATT),
(fig. L2); insert it into the light box. Remove the burnt-out bulb only if you have another to
replace it.
MINOR BREAKDOWNS AND
ANOMALIES

Fresh meat
We advise you to thaw the meat completely before cooking it to avoid meat from cooking
quicker on the outside than on the inside, with the exception of schnitzels that can be put
directly to cook with a low/medium flame and for boiled meats.
Poultry
They must be plucked, skinned and the innards removed, cut into pieces, washed and dried.
Feathered game
They must be plucked, skinned and the innards removed, cut into pieces, washed and dried.
Fish
Cooked food
N.B. The time limit of preservation of cooked food is reduced if you use fat bacon or lard as sauces.
Put directly onto the flame or into the oven without thawing.
PRODUCT TIME LIMIT
Small cuts of lamb 6 months
Roasted pig 5 months
Pork chops 4 months
Boiled beef, roast beef 10 months
Beef steaks, ribs, stew
8 months
Roast veal
Veal steaks, choice veal cuts 10 months
Minced meat 4 months
Giblets 3 months
Sausages 2 months
PRODUCT TIME LIMIT
Duck 4 months
Rabbit 6 months
Chicken for broth 7 months
Goose 4 months
Chicken 10 months
Turkey 6 months
Giblets 3 months
PRODUCT TIME LIMIT
Wild duck
8 monthsWoodcock
Pheasant
Hare 6 months
Partridge
8 months
Quail
PRODUCT TIME LIMIT PREPARATION
Carp
2 months Remove scales, gut and clean fish, remove head, wash, dry and freeze
Pike
Rhomb
Salmon
Mackerel
Tench
Trout
Gilthead
3 months
Remove scales, gut and clean fish, remove head, wash, immerse in cold salt water
for 30 seconds, dry and freeze
Sole
PRODUCT TIME LIMIT COOKING PREPARATIONS
Meat stew sauce
3 months
Not fully cooked
Tomato sauce Fully cooked
Vegetable soup 2 months Without pasta
Lasagne 4 months Not fully cooked
Roast 2 months Fully cooked
Osso buco (Marrow-bone) 1 month
Not fully cooked
Meat stews 3 months
Game in salmi
2 months
Fully cooked
Boiled fish
Baked fish
Pepperoni, eggplant (aubergines), Meat-stuffed
baby marrows
Not fully cooked
Boiled spinach
Pizza 6 months Fully cooked
9
FREEZING TABLES

It is advisable to steam cook the vegetables so as not to loose the vitamins and minerals into
the water. Therefore there is no need to wait for them to dry before freezing them, but allow
them to cool first.
Generally, the vegetables are better if they are cooked directly without thawing. Reduce the
cooking times bearing in mind the boiling effected before freezing.
Fruit must be covered with sugar or syrup according to the cases. The quantity of sugar to
use in order to preserve it is about 250 gr. per kg of fruit. Syrups are to be used in different
percentages and they are prepared by boiling water with some sugar already melted in it.
The various concentration are:
• 30% solution, 450 gr. of sugar for every litre of water
• 40% solution, 650 gr. of sugar for every litre of water
• 50% solution, 800 gr. of sugar for every litre of water
To maintain the colour of the fruit unaltered, dip it into some lemon juice before covering it with
sugar, or otherwise add some lemon juice to the syrup. Fruit to be freezed needs an hour in the
fridge for setting before being placed into the freezer. The syrup must cover the fruit completely.
To be preserved for 2 months. Defreeze the bread in the oven at 50 C having put it in be-
fore switching the oven on.
Before freezing butter and cheese, cut them into pieces for weekly consumption. Butter is
preserved for 8 months and so is hard cheese (parmesan). Other types of cheese need 4
months. defreezing must be done in the fridge being careful about the condensation which
logically forms on these products.
Asparagus 12 months Wash, remove hard parts 2 minutes
Cabbage, cauliflower 6 months Wash, cut into pieces 2 minutes
(1)
Artichokes
12 months
Remove external leaves 6 minutes
(1)
Beans Shell 3 minutes
French beans Wash, remove stalk 4 minutes
Mushrooms Wash 2 minutes
(1)
Eggplants Wash, slice 4 minutes
(2)
Pepperonies (3) Wash, slice, remove pips
Do not boil
Peas, tomatoes (3)
Shell, freeze, immediately placing them on one layer
only, pack them
Parsley, basil 8 months
Wash
Spinach
12 months
2 minutes
Mixed vegetables ready for
soup (Celery, carrots,
beetroot, leaks, etc.)
Wash, cut into pieces, divide into portions, do not
put potatoes as they turn black
Do not boil
(1) Put a bit of vinegar or lemon in the cooking water.
(2) Salt well before cooking.
(3) The vegetables become mushy during the thawing, owing to the high content of water in them. We advise freezing only if you
intend consuming the cooked products.
Apricots 8 months Wash, stone, 40% syrup
Pineapple
10 months
Peel, slice, 50% syrup
Oranges Peel, slice, 30% syrup
Cherries Wash, stone, cover with sugar or with 30% syrup
Strawberries
12 months
Wash, remove stalks and cover with sugar
Melons Peel, slice, remove pips and cover with 30% syrup
Peaches 8 months Peel, stone, slice and cover with 50% syrup
Grapefruit 12 months Peel, slice, 30% syrup
Citrus juice 10 months Squeeze, remove pips, sugar according to taste
Plums
12 months
Peel, stone, cover with sugar or with 50% syrup
Grapes Separate the grapes from the stalk, wash, cover with sugar or with 30% syrup
Whortleberries, blackberries
red, black current goose
berries, raspberries
10 months Wash, remove stalks, cover with sugar
10


174.5687.0
-
 1
1
-
 2
2
-
 3
3
-
 4
4
-
 5
5
-
 6
6
-
 7
7
-
 8
8
-
 9
9
-
 10
10
-
 11
11
-
 12
12


Brandt CFB201WU Owner's manual
- Category
- Fridge-freezers
- Type
- Owner's manual
Ask a question and I''ll find the answer in the document
Finding information in a document is now easier with AI
Related papers
-
Groupe Brandt CO27FWLU Owner's manual
-
-
-
-
-
-
Groupe Brandt CO31BWLU Owner's manual
-
Groupe Brandt DI39AWKE Owner's manual
-
-
Other documents
-
 FIVEGIVEN 3 Tier Bookshelf Rustic Industrial Bookshelf Wood and Metal, Brown User guide
-
Hoover HCF6185A User manual
-
Danby dac12070ee User manual
-
Danby DAC5088M User manual
-
Masterbuilt 20078215 User manual
-
VocoPro PA-MAN User manual
-
Toshiba D-R5SU User manual
-
LG VC4220NHTY User manual
-
Samsung AQ09NLX User manual
-
