Page is loading ...

TRANSLATION OF ORIGINAL ORIGINAL OPERATING AND
INSTRUCTION MANUAL
ELECTRONIC OVEN WITH TOUCH SCREEN
KDTE511 – KDCTE612 – KDTE611SC –
KDTE711 – KDTE1011SC – KDTE1111

1

2
CONTENTS
1. Technical service _________________________________________________________________________ 6
2. Instructions for the user ___________________________________________________________________ 6
2.1 Control panel _____________________________________________________________________ 6
2.2 Touch Screen control operation ______________________________________________________ 7
2.3 Switching on ______________________________________________________________________ 7
2.4 Explanations of the symbols: ________________________________________________________ 10
2.5 “HOME” screen __________________________________________________________________ 11
2.6 Operating parameters _____________________________________________________________ 12
2.7 Additional functions: ______________________________________________________________ 13
2.8 “Simplified” mode function (allows a single cooking step) _______________________________ 14
2.9 “Advanced” mode function (allows 10 cooking steps) __________________________________ 15
2.10 Cooking cycle with core probe “Advanced” mode ____________________________________ 17
2.11 Cooking cycle with core probe and ΔT temperature “Advanced” mode ___________________ 18
2.12 Cooking cycle with “Pre-heating” function __________________________________________ 19
2.13 Cooking cycle with “Maintenance” function _________________________________________ 19
2.14 Cooking cycle with “Postpone” function ____________________________________________ 19
2.15 Program storage (recipe) __________________________________________________________ 20
2.16 Program storage (recipe) with picture _______________________________________________ 20
2.17 Recipe book ____________________________________________________________________ 21
2.18 How to delete cooking programs from the “CHEF” library ______________________________ 22
2.19 Import / export from "USB" to "Chef Recipes" _______________________________________ 23
2.19.1 Export all recipes (stored programs) _______________________________________________ 23
2.19.2 Import all recipes (stored programs) _______________________________________________ 23
2.19.3 Export some recipes (stored programs) _____________________________________________ 24
2.19.4 Import some recipes (stored programs) ____________________________________________ 24
2.20 “Multi-level” function ____________________________________________________________ 25
2.21 Accessories _____________________________________________________________________ 26
2.22 Cooling ________________________________________________________________________ 27
2.23 Settings ________________________________________________________________________ 28
2.24 “HACCP” function _______________________________________________________________ 29
2.24.1 Activating/deactivating the “HACCP” function ______________________________________ 29
2.24.2 Downloading “HACCP” data on a USB flash drive ___________________________________ 29
2.25 Wi-Fi network connection _________________________________________________________ 30
2.25.1 Software update availability (oprative function update) _______________________________ 31
2.26 Technical Service_________________________________________________________________ 31
3. Cleaning ______________________________________________________________________________ 31
3.1 Manual cooking chamber cleaning ___________________________________________________ 31
3.2 Semi-automatic cooking chamber cleaning ____________________________________________ 32
3.3 Automatic cooking chamber cleaning ________________________________________________ 32
3.4 Cleaning fans ____________________________________________________________________ 33
3.5 Door gasket cleaning ______________________________________________________________ 33
3.6 Door cleaning ____________________________________________________________________ 33
3.7 Cleaning the external casing ________________________________________________________ 33
3.8 Inactivity period___________________________________________________________________ 33
4 Troubleshooting _________________________________________________________________________ 34
5 Possible alarms __________________________________________________________________________ 34
6 Possible errors ___________________________________________________________________________ 38
7. Technical support _______________________________________________________________________ 39
8. Disposal of the appliance _______________________________________________________________ 39

3
GENERAL INFORMATION
It is essential for this instruction manual to be stored together with the appliance
for future referencing; in the event of misplacing it, a copy must be obtained directly from the
manufacturer.
This information has been prepared for your safety and that of others.
Therefore, we kindly ask you to read it carefully before installing and using the appliance.
If upon reception of the goods the packaging should not be intact or should it be damaged, affix the
following wording: “GOODS SUBJECT TO CHECK”, with the specification of the damage and
countersigned by the driver; file a written complaint with the vendor within 4 calendar days (not business
days) from the date of delivery, after which no complaints shall be accepted.
For periodic maintenance checks and repairs, contact your nearest Technical Support Centre and only use
original spare parts. Failure to comply with this provision shall forfeit the warranty right
The “technical data” plate is located on the side panel of the appliance.
The inappropriate or incorrect use of the appliance shall invalidate any liability and warranty right by the
Manufacturer.
BURN and INJURY HAZARD
• The temperature of the appliance's external surfaces may exceed 60°C, only touch control elements.
Burn hazard!
• Pay attention to handling food containers during and after cooking: they might be very hot. Wear
appropriate protective thermal clothing to prevent burns.
• During operation, with the door open, do not remove the fan cover; do not touch the moving fans and
resistors which are still hot.
• The maximum working height, referred to the highest surface level, must be 160 centimetres from the
floor. After installing the appliance apply the suitable adhesive symbol (supplied) at a height of
160 centimetres.
• To prevent boiling, do not use containers filled with liquids or food that liquefy with heat, in excessive
amounts that cannot be easily kept under control. For this reason, only use trays that let you see inside
the container. When extracting a tray containing hot liquid pay attention not to spill any liquid.
• Before removing the food from the oven after cooking with the needle shaped thermal probe (core
probe), carefully extract the still hot probe from the food, taking care not to leave it hanging outside the
cooking chamber.
• Do not open the door during washing operations, as chemical substances (corrosive) used for cleaning
and hot fumes might escape.
• After baking open the door with caution, to avoid the violent outflow of heat which might cause burns.
ELECTRIC SHOCK HAZARD
• Before performing any cleaning on the appliance, disconnect the power supply (act on the safety
magnetic circuit breaker) and water supply (close the water cock). Let it cool completely.
• Any modification to the electrical system that might be required to be able to install the appliance must
be carried out by competent personnel only.

4
• The power supply system must be fitted with effective earthing connection according to the regulations
in force.
• In the permanent connection to the mains, a protective pole switch must be provided between the
appliance and the mains with minimum opening between the contacts of overvoltage category III
(4000V), sized for the load and complying with applicable regulations (automatic circuit breaker).
• If the power supply cable is damaged, it must be replaced by the manufacturer or their technical
support service, or in any case by a person with similar qualifications, to prevent any risk.
• The appliance also has electrical components inside, for safety reasons it is forbidden to wash it with
water or steam jets especially if aimed at the aeration vents on the metal surfaces of its outer casing.
FIRE HAZARD
• No foods containing easily flammable substances must be cooked, such as alcohol-based foods; self-
combustion phenomena might occur leading to fires and explosions in the cooking chamber.
• Before using the appliance, make sure that there are no non-compliant objects (e.g. User manuals,
plastic bags or other flammable objects) or detergent residues, inside the cooking chamber.
• Always keep the cooking chamber clean. Cooking liquids (fats) or food residues may ignite!
USER SAFETY
• The appliance is intended for professional use in institutional and professional kitchens and must only be
used by skilled personnel who have been trained on its proper use. For safety reasons the appliance
must be supervised during operation.
• This appliance is not intended for use by persons (including children) with reduced physical, sensory or
mental capabilities, or lack of experience and knowledge, unless they have been given supervision or
instruction concerning use of the appliance by a person responsible for their safety.
• Children should be supervised to ensure that they do not play with the appliance.
• In the event of failure or poor operation, switch off the appliance, close the water supply cock,
disconnect the power supply and contact an authorised Technical Support Centre.
• This appliance shall be used only for the purposes for which it was designed, meaning for all types of
baking of pastries, baked goods and food: fresh and frozen; for reconditioning chilled and frozen food,
for steam cooking meats, fish and vegetables.
Any other use is considered improper.
• The noise level of the appliance in operation is less than 70 dB (A).
INFORMATION FOR THE USER
• When the appliance is first used it is recommended to operate it unladen for 40/50 minutes at a
temperature of 220/230°C. In this way all unpleasant yet fully normal smells due to heating the thermal
insulation enveloping the cooking chamber and the silicone used for its external sealing are dissipated.
• Avoid prolonged permanence on the steel surfaces of foods containing acidic substances (lemon juice,
vinegar, salt, etc.) which cause corrosive deterioration.
• The appliance must be cleaned at regular intervals, even daily (using automatic washing, if available), to
assure best functionality and lengthening its life cycle.
• In the event specific detergents (degreasers) are used for cleaning stainless steel, ensure they do not
contain corrosive acid substances (no presence of chlorine even if diluted) or abrasive substances.
Carefully follow the instructions and warnings of the detergent's manufacturer and take precautions
such as using adequate rubber gloves.
• Strictly avoid using scouring pads, steel wool and scrapers that may ruin the treated surfaces.
• In order not to irreparably damage the needle shaped thermal probe (core probe), avoid using it in high
temperature cooking (OVER 230°C); also avoid letting the probe cable come into direct contact with the
hot metal surfaces inside the cooking chamber.

5
COOKING TIPS
• In placing the food in the cooking chamber, maintain a space of at least 40 mm between trays
in order not to excessively obstruct air circulation.
• Do not use trays with sides higher than necessary: the sides form barriers that prevent hot air
circulation.
• Preheat the oven every time before cooking to achieve top performance.
• For cooking as consistently as possible, spread the food evenly in every tray taking into account
its size, layer or thickness.
• Avoid adding salt to food in the cooking chamber.
• To check correct progress of the cooking cycle use the chamber's internal lighting: avoid
uselessly opening the door, which causes wastes of energy and longer cooking times.
RESIDUAL RISKS
• After baking open the door with caution, to avoid the violent outflow of heat which might cause burns.
• During oven operation pay attention to hot areas of its outer surfaces (marked on the appliance).
• Do not use the door handle to move the appliance (possible glass breakage).
• The supporting bench must be able to withstand the weight of the machine and house it correctly.
• The appliance is fitted with electrical parts and must never be washed with a water or steam jet.
• The appliance is electrically connected: disconnect the power supply before performing any type of
cleaning.
• To avoid incorrect connections of the appliance, the relevant electrical/water connections are
marked on the appliance by suitable identification plates.

6
1. Technical service
• It is essential for this instruction manual to be stored together with the appliance for future referencing;
in the event of misplacing it, a copy must be obtained directly from the manufacturer.
This information has been prepared for your safety and that of others; therefore we kindly ask you to
read it carefully before installing and using the appliance.
• For periodic maintenance checks and repairs, contact your nearest Technical Support Centre and only
use original spare parts. Failure to comply with this provision shall forfeit the warranty right.
• All installation and commissioning operations must exclusively be performed by technically skilled
installers, according to the manufacturer's instructions and in compliance with national standards in
force.
• The “technical data” plate is located on the side panel of the appliance.
Note: The inappropriate or incorrect use of the appliance and failure to comply with installation rules shall
invalidate any liability by the Manufacturer.
2. Instructions for the user
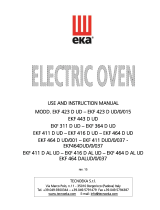
2.1 Control panel
1- 7” Touch Screen Display
2- Knob with “PUSH” function

7
2.2 Touch Screen control operation
The oven is equipped with a Touch Screen control and an adjustment knob.
The Touch Screen control works by touching the icon of the displayed parameter and/or function with your
finger (only use dry and clean fingers and no other tool such as knives, forks or other objects in general).
Turning the adjustment knob clockwise/anti-clockwise changes the selected operating parameter,
modifying the value shown on the display. Pressing it slightly (“push” function) confirms the selected
operating parameter and corresponding set value, switching automatically to the next operating parameter.
2.3 Switching on
The oven is equipped with an "ON/OFF" button to electrically power the electronic control board and
activate its operational functionality (Fig. 1).
The button (A) is not directly visible as it is located under the base of the oven, in the direction of the door
sensor: an identification plate (B) on the side indicates its presence.
To activate the oven function, set the button to "ON".
Fig.1
Stand-by and “lock” of display
If the oven is not used (no operation is being performed), the stand-by mode is automatically activated
after 5 minutes.
In this configuration, the current time is shown in the center of the display. To reactivate the functional
mode of the oven, just double tap display.

8
Using the Touch Screen display
TOUCH (confirms the active function, the selected
operating parameter and the corresponding set
value)
SCROLL (selects the active function and the set parameter
value)
Examples:

9
Using the knob
PRESS THE KNOB
(confirms the active
function, the selected
operating parameter
and the corresponding
set value)
TURN THE KNOB
(changes the active
function, the selected
operating parameter
and the
corresponding set
value)
Examples:
By turning the knob clockwise, you can select the various active functions
and the values of the operating parameters in sequence. Pressing the
knob again confirms the active function and the value of the operating
parameter.
PUSH
PUSH

10
2.4 Explanations of the symbols:
CONFIRM
Confirms the set operating parameter
START
Starts the cooking cycle
STOP
Stops the cooking cycle
BACK
Goes back to the previous screen
HOME
Goes back to the main screen
ADDITIONAL
FUNCTIONS
Accesses the additional functions
ON
Activates the indicated function
OFF
Deactivates the indicated function
ADD
Adds a baking level when using the “Multilevel” function/add
cooking steps
DELETE
Deletes the unwanted data inside the selected function
“BROWSE” THE
VARIOUS
MENUS/NAVIGATE
BETWEEN THE
VARIOUS
MENUS/WINDOWS
“Browse” the data of the various menus + ADD COOKING
STEPS
RECIPE NOT SAVED IN
THE RECIPE BOOK
The set recipe is not saved in the recipe book
RECIPE SAVED IN THE
RECIPE BOOK
The set recipe is saved in the recipe book
RECEPTIVE MENU
The recipe list is sorted by type
ADDITIONAL
INFORMATION
Displays additional information (if any)
STOP “COOLING” or
“WASHING”
The “COOLING”/”WASHING” function stops

11
2.5 “HOME” screen
The “Home” screen (Fig.2) appears once the first switch-on procedure is completed.
Fig.2
The “active functions” are those used by the oven.
The “available functions” are those that can be potentially used by the oven for its operation. And
they are:
• SIMPLIFIED MODE
• ACCESSORIES
• ADVANCED MODE
• COOLING
• RECIPE BOOK
• SETTINGS
• MULTI LEVEL
• TECHNICAL SERVICE
The “Home” screen can be activated whenever the “ ” symbol is touched.
“Recipe book Board”
(“Active functions”)
Recipe books
“Window”
(“Available functions”)

12
2.6 Operating parameters
COOKING TIME
from 1 minute to 11 hours and 59 minutes or INFINITE
( = OFF = ON)
COOKING
TEMPERATURE
from 30°C to 270°C
CORE TEMPERATURE
from 0 to 100°C (only in “Advanced Mode”)
ΔT TEMPERATURE
from 0 to 100°C (only in “Advanced Mode”)
HUMIDITY
from 0 to 100% with 10% step or OFF
FAN SPEED
from 1 to 5
SEMI
STATIC
from 1 to 5
MANUAL
HUMIDIFICATION KEY
Humidification always active
MANUAL DRYING KEY
Drying always active
INSIGHTS
• “SEMI-STATIC” MODE
“Semi-static” baking is a mode that allows motors to be activated only when the heating elements are
operating. The mode is activated by touching the “ ” symbol on the display.
The fans are activated in order to distribute the heat generated by the heating elements and make the
temperature inside the cooking chamber even.
In this way static oven operation is reproduced.
• HUMIDIFICATION / DRYING OPERATION
Using the algorithms, the oven is able to detect the actual percentage of humidity/steam in the cooking
chamber. This independently activates drying or humidification. If, for example, there is 80% of humidity
in the cooking chamber and a value of 20% is set on the display, the oven automatically detects that the
humidity present is greater than that set and so independently activates the drying system; otherwise, if
a higher value of humidity compared to that detected in the cooking chamber is set on the display, the
oven independently activates the input of humidity/steam. The value “0” indicates no presence of
humidity/steam in the cooking chamber (automatic activation of the drying system). The “OFF” value
deactivates the automation of the system that manages “the climate” in the cooking chamber, and the
amount of humidity/steam or drying can only be manually activated by touching the “ or “
symbols on the display.

13
2.7 Additional functions:
PRE-HEATING
The “PRE-HEATING” function can be enabled or disabled by the user;
when enabled, there is an automatic increase of 40°C of the set
cooking temperature.
If, for example, a temperature of 180°C is set (“Fase 1” (Step 1)), the
“PRE-HEATING” function will allow reaching the temperature of
220°C inside the cooking chamber. A buzzer warns that this
temperature has been reached and the display shows the following
message: “PRE-HEATING OK OPEN THE DOOR”. The temperature is
maintained until the door is opened.
Open the door, put the food in the oven, close the door: the cooking
cycle starts automatically.
The “PRE-HEATING” function cannot be used together with the
delayed start.
The pre-heating temperature cannot exceed 270°C.
MAINTENANCE
The “MAINTENANCE” function can be enabled or disabled by the
user; when enabled in the cooking program, it becomes operational in
the last step of the program and it consists in maintaining the
temperature inside the cooking chamber at 80°C. This function is used
to keep food warm at the end of cooking, for as long as necessary. It
stops when the door is opened.
POSTPONE
The “POSTPONE” function can be enabled by the user in the cooking
program; when enabled, it allows a “delayed” start of the cooking
cycle: useful for products that must be allowed to rise before being
cooked.
The “delayed” start can be preset for a time between 1 minute and
11h and 59’. During this time only the cooking chamber lighting is
active.
This function cannot be enabled together with “pre-heating”.

14
2.8 “Simplified” mode function (allows a single cooking step)
The following parameters can be set by touching the “Simplified” mode icon on the display:
• Cooking time
• Fan speed
• Cooking temperature
• “Semi-static” cooking
• Humidity %
Fig.3 Fig.4 Fig.5
The parameter value is set by sliding, up or down, your finger on the “number” next to the parameter (Fig.
3), to the desired value; or by turning the knob clockwise or anti-clockwise to the desired value. This value
is confirmed by pressing the knob; turning it again goes directly to the next parameter.
The “ ” symbol is present at top-left of the display; touching it, displays a window (Fig. 4) which allows
enabling the following functions:
• Pre-heating
• Maintenance
Touching “” displays the “summary” screen (Fig. 5); touching it again, enables the cooking cycle. The
following are displayed at the top-right of the screen: the remaining cooking time and the actual
temperature in the cooking chamber. The “ ” symbol is on the left of the screen and the “ ” symbol
is in the centre. The “summary” screen contains all parameters and functions that can be set for a single
cooking step. By selecting each individual parameter, you can edit the set value at any time; simply touch
the symbol of the desired parameter: a window appears indicating the parameter and its set value. The
new value can be set by sliding the finger or turning the knob; touching the “” symbol in the window
automatically confirms the value and the window goes back to “summary” screen mode; vice-versa, if the
“ ” symbol is touched the new parameter value is not confirmed and the previous value remains active.
Bottom-left of the “summary” screen has the symbol “ ” which allows to go back to the previous
screen, while bottom-right has the symbol “ ” which allows stopping the cooking cycle.

15
2.9 “Advanced” mode function (allows 10 cooking steps)
The following parameters can be set by touching the “Advanced” mode icon on the display:
• Cooking steps (from 1 to 10)
• Core temperature
• Fan speed
• Cooking time
• ΔT Temperature
• “Semi-static” cooking
• Cooking temperature
• Humidity%
Fig.6 Fig.7 Fig.8
The parameter value is set by sliding, up or down, your finger on the “number” next to the parameter (Fig.
6) to the desired value; or by turning the knob clockwise or anti-clockwise to the desired value. This value is
confirmed by pressing the knob; turning it again goes directly to the next parameter.
The “ ” symbol is present at top-left of the display; touching it, displays a window (Fig. 7) which allows
enabling the following functions:
• Pre-heating
• Maintenance
• Postpone
Touching “” displays the “summary” screen (Fig. 8); touching it again, enables the cooking cycle. The
following are displayed at the top-right of the screen: the remaining cooking time, the actual temperature
in the cooking chamber and the actual temperature of the core probe, if enabled (in this case, the
“Cooking time” parameter is disabled). The “ ” symbol is on the left of the screen and the “ ”
symbol is in the centre. The “summary” screen contains all parameters and functions that can be set for
each cooking step. By selecting each individual parameter, you can edit the set value at any time; simply
touch the symbol of the desired parameter: a window appears indicating the parameter and its set value.
The new value can be set by sliding the finger or turning the knob; touching the “” symbol in the
window automatically confirms the value and the window goes back to “summary” screen mode; vice-
versa, if the “ ” symbol is touched the new parameter value is not confirmed and the previous value
remains active. Bottom-left of the “summary” screen has the symbol “ ” which allows to go back to
the previous screen, while bottom-right has the symbol “ ” which allows stopping the cooking cycle.

16
INSIGHTS:
• COOKING WITH CORE PROBE
There are two parameters to be set to cook with core probe: core temperature and cooking temperature.
The cooking time is no longer a control parameter and so does not appear on the “summary screen”.
If the cooking cycle consists of a single step, the oven works until the temperature detected by the core
probe is reached inside the food. If the cooking cycle consists of several steps and core probe cooking is
enabled in one of them, once the temperature detected by the core probe is reached, the oven continues
to work switching to the next step.
If, during a cooking cycle with needle shaped thermal probe (core probe) the probe is not properly
connected, the display shows an error with corresponding sound alarm.
IMPORTANT
The needle shaped thermal probe must be inserted inside the food, in the thickest area, avoiding
contact with any bones.
If a cooking cycle with core probe is enabled, the needle shaped thermal probe must already be
connected to the specific socket on the bottom of the oven; otherwise, the display will show the
corresponding alarm.
With the door closed, the needle shaped thermal probe cable must pass between the door
gasket (bottom area) and the door itself.
• COOKING WITH “ΔT” TEMPERATURE
There are two parameters to be set to cook with “ΔT” temperature: core temperature and “ΔT”
temperature. The cooking time is no longer a control parameter and so does not appear on the “summary
screen”.
The “ΔT” temperature parameter makes it possible to maintain constant, throughout the cooking step,
the difference between the temperature inside the food (temperature detected by the needle shaped
thermal probe) and the temperature inside the cooking chamber (cooking temperature). In this way the
value of the temperature in the cooking chamber becomes the sum of the temperature inside the food
and the set “ΔT” temperature. In practical terms there is a slow increase of the temperature in the
cooking chamber: the food undergoes a prolonged and delicate cooking process.
If the cooking cycle consists of a single step, the oven works until the temperature detected by the core
probe is reached inside the food. If the cooking cycle consists of several steps and cooking with “ΔT”
temperature is enabled in one of them, once the temperature detected by the core probe is reached, the
oven continues to work switching to the next step.
If, during a cooking cycle with “ΔT” temperature and needle shaped thermal probe (core probe) the
probe is not properly connected, the display shows an error with corresponding sound alarm.

17
2.10 Cooking cycle with core probe “Advanced” mode
Set the following parameters by touching the “Advanced” mode function icon on the display (Fig. 9) and
then sliding your finger on the display to the left (Fig. 10):
• Core temperature
• Fan speed
• Cooking temperature
• “Semi-static” cooking
• Humidity %
Fig.9 Fig. 10
Fig. 11 Fig. 12
The parameter value is set by sliding, up or down, your finger on the “number” next to the parameter (Fig.
11) to the desired value; or by turning the knob clockwise or anti-clockwise to the desired value. This value
is confirmed by pressing the knob; turning it again goes directly to the next parameter.
Touching “” displays the “summary” screen (Fig. 12); touching it again, enables the cooking cycle. The
following are displayed at the top-right of the screen: the actual temperature in the cooking chamber and
the actual temperature of the core probe. The “ ” symbol is on the left of the screen and the “ ”
symbol is in the centre. The “summary” screen contains all parameters and functions that can be set for
each cooking step. By selecting each individual parameter, you can edit the set value at any time; simply
touch the symbol of the desired parameter: a window appears indicating the parameter and its set value.

18
The new value can be set by sliding the finger or turning the knob; touching the “” symbol in the
window automatically confirms the value and the window goes back to “summary” screen mode; vice-
versa, if the “ ” symbol is touched the new parameter value is not confirmed and the previous value
remains active. Bottom-left of the “summary” screen has the symbol “ ” which allows to go back to
the previous screen, while bottom-right has the symbol “ ” which allows stopping the cooking cycle.
2.11 Cooking cycle with core probe and ΔT temperature “Advanced” mode
Set the following parameters by touching the “Advanced” mode function icon on the display (Fig. 13) and
then sliding your finger twice on the display to the left (Fig. 14):
• Core temperature
• Fan speed
• ΔT Temperature
• “Semi-static” cooking
• Humidity %
Fig.13 Fig. 14
Fig. 15 Fig. 16
The parameter value is set by sliding, up or down, your finger on the “number” next to the parameter (Fig.
15) to the desired value; or by turning the knob clockwise or anti-clockwise to the desired value. This value
is confirmed by pressing the knob; turning it again goes directly to the next parameter.

19
Touching “” displays the “summary” screen (Fig. 16); touching it again, enables the cooking cycle. The
following are displayed at the top-right of the screen: the actual temperature in the cooking chamber and
the actual temperature of the core probe. The “ ” symbol is on the left of the screen and the “ ”
symbol is in the centre. The “summary” screen contains all parameters and functions that can be set for
each cooking step. By selecting each individual parameter, you can edit the set value at any time; simply
touch the symbol of the desired parameter: a window appears indicating the parameter and its set value.
The new value can be set by sliding the finger or turning the knob; touching the “” symbol in the
window automatically confirms the value and the window goes back to “summary” screen mode; vice-
versa, if the “ ” symbol is touched the new parameter value is not confirmed and the previous value
remains active. Bottom-left of the “summary” screen has the symbol “ ” which allows to go back to
the previous screen, while bottom-right has the symbol “ ” which allows stopping the cooking cycle.
2.12 Cooking cycle with “Pre-heating” function
The “Pre-heating” function can be set before or after setting the cooking cycle parameters. It can be set in
both “Simplified” or “Advanced” mode.
Simply touch the “ ” symbol at the top-left of the “Parameters” screen: a window appears indicating the
“Pre-heating” function symbol and the symbol of the switch not
enabled ( ). Touching the switch enables the function ( ); touching it again, disables it. Touching
the “” symbol on the window automatically confirms the function and the window goes back to show
the “Parameters” screen; vice-versa, if the “ ” symbol is touched, the function is not confirmed. The
window still goes back to “Parameters” screen mode.
The “Pre-heating” function cannot be enabled together with the “delayed” start.
2.13 Cooking cycle with “Maintenance” function
The “Maintenance” function can be set before or after setting the cooking cycle parameters. It can be set
in both “Simplified” or “Advanced” mode.
Simply touch the “ ” symbol at the top-left of the “Parameters” screen: a window appears indicating the
“Maintenance” function symbol and the symbol of the switch not enabled ( ). Touching the
switch enables the function ( ); touching it again, disables it. Touching the “” symbol on the window
automatically confirms the function and the window goes back to show the “Parameters” screen; vice-
versa, if the “ ” symbol is touched, the function is not confirmed. The window still goes back to
“Parameters” screen mode.
2.14 Cooking cycle with “Postpone” function
The “Postpone” function can be set before or after setting the cooking cycle parameters. It can only be set
in “Advanced” mode.
Simply touch the “ ” symbol at the top-left of the “Parameters” screen: a window appears indicating the
“Postpone” function symbol . The time value (in hours and minutes) for the “delayed” start of the
cooking cycle is set by sliding your finger, up or down, on the “number” next to the symbol, to the desired
value. Touching the “” symbol on the window automatically confirms the function and the window goes
back to show the “Parameters” screen; vice-versa, if the “ ” symbol is touched, the function is not
confirmed. The window still goes back to “Parameters” screen mode. The “Pre-heating” function cannot
be enabled together with the “Postpone” function.
/