subzero.com
|
15
WATER FILTER BYPASS
If the water ltration system will not be utilized, it can be
placed in water lter bypass mode by removing the water
lter. Follow these steps to remove the water lter:
1 Pull out on the bottom edge of the access door and tilt
upward.
2 To remove the lter, rotate counterclockwise one-quarter
turn, then pull out. Refer to the illustration below.
WARNING
Follow all city and state laws when storing, recycling or
discarding unused refrigerators and freezers.
Completion
KICKPLATE INSTALLATION
Position the kickplate and install using the two mounting
screws. Refer to the illustration below. Kickplate must
be removable for service. The oor cannot interfere with
removal.
A maximum 6"
(152) decorative kickplate can be attached
to the factory-installed kickplate. The two rows of vented
louvers can be covered if door panel is a minimum 4"
(102)
from nished oor.
To install a decorative kickplate, remove paper backing from
the magnets and attach decorative kickplate to magnets.
Magnets may also be tacked into position to increase adhe-
sion. Magnets will allow decorative kickplate to be removed,
if necessary.
Turn power on by touching ‘power’ on the control panel.
90° DOOR STOP
A 105° door stop is built into the hinges of tall and column
units. To limit the door to 90°, open the door slightly less
than 90°, then use a standard screwdriver blade to remove
the existing clips from each hinge. Locate the 90° clips from
inside the plastic bag containing product literature, then
insert the 90° clips onto each hinge. Refer to the illustration
below.
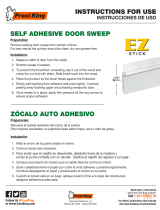
INSTALLATION
SCREWMAGNET
CLIP
Kickplate installation.
90° door stop.
WATER FILTER
ACCESS DOOR
Water lter removal.
Sub-Zero, Sub-Zero & Design, Dual Refrigeration, The Living Kitchen, Great American Kitchens The Fine Art of Kitchen Design, and Ingredients are registered trademarks and service
marks of Sub-Zero, Inc. Wolf, Wolf & Design, Wolf Gourmet, W & Design and the color red as applied to knobs are registered trademarks and service marks of Wolf Appliance, Inc.
All other trademarks or registered trademarks are property of their respective owners in the United States and other countries.