Page is loading ...

PRODUCT USES: ADDS MOTORIZATION TO EXISTING DRAPERY AND VERTICAL BLINDS.
HOW PRODUCT WORKS:
This product was tested before shipment and is defect free. In this booklet we have highlighted ways for you to gain
product knowledge and enjoy years of convenience and reliable product service. Please follow this advice.
1. Comply with product labels and tags.
2. Before starting installation, read this entire booklet. Call us at 1-480-837-8170 if you have questions.
3. After installation, a problem exists if you notice a change in the closed stop position. Correct promptly by following
Step 7 page 3. Never permit motor to run after window covering reaches a travel limit. Motor gears and drive axle have an
engineered stress limit and will permanently disconnect to prevent damage to your window covering. In this event, motor repair
is required. Also, AC-DC Adapter fuse can open requiring replacement. These situations are not covered by warranty. Refer to
Repair section on page 4.
X-10 and Z-Wave users: ONLY use an Appliance Module for control of this product. See page 4 for important information.
GENERAL SAFETY: Symbols and notices are for your protection.
Indoor use only. Do not use in presence of medical oxygen, flammable-explosive liquids or gases. Small parts pose swallow-inhalation hazard. Keep children and pets
away. If any part of body, hair, clothing becomes entangled while motor operates, immediately actuate Switch 2c and unplug Adapter. Do not oil, modify or disassemble.
Product may operate unexpectedly if controlled by timer or remote control out of view. Motor has Safety Guard that must be installed before use.
AAM-87456 04-13
Add-a-Motor Installation
Tools needed:
!!!1!!2!!3!!4!
INDEX
Product Uses 1
How Product Works 1
General Tips and X-10 Safety 1
Installation Steps 2 & 3
Important Tip 3
When Adjustment is Needed 3
Remote Control 3
Timer Control 4
Manual Control 4
Trouble Shooting 4
Vacation Checklist 4
X-10 and Z-Wave 1 & 4
Warranty Customer Service 4
Repair
4
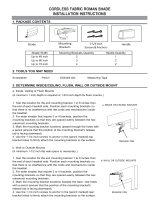
COMPONENTS
1. Housing
2a. Actuator (Tipped)
2b. Actuator (Flat)
2c. Stop Switch
3. Drive Wheel & Groove
4. Safety Guard
5. Wall Screws (2)
6. Wall Anchors (2)
7. Wall Bracket
8. Lock
9. AC-DC Adapter
9a. AC plug
9b. DC plug
10. Bar (optional)
11. Chain Connector
2b
5
9b
7
8
1
3
4
9
9a
6
2c
2a
10
11
EASY CUSTOMER INSTALLATION, USE, AND CARE.
Traverse 1-way, either direction.
Max: 8-ft. sliding-carrier track.
Max: 10-ft. wheel-carrier track.
Max: 35 pounds fabric weight.
10 feet
Traverse center-open.
Max: 10-ft. sliding-carrier track.
Max: 12-ft. wheel-carrier track.
Max: 35 pounds fabric weight.
10 feet
Rotate or Traverse vertical blinds.
Rotate
+ Traverse requires 2 motors.
OR
NOT APPROVED FOR THE FOLLOWING
SHADES THAT TRAVEL UP AND DOWN
CURVED OR DECORATIVE TRACKS
CHICKEN COOP DOORS
Motor replaces tension
device attached to a
continuous loop cord or
chain.
Some 2-piece cords & chains are actually a cut
continuous loop. To identify this type, pull DOWN
on 1-side. If opposite side travels UP, it is a cut
loop. This type can be rejoined and motorized.
WARNING
!
҉"ADD%A% MOTOR,"INC
Model"80"Owner’s"Manual"
Universal Window Covering Motor to
traverse Drapery, Sliding Panel
Curtains and Vertical Blinds, or rotate
Vertical Blinds.
Timer and X-10 Compatible.
Read All Instructions Before Using.
Save For Future Reference.
US Patent 4958112
Manufactured by Add-a-Motor, Inc.
Made in the USA from domestic and
imported materials.

HOW MOTOR OPERATES
! Stop Switch 2c is similar to a light switch. However, it only stops the motor. This Switch cannot start motor.
! The Stop Switch is operated automatically by Actuators 2a and 2b. Switch can also be operated manually by hand.
! When the motor runs, one Actuator moves toward the Stop Switch while the other moves away.
! When an Actuator pushes the Stop Switch from one-side to the other, the motor stops.
! After motor stops, motor will not run again until power is turned OFF for at least 2 seconds, and then back ON.
! When power is turned back ON, motor runs in opposite direction until the other Actuator moves the Stop Switch.
! Power is turned ON and OFF by remote control, timer or other available AC control switch.
! The user adjusts the Actuators closer to, or farther away from the Switch to set desired open and closed positions.
! START BY SETTING BOTH ACTUATORS close to switch 2c. Actuators are tight - Rotate by hand.
1. IMPORTANT: OPEN WINDOW COVERING APPROXIMATELY HALFWAY AND LEAVE IN THAT POSITION.
! VERIFY that headrail is securely affixed to a strong structure.
! REMOVE pulley or weight attached to Cord or Chain loop.
Exposed cord & chain loops can be a hazard to children. Never leave unattended when children present.
! MEASURE below loop. Required clearance is 5 inches or more. If needed, shorten cord inside track. DO NOT cut loop.
2. SLIDE WALL BRACKET INTO CHANNELS ON THE REAR OF THE MOTOR.
! LOCK Motor in highest slot of Wall Bracket as shown.
! REMOVE U-shape Safety Guard by sliding it off bottom of Motor.
! UNTWIST window covering cord (chain) and open loop.
! PLACE Drive Wheel Groove on loop.
! HOLD against wall making cord (chain) VERTICAL, and SLIGHTLY TAUT.
! MARK on wall the location of the 2 oval holes in Wall Bracket.
! REMOVE Motor from cord (chain).
! SEPARATE Wall Bracket from the Motor.
3. HAMMER SUPPLIED ANCHORS INTO WALL AT MARKED LOCATIONS.
(Use screws alone in wood wall. Use optional anchor for plaster wall.)
! ATTACH Wall Bracket to Anchors with supplied screws.
! DRIVE screws until tight. Do not over-tighten.
THE FOLLOWING ONLY APPLIES TO CHAINS THAT ROTATE VERTICAL BLINDS.
Close blinds fully: pull cord first, then chain. Next, pull chain to rotate open to desired position. If pull length is more than 3-inches,
proceed with installation. If pull is less than 3-inches, do the following. With blinds rotated to desired position, attach supplied
Connector 11 (for plastic bead-chain) on chain side that traveled UP while opening. Connector must touch headrail. Pull chain to
verify that open travel is restricted. Rotate blind closed about halfway and leave in this position. Set Actuators 2a and 2b
touching Switch 2c. Proceed with installation. To avoid damage to vertical blinds: 1. When opening, ROTATE first. 2. When
closing, ROTATE last.
4. OPEN WINDOW COVERING HALFWAY. UNTWIST CORD AND OPEN LOOP.
! PLACE Drive Wheel Groove on loop.
! PUSH Cord under Tension-Bars on both sides of Drive Wheel.
! DO NOT place a Chain under these Bars
(AAM-87456) 04-13 2.
Installation continued.
5. SLIDE MOTOR ONTO WALL BRACKET.
Lock Motor in
HIGHEST slot of
Wall Bracket.
Make cord
slightly taut.
MARK hole
locations on
wall.
2. WALL BRACKET IN CHANNELS.
Requires 5"
clearance.
Loop of Cord or
Chain.
OPEN WINDOW COVERING
APPROXIMATELY HALFWAY.
1.
Remove any
pulley or weight.
WARNING
!
3. HAMMER ANCHORS IN WALL
Attach Wall Bracket with 2 screws.
Drapery and vertical blind cords only:
Push Cord under Bar on both sides.
4. PUSH CORD UNDER BAR.
Chain must be outside Bar.
Bar on both
sides of
Drive
Wheel.
INSTALLATION STEPS: START HERE
Actuators:
2a (Tipped)
2b (Flat)
Actuators set
open and closed
stop position.
Stop Switch 2c.
S
T
O
P
S
T
O
P
SET BOTH ACTUATORS
CLOSE TO STOP SWITCH.
5. MOTOR ON WALL BRACKET.
Guard peg facing
to rear.
MAKE cord (chain)
moderately taut.
LOCK Motor in
Bracket.
Slide Guard
VERTICALLY onto
Motor until it snaps
on. Do not force.
DC Plug

! LOWER Motor on Wall Bracket and remove any slack in cord (chain).
! MAKE cord (chain) moderately taut. LOCK Motor in nearest slot in Wall Bracket.
! SLIDE U-shape Safety Guard onto Motor VERTICALLY from underneath, Peg facing rear.
! INSERT Adapter DC output plug into receptacle at bottom of Motor.
MOTOR WILL OPERATE IMMEDIATELY DURING STEP 6. FIRST, READ ALL INSTRUCTIONS INSIDE FOLLOWING BOX
" WINDOW COVERING MUST BE APPROXIMATELY HALF OPEN.
" WINDOW COVERING CORD MODERATELY TAUT ( NOT EXCESSIVELY TAUT ).
" BOTH ACTUATORS MUST BE SET CLOSE TO STOP SWITCH 2C.
6. PLUG ADAPTER DIRECTLY INTO A 120V AC ELECTRIC WALL OUTLET. BE READY TO UNPLUG ADAPTER.
If window covering reaches desired position IMMEDIATELY UNPLUG Adapter. Then do the following.
! Manually move Stop Switch 2c from its present position to the opposite side. DO NOT MOVE IT BACK.
! If you move the Switch left, then rotate TIPPED-Actuator 2a until it touches the Switch.
! If you move the Switch right, then rotate FLAT-Actuator 2b until it touches the Switch.
If motor stops before window covering reaches desired position, do the following.
! Measure remaining distance to desired position, divide by 3. Example: Distance = 24 inches. Divide by 3 = 8.
! Rotate "controlling" Actuator 8-clicks AWAY from the Switch. "Controlling" Actuator will be nearest the Switch.
Unplug Adapter from wall outlet. Wait 2 seconds. Plug it in again. Motor will run in opposite direction.
! Repeat above steps. Make final adjustment to the closed position. Fully closed is normal.
! Set desired open position, but NEVER 100% open. Set to stop 4 inches or more before full open.
Never allow motor to run after window covering is full open or closed. If motor labors, travel limit
is reached, or cord is too taut. Set both Actuators to prevent overrun. Monitor/adjust periodically.
IMPORTANT TIP LISTEN . . . If you hear a change in the motor sound, there might be a problem.
If you hear the motor make a straining sound, window covering has reached its travel limit. Immediately
unplug motor and repeat Step 6. If motor is allowed to keep running, damage to gears, drive axle,
Adapter, or window covering might occur.
7. IF ANY STOP POSITION CHANGES, PROMPT ADJUSTMENT IS NEEDED TO AVOID DAMAGE.
! If window covering fails to close fully: Move Closed Position Actuator 1 or more
clicks away from the Stop Switch. And move the opposite Actuator the same number of click
closer to the Stop Switch to prevent over-travel in Open Position.
! If window covering over-travels: Move Actuator 1 or more clicks closer to Stop Switch.
! Check for cord slack. Lower motor one notch on wall bracket if needed. Do not force.
It is normal for window cord to stretch after motor installation. This can cause stop
positions to change. Observe window covering stops. Promptly make required adjustment.
8. PLUG ADAPTER INTO REMOTE CONTROL RECEIVER OUTLET. PLUG RECEIVER INTO WALL OUTLET.
Receiver MUST have label approved for appliance use, motor, or marked HP. NEVER use Lamp Module.
! Press OFF button. LED should light. If not, check battery compartment for paper tab on terminals, or insert battery.
! Press and hold ON button until motor starts, then release button. Window covering will move to set position then stop.
! Press and hold OFF button until Motor stops. Motor will not run again unless Receiver switches OFF. Wait
2 seconds after Receiver switches OFF to allow Motor electronics to reset.
! To move window covering to opposite position, press and hold ON button until motor starts.
! If OFF button is pressed while Motor is running, Motor will stop. When ON button is pressed again, Motor will
run in the original direction until set position is reached.
(AAM-87456) 04-13 3.
TIMER CONTROL: Home security. Energy savings. Convenience.
Plug AC-DC Adapter into lamp timer switch that has a minimum of 2 On and 2 Off settings per day. Never use a timer that has a dimming capability (AC-DC Adapter will
be damaged). Timer label must state that it is approved for appliance use, motor load, or have the designation HP.
Timer ON setting controls WHEN window covering is repositioned. The timer must be set to switch OFF after every ON.
WARNING
!
To increase travel distance, rotate
"controlling" actuator 1-click away from
Switch. To decrease, rotate it closer.
Travel distance varies 1/2" to 3" per click
based on window covering mechanism.
6.
Motor stops when
"controlling" Actuator
pushes Stop Switch.
Motor will reverse
direction during next
ON cycle.
S
T
O
P
S
T
O
P
6
8. Plug Adapter into remote control
receiver outlet. Plug into wall outlet.
Press OFF. LED should light. If not,
check for battery tab, or insert battery.
REMOTE CONTROL
REQUIRED ADJUSTMENT
AFTER
COMPLETING
STEP 6 ABOVE
WARNING
!

Example: Open window covering at 8:30 AM, and close it at 7:00 PM.
1. Set Timer for current time of day (AM-PM).
2. Set Timer to switch ON at 8:30 AM. IMPORTANT: Set Timer to switch OFF as soon as possible thereafter. For example, OFF at 9:00 AM.
3. Set Timer to switch ON at 7:00 PM. IMPORTANT: Set Timer to switch OFF as soon as possible thereafter. For example, OFF at 7:30 PM.
Note: To open or close sooner than a preset time, turn Timer manual switch to ON. Motor will operate and stop at set position. To return to original open/closed schedule, leave timer ON,
and allow it to go through its scheduled cycle. When the next ON occurs, the motor will ignore it. The next OFF will then reset original sequence. For energy conservation, use a timer that
has a minimum of 4 ON and 4 OFF settings per day. This can open and close window covering 4 times daily.
MANUAL CONTROL: Example: During electrical power outage … unplug motor, unlock motor and raise up on wall bracket. Pull window covering cord or chain by
hand. When power is restored, repeat Step 6, and ALWAYS open window covering half-way before connecting power to motor.
TROUBLE SHOOTING First, check remote control battery. Press OFF button. LED should light. If not, replace battery.
Motor does not operate. Push Switch 2c to opposite side then back. Retry.
♦ Plug Adapter directly into wall outlet. Motor should operate immediately;
otherwise outlet is controlled by switch that is Off, or Adapter is damaged.
♦ Loose plug in motor jack. Tie tape around plug, but leave 4” free end.
Pull free end of tape to side, make it slightly taut and attach to motor housing.
♦ UL fuse in AC-DC Adapter opened. Try other Adapter with 12-volt DC output,
1 amp max. Output plug must be center positive. − +
Open − closed sequence has reversed.
♦ An electric power failure can change Timer settings. Verify AM-PM, and
time of day settings. Also, verify that an OFF setting follows every ON.
♦ Timed event preempted. Refer to TIMER CONTROL section.
VACATION CHECKLIST
1. If remote control is used, unplug motor to prevent a spurious signal from operating.
2. If timer is used, verify that it is set to switch itself OFF after every ON.
3. Adjust Actuator to stop motor 10 inches or more before full open.
4. Inspect and eliminate any Cord/Chain slack. Lock in Wall Bracket.
LIMITED WARRANTY AND CUSTOMER SERVICE
Motor warranted against defective materials for one year from date of purchase. AC-DC Adapter warranty 90 days. In event product fails to conform to this warranty, please follow
procedure below.
• Contact Customer Service 1-480-836-8170 (8:30 AM to 4:00 PM Arizona time, weekdays), or email to info@add-a-motor.com. Request a Return Identification Number.
• Carefully pack and seal defective item. Ship or mail prepaid to: ADD-A-MOTOR, INC. 16044 E STAR GAZE, FOUNTAIN HILLS, AZ 85268
• Write your return address and Return Identification Number on outside of package. Inside package include the following:
1. Copy of dated proof of purchase (keep the original).
2. An explanation of the problem, plus your Return Identification Number.
3. Your name, address, plus telephone number (very important).
• A return shipping charge applies for product shipped back to Hawaii, Alaska and other locations outside CONUS.
Warranty void if AC-DC Adapter is plugged into a receiver or timer switch rated only for lamp use. Control switch label must state use approval for appliance, motor load, or have the
approval designation HP. This warranty applies only to original purchaser. Product failure caused by any reason not related to product materials is not covered. Commercial use of
product is excluded. Warranty excludes damage caused by use, misuse, abuse, neglect, and acts of God. Warranty excludes battery if supplied. No employee, agent, dealer or
other person is authorized to give any warranty on behalf of Add-a-Motor, Inc. If our inspection reveals that problem was caused due to materials within the limits of this warranty,
Add-a-Motor will repair or replace product free of charge. Replacement unit is under warranty for the remainder of the original warranty period. ADD-A-MOTOR MAKES NO OTHER
WARRANTY OF ANY KIND. ANY EXPRESSED OR IMPLIED WARRANTY INCLUDING MERCHANTABILITY AND FITNESS FOR A PURPOSE WHICH EXCEEDS THE OBLIGATION
MENTIONED IN THIS WARRANTY ARE DISCLAIMED AND EXCLUDED IN ALL RESPECTS. The sole obligation of Add-a-Motor is to repair or replace the product at our discretion. Add-a-Motor is
not liable for incidental, consequential, or any damage or injury due to use or misuse of product whether or not product is found defective for any reason.
REPAIR
Product damage is not covered by warranty. If motor becomes damaged, you might be able to repair it yourself and save labor and return shipping cost. The following parts are
snap-in, or push-on with some screwdriver assembly required. Call us at 1-480-836-8170, or email us at info@add-a-motor.com to order needed part.
If you choose to return the motor for inspection, please call us to obtain a Return Authorization Number before you ship it. If motor is defective, it will be
repaired or replaced as stated in our warranty. If damage repair is needed, cost normally ranges from $19.95 to $29.95 plus shipping.
1. Drive Axle Repair skill level - basic. Item No. 29008 Cost $9.00
plus shipping
2.
Motor Shaft Gear Repair skill level - basic. Item No. 465PIN Cost $4.73 plus shipping
3. Gearmotor Repair skill level - basic. Item No. 46555 Cost $19.78
plus shipping
4. AC-DC Adapter Repair skill level - none. Item No.
78922 Cost $19.55 plus shipping
(AAM-87456) 04-13 4.
Closed Stop Position changed.
a. Check for an obstructed or crimped headrail. Repair, or replace.
b. Follow Step 7.
c. Never set 100% open as a stop position. Adjust motor to stop 4 inches or
more before full-open to avoid overtravel. OK to set closed as stop position.
Headrail squeaks: Apply dry wax to channel rails. DO NOT APPLY TO CORD.
Motor squeaks: Apply liquid hand soap to sides of drive wheel (do not oil).
Apply 1-drop hand soap to 3x5 card.
Slide between housing and sides of
drive wheel, wipe back and forth.
Never apply in drive wheel groove.
X-10 and Z-WAVE
X-10: Model 80 motor is compatible with any X-10 control and Appliance Module.
Z-Wave: Model 80 motor is compatible only with LOM-15 Wall Outlet (similar to
X-10 Model SR227 wall outlet). It is then controllable using a Z-Wave controller.
DO NOT use Z-Wave Shade Controllers ABMHZ, DBMZ, AC1-ZW or DC1-ZW.
/