Page is loading ...

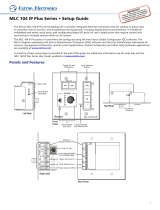
Remove 2 screws on the bottom,
2 on the top, and 1 on the side.
Ethernet Setup Guide
Extron recommends configuring this device via an Ethernet connection. Visit http://www.extron.com, download and install the necessary Extron software
(Windows
®
-based configuration program, device driver packages, IR Learner) on a Windows-based (Windows 2000, XP, or higher) PC equipped with a network
adapter. Then follow these steps:
1. Locate and right-click on My Network Places on the Windows (2000, XP, or higher) desktop, then click on Properties to open the Network
Connections page.
or
Click on the Start menu, select Settings (if needed), click on Control Panel, then double-click on Network and Dial-up Connections to open the
Network and Dial-Up Connections page.
2. Right-click on Local Area Connection, then select Properties. The Local Area Connection Properties dialog box appears.
3. Select Internet Protocol (TCP/IP) and click the Properties button. The corresponding dialog box appears, displaying current settings.
4. Write down the existing IP address and the subnet mask shown in the Internet Protocol (TCP/IP) Properties dialog box. You will need them later so you
can restore the PC’s settings after configuring the Extron device for network use.
5. Click the Use the following IP address: radio button.
6. Enter 192.168.254.253 for the IP address and enter 255.255.0.0 for the subnet mask. Click the OK button.
7. Connect the supplied network crossover cable from the PC’s Ethernet port to the Extron device’s LAN connector.
8. Start the Windows-based configuration program.
9. Select IP (LAN), and click on OK.
10. In the Connection dialog box, enter the default IP address (192.168.254.254) in the IP address field. You do not need to enter a password unless one
was assigned to the switcher previously.
11. Click the Connect button to make the Ethernet connection between the PC and the Extron device.
12. Once the configuration program opens fully, configure the device and any optional equipment that will be part of the system. See the user’s manual for
details.
68-1066-01, Rev. C
08 07
Extron Electronics, USA
1230 South Lewis Street
Anaheim, CA 92805
800.633.9876 714.491.1500
FAX 714.491.1517
Extron Electronics, Europe
Beeldschermweg 6C
3821 AH Amersfoort, The Netherlands
+800.3987.6673 +31.33.453.4040
FAX +31.33.453.4050
Extron Electronics, Asia
135 Joo Seng Rd. #04-01
PM Industrial Bldg., Singapore 368363
+800.7339.8766 +65.6383.4400
FAX +65.6383.4664
Extron Electronics, Japan
Kyodo Building, 16 Ichibancho
Chiyoda-ku, Tokyo 102-0082
Japan
+81.3.3511.7655 FAX +81.3.3511.7656
www.extron.com
MLC 104 IP Link
™
Upgrade Guide
8-pin
Firmware Chip
3
9
The MLC 104 IP Link
™
Upgrade Kit, Extron part number 70-472-01, allows you to upgrade an Extron MLC 104
MediaLink
™
Controller (part number 60-573-xx) to enable IP Link
™
Ethernet communication. Follow the procedures
below and on the other side of this card to replace the firmware chip and to set up the unit for Ethernet communication.
CAUTION
Changes to firmware must be performed by authorized service personnel only.
Replacing the 8-pin Firmware Chip
1. Disconnect power from the MLC 104 and remove it from the wall or furniture.
To prevent electric shock, always disconnect the MLC from the power source before opening the enclosure.
2. Remove the yellow “IP Link
™
is not supported” label from the LAN connector at the side of the MLC 104.
3. Remove the five black screws attaching the back enclosure panel to the top, bottom, and side of the rest of the
enclosure. See the photo in the upper right corner.
4. Lift off the rear enclosure panel and set it and the five screws aside for later reinstallation.
CAUTION
Do not touch any electronic components inside the MLC other than the 8-pin firmware chip. Doing so
could damage the unit. Electrostatic discharge (ESD) can damage IC chips even though you cannot feel it.
You must be electrically grounded before proceeding with firmware replacement. A grounding wrist strap
is recommended.
5. Locate the 8-pin firmware chip (part number 19-1542-01 or 19-1736-01) at U6 on the main circuit board, shown at
right, and note the orientation of the notch in one end of the chip. The notch should point toward the top of the MLC.
Align
Notches
U6
5
6. After you are electrically grounded, align the hooks of an IC extractor tool (supplied) with the ends of the firmware chip.
7. Insert the hooks into the slots, and squeeze the tool gently to grasp the chip.
8. Pull the chip straight out of the socket, and set it aside.
9. Orient the notch on the new firmware IC chip (part number 19-1541-01 or 19-1737-01) with the end notch on the circuit
board in the same orientation as the old chip. See the diagram at right.
10. Align the chip’s legs with the holes, and gently but firmly press the chip into place in the socket.
11. Reinstall the MLC’s back cover, and fasten it with the screws that were removed in step 3.
12. Peel the backing from the MLC 104 IP product label (part number 33-1109-01) that is included in the firmware upgrade
kit, and place it over the old MLC 104 product label on the rear panel.
13. Remount the MLC into the wall or furniture, and reconnect it to the power source.
See the other side for Ethernet setup instructions.
/