Page is loading ...

Signamax Connectivity Systems
Hardened Managed Ethernet Switch
Model -065-7714HSFPTB
U
SER
’
S
G
UIDE
H

Hardened Managed Ethernet Switch
User’s Manual 1
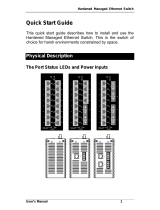
Quick Start Guide
This quick start guide describes how to install and use the
Hardened Managed Ethernet Switch. This is the switch of
choice for harsh environments constrained by space.
Physical Description
The Port Status LEDs and Power Inputs
LED State Indication
10/100BaseTX
Link/ACT
Steady A valid network connection established.
Flashing
Transmitting or receiving data.
ACT stands for ACTIVITY.
10/100
Steady Communication speed is 100Mbps.
Off Communication speed is 10Mbps.
10/100/1000BaseTX, 1000BaseSX/LX
Link/ACT
Steady A valid network connection established.
Flashing
Transmitting or receiving data.
ACT stands for ACTIVITY.

Hardened Managed Ethernet Switch
User’s Manual 2
1000
Steady Communication speed is 1000Mbps.
Off Communication speed is 10/100Mbps.
SFP Link
Steady A valid network connection established.
Off No valid network connection established.
Power Input Assignment
Power3
12VDC
DC Jack
Power1
+
12-48VDC
Terminal Block
-
Power Ground
Power2
+
12-48VDC
Earth Ground
There are two pairs of power inputs can be used to power up this switch.
Redundant power supplies function is supported.
Options A-Terminal Block power supplies, part numbers: DC-1824-30W;
DC-1824-60W; DC-1824-75W; DC-1824-120W
Options B- DC Jack power supply
※Signamax strongly recommends the use of a terminal block power
supply; however, a jack for power is also provided. Please see the
pinout chart below for use when wiring a power jack for this equipment:
Output No. Name
PIN 1 V+
PIN 2 GND
PIN 3 NC

Hardened Managed Ethernet Switch
User’s Manual 3
Functional Description
Meets NEMA TS2 Environmental requirements such as temperature,
shock, and vibration for traffic control equipment.
Meets EN61000-6-2 EMC Generic Standard Immunity for industrial
environment.
Manageable via SNMP, Web-based, Telnet, and RS-232 console port.
Support 802.3/802.3u/802.3ab/802.3z/802.3x. Auto-negotiation:
10/100/1000Mbps, full/half-duplex; Auto MDI/MDIX.
1000Base-SX/LX: Multi mode or Single mode SC type; WDM Single
mode SC type.
Support 8192 MAC addresses. Provides 2M bits memory buffer.
Operating voltage and Max. current consumption: 1.25A @ 12VDC,
0.625A @ 24VDC, 0.313A @ 48VDC. Power consumption: 15W Max.
Power Supply: Redundant DC Terminal Block power inputs or 12VDC
DC JACK with 100-240VAC external power supply.
-40℉ to 167℉ (-40℃ to 75℃) operating temperature range.
Tested for functional operation @ -40℉ to 185℉ (-40℃ to 85℃).
Supports Din-Rail, Panel, or Rack Mounting installation.
Console Configuration
Connect to the switch console:
Connect the DB9 straight cable to the RS-232 serial port of the device
and the RS-232 serial port of the terminal or computer running the
terminal emulation application. Direct access to the administration
console is achieved by directly connecting a terminal or a PC equipped
with a terminal-emulation program (such as HyperTerminal) to the
switch console port.
Configuration settings of the terminal-emulation program:
Baud rate: 115,200bps
Data bits: 8
Parity: none
Stop bit: 1
Flow control: none

Hardened Managed Ethernet Switch
User’s Manual 4
Press the “Enter” key. The Command Line Interface (CLI) screen should
appear as below:
Logon to Exec Mode (View Mode):
At the “switch_a login:” prompt just type in “root” and press <Enter> to
logon to Exec Mode (or View Mode). And the “switch_a>” prompt will
show on the screen.
Logon to Privileged Exec Mode (Enable Mode):
At the “switch_a>” prompt just type in “enable” and press <Enter> to
logon to Privileged Exec Mode (or Enable Mode). And the “switch_a#”
prompt will show on the screen.
Logon to Configure Mode (Configure Terminal Mode):
At the “switch_a#” prompt just type in “configure terminal” and press
<Enter> to logon to Configure Mode (or Configure Terminal Mode). And
the “switch_a(config)#” prompt will show on the screen.
Set new IP address and subnet mask for Switch:
At the “switch_a(config)#” prompt just type in “interface vlan1.1” and
press <Enter> to logon to vlan 1 (vlan1.1 means vlan 1). And the
“switch_a(config-if)#” prompt will show on the screen.
Command Syntax: “ip address A.B.C.D/M”. “A.B.C.D” specifies IP

Hardened Managed Ethernet Switch
User’s Manual 5
address. “M” specifies IP subnet mask. “M”= 8: 255.0.0.0,
16:255.255.0.0, or 24: 255.255.255.0.
For example, At the “switch_a(config-if)#” prompt just type in “ip address
192.168.1.10/24” and press <Enter> to set new IP address
(192.168.1.10) and new IP subnet mask (255.255.255.0) for Switch.
Web Configuration
Login the switch:
Specify the default IP address (192.168.1.10) of the switch in the web
browser. A login window will be shown as below:

Hardened Managed Ethernet Switch
User’s Manual 6
Enter the factory default login ID: root.
Enter the factory default password (no password).
Then click on the “Login” button to log on to the switch.

Hardened Managed Ethernet Switch
User’s Manual 7
Preface
This manual describes how to install and use the Signamax
Hardened Managed Ethernet Switch. This switch introduced
here is designed to deliver full scalability with SNMP/RMON
web-based management functions by providing:
To get the most out of this manual, you should have an
understanding of Ethernet networking concepts.
In this manual, you will find:
Features on the Hardened Managed Ethernet Switch
Illustrative LED functions
Installation instructions
Management Configuration
SNMP, IGMP…
Specifications

Hardened Managed Ethernet Switch
User’s Manual 8
Table of Contents
Quick Start Guide 1
PHYSICAL DESCRIPTION 1
The Port Status LEDs and Power Inputs 1
FUNCTIONAL DESCRIPTION 3
CONSOLE CONFIGURATION 3
WEB CONFIGURATION 5
Preface 7
Table of Contents 8
Product Overview 10
INDUSTRIAL MANAGED GIGABIT ETHERNET SWITCH 10
PACKAGE CONTENTS 10
PRODUCT HIGHLIGHTS 11
Basic Features 11
Management Support 11
FRONT PANEL DISPLAY 13
PHYSICAL PORTS 14
SWITCH MANAGEMENT 15
Web-based browser interface 15
Administration console via RS-232 serial port (CLI) 15
External SNMP-based network management application 15
Installation 16
SELECTING A SITE FOR THE SWITCH 16
CONNECTING TO POWER 16
12VDC DC Jack 16
Redundant DC Terminal Block Power Inputs 17
CONNECTING TO YOUR NETWORK 17
Cable Type & Length 17
Cabling 18
Switch Management 20
MANAGEMENT ACCESS OVERVIEW 20
ADMINISTRATION CONSOLE (CLI) 21
Direct Access 21
WEB MANAGEMENT 22
SNMP-BASED NETWORK MANAGEMENT 22
PROTOCOLS 22
MANAGEMENT ARCHITECTURE 23
Web-Based Browser Management 24
SNMP & RMON Management 25

Hardened Managed Ethernet Switch
User’s Manual 9
OVERVIEW 25
SNMP AGENT AND MIB-2 (RFC 1213) 26
RMON MIB (RFC 2819) AND BRIDGE MIB (RFC 1493) 26
RMON Groups Supported 27
Bridge Groups Supported 27
Web-Based Browser Management 28
LOGGING ON TO THE SWITCH 28
UNDERSTANDING THE BROWSER INTERFACE 30
SYSTEM 32
PORT 45
SWITCHING 50
TRUNKING 53
STP / RING 54
VLAN 63
QOS 69
SNMP 72
802.1X 77
OTHER PROTOCOLS 82
Command Line Console Management 87
ADMINISTRATION CONSOLE 87
Exec Mode (View Mode) 88
Privileged Exec Mode (Enable Mode) 92
Configure Mode (Configure Terminal Mode) 97
SYSTEM 101
PORT 110
SWITCHING 115
TRUNKING 120
STP / RING 121
VLAN 135
QOS 141
SNMP 144
802.1X 151
OTHER PROTOCOLS 156
Specifications 167
Appendix A 169
Appendix B 170
Contact Information 177

Hardened Managed Ethernet Switch
User’s Manual 10
Product Overview
Industrial Managed Gigabit Ethernet Switch
Front and Rear View
Package Contents
When you unpack the product package, you shall find the
items listed below. Please inspect the contents, and report
any apparent damage or missing items immediately to your
authorized reseller.
•
The Hardened Managed Ethernet Switch
• User’s Manual
• RS232 cable
• Panel-mount brackets with screws

Hardened Managed Ethernet Switch
User’s Manual 11
Product Highlights
Basic Features
Complies with NEMA TS2 Environmental requirements for Traffic control
equipment
Complies with EN61000-6-2 EMC Generic standard immunity for
Industrial environment
Supports 8192 MAC addresses
Provides 2M bits memory buffer
Auto-negotiation for speed and duplexity on all TX ports
Auto-MDIX on all TX ports
Full wire-speed forwarding rate
Store-and-forward mechanism
Half-duplex back-pressure and IEEE802.3x full-duplex compliant flow
control
Redundant power inputs: 12VDC (DC Jack) and 12 to 48VDC (Terminal
Block)
-40°F to 167°F (-40°C to 75°C) operating temperature range
Tested for functional operation @ -40℉ to 185℉ (-40°C to 85°C)
Front panel reset button
Front panel port status LEDs
Hardened aluminum case
Supports DIN-Rail, Panel, or Rack Mounting installation
Management Support
VLAN
Port-based VLAN
IEEE802.1Q tagged VLAN
TRUNKING
IEEE802.3ad Link Aggregation Control Protocol
MAC-based Trunking with automatic link fail-over
PORT-SECURITY
Per-port programmable MAC address locking
Up to 24 Static Secure MAC addresses per port
PORT-MIRRORING
Port-mirroring
QOS (IEEE802.1p Quality of Service)
4 priority queues

Hardened Managed Ethernet Switch
User’s Manual 12
INTERNETWORKING PROTOCOLS
Bridging:
IEEE802.1s Multiple Spanning Tree
IEEE802.1w Rapid Spanning Tree
IEEE802.1D Spanning Tree compatible
IEEE802.1Q – GVRP
Recover-Ring(tm) capability
IP Multicast:
IGMP Snooping
Rate Control
NETWORK MANAGEMENT METHODS
Console port access via RS-232 cable (CLI, Command Line Interface)
Telnet remote access
SNMP agent:
MIB-2 (RFC1213)
Bridge MIB (RFC1493)
RMON MIB (RFC1757) – statistics, history, alarm and events
VLAN MIB (IEEE802.1Q/RFC2674)
Private MIB
Web browser
TFTP software-upgrade capability

Hardened Managed Ethernet Switch
User’s Manual 13
Front Panel Display
POWER
This LED comes on when the switch is properly connected to power and
turned on.
P ort Sta tus LEDs
The LEDs are located on the front panel, displaying status for each
respective port. Please refer to the following table for more details.
LED State Indication
10/100TX
Link/ACT
On A valid network connection established
Flashing
Transmitting or receiving data
ACT stands for ACTIVITY
10/100
On Communication speed is 100Mbps
Off Communication speed is 10Mbps
1000
On Communication speed is 1000Mbps
Off Communication speed is 10/100Mbps
SFP Link
On A valid network connection established
Off
No valid network connection established

Hardened Managed Ethernet Switch
User’s Manual 14
Physical Ports
The Hardened Managed Ethernet Switch provides:
12-port 10/100BaseTX + 2-port SFP/RJ-45 combo Gigabit
Hardened Managed Ethernet Switch
CONNECTIVITY
RJ-45 connectors on TX ports
SC connector on 1000BaseSX/LX/BX fiber port
MODE SELECTION
10BaseT full-duplex mode
10BaseT half-duplex mode
100BaseTX full-duplex mode
100BaseTX half-duplex mode
1000BaseT/SX/LX/BX full-duplex mode
Auto-negotiating mode

Hardened Managed Ethernet Switch
User’s Manual 15
Switch Management
Web-based browser interface
The switch also boasts a point-and-click browser-based interface that
lets user access full switch configuration and functionality from a
Netscape or Internet Explorer browser.
Administration console via RS-232 serial port (CLI)
The switch provides an onboard serial port, which allows the switch to be
configured via a directly connected terminal.
External SNMP-based network management
application
The switch can also be configured via SNMP.

Hardened Managed Ethernet Switch
User’s Manual 16
Installation
This chapter gives step-by-step instructions about how to
install the switch:
Selecting a Site for the Switch
As with any electric device, you should place the switch
where it will not be subjected to extreme temperatures,
humidity, or electromagnetic interference. Specifically, the
site you select should meet the following requirements:
-The ambient temperature should be between -40℉ to 167℉ (-40℃ to 75
℃).
-The relative humidity should be less than 95 percent, non-condensing.
-Surrounding electrical devices should not exceed the electromagnetic field
(RFC) standards.
-Make sure that the switch receives adequate ventilation. Do not block the
ventilation holes on each side of the switch.
Connecting to Power
Redundant DC Terminal Block Power Inputs or 12VDC DC
Jack:
12VDC DC Jack
Step 1: Connect the supplied AC to DC power adapter to the receptacle on
the topside of the switch.
Step 2: Connect the power cord to the AC to DC power adapter and attach
the plug into a standard AC outlet with the appropriate AC voltage.

Hardened Managed Ethernet Switch
User’s Manual 17
Redundant DC Terminal Block Power Inputs
There are two pairs of power inputs for use with redundant
power sources. You only need to have one power input
connected to run the switch.
Step 1: Connect the DC power cord to the plug-able terminal block on the
switch, and then plug it into a standard DC outlet with a voltage
range from 12 to 48VDC. Turn on the DC power supply.
Step 2: Disconnect the power cord if you want to shut down the switch.
Rear View
Connecting to Your Network
Cable Type & Length
It is necessary to follow the cable specifications below when connecting
the switch to your network. Use appropriate cables that meet your speed
and cabling requirements.
Cable Specifications

Hardened Managed Ethernet Switch
User’s Manual 18
Speed Connector Port
Speed
Half/Full
Duplex
Cable Max.
Distance
10BaseT RJ-45 10/20 Mbps
2-pair
UTP/STP
Cat. 3, 4, 5
100 m
100BaseTX RJ-45
100/200
Mbps
2-pair
UTP/STP
Cat. 5
100 m
1000BaseT
RJ-45
2000 Mbps
4-pair
UTP/STP
Cat. 5
100 m
1000BaseSX SC 2000 Mbps MMF
(62.5μm)
220 m
1000BaseSX SC 2000 Mbps MMF
(50μm)
550 m
1000BaseLX SC 2000 Mbps SMF
(9, 10μm)
10, 20, or
50 km
1000BaseBX SC 2000 Mbps SMF
(9, 10μm)
20, 40 km
SFP
1000BaseSX Duplex LC 2000 Mbps MMF
(62.5μm)
550 m
2 km
1000BaseLX Duplex LC 2000 Mbps SMF
(9, 10μm)
10, 40, 60
km
1000BaseBX Single LC 2000 Mbps SMF
(9, 10μm)
70 km
Cabling
Step 1: First, ensure the power of the switch and end devices are turned off.
<Note> Always ensure that the power is off before any installation.
Step 2: Prepare cable with corresponding connectors for each type of port
in use.
Step 3: Consult Cable Specifications Table on previous page for cabling
requirements based on connectors and speed.

Hardened Managed Ethernet Switch
User’s Manual 19
Step 4: Connect one end of the cable to the switch and the other end to a
desired device.
Step 5: Once the connections between two end devices are made
successfully, turn on the power and the switch is operational.
/