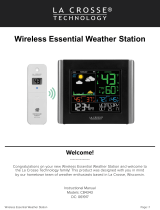
La Crosse CA79103 Owner's manual
- Category
- Weather stations
- Type
- Owner's manual
This manual is also suitable for

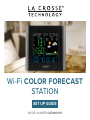
SET UP GUIDE
MODEL NUMBER CA79103/V11
Wi-Fi COLOR FORECAST
STATION

Table of Contents
BASICS LA CROSSE VIEW
FORECAST PRESSURE
Initial Setup
Station Settings
Buttons
LCD Display Brightness
Auto-Dim Settings
Time and Calendar
Connecting to the App
Connecting Your Station
Add Your Sensors to the
App
Add-On Sensor Info
Viewing Your Forecast Data
Seasonal Trees
Standalone Forecast Icons
Enhanced Forecast Data
Daily/Hourly Forecast
Relative Pressure
02
07
08
09
09
10
TEMP. AND HUMIDITY
Viewing Your TH Data
History Records
Outdoor Comfort Meter
Temp. & Humidity Alerts
11-12
13
13
14
APPENDIX
Specifications
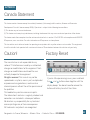
Cautions/Statements
Warranty
Recycling & Disposal
21
21-23
22
22
03
04
05
18
97
15
15
16
16
17
18
SENSORS
Water Leak Sensor
Mounting Your TH Sensor
Add-On Sensor Info
Adding an Extra Sensor
18-19
19
18, 20
20

02
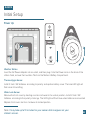
Initial Setup
Power Up
Note: It may take up to 10 minutes for your sensor data to appear on your
station’s screen.
BASICS
Weather Station
Insert the 5V Power Adapter into an outlet, and then plug it into the Power Jack on the back of the
station. Next, remove the Insulation Tab from the Station’s Battery Compartment.
Thermo-Hygro Sensor
Install 2 fresh “AA” batteries according to polarity and replace battery cover. The blue LED light will
flash when transmitting.
Water Leak Sensor
Remove the front cover by twisting counter-clockwise to the unlock position. Install 2 fresh “AA”
batteries according to the polarity markings. The LED light will flash blue when batteries are inserted.
Replace front cover and turn clockwise to locked position.

03
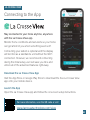
Connecting to the App
LA CROSSE VIEW
Download the La Crosse View App
Visit the App Store or Google Play Store to download the free La Crosse View
app onto your mobile device.
Stay connected to your home anytime, anywhere
with the La Crosse View app.
Monitor home conditions and set alerts so your home
can get ahold of you when something seems o.
Connecting your station is optional and the display
will function as a standalone unit without the Wi-Fi
connection. However, we recommend connecting
during the initial setup, as it will save you time and
unlock all of the advanced features right away.
Launch the App
Open the La Crosse View app and follow the on-screen setup instructions.
Stay Connected to Your Home
Anytime, Anywhere.
For more information, scan the QR code or visit:
www.lacrossetechnology.com/view

04
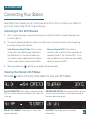
Connecting Your Station
LA CROSSE VIEW
Connecting to Your Wi-Fi Network
Checking Your Station’s Wi-Fi Status
Press the button on the top of the station to view your Wi-Fi Status.
ALL OK CONNECTED: Your station is connected to your
Wi-Fi and its data should be available on the station and
in the app.
SEE APP TO CONNECT: Check your La Crosse View
app for notifications.
NO WEATHER SERVICE: Your Internet weather and time
services are not connecting. These should resolve on
their own, please be patient.
LOST WIFI: Check your router and network
connections.
Now that you’ve created your La Crosse View account, it’s time to connect your station to
your home router using the La Crosse View app.
The La Crosse View app is required to connect your station to the Wi-Fi network. Download and
install the app first.
Initial Setup of a New Station: If this is a new
station and is not added to your account yet,
tap “Add Device” in the app and follow the
instructions on your mobile device to add the
station to your account and connect to Wi-Fi.
Reconnecting to Wi-Fi: If the station is
already in your account and you would like to
reconnect to Wi-Fi, tap “Connect Wi-Fi” in the
app and follow the instructions on your mobile
device to connect to Wi-Fi.
1.
The app will provide detailed instructions and inform you what buttons to press while connecting
the display to your Wi-Fi network.
2.
When connected, the indicator on the display will become solid. 3.

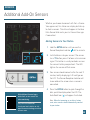
Add Your Sensors to the App
LA CROSSE VIEW
Upon getting the station connected to your Wi-Fi network, the next app
screen will explain how your connected sensor(s) should be brought
in. Within the next 15 minutes, you should receive an Add Device
notification in your app. This is indicated by the Red Cloud and the
numbers inside of it. Tap this icon to begin adding your sensor(s) into
the app.
ADD button: Press ADD to add the sensor to your app. Within 10
minutes each sensor reading will show on their own app page.
DISMISS button: Select DISMISS if you do not want the sensor to send
readings to your app.
Note: If DISMISS is selected, you can scan the barcode on your sensor
at any time to add it to your app if desired.
Instructions on scanning the barcode to add your sensor is on the next
page.
05

* This step is only required if you do not receive the Add Device notification within the app.
Prior to connecting to Wi-Fi and mounting your sensor, make sure your station is receiving sensor data.
1.
Manually Add Sensor Into the App*
3.
4.
2.
Open your La Crosse View app. On the Main Menu, go to ADD/EDIT and select DEVICES.
Scan the Barcode on your Breeze Pro Sensor or type in the Device ID manually.
Confirm the sensor image and Device ID and add a Device Name and Location Name. Select DONE.
On the Devices page, select the ADD DEVICE or PLUS (+) button.
123456-ABC
123456-ABC
123456-ABC
06

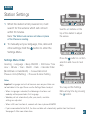
Station Settings
BASICS
Settings Menu Order
Greeting • Language • Beep ON/OFF • 12/24 Hour Time
Hour • Minute • Year • Month • Date • Calendar Order
(Month/Date or Date/Month) • Celsius/Fahrenheit
Pressure Units (hPa/InHg) • Pressure Number Setting
1.
2.
When the station is first powered on, it will
search for the sensors which will connect
within 10 minutes.
To manually set your language, time, date and
other settings, hold the button to enter the
Settings Menu.
07
Note: The Water Leak sensor will show in place
of the Pressure reading.
Use the +/- buttons on the
top of the station to adjust
the values.
Press the button to confirm
selection and move to next
step.
You may exit the Settings
Menu at any time by pressing
the button.
Notes
Important: Language and units of measure seen on you station are
not controlled in the app. Please use the Settings Menu to adjust.
When a language is selected, the following instructions and
weekday will be presented in that language.
Weekday will set automatically after year, month, and date
settings are adjusted.
When in 24 hour time format, seconds will show in place of AM/PM.
If you’re connected to the Wi-Fi, the time and date will automatically update from the Internet.
See pages 3-4 for more information.

Buttons
BASICS
1. LIGHT ( )
Press to adjust backlight.
Hold to enter Auto-Dim
settings.
2. TEMPERATURE ( )
Press to view Temperature
and Humidity History. While
viewing, hold MINUS button to
delete the history reading.
3. EXTRA
Press to toggle through extra
sensors and pressure. Hold to
add sensors. While viewing,
hold the MINUS button delete
the sensor.
6. ALERTS ( )
Hold to enter Alert Settings.
Press to turn Alert(s) on/o.
9. WIFI
Press to search for Wi-Fi
signal. Hold to delete the
currently saved network
sign-on information and
search for a new Wi-Fi
signal.
4. SET ( )
Press to view Wi-Fi status.
Hold to enter Settings Menu.
7. HOURLY FORECAST ( )
Press to see Hourly Forecast*
5. PLUS/MINUS (+/-)
Use to adjust values. Hold
both together to search for
Wi-Fi signal.
8. DAILY FORECAST ( )
Press to see Daily Forecast*
Back View
* Your display must be connected to Wi-Fi to receive Hourly/Daily
forecast information.
08
13
2
6 8
7
4
5
9

09
LCD Display Brightness
Adjusting the LCD Display Brightness
Auto-Dim Settings
Press the button to adjust the backlight intensity.
There are 4 brightness levels, plus an o option.
1.
2.
3.
4.
Program your display to automatically dim during preselected times.
The icon will appear on the LCD when the Auto-Dim feature is activated.
BASICS
Hold the button to enter
the Auto-Dim Settings Menu.
Press the +/- buttons to turn the
Auto-Dim feature on or o.
Press to confirm.
Press the +/- buttons to adjust the
starting hour. Press to confirm.
Press the +/- buttons to adjust the
stopping hour. Press to confirm
and exit.

10
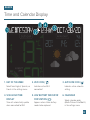
BASICS
Time and Calendar Display
1. DAY OF THE WEEK
4. 12/24 HOUR TIME
DISPLAY
5. LOW BATTERY INDICATOR
FOR STATION ( )
6. CALENDAR
Select from English, Spanish, or
French in the settings menu
Time will automatically update
when connected to Wi-Fi
Appears when station battery
needs to be replaced
Select calendar order
(Month/Date or Date/Month)
in the settings menu
2. WI-FI ICON ( )
Indicates active Wi-Fi
connection*
3. AUTO-DIM ICON ( )
Indicates active auto-dim
setting

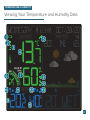
Viewing Your Temperature and Humidity Data
TEMPERATURE & HUMIDITY
11

Viewing Your Temperature and Humidity Data
TEMPERATURE & HUMIDITY
12
2. OUTDOOR HIGH
TEMPERATURE ALERT
ICON ( )
Appears if a high temperature
alert is set and active
8. OUTDOOR HIGH
HUMIDITY ALERT
ICON ( )
Appears if a high humidity
alert is set and active
3. OUTDOOR LOW
TEMPERATURE ALERT
ICON ( )
Appears if a low temperature
alert is set and active
9. OUTDOOR LOW
HUMIDITY ALERT
ICON ( )
Appears if a low humidity
alert is set and active
5. SENSOR RECEPTION
INDICATOR ( )
Indicates if the station is
receiving data from the
thermo-hygro sensor
6. OUTDOOR
COMFORT METER
Represents current outdoor
comfort level
4. OUTDOOR
TEMPERATURE
Current outdoor temperature
1. LOW BATTERY ICON
FOR THERMO-HYGRO
SENSOR ( )
Indicates thermo-hygro sensor
battery needs to be replaced
INDOOR HIGH
TEMPERATURE ALERT
ICON ( )
Appears if a high temperature
alert is set and active
INDOOR LOW
TEMPERATURE ALERT
ICON ( )
Appears if a low temperature
alert is set and active
INDOOR TEMPERATURE
Current indoor temperature
INDOOR HIGH
HUMIDITY ALERT
ICON ( )
Appears if a high humidity
alert is set and active
7. OUTDOOR HUMIDITY
Current outdoor humidity
12.
14. INDOOR HUMIDITY
Current indoor humidity
15. INDOOR LOW
HUMIDITY ALERT
ICON ( )
Appears if a low humidity
alert is set and active
13.
10. 11.

13
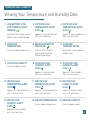
Viewing Your Temperature and Humidity Data
TEMPERATURE & HUMIDITY
Viewing Records
Resetting Individual Temperature and Humidity Records
Records Viewing Order
Press the button to toggle through indoor/
outdoor temperature & humidity history records
with time and date stamps.
Press the button to
view the individual
values you’d like to
reset.
Next, hold the MINUS
(-) button until dashes
appear on the LCD.
This reading is now
reset to your current
temperature or
humidity value.
Outdoor High Temperature • Outdoor Low Temperature • Outdoor High Humidity
Outdoor Low Humidity • Indoor High Temperature • Indoor Low Temperature
Indoor High Humidity • Indoor Low Humidity • Heat Index • Dew Point
1. 2. 3.
Outdoor Comfort Meter
The arrow indicates outdoor comfort level based on current relative humidity.
1%RH to 25%RH 84%RH to 99%RH26%RH to 39%RH 40%RH to 75%RH 76%RH to 83%RH

14
Temperature and Humidity Alerts
TEMPERATURE & HUMIDITY
Alerts Setting Order
Outdoor Low Temperature • Outdoor High Temperature • Outdoor Low Humidity
Outdoor High Humidity • Indoor Low Temperature • Indoor High Temperature
Indoor Low Humidity • Indoor High Humidity
Activate/Deactivate Alerts Important Notes:
Press and release the button to activate/
deactivate the alerts.
• The alert is defaulted to be o.
• When the armed alert value is reached, the station
will beep and the icon will flash. Press any button
to stop the alert sound.
• The Alert Icon will remain flashing until out of the
alert range.
• This alert is for the station only and will not
aect the app.
1. Hold the button for to enter the
Alert Settings Menu.
2. Use the +/- buttons adjust alerts
settings. Press to confirm your
selection.
3. Your programmed alerts are active
when the and / icon(s)
appear on the LCD.
Setting Temperature and Humidity Alerts

15
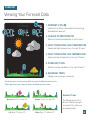
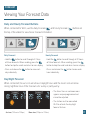
Viewing Your Forecast Data
2. CHANCE OF PRECIPITATION
Percent chance of precipitation in the 12 hours*
3. DAILY FORECASTED HIGH TEMPERATURE
Forecasted high temperature in the next 12 hours*
5. FORECAST ICONS
Predicts weather conditions in the next 12 hours**
4. DAILY FORECASTED LOW TEMPERATURE
Forecasted low temperature in the next 12 hours*
6. SEASONAL TREES
Foliage scene changes seasonally
1. INTERNET ICON ( )
Indicates the station is connected and receiving
AccuWeather forecasts*
Spring (March 20th to June 20th)
Fall (Sept. 21st to Dec. 20th)
Summer (June 21st to Sept. 20th)
Winter (Dec. 21st to March 19th)
Seasonal Trees
The foliage scene in the
forecast section changes
seasonally. The dates are
pre-programmed.
*Your display must be connected to Wi-Fi to receive AccuWeather forecast data.
**When connected, your station will display 6 additional forecast icons.
FORECAST

16
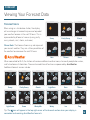
Viewing Your Forecast Data
FORECAST
Forecast Icons
Please Note: The Forecast Icons may not represent
your current weather. They are a future prediction of
the weather to come over the next 12 hours.
When using as a standalone station, the display
will use changes in barometric pressure to predict
your weather to come in the next 12 hours. This is
represented by 6 forecast scenes (sunny, partly
sunny, clouds, rain, t-storm, and snow).
When connected to Wi-Fi, the station will receive additional weather icons, chance of precipitation values,
and future forecast information. These enhanced Internet features are powered by AccuWeather.
Additional forecast scenes include:
Sunny Clouds
T-Storm
Partly Sunny
Rain Snow
Tip: The icon will appear in the top right corner of the forecast section when your display is
connected and receiving AccuWeather forecasts.
Sunny
Light Snow
Clouds
Wintry Mix
Rain
Ice
Partly Sunny
Snow
Light Rain
Windy
T-Storm
Fog

17
Viewing Your Forecast Data
FORECAST
Daily and Hourly Forecast Buttons
Day/Night Forecast
When connected to Wi-Fi, use the daily forecast ( ) and hourly forecast ( ) buttons on
the top of the station to view future forecast information.
When connected, the sun icon will show in daylight hours and the moon icon will show
during nighttime hours if the forecast is for sunny or partly sunny.
• The times the sun and moon icons
appear are pre-programmed and
cannot be adjusted.
• The station must be connected
Wi-Fi to activate the day/night
forecast feature.
Daily Forecast
• Hold the button to scroll through all 7 days
of future forecasts. When scrolling, press the
button to stop the scroll and return to main display.
• Press and release the button to view each
day individually.
• Hold the button to scroll through all 12 hours
of future forecasts. When scrolling, press the
button to stop the scroll and return to main display.
• Press and release the button to view each
hour individually.
Hourly Forecast
Sun Icon (7:00am to 7:00pm) Moon Icon (7:00pm to 7:00am)

18
Relative Pressure
• Your Relative Pressure reading will come
from your station’s internal barometer.
• Please allow up to 10 days for automatic
calibration, or program your local pressure
value in the Settings Menu.
• The arrows located to the left of the values
represents Pressure Tendency ( / ).
• Select your desired unit of measurement
(hPa or InHg) in the Settings Menu.
You can also set a specific pressure
number setting if desired.
Spot Water Leak Sensor
Your Water Leak Sensor data shares the
same display area as the pressure readings.
How to View Additional Data in the
Extra Sensor Field
Press the EXTRA button on the top of the
station to view Water Leak, Pressure, other
add-on sensors data (see page 18), or select
Auto Scroll to toggle through all of available
readings.
When the Auto-Scroll feature is active, the
Auto Scroll icon ( ) will appear in the Extra
Sensor field. Each reading will show for 6
seconds and the sensor icon will blink
every 2 seconds.
PRESSURE SENSORS
Note: The default pressure reading is 1013 hPa (29.92 INHg).
The station will acclimate on it’s own if the pressure number
is not set.

19
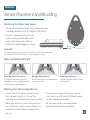
Sensor Placement and Mounting
SENSORS
• The sensor will work best when simply placed on a floor.
It will begin to detect water at 0.787mm (0.031 inches).
• Use the hole at the top to hang your sensor
from the back using a nail. Or, insert one
mounting screw through the front of your sensor.
• Mount your sensor on a north-facing wall or in
any shaded area. Under an eave or deck rail is
preferred to avoid inaccurate readings from
the sun.
• The maximum wireless transmission range to
the station is up to 121 meters (400 feet) in open
air, not including walls or floors.
• Be sure your sensor is mounted vertically,
to allow moisture to drain out properly.
• If sensor is placed vertically (i.e. hung
inside a sump pump) the depth of the
water needs to be at least 6.35mm
(0.25 inches) high to trigger the sensor.
Mounting Your Thermo-Hygro Sensor
Positioning Your Water Leak Sensor
Water Leak Sensor LED Light
Blue Light: Normal Transmission
The light will occasionally flash blue,
indicating it is still transmitting correctly
and no water has been detected.
Red Light: Water Detected
The LED light will flash red twice every
5 seconds until dry.
Purple Light: Low Battery
Indicates the sensor batteries need
to be replaced.
IMPORTANT:
The metal contacts on the sensor should not be in contact with other metal.
This will cause false WET readings and may damage the sensor.
Water
Sensor
Bottom of
Water Leak Sensor
Page is loading ...
Page is loading ...
Page is loading ...
Page is loading ...
-
 1
1
-
 2
2
-
 3
3
-
 4
4
-
 5
5
-
 6
6
-
 7
7
-
 8
8
-
 9
9
-
 10
10
-
 11
11
-
 12
12
-
 13
13
-
 14
14
-
 15
15
-
 16
16
-
 17
17
-
 18
18
-
 19
19
-
 20
20
-
 21
21
-
 22
22
-
 23
23
-
 24
24


La Crosse CA79103 Owner's manual
- Category
- Weather stations
- Type
- Owner's manual
- This manual is also suitable for
Ask a question and I''ll find the answer in the document
Finding information in a document is now easier with AI
Related papers
-
La Crosse V11 User manual
-
La Crosse 327-30647 User manual
-
La Crosse C83100-INT User manual
-
La Crosse LTV-TH5i User manual
-
-
La Crosse LTV-WL1-2 User manual
-
-
La Crosse LTV-TH1 User manual
-
-
Other documents
-
La Crosse Technology C75716 User manual
-
 La Crosse Technology C79790 Faqs
-
 La Crosse Technology C79790V2 User guide
-
 La Crosse Technology V10-TH User manual
-
La Crosse Technology 328-47577 Setup Manual
-
Sharper Image V21-WTH Owner's manual
-
 La Crosse Technology 330-2315 User manual
-
 La Crosse Technology C84343 Instructional Manual
-
 La Crosse Technology S84060 User manual
-
 La Crosse Technology C8929 User manual


