Nova-Strobe bax
and / et / y
Nova-Strobe bbx
Portable Stroboscopes
Stroboscopes portables
Estroboscopios Portátiles
MONARCH INSTRUMENT
Instruction Manual
(Nova-Strobe bbx
shown / montré /
mostrado)
Impreso en los EEUU.
El derecho de autor 2010 Monarch Instrument, reservó bien
1071-4206-312R
1071-4206-512R - 0510
www.GlobalTestSupply.com
Find Quality Products Online at: sales@GlobalTestSupply.com

Safeguards and Precautions
1. Read and follow all instructions in this manual carefully, and
retain this manual for future reference.
2. Do not use this instrument in any manner inconsistent with
these operating instructions or under any conditions that
exceed the environmental specifications stated.
3. Certain strobe frequencies can trigger epileptic seizures in
those prone to that type of attack.
4. Users should not stare directly at the light source.
5. Prolonged exposure to the light can cause headaches in some
people.
6. Objects viewed with this product may appear to be stationary
when in fact they are moving at high speeds. Always keep a
safe distance from moving machinery and do no touch the
target.
7. There are lethal voltages present inside this product. Refer to
the section on Lamp Replacement before attempting to open
this product.
AC Stroboscopes that have three wire mains cable must
have the earth wire connected to a suitable Earth point.
8. Do not allow liquids or metallic objects to enter the ventilation
holes on the stroboscope as this may cause permanent
damage and void the warranty.
9. Do not allow cables extending from unit to come into contact
with rotating machinery, as serious damage to the equipment,
or severe personal injury or death may occur as a result.
LA DECLARACION DE Ce DE LA CONFORMIDAD
Cuando Fabrica:
Monarch Instrument
La división del Monarch International Inc.
15 Columbia Drive, Amherst NH 03031 USA
declara bajo el Monarch’s única responsabilidad que el product:
a que esta declaración relaciona está en la conformidad con los estándares siguientes:
y por lo tanto se conforma con los requisitos del Concilio Directivo 2004/108/EG
que relaciona la compatibilidad electromagnéticos y 2006/95/EC que relaciona a la
directiva baja del voltaje cuando operado de acuerdo con la guía de usuario. EMC
que prueba de este producto fue realizado por Retlif Testing Laboratories, NH (el
Archivo R-4702N-5).
Nombre: Serie Nova-Strobe X
Modelo: bbx, dbx, pbx, vbx
15
th
January, 2010
El fabricante (Amherst,NH) Alan Woolfson, Vice Presidente que Dirige (Autorizó Firma)
EN61326:1997 EMC /A1:1998/A2:2001/A3:2003 La Clase A
Específicamente CISPR 16-1:2003/CISPR 16-2:2003
EN55011:1998/A1:1999/A2:2002 EN61000-4-2 EN61000-4-3
EN61010-1:2001-2 Norma de Seguridad
www.GlobalTestSupply.com
Find Quality Products Online at: sales@GlobalTestSupply.com

TABLE OF CONTENTS
TABLE OF CONTENTS
1.0 OVERVIEW ..........................................................................E-1
1.1 Display Panel / Definition of Buttons ........................E-1
2.0 PREPARATION FOR USE .....................................................E-2
2.1 Power.........................................................................E-2
3.0 OPERATION .........................................................................E-2
3.1 Power Up Features ...................................................E-3
4.0 USING THE STROBOSCOPE TO MEASURE RPM ...............E-4
5.0 LAMP AND FUSE REPLACEMENT ......................................E-6
5.1 Lamp Replacement ...................................................E-6
5.2 Fuse Replacement ....................................................E-7
6.0 BATTERY POWERED MODELS ONLY .................................E-8
6.1 Low Battery Indication ..............................................E-9
6.2 Charging the Batteries..............................................E-9
6.3 Battery Disposal ......................................................E-10
7.0 SPECIFICATIONS............................................................... E-11
8.0 OPTIONS AND ACCESSORIES .........................................E-13
S-13
8.0 OPCIONES Y ACCESORIOS
CC-7 Cerrar con picaporte que lleva el caso para la luz
Estroboscópica con la provisión para accesorios
L-1903 Lámpara digital de reemplazo de Estroboscopio
PSC-2U Recharger universal, 115/230 Vac con EEUU, U.K., AU,
Tapones de Adaptador de euro para la batería operaron
Nuevo-LUZ Estroboscópicas
SPC-1 Salpique la prueba la Cubierta Protectora para la Batería
Accionó luz Estroboscópica SOLO
CAL-N.I.S.T. N.I.S.T. El Certificado rastreable de la Calibración
www.GlobalTestSupply.com
Find Quality Products Online at: sales@GlobalTestSupply.com

E-1
1.0 OVERVIEW
All descriptions in this manual apply to both the “basic” battery powered
(bbx) and “basic” AC mains powered (bax) digital stroboscopes except
where noted.
1.1 Display Panel / Definition of Buttons
The display panel consists of
a backlighted liquid crystal
display with six numeric
digits on top and five
alphanumeric digits on the
bottom, which indicate
modes, flash rates, etc. (see
Figure 1).
Additional information
displayed include:
- - - - - Indicates input
frequency exceeds
the limit of the
stroboscope
(Battery Powered Model Only) Battery indication, see
section 6.0
Below the display are two membrane buttons:
Multiplies flash rate by 2 times
Hold when powering up to show all segments, then Rev #
and display test
Divides flash rate by 2
Hold when powering up to reset factory defaults
Figure 1 Display Panel
S-12
Este producto es diseñado para estar a salvo para uso interior bajo las
condiciones siguientes (por IEC61010-1).
Temperatura operadora 32-104 ºF {0-40 ºC}
LA NOTA: La seguridad la característica térmica pondrá la unidad en
el Modo de TACH (las paradas que destellan) en caso de
recalentar interno. La unidad entonces debe ser cycled de
poder.
Humedad Maximun humedad relativa 80% para la temperatura hasta
88 ºF {31 ºC} disminuyendo linealmente a 50% de humedad
relativa en 104 ºF {40 ºC}
bbx Especifico:
Poder de Entrada La batería accionó: Las Baterías Recargables internas
6 Vdc, recharger Externo de C.A. (100 Vac a 240 Vac,
50/60 Hz)
Produccion Ligera El promedio: 13 Vatios típicos >4000 FPM
Instantáneo (por el destello): 230 mJoule típico a 4000 FPM
Corra Tiempo 2 horas típicas en 1800 FPM, y más de 1 hora en
6000 FPM con baterias cargadas
Cargue Tiempo 4-5 horas típicas con PSC-2U
Peso 1.875 lbs {0.8505 kg) including batteries
bax Específico:
Poder de Entrada C.A. accionó: 115 Vac O 230 Vac, 35VA (ordenó
como)
Produccion Ligera El Poder medio: 15.5 Vatios típicos > 4000 FPM
Instantáneo (por el destello): 230 mJoule típico a 4000 FPM
Corra Tiempo Continuo dentro de limitaciones de temperatura. Las
aberturas no deben ser restringidas. La unidad debe
estar horizaontal.
Peso 1.55 lbs {0.70 kg}
www.GlobalTestSupply.com
Find Quality Products Online at: sales@GlobalTestSupply.com

E-4
4.0 USING THE STROBOSCOPE TO MEASURE
RPM
The primary use for a stroboscope is to stop motion for diagnostic inspection
purposes. However the stroboscope can be used to measure speed (in
RPM / RPS). In order to do this several factors need to be considered. First,
the object being measured should be visible for all 360° of rotation (e.g. The
end of a shaft). Second, the object should have some unique part on it, like
a bolt, key way or imperfection to use as a reference point. If the object
being viewed is perfectly symmetrical, then the user needs to mark the
object with a piece of tape or paint in a single location to be used as a
reference point. Look only at the reference point.
If the speed of rotation is within the range of the stroboscope, start at the
highest flash rate and adjust the flash rate down. At some point you will
stop the motion with only a single reference point of the object in view.
Note that at a flash rate twice the actual speed of the image you will see two
images (reference points). As you approach the correct speed you may see
three, four or more images at harmonics of the actual speed. The first
SINGLE image you see is the true speed. To confirm the true speed, note
the reading and adjust the stroboscope to exactly half this reading, or just
press the ÷2 button. You should again see a single image (which may be
phase shifted with respect to the first image seen).
For example, when viewing a shaft with a single key way you will see one
stationary image of the key way at the actual speed and at 1/2,1/3,1/4, etc,
of the actual speed. You will see 2 images of the key way at 2 times the
actual speed, 3 key way at 3 times, etc. The Flashes Per Minute (FPM)
equals the shaft’s Revolutions Per Minute (RPM) at the highest flash
rate that gives only one stationary image of the key way.
S-9
Como NiCDs, baterías de NiMH son propenso a la auto-descarga - 10
a 15% de la carga son perdidos en las primeras 24 horas entonces continúa
a razón de 0,5 a 1% por día. Para el desempeño máximo, cargue las baterías
apenas antes del uso.
Cuándo no en uso, las baterías deben ser cargadas por lo menos cada tres
meses, de otro modo la capacidad de batería será reducida o las baterías
pueden llegar a ser inutilizables.
Cargue las baterías utilizan antes y permiten 3-5 ciclos de cargar y
descargar para baterías para alcanzar la capacidad repleta.
El cerco contiene la electrónica del control a carga sin peligro y
apropiadamente las baterías. Nunca quite las baterías del cerco y la tentativa
para cargar externamente. Siempre utilice el corcel suministrado
(PSC-2U).
6.1 Indicación baja de Batería
Cuándo las baterías son cargadas, no habrá icono Bajo de Batería.
Cuándo las baterías son bajas, el icono Bajo de Batería parpadeará en el
despliega. La luz estroboscópica todavía puede ser utilizada para un
tiempo corto.
Icono Bajo de Batería = Resuma Parpadear (muy poco tiempo
dejó)
La luz Estroboscópica tiene una característica de la protección que
previene la luz estroboscópica de operar si el voltaje de batería es
demasiado bajo. Esta condición es indicada por ningún destello y
las exposiciones del despliegue “LO BAT” (“AQUI BATEA”). En
este momento las baterías deben ser recargadas. Recuerde de liberar el
interruptor del disparador.
www.GlobalTestSupply.com
Find Quality Products Online at: sales@GlobalTestSupply.com

E-5
Example: object rotating at 2500 RPM
If the speed is outside the full scale range of the stroboscope (10,000 FPM),
it can be measured using the method of harmonics and multipoint calculation.
Start at the highest flash rate and adjust the flash rate down. You will
encounter multiple images so be aware of these. Note the flash rate of the
first SINGLE image you encounter, call this speed “A”. Continue decreasing
the flash rate until you encounter a second SINGLE image. Note this speed
as “B”. Continue decreasing the speed until you reach a third SINGLE
image at speed “C”.
For a two point calculation the actual speed is given by:
RPM = AB/(A-B)
For a three point calculation:
RPM = 2XY(X+Y)/(X-Y)
2
where
X = (A-B) and
Y = (B-C)
In instances when you can shut down the device and install a piece of
reflective tape, then an optical tachometer is easier to use for RPM
measurement. Stroboscopes must be used when you can’t shut down
the device. The human eye is not easily tricked into seeing a stopped image
by a stroboscope when the flash rate is slower than 300 FPM. Therefore,
stroboscopes are just about impossible to use below 300 FPM for inspection
or to measure RPM.
Stopped Image 1/4 times 1/2 times 1 time 2 times 3 times 4 times
Flash Rate (FPM) 833 1250 2500 5000 7500 10000
S-8
5.2 Funda el Reemplazo
Bajo condiciones de funcionamiento normales, el fusible dentro del
estroboscopio nunca debe soplar. Los ejemplos de condiciones de
funcionamiento anormales serían las materias extranjeros que entran la
luz estroboscópica, tal como agua, la pulpa, la tinta, etc.
La C.A. Accionó estroboscopio tiene un fusible reemplazable dentro
de la unidad, que puede ser conseguir acceso a quitando el lente y el
reflector - se refiere para figurar 4. Si las necesidades de fusible para ser
reemplazadas, reemplacen sólo con un fusible del mismo tipo y el
valor: El Golpe rápido - 750mA, 2AG.
La ADVERTENCIA: Antes procurar para reemplazar el
fusible, la marca segura el
estroboscopio es apagado y cualquier
cuerda de red es quitada de la salida
de C.A. Permita la lámpara para
refrescar esperar por lo menos 5
minutos.
La Batería Accionó estroboscopio tiene un fusible de resettable, que
repondrá una vez condiciones son normales otra vez.
6.0 LA BATERIA ACCIONO LOS MODELOS
SOLO
El bbx Nuevo-Estroboscópico es quedado con NiMH recargable (Metal de
Níquel Hydride) baterías. Estas baterías contienen menos metales tóxicos
que NiCD (Cadmio de Níquel) y son clasificados actualmente
“ambientalmente amistoso”. Ellos tienen también 30% más capacidad que
baterías de NiCD del mismo tamaño.
www.GlobalTestSupply.com
Find Quality Products Online at: sales@GlobalTestSupply.com

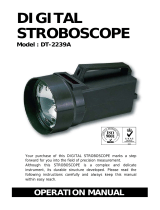
5.0 LAMP AND FUSE REPLACEMENT
5.1 Lamp Replacement
WARNING: Before attempting to remove the lamp, make
sure the stroboscope is turned off and any
mains cord is removed from the AC outlet. Allow
the lamp to cool waiting at least 5 minutes.
The stroboscope is designed to discharge the internal high voltages
within 30 seconds. However, caution should be exercised when replacing
the lamp.
The lamp can be replaced by using just a pocket screwdriver. It is not
necessary to remove any screws to replace the lamp.
To change the lamp:
1. Push apart the two tabs on the side of the reflector housing and
remove the lens using a small screwdriver to help pry one tab and
lift the lens. Take care not to pry the tab any more than is necessary
to free the lens. The reflector is held in place by the front lens and
will come loose, but it is not necessary to remove the reflector.
2. Hold the lamp with a cloth between your forefinger and thumb
and rock it back and forth gently while pulling out. Do not attempt
to rotate the lamp. The lamp is socketed and will come out easily
when pulled straight out.
WARNING: Do NOT touch the new lamp with bare fingers.
3. The lamps are polarized and must be put into the socket matching
polarity. Using a lint free cloth, match up the red dot on the
plug with the red dot on the socket and gently rock the lamp
E-6 S-7
3. Las lámparas son polarizadas y deben ser puestas en el enchufe
que empareja la polaridad. Utilizar una hilas libertan tela, el
igual arriba el punto rojo en el tapón con el punto rojo en el
enchufe y mecen suavemente la lámpara al empujar en lugar (Vea
la Figura 4). Cerciórese lámpara está en recto y centrado en el
hoyo de reflector.
El CUIDADO: No permita el reflector para contactar la
lámpara.
4. Vuelva a instalar el reflector y entonces posicione el lente anterior
en el igualar del lugar los cortes en el lente con las dos pequeñas
etiquetas en la envoltura para prevenir la rotación de lente (ve la
figura 4). Empuje las etiquetas en el borde anterior exterior y
apriete el lente en el lugar.
Figura 4 Reemplazo de Lámpara
Los Puntos
Rojos
Los Cortes
www.GlobalTestSupply.com
Find Quality Products Online at: sales@GlobalTestSupply.com

E-7
while pushing it into place (see Figure 4). Make sure the lamp is
in straight and centered in the reflector hole.
CAUTION: Do NOT allow the reflector to contact the lamp.
4. Reinstall the reflector and then position the front lens in place
matching up the notches on the lens with the two small tabs on
the housing to prevent lens rotation (see Figure 2). Push the tabs
on the front rim outward and press the lens into place.
5.2 Fuse Replacement
Under normal operating conditions, the fuse within the stroboscope
should never blow. Examples of abnormal operating conditions would
be foreign materials entering the strobe, such as water, pulp, ink, etc.
Figure 4 Lamp Replacement
Red Dots
Notches
5.0 LA LAMPARA Y FUNDE EL REEMPLAZO
5.1 Reemplazo de lámpara
La ADVERTENCIA: Antes procurar para quitar la lámpara,
la marca segura el estroboscopio es
apagado y cualquier cuerda de red es
quitada de la salida de C.A. Permita la
lámpara para refrescar esperar por lo
menos 5 minutos.
El estroboscopio es diseñado para descargar los voltajes altos internos
dentro de 30 segundos. Sin embargo, el cuidado debe ser ejercitado al
reemplazar la lámpara.
La lámpara puede ser reemplazada utilizando apenas un destornillador
de bolsillo. No es necesario para quitar ningún tornillo para
reemplazar la lámpara.
Para cambiar la Lampara:
1. Empuje aparte las dos etiquetas en el lado del reflector que alberga
y quita el lente que utiliza un pequeño destornillador para ayudar
a curiosear una etiqueta y levantar el lente. Tome el cuidado para
no curiosear la etiqueta más que es necesario para libertar el lente.
El reflector es contenido el lugar por el lente anterior y se aflojará,
pero no es necesario para quitar el reflector.
2. Tenga la lámpara con una tela entre su índice y el pulgar y lo mece
apoya y adelante suavemente al sacando. No procure girar la
lámpara. La Lámpara es socketed y saldrá fácilmente cuando tirado.
La ADVERTENCIA: No toque la nueva lámpara con dedos
descubiertos.
S-6
www.GlobalTestSupply.com
Find Quality Products Online at: sales@GlobalTestSupply.com

E-8
The AC Powered stroboscope has a replaceable fuse inside the unit,
which may be accessed by removing the lens and reflector - refer to
Figure 2. If the fuse needs to be replaced, replace only with a fuse of
the same type and value: Fast Blow - 750mA, 2AG.
WARNING: Before attempting to replace the fuse, make
sure the stroboscope is turned off and any
mains cord is removed from the AC outlet. Allow
the lamp to cool waiting at least 5 minutes.
The Battery Powered stroboscope has a resettable fuse, which will
reset once conditions are normal again.
6.0 BATTERY POWERED MODELS ONLY
The Nova-Strobe bbx is fitted with rechargeable NiMH (Nickel Metal
Hydride) batteries. These batteries contain fewer toxic metals than NiCd
(Nickel Cadmium) and are currently classified “environmentally friendly”.
They also have 30% more capacity than NiCd batteries of the same size.
Like NiCds, NiMH batteries are prone to self-discharge - 10 to 15% of
charge is lost in the first 24 hours then continues at a rate of 0.5 to 1% per
day. For maximum performance, charge the batteries just prior to use.
When not in use, the batteries should be charged at least every three months,
otherwise the battery capacity will be reduced or the batteries may become
unusable.
Charge the batteries before use and allow 3-5 cycles of charging and
discharging for batteries to reach full capacity.
The enclosure contains control electronics to properly and safely charge the
batteries. Never remove the batteries from the enclosure and attempt to
charge externally. Always use the charger supplied (PSC-2U).
S-5
Ejemplo: Se opone girando en 2500 RPM
Si la velocidad está fuera de la gama repleta de la escala del estroboscopio
(10,000 FPM), puede ser medido utilizando el método del cálculo de armonía
y multipoint. La estrella en la tasa más alta del destello y ajusta la tasa
rápida hacia abajo. Usted encontrará múltiples imágenes tan están enterado
de éstos. Note la tasa rápida de la SOLA primera imagen que usted encuentra,
llama esta velocidad “UN”. Continúe disminuir la tasa rápida hasta que
usted encuentre una SOLA segunda imagen. Note esta velocidad como “B”.
Continúe disminuir la velocidad hasta que usted alcance un thrid SOLA
imagen en la velocidad “C”.
Para un dos calculo del punto que la velocidad verdadera es dada por:
RPM = AB/(A-B)
Para un tres calculo de punto:
RPM = 2XY(X+Y)/(X-Y)
2
donde
X = (A-B) y
Y = (B-C)
En casos cuando usted puede cerrar el dispositivo e instalar un pedazo de
cinta reflectora, entonces un tacómetro óptico es más fácil de utilizar para la
medida de RPM. Estroboscopios deben ser utilizados cuando usted no
puede cerrar el dispositivo. El ojo humano no es engañado fácilmente a ver
una imagen parada por un estroboscopio cuando la tasa rápida es más lenta
que 300 FPM. Por lo tanto, estroboscopios son casi igual imposibles utilizar
debajo de 300 FPM para la inspección o para medir RPM.
La imagen parada 1/4 tiempos 1/2 tiempos 1 tiempo 2 tiempos 3 tiempos 4 tiempos
Destella Tasa (FPM) 833 1250 2500 5000 7500 10000
www.GlobalTestSupply.com
Find Quality Products Online at: sales@GlobalTestSupply.com

E-9
6.1 Low Battery Indication
When the batteries are charged, there will be no battery indication.
When the batteries are low, the Low Battery icon will blink in the
display. The strobe may still be used for a short time.
Low Battery Icon = Outline blinking (very little time left)
The strobe has a protection feature that prevents the strobe from
operating if the battery voltage is too low. This condition is indicated
by no flash and the display shows “LO BAT”. At this time the
batteries must be recharged. Remember to release the trigger switch.
6.2 Charging the Batteries
The unit may be recharged at any time. You do not need to wait until
the low battery condition is indicated.
To charge the battery powered strobe with the recharger:
1. Release the trigger so the strobe is off.
2. Plug the recharger cable into the recharger socket (located below
the display panel behind the handle).
3. Plug the recharger into an AC mains wall outlet (115/230 Vac).
CAUTION: Use of rechargers other than the one supplied
(PSC-2U) will damage the stroboscope and void
the warranty.
When the recharger plug is inserted into the recharger jack, the strobe
will go into the Charging Mode. Make sure the trigger switch is not
depressed. The strobe will not do anything else when charging (e.g. it
will not flash and the buttons have no function).
S-4
4.0 UTILIZAR EL ESTROBOSCOPIO PARA
MEDIR RPM
El uso primario para un estroboscopio es de parar el movimiento para
propósitos diagnósticos de inspección. Sin embargo el estroboscopio puede
ser utilizado para medir debe ser visible para el al 360‘ de la rotación (por
ejemplo. El fin de un túnel). Segundo, el objeto debe tener alguna parte
extraordinaria en ello, como un cerrojo, la manera o la imperfección claves
para utilizar como un punto de referencia. Si el objeto para ser visto es
perfectamente simétrico, entonces el usuario necesita marcar el objeto con
un pedazo de cinta o pintura en una sola ubicación para ser utilizado como
un punto de referencia. Mire sólo en el punto de referencia.
Si la velocidad de la rotación está dentro de la gama del estroboscopio, el
comienzo en la tasa más alta del destello y ajusta la tasa rápida hacia abajo.
En algún punto usted parará el movimiento con sólo un solo punto de
referencia del objeto en la vista. Note que en una tasa rápida dos veces ese
tha la velocidad verdadera de la imagen usted verá dos imágenes (puntos de
referencia). Cuando usted se acerca la velocidad correcta usted puede ver
tres, cuatro o más imágenes en armonía de la velocidad verdadera. La SOLA
primera imagen que usted ve es la velocidad verdadera. Para confirmar la
velocidad verdadera, notar la lectura y ajustar el estroboscopio a exactamente
media esta lectura, o apretar apenas el +2 botón. Usted otra vez debe ver
una sola imagen (que puede ser fase cambiada con respecto a la primera
imagen vista).
Por ejemplo, al ver un túnel con una sola manera clave usted verá una imagen
inmóvil de la manera clave en la velocidad verdadera y en 1/2, 1/3, 1/4, etc.,
de la velocidad verdadera. Usted verá 2 imágenes de la manera clave en 2
veces la velocidad verdadera, 3 manera clave en 3 veces etc. El Destello Por
Minuto (FPM) iguala las Revoluciones de túneles Por Minuto (RPM)
en la tasa más alta del destello que da sólo una imagen inmóvil de la
llave lejos.
www.GlobalTestSupply.com
Find Quality Products Online at: sales@GlobalTestSupply.com

E-10
When charging, the strobe will indicate CHRGE in the bottom right of the
display. The recharger will fast charge the batteries for about 4-5
hours and then trickle charge the batteries.
Allow the recharger to charge the batteries until the display shows
DONE for peak battery life performance. If the batteries are not charged
to 100% regularly, the batteries will lose capacity.
6.3 Battery Disposal
Prior to disposing of the battery-powered strobe, the user must remove
the Nickel-Metal Hydride batteries. To do this, remove the lens,
reflector and lamp as detailed in the Lamp Replacement section. This
will expose four (4) screws that must be removed so the reflector
housing can be dismantled. There are four (4) additional screws in the
case half opposite the input and output jacks that must be removed.
The case halves can now be separated, exposing the batteries. Remove
the cables from the batteries and place tape over the battery terminals
to prevent them from shorting. The batteries should be sent to a
recycling center or returned to the factory. The rest of the parts may
now be disposed of.
S-3
destello, girar rapidamente la perilla (o utilizar el x2 o +2 botones) cambiar
toscamente el FPM. Entonces gire lentamente la perilla para ajustes de multa.
LA NOTA: Hay dos valores maximos y minimos en cada modo mas alla de
que usted no puede ajustar. Si usted ajusta la tasa y usted
alcanza un valor que en el proximo incremento excederia la tasa
rapida maxima, el despliegue no incrementara. El mismo es
verdad si usted trata de ajustar la tasa rapida debajo de la tasa
rapida minima.
Para multiplicar o divider la tasa rapida actual por 2:
Ademas de la perilla, hay dos botones en el entrepaño de espalda marcaron
x2 y ÷2. Esto permite al usuario a duplicar instantaneamente o para
compartir la lectura en el despliegue al maximo o el minimo valor permitido.
Esta caracteristica es util para verificar armonia en el modod intermitente
interno.
3.1 Poder Arriba Caracteristicas
Cuando las luces estroboscopicas lo son encendidos recordara los ultimos
scenarios.
La prensa y tiene el botón x2, entonces vuelta en la luz estroboscópica
deprimiendo el interruptor de tigger. Esto prenderá todos los segmentos
del despliegue por dos segundos o hasta que usted libere el botón.
Entonces mostrará la revisión de software, REVOLUCION X.X y
entonces atravesará un despliegue diagnóstico.
La prensa y tiene el botón ÷2, entonces vuelta en la luz estroboscópica
deprimiendo el interruptor de tigger. Esto restaurará la fábrica
programada fija.
www.GlobalTestSupply.com
Find Quality Products Online at: sales@GlobalTestSupply.com

E-11
7.0 SPECIFICATIONS
Internal Mode:
Flash Range 30 - 10,000 FPM (Flashes Per Minute)
Flash Rate Accuracy ±1 FPM
Flash Rate Resolution 1 FPM
Display Update Rate Instantaneous
Time Base Ultra Stable Crystal Oscillator
Display LCD display with 6 numeric 0.506 inch
[12.85 mm] high digits and
5 alphanumeric 0.282 inch [7.17 mm] high
digits
Indicators Battery level
Knob Adjustment Digital Rotary switch with 36 detents per
revolution; velocity sensitive
Memory Last setting before power down is remembered
and restored on next power up
Flash Duration 10-25 microseconds (auto adjust with flash
rate)
Flash Tube (Lamp) Life 100 million flashes
This product is designed to be safe for indoor use under the following
conditions (per IEC61010-1).
Operating Temperature 32-104 ºF [0-40 °C] (May be operated for short
time periods, slightly beyond stated temperature
range)
NOTE: Safety thermal feature will set unit into TACH Mode (stops
flashing) in the event of internal overheating. Unit must
then be power cycled.
Humidity Maximum relative humidity 80% for temperature
up to 88 °F [31 °C] decreasing linearly to 50%
relative humidity at 104 °F [40 °C]
S-2
2.0 PREPARACION PARA EL USO
La luz Estroboscopica puede ser mano tenida o montada en un tripode u
otro usuario suministro parenthesis que utilize el buje de UNC ¼-20 en la
base del asidero.
2.1 Poder
La C.A. acciono luz estroboscopica debe tener su cuenta del poder
tapada en una salida de C.A. (115 Vac o 230 Vac).
La bacteria acciono luz estroboscopica tiene baterias recargables
internas. La unidad debe ser cargada antes uso (vea la seccion 6.0). El
tiempo operador verdadero del estroboscopio depende del ciclo rapido
de la tasa y el deber de la operacion. Las tasas rapidas mas lentas
(debajo de 4.000 FPM) aumenta el tiempo operador. Note que la luz
estroboscopica no operara del recharger suministro con la unidad.
3.0 OPERACION
Para aprender el estroboscopio, deprimir y tener el disparador. El disparador
puede ser encerrado la posicion que utilize el lado que cierra el boton. Para
cerrar el estroboscopio en, deprime el disparador por lo que ira y entonces
apretara el boton que cierra. Una vez que el boton que cierra le es puesto
puede liberar el disparador y el disparador sera contenido el lugar. Para
desatrancar el estroboscopio, deprime simplemente el disparador y entonces
liberacion.
Para cambiar la tasa rapida:
Con el poder en, gire la perilla contra a la derecha para aumentar la tasa rapida y
a la derecha para disminuirlo. La perilla es la velocidad sensible. Gire la perilla
para tener lentamente cada “click” es igual a 1 FPM. La curva que la perilla mas
ajustara rapidamente el FPM por pasos mas grande. Al ajustar la tasa del
www.GlobalTestSupply.com
Find Quality Products Online at: sales@GlobalTestSupply.com

E-12
bbx Specific:
Input Power Battery powered: Internal Rechargeable
Batteries 6 Vdc, External AC recharger (100 Vac
to 240 Vac, 50/60 Hz)
Light Output Average: 13 Watts typical > 4000 FPM
Instantaneous (per flash): 230 mJoule typical
to 4000 FPM
Run Time 2 hours typical at 1800 FPM, and over 1 hour at
6000 FPM with fully charged batteries
Charge Time 4-5 hours typical with PSC-2U
Weight 1.875 lbs [0.8505 kg] including batteries
bax Specific:
Input Power AC powered: 115 Vac OR 230 Vac, 35VA (as
ordered)
Light Output Average Power: 15.5 Watts typical > 4000 FPM
Instantaneous (per flash): 230 mJoule typical
to 4000 FPM
Run Time Continuous within temperature limitations.
Vents must not be restricted. Unit must be
horizontal.
Weight 1.55 lbs [0.70 kg]
S-1
1.0 VISTA GENERAL
Todas descripciones en este manual aplican a la batería “basica” accionó
(bbx) y red “basica” de C.A. accionó (bax) estroboscopios digitales menos
donde notaron.
1.1 Entrepaño del Despliegue / la Definicion de
Botones
El Entrepaño del despliegue
consiste en una pantalla de
cristal liquid alumbrada de
fondo con seis digitos
numericos en la cima y cinco
digitos alfanumericos en el
buttom, que indica los modos,
destellan las tasas, etc. (Vea
la figura 1).
La informacion adicional
demostrada incluye:
- - - - - Indica la frecuencia
de entrada exceed el limite del estroboscopio
(Batería el Modelo Accionado Solo) la indicacion de
Batería, vea la seccion 6.0
Debajo del despliegue son dos botones de membrane:
Multiplica la tasa rapida por 2 veces
Tenga el accionar arriba mostrar todos los segmentos, entonces
Revolucion # y la prueba del Despliegue
Divide la tasa rapida por 2
Tenga al accionar arriba reponer los defectos de fábrica
Figure 1 Display Panel
www.GlobalTestSupply.com
Find Quality Products Online at: sales@GlobalTestSupply.com
/