Command 231
Radio code keypad for impulse control
Version
Command 231 868 MHz (Art.-No. 68 328)
Command 231 433 MHz (Art.-No. 68 333)
Safety advice
Attention:
• Please read these instructions carefully
before connecting and operating this
device!
• Have faulty and defective devices checked
by the manufacturer.
• You are not authorized to carry out
changes to this device.
Function
The radio code keypad offers you the possibility to
open and close your garage door by entering a
4-digit personal identification number (PIN). It can
be programmed, so that up to 3 garage door
operators can be actuated with a different code
each or one garage door operator can be actuated
with up to three different PIN's. Additionally any
number can be programmed temporarily as PIN in
order to grant a temporary access for certain visitors
or service personnel.
Beside this an additional device (e.g. the yard light)
can be controlled. For this function ("light function")
a further receiver is required.
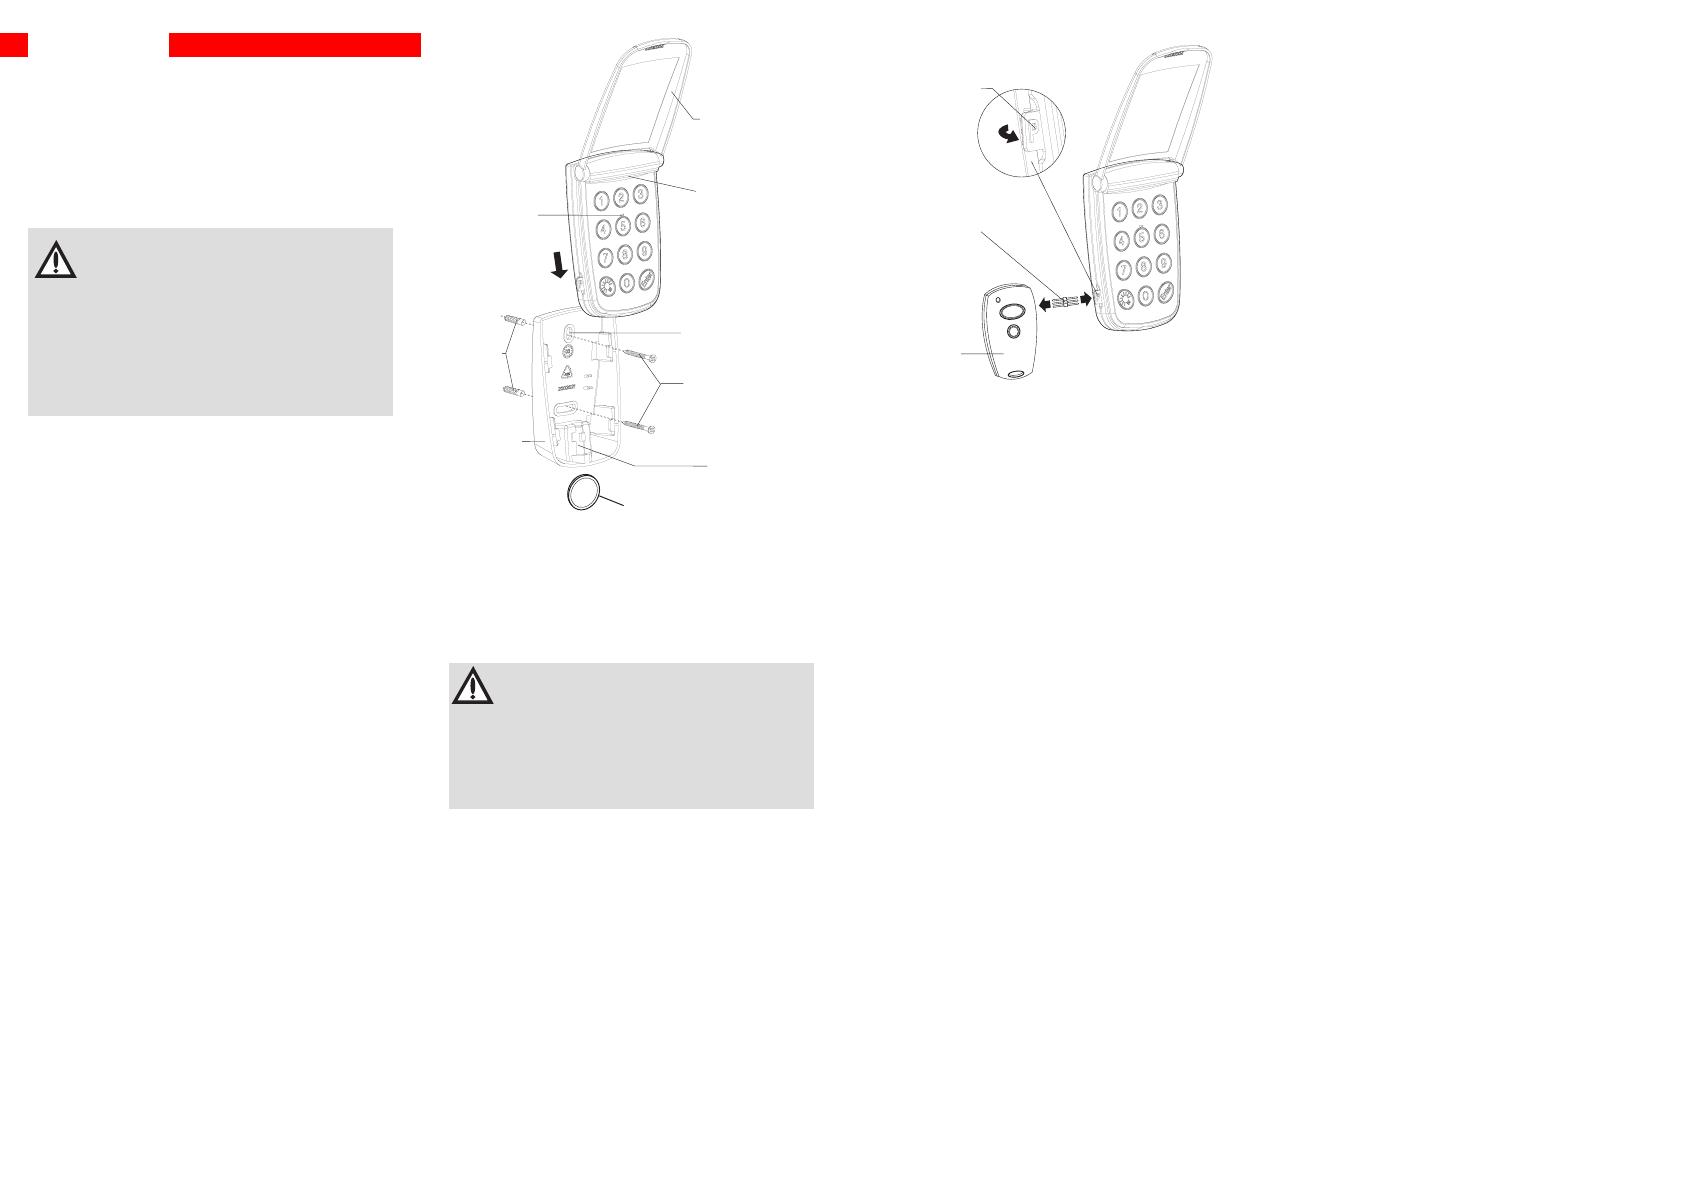
Installation of the radio code keypad
• Choose a suitable place to install the radio code
keypad.
• Take the wall bracket as pattern and mark the
place for the two drill holes. Then drill the holes
and insert the enclosed wall plugs.
• Screw on the wall bracket by means of the
enclosed screws. For surfaces other than wood
other screws and wall plugs may be necessary.
• Click the radio code keypad into the wall bracket.
• Take a coin to turn the lock on the bottom side of
the wall bracket clockwise to fix the radio code
keypad.
Enter PIN and transmit code
Your radio code keypad is delivered with
1 random code and 1 PIN already programmed.
The factory programmed PIN is 1-2-3-4.
Attention:
To program the third code the preset
code (random programming) must be
overwritten with the PIN 1-2-3-4 and
then the PIN 1-2-3-4 must be changed
according to the instructions.
In case you already use another radio transmitter to
control your garage door operator, the code of this
has to be transmitted from the transmitter to the
actual radio code keypad.
Transmit the code for the garage door control
from one transmitter to the radio code keypad:
• Connect the radio code keypad and the actual
transmitter by means of the programming plug.
• Hold the button on the transmitter you control
the garage door with.
Press the ENTER button on the radio code keypad.
The keypad lights up.
• Enter a new 4-digit PIN of your choice. Then press
the ENTER button again. Hold the transmitter
button until the LED on the radio code keypad
flashes quickly.
• Now the radio code keypad has learned the
transmitter code and saved under the PIN you
have entered. Now you may remove the
programming plug.
Transmit the code for light function from one
transmitter to the radio code keypad:
The light function is already programmed with a
special code. But you may as well transmit another
transmitter code to actuate the light function.
• Connect the radio code keypad and the actual
transmitter by means of the programming plug.
• Hold the specific button on the transmitter you
activate the other device with. Press the ENTER
button on the radio code keypad. The keypad
lights up.
• Press the LIGHT button and then again the ENTER
button. Hold the transmitter button until the LED
on the radio code keypad flashes quickly.
• The radio code keypad has now learned the new
transmitter code for the light function. Now you
may remove the programming plug.
Save more than 1 code to control more than
1 garage door operator:
• With the radio code keypad you may control up
to 3 different garage door operators, each with a
different code.
• For each of the 3 codes proceed as described
above, but with one exception: You must enter a
different PIN for each code, which means each
code requires an individual PIN.
• To open or close a certain garage door with the
radio code keypad, just enter the respective PIN
and then press the ENTER button.
Save more than 1 PIN for the same code:
Beside the already programmed PIN it is possible to
save up to 2 additional PIN's for the same code and
to assign these PIN's to different persons.
• Follow the instructions described under "Transmit
the code for the garage door control from one
transmitter to the radio code keypad" for every
single PIN. Repeat these steps for each PIN with
the same transmitter. So the same code is saved
under 3 different PIN's.
Save a temporary PIN:
A temporary PIN that is valid only for three actuations
can be saved.
• Hold "button 1" for 3 sec. until the LED flashes
quickly. Enter the currently valid PIN and then
press the ENTER button.
• Enter a temporary 4-digit PIN of your choice and
then press the ENTER button.
• The LED glows up for 2 sec. Then the keypad light
goes off. The radio code keypad is ready for
operation again.
• To use the radio code keypad with the latest
temporary PIN enter the 4-digit temporary PIN and
then press the ENTER button. You are allowed to
use this PIN three times and then it is automatically
cleared.
iverSender
P rstecker
Steckerbuchse
Cover
Keypad light
Socket
Programming plug
A
ctive
transmitter
Mounting holes
Screws
Lock
Coin
Wall bracket
W
all
p
lug
L
ED
2


