Page is loading ...

Operation 6080
ENGLISH
FAN
AUTO
ON
HEAT
COOL
OFF
AUTO
TARGET TEMP
HEAT
DAY
PM
HUMIDITY
MENU
PROG
HEAT
2STG
COOL
FAN

Statement of use: The 6080 can be used with millivolt, 24VAC, single
and 2 stage conventional systems, gas/oil/electric heat, 1 stage heat
pumps, 2 stage heat pumps, zoned hot water (2 or 3 wire), zoned
forced air, single and 2 stage cooling and hybrid systems.
Using a TOUCH SCREEN
Thermostat
Mode
PG 2
PG 1
Day
Time of day
Touch here
to change
from 12 to 24hr
clock display.
Time
Slot
Current Room
Temperature
Chirp
indicator
Target
Temperature
Humidity
Basic Screens
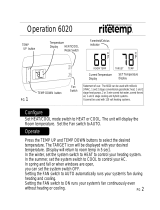
The MODE SWITCH of the 6080 must be in the HEAT or the COOL position to access all
control functions. The 6080 Thermostat has 4 basic screens - HOME, MENU, PROGRAM and
MANUAL. The HOME screen is displayed when unit is operating your system.
Touching the will always return you to this screen.
HOME screen
Operation 6080
Please take a moment to try out your
touch screen itself.
To test a simple function on the touch
screen, place your finger on the time
display and give a short firm push. Try a
"tap" of the finger or stylus. Your input
must last long enough for the system to
determine it is not an accidental 'bump'.
Using the stylus is more comfortable
for some users. Again allow the system
enough time to recognize your inputs.
When you are comfortable with touch
inputs, proceed.
FAN
AUTO
ON
HEAT
COOL
OFF
AUTO
TARGET TEMP
HEAT
TU
DAY
PM
HUMIDITY
MENU
PROG
HEAT
2STG
COOL
FAN
Menu
button
Program
button
+/- Temp
adjust
buttons
Mode
Switch
Fan
Switch
Day
Home
button
Time
of day
Humidity
Time
Slot
Current
Room
Temperature
Touch
Screen
Thermostat
Mode
Mode
Lights
Target
Temperature
TARGET TEMP
HEAT
DAY
PM
HUMIDITY
Mo

PG
3
PG
4
Displayed when the MENU button is pressed.
Displayed when the PROGRAM button is pressed.
MENU screen
PROGRAM screen
Set Day
Touch this area to set
the day of the week.
Set Time
Touch this area to set
the time of day.
Left arrow goes back,
right arrow goes forward.
Calibration control
Use this to calibrate
your LCD display
match to another
thermometer.
Set
o
C -
o
F
Touch this to set
temperature display.
Lock Program
Touch for 2 sec
to lock level1
[allows temporary
changes] and 5sec
more for level2
[full lock]
UV Bulb Timer set
Filter Timer set
Humidifier Pad
Timer set
Day Light
Savings Time
Remote Channel set
Chirp set
Touch this to turn the
audible chirp on or off.
Comfort setting
Use this to select
efficiency or comfort
Random Fan
Use this for additional
air circulation for better
indoor air quality
Set Time Slot
Touch this area to set
the Time Slot you
want to program.
Set Program Time
Touch this area to set the
time of day you want each
time period to start.
Left arrow goes back,
right arrow goes forward.
Copy
Touch this area to copy
current program to the
next day
Temp Up /
Temp Down arrows.
Touch these to raise
and lower each
Target Temp.
Program select
Touch and hold for
2 sec to cycle through
2, 4, 6 time slot programs.
[note: EPA Energy-Star
prog is not changable.]
Review
touch this area to auto cycle
through your program
Return HOME
When programming
is complete press
this to run
your program.
COPY
B
PROGRAM
HEAT
DAY
REVIEW
PM
Su
MENU
PROG
Set Program Day
Touch this area to
set the day of the
week you want to
program Target
Temps for.
COMFORT
NORM LXECON
H-PAD
FILTER
UV-BULB
PM
RANDOM
DST
CALIBRATE
Mo
HUMIDITY
MIN
MAX
CH 2

This Thermostat comes preprogrammed with an Energy-Star
TM
approved program. This program is recommended by the EPA for
energy efficiency.
We strongly recommend that you Auto-Run this program for one week, and see if it
works for you. If it does not fit your needs you can always input a custom program.
• To Auto-Run the Energy-StarTM program, select HEAT or COOL with the mode
switch. The unit is now running the Energy-StarTM program.
• The clock is displayed on the left. The ambient temperature is displayed in the the
center of the LCD touch screen. The TIME SLOT icon indicates the TIME SLOT active
in the Energy-StarTm program.
• The programmed temperature is shown on the lower right. For program details refer to
the Energy-Star
TM
program chart below.
PG 6
All Days 70
o
F 62
o
F 70
o
F 62
o
F
MORN
6:00am
HEAT
DAY
8:00am
EVEN
6:00pm
NITE
10:00pm
All Days 78
o
F 85
o
F 78
o
F 82
o
F
MORN
6:00am
COOL
DAY
8:00am
EVEN
6:00pm
NITE
10:00pm
Configure
Press MENU to configure the thermostat (from HOME screen).
Set day of the week -
Touch the Day of the week area to cycle through the days of
the week to select the current day.
Set time of day -
Touch the Time of Day arrows to move the time selection
forward or backward until it displays the current time. Touch
and hold for faster setting.
Set
o
C -
o
F
display
Touch the
o
F
and it will toggle to
o
C.
Set audible chirp -
Touch the the musical note icon to select the chirp or no chirp.
Return HOME by pressing the home button.
PG 5
ForwardBackward
The Mode Switch must be in
HEAT or COOL mode to configure.
EPA
Auto-run

Program
Program cont.
NOTE: 60 Second Rule-During programming, if a button is not
pushed in 60 seconds, the unit will return to the home screen.
Everything you have changed while programming will be saved.
PG
7
PG
8
Select Program you want set - B, C, D, or EPA
Prog B has 2 periods, C 4 periods, D 6 periods.
Select HEAT with the HEAT/Cool MODE switch.
Press PROG to go to the programming screen.
Select the day you want to program-
Touch the Day of the week area to cycle through
the days of the week to select the desired day.
Select the time slot you want to program -
Touch the Time slot area to cycle through the 4 time slots,
until it displays the desired time slot.
Select the time of day -
Touch the Time of Day arrows to move the time selection
forward or backward until it displays the desired time. Touch
and hold for faster time set.
ForwardBackward
Select the desired temperature -
Press the + temp / - temp buttons.
Repeat the above procedures for each day of the week and each time slot of the day as
desired.
To REVIEW your program touch REVIEW. Each time slot for each day or set of
identical days, will be displayed every 3 seconds.
Return HOME by pressing the home button.
To COPY the program from the current day to another day -
Touch COPY on the program screen. The current day will remain solid, the
destination day will flash.
Touch the day area to advance the day and select a copy destination.
Touch COPY again to copy all settings to the destination day.
To program for cooling -
Select COOL with the Heat/Cool MODE switch and repeat the above
procedure.
C
PROGRAM

Manual cont.
Manual
Temporary OVERRIDE -
• Press the + Temp / - Temp buttons to select your desired temporary Target
Temperature.
• Press HOME to return to operation.
The TEMPORARY icon will go on indicating you have modified the Target
Temp for the current Time Slot only (see PG7-Time Slot).
The 6080 has 2 manual override commands. These are accessed by
pressing the + Temp / - Temp buttons.
PG 9
PG 10
Target
Temperature
HOLD
Touch this area to set
a comfortable target
temp for the system
to hold until you return
and remove HOLD.
Return HOME
+ Temp / - Temp buttons
Touch these to raise and lower
the manual override Target Temp.
Manual Override indicator
Blinks TEMPORARY when
you have modified the Target.
This returns to the programed
target temp at the next time slot.
MANUAL override screen
HOLD -
• At the Manual override screen, Touch HOLD to initiate a hold temperature.
• Press the + Temp / - Temp buttons to select your hold temperature.
• Press HOME to return to operation.
The ON HOLD icon will flash indicating you have changed the Target Temp.
The system will HOLD this temperature until you return to this screen
and de-select HOLD, by touching the HOLD icon again.
The Mode Switch must be in
HEAT or COOL mode to override.
TEMPORARY
HEAT
MENU
PROG

Special Features
Spec. Featr. cont.
Comfort Level
There are three COMFORT level selections ECON, NORM , and LX. We recommend
the NORM for most areas, LX for severely cold areas (particularly with heat
pumps) and ECON for warm climates (uses less energy).
To change the setting, with the MODE switch in heat or cool, press the
MENU button. The touch COMFORT level you want unitl it is
selected.
Filter
The 6080 has a feature that keeps track of actual furnace run time and
reminds you to periodically replace your systems air FILTER.
Press MENU and touch the FILTER icon.This will display your filter run-time to
date in weeks. To zero the FILTER timer for a new FILTER, touch the run-time
time display. To input a new FILTER life time, touch the FILTER icon for 3
seconds. Input the life time in weeks for your new FILTER to activate a
reminder (FILTER icon on home screen).
To leave the FILTER display, touch the HOME button.
Lock
Allows you to to prevent any changes in custom settings.
To Lock Level1, touch the LOCK icon on the MENU screen for 2 sec.
Level1 allows temporary target adjustments but no program changes
To Lock Level2, touch LOCK icon for 2 sec. Level2 allows no changes.
To unlock, Touch the locked icon for 2 sec.
Low Battery
When the batteries are low, the battery icon will flash.
The two AA Batteries in the unit need to be replaced. In some installations your
heater system will stop functioning when the thermostat loses power. Replace
batteries as soon as you see this warning. The thermostat programs will remain
for 60 seconds while the batteries are changed.
Do not take longer than 30 sec to change the batteries in your unit or you will
lose all custom settings and all programming. Only the Energy-Star
TM
program will
remain. Once the batteries are replaced, the system will return to normal in 2
seconds.
12/24 hour
The thermostat can display time in 12 or 24 hour formats.
At the HOME screen touch the time to toggle from 12 to 24 hr display.
PG
11
PG
12
LIMIT WKS
COMFORT
NORM

Spec. Featr. cont.
UV BULB
P 13
P 14
If you have a heat pump with Auxiliary heat, the new sequential staging will give you faster
recovery from set backs. The thermostat can be configured for Electric aux or gas/oil aux heat
(see installation). If the heat pump cannot maintain your desired room temperature, the new
system allows the Aux heat to help maintain your heat all the way to your desired room
temperature.
When using a heat pump with Auxiliary heat, if the heat pump is not working, you can shut off the
heat pump and use just your auxiliary heat; assuming the 6080 is set up for a heat pump (see
installation jumper set up for heat pump). While at HOME screen, push the MENU button. The
ON HEAT PUMP icon will be shown (bottom of screen). Touch the HEAT PUMP ICON and it will
change to HEAT PUMP OFF. Then push HOME. Auxiliary heat is more expensive than the heat
pump, so turn the heat pump back on as soon as possible.
Heat Pump Features
The 6080 allows you to keep track of the actual humidifeir run time of your humidifier
pad and can remind you to periodically replace your H-PAD.
Press MENU and touch H-PAD icon. This will display your accumulated humidifier
running time in weeks. To zero the H-PAD timer for a new bulb, touch the accumulated
time display. To input a new H-PAD life time, touch the H-PAD icon for 3 seconds.
Input the life time in weeks for your new H-PAD to activate a reminder (H-PAD icon on
home screen).
To leave the H-PAD display, touch the HOME button.
The 6080 allows you to keep track of the actual real time of your Ultra Violet air purifier
and can remind you to periodically replace your UV-BULB.
Press MENU and touch UV-BULB icon.
This will display your accumulated bulb running time in weeks. To zero the UV-BULB
timer for a new bulb, touch the accumulated time display. To input a new UV-BULB life
time, touch the UV-BULB icon for 3 seconds. Input the life time in weeks for your new
UV-BULB to activate a reminder (UV-BULB icon on home screen)
To leave the UV-BULB display, touch the HOME button.
H-PAD

The 6080 can automatically switch from HEAT to COOL. In addition to COOL and HEAT
modes, the 6080 TRUE AUTO mode switches automatically between heat and cool. Auto
switching is normally limited in two ways. The COOL target cannot be any closer than 2F
or 3F above the heat target, and the COOL programmed times must be the same as the
HEAT programmed times. Unlike all other manufactures, the 6080 TRUE AUTO has no
such temperature or time limitations (Patent pending).
Note: The remote control cannot work unless the C wire is
connected from your HVAC (see installation guide)
The 6080 comes with a 3 channel remote control with a range of as
much as 50 feet (walls may reduce this range). If there is interference
with the remote, or you are using more than one 6080, you can select a
different channel on the remote. The thermostat's receive channel must
then be changed to match that channel by pushing the MENU button
and then touching the channel icon at the top right side of the screen.
Each time you touch it, it toggles to the next channel.
To use the remote, press up or down, there will be a delay, and then
the thermostats target temperature will temporally change one degree per
push of the remote. If you wish to restore the target to its program setting,
press the RESET button on the remote. If you do not use the RESET
button, your change will stay until the next programmed period and go
back to the programmed target.
To activate the remote pull out the plastic tab on the back to connect
its battery (Battery Type A23 (MN21) 12V).
REMOTE CONTROL
TRUE AUTO MODE
Spec. Featr. cont.
P 15
P 16
The RANDOM FAN function allows your fan to circulate air for at least 5 minutes per
hour for better indoor air quality.
To turn it on or off, touch the MENU button, and touch the RANDOM FAN icon: the ON
icon will come be displayed, touch again to turn it off. When the thermostat is controlling
the fan, the fan icon will indicate it is running.
RANDOM FAN
+
-
CHANNEL
1 2 3
Channel selector
Battery install

P 18
The 6080 has a built in humidistat to control an external humidifier for humidifying. To
set a minimum humidity level (with a humidifier installed) from the HOME screen, touch
the MENU button then touch the HUMIDITY icon. Touch MIN and use the +/- buttons
to set the desired minimum humidity level. The 6080 can be set up to run the humidifier
whenever the humidistat calls for humidity (fan also runs) or can be set to run only
when the humidistat is calling for humidity and the heat is also running. (Refer
installation instruction humidistat).
De-humidifying
The 6080's built in humidistat can also control the Air Conditioner for de-humidifying.
To set a maximum humidity level (using the air conditioner) from the HOME screen,
touch the MENU button then touch the HUMIDITY icon. Touch MAX and use the +/-
buttons to set the desired maximum humidity level. The 6080 can be set up to run the
air conditioner whenever the humidistat calls to de-humidify or can be set to run the air
conditioner only when the humidistat calls to de-humidify and the thermostat is also
calling for COOL. (Refer installation instruction Humidistat).
HUMIDISTAT
Spec. Featr. cont.
P 17
Remote Control frequency 312MHZ
This device complies with Part 15 of the FCC Rules. Operation is subject to the follow
two conditions: (1) This device may not casue harmful interference, and (2) This device must
accept any interference received, including interference that may cause undesired operation.
Warning: Changes or modifications to this unit not expressly approved by the party
responsible for compliance could void the user`s authority to operate the equipment.
This equipment has been tested and found to comply with the limits for a Class B digital
device, pursuant to Part 15 of the FCC Rules. These limits are designed to provide reasonable
protection against harmful interference in a residential installation. This equipment
generates,uses and can radiate radio frequency energy and, if not installed and used in
accordance with the instructions,may cause harmful interference to radio communications.
However, this is no guarantee that interference will not occur in a particular installation. If this
equipment does cause harmful interference to radio or televsion reception, which can be
determined by turning the equipment off and on, the user is encouraged to try to correct the
interference by one or more of the following measures:
- Reorient or relocate the receiving antenna.
- Increase the separation between the equipment and receiver.
- Connect the equipment into an outlet on a circuit different from that to which the receiver is
connected.
- Consult the dealer or an experienced radio/TV technician for help.

NOTE: Your thermostat comes from the factory calibrated to + or - 1
o
F actual
temperature. It is an accurate instrument. If you want your thermostat to display the
same temperature as another thermometer in your home, you can adjust it. Maximum
calibration is +/-6
o
.
To change the calibration:
Press the MENU button nad
touch CALIBRATE.
Press the Temp+/- buttons to
adjust the temperature reading.
CALIBRATE ON will appear on
the MENU screen.
Press HOME to save the new
setting.
Calibration
Calibrate controls
P 20
This thermostat can be used with all millivolt and 24VAC heating and cooling systems. It
cannot be used with line voltage systems. This thermostat is digital and your desired heat or
cool temperatures can be easily be set on the large touch screen with the UP/DOWN arrows.
A minimum 4 minute off time protects heating and cooling systems from damage.
When using a heat pump with Auxiliary heat, if the heat pump is not working, you can shut
off the heat pump and use just your auxiliary heat; assuming
the 6080 is set up for a heat pump (see installation jumper
set up for heat pump). While at HOME screen, push the
MENU button. The ON HEAT PUMP icon will be shown
(bottom of screen). Touch the HEAT PUMP ICON and it
will change to HEAT PUMP OFF. Then push HOME.
Auxiliary heat is more expensive than the heat pump, so
turn the heat pump back on as soon as possible.
6080 Features
TARGET TEMP
HEAT
DAY
PM
HUMIDITY
MENU
PROG
FAN
AUTO
ON
HEAT
COOL
OFF
AUTO
HEAT
2STG
COOL
FAN
P 19

1611-029
Printed in China
Customer Support: 877-505-2353 or
Visit our website www.ritetemp-thermostats.com
FAN
AUTO
ON
HEAT
COOL
OFF
AUTO
TARGET TEMP
HEAT
DAY
PM
HUMIDITY
MENU
PROG
HEAT
2STG
COOL
FAN
/