Trendnet TEW-435BRM User guide

Category
WLAN access points
Type
User guide
i
ii
Table of Contents
CHAPTER 1 INTRODUCTION.............................................................................................1
TEW-435BRM Features...................................................................................................1
Package Contents..............................................................................................................3
Physical Details..................................................................................................................4
CHAPTER 2 INSTALLATION...............................................................................................6
Requirements.....................................................................................................................6
Procedure...........................................................................................................................6
CHAPTER 3 SETUP................................................................................................................8
Overview ............................................................................................................................8
Configuration Program ....................................................................................................9
Setup Wizard...................................................................................................................10
Home Screen....................................................................................................................12
LAN Screen......................................................................................................................13
Wireless Screen................................................................................................................15
Wireless Security.............................................................................................................17
Trusted Wireless Stations...............................................................................................19
Password Screen..............................................................................................................21
Mode Screen ....................................................................................................................22
CHAPTER 4 PC CONFIGURATION..................................................................................23
Overview ..........................................................................................................................23
Windows Clients..............................................................................................................23
Macintosh Clients............................................................................................................34
Linux Clients....................................................................................................................34
Other Unix Systems.........................................................................................................34
Wireless Station Configuration......................................................................................35
Wireless Configuration on Windows XP.......................................................................35
CHAPTER 5 OPERATION AND STATUS.........................................................................44
Operation - Router Mode...............................................................................................44
Status Screen....................................................................................................................44
Connection Status - PPPoE & PPPoA...........................................................................46
Connection Details - Dynamic IP Address....................................................................47
Connection Status - Fixed IP Address...........................................................................49
CHAPTER 6 ADVANCED FEATURES..............................................................................50
Overview ..........................................................................................................................50
Internet.............................................................................................................................50
Dynamic DNS (Domain Name Server)..........................................................................54
Firewall Rules..................................................................................................................56
User-defined Services......................................................................................................61
Options.............................................................................................................................63
Schedule ...........................................................................................................................64
Virtual Servers ................................................................................................................66
CHAPTER 7 ADVANCED ADMINISTRATION...............................................................68
Overview ..........................................................................................................................68
PC Database.....................................................................................................................69
Config File........................................................................................................................73
Logs...................................................................................................................................74
E-mail...............................................................................................................................76
Diagnostics.......................................................................................................................78
Remote Administration...................................................................................................79
Routing.............................................................................................................................81
Upgrade Firmware..........................................................................................................85
iii
CHAPTER 8 MODEM MODE..............................................................................................86
Overview ..........................................................................................................................86
Management Connections..............................................................................................86
Home Screen....................................................................................................................87
ADSL Screen....................................................................................................................88
Operation.........................................................................................................................88
Status Screen....................................................................................................................89
APPENDIX A TROUBLESHOOTING................................................................................91
Overview ..........................................................................................................................91
General Problems............................................................................................................91
Internet Access ................................................................................................................91
Wireless Access................................................................................................................92
APPENDIX B ABOUT WIRELESS LANS..........................................................................93
Modes ...............................................................................................................................93
BSS/ESS............................................................................................................................93
Channels...........................................................................................................................94
WEP..................................................................................................................................94
WPA-PSK ........................................................................................................................94
Wireless LAN Configuration..........................................................................................95
APPENDIX C SPECIFICATIONS.......................................................................................96
Multi-Function TEW-435BRM......................................................................................96
Wireless Interface............................................................................................................96
Regulatory Approvals.....................................................................................................97
P/N: 9560PC0037
Copyright © 2005. All Rights Reserved.
Document Version: 2.9
All trademarks and trade names are the properties of their respective owners.
1
Chapter 1
Introduction
This Chapter provides an overview of the TEW-435BRM's features and
capabilities.
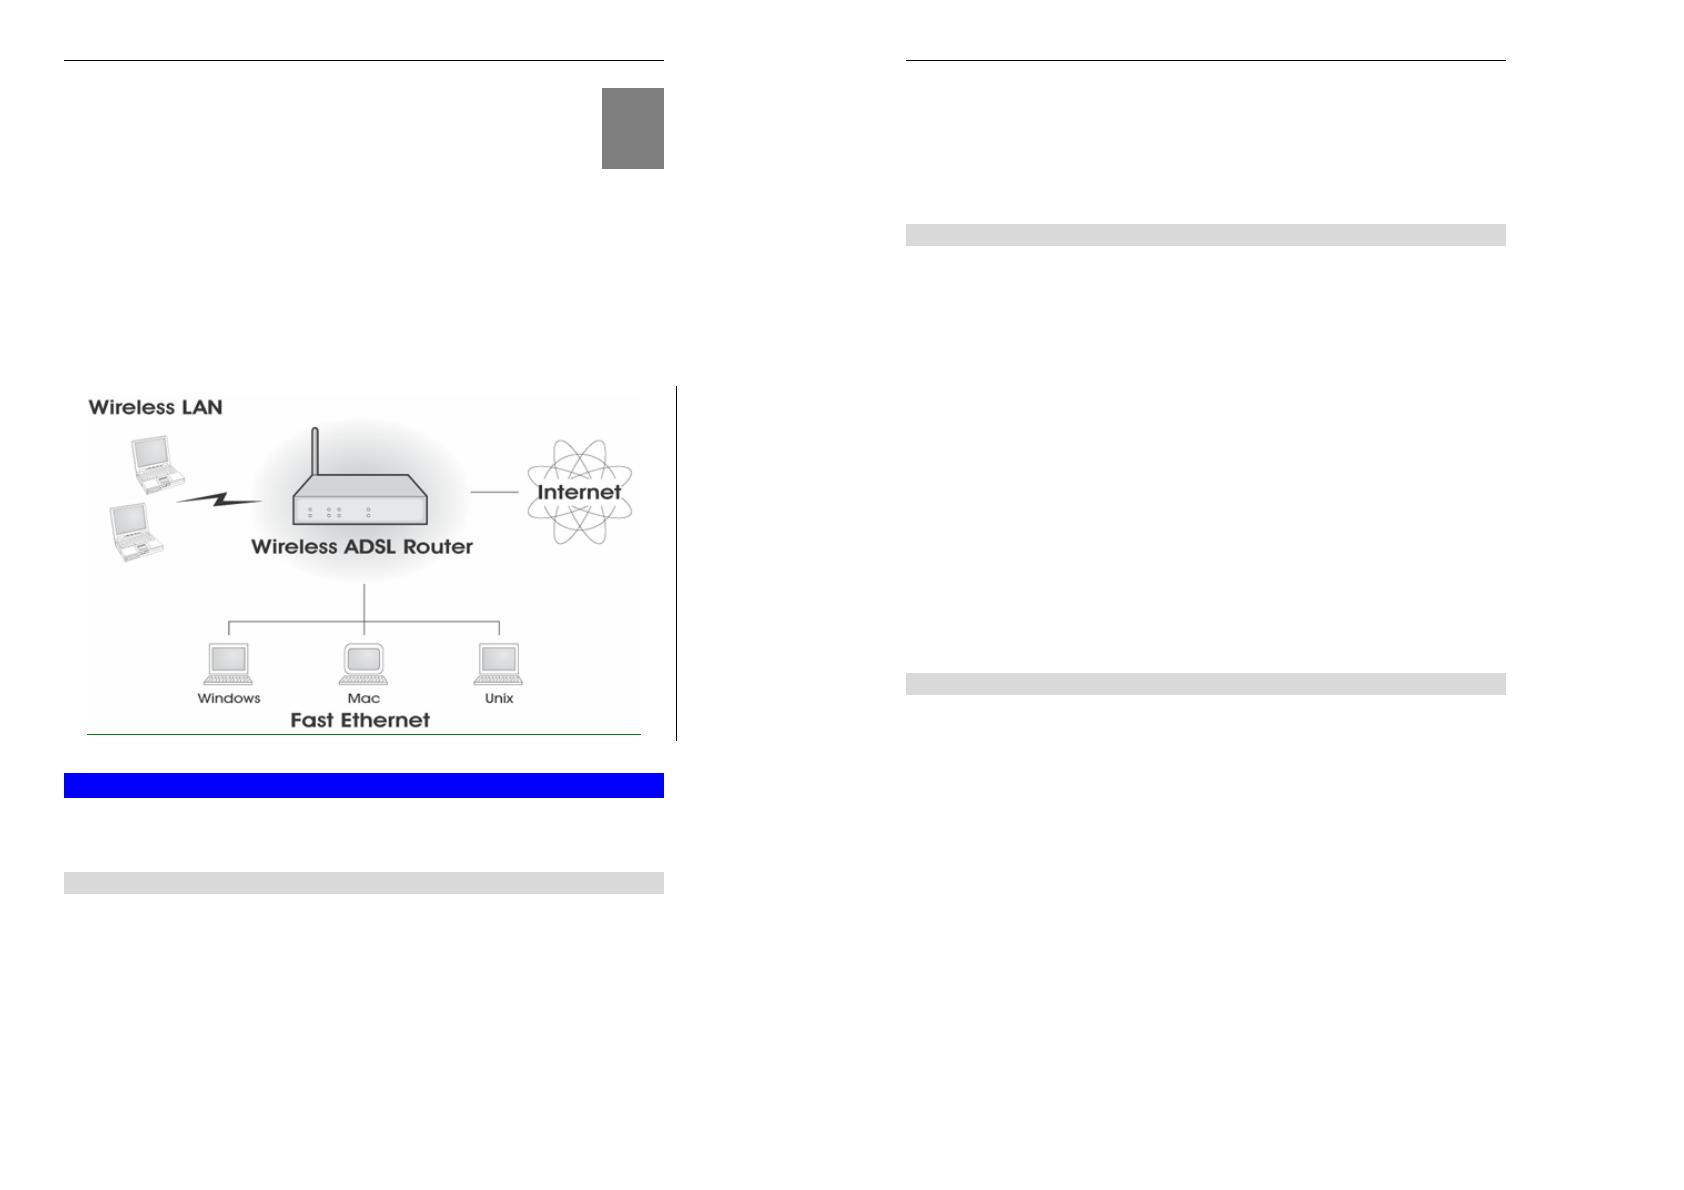
Congratulations on the purchase of your new TEW-435BRM. The TEW-435BRM is a multi-
function device providing the following services:
ADSL Modem.
Shared Broadband Internet Access for all LAN users.
Wireless Access Point for 802.11b and 802.11g Wireless Stations.
4-Port Switching Hub for 10BaseT or 100BaseT connections.
Figure 1: TEW-435BRM
TEW-435BRM Features
The TEW-435BRM incorporates many advanced features, carefully designed to provide
sophisticated functions while being easy to use.
Internet Access Features
Shared Internet Access. All users on the LAN or WLAN can access the Internet
through the TEW-435BRM, using only a single external IP Address. The local (invalid)
IP Addresses are hidden from external sources. This process is called NAT (Network
Address Translation).
Built-in ADSL Modem. The TEW-435BRM has a built-in ADSL modem, supporting
all common ADSL connections.
IPoA, PPPoE, PPPoA, Direct Connection Support. The TEW-435BRM supports
all common connection methods.
1
Wireless ADSL Router User Guide
2
Auto-detection of Internet Connection Method. In mode situations, the TEW-
435BRM can test your ADSL and Internet connection to determine the connection
method used by your ISP.
Fixed or Dynamic IP Address. On the Internet (WAN port) connection, the TEW-
435BRM supports both Dynamic IP Address (IP Address is allocated on connection) and
Fixed IP Address.
Advanced Internet Functions
Application Level Gateways (ALGs). Applications which use non-standard
connections or port numbers are normally blocked by the Firewall. The ability to define
and allow such applications is provided, to enable such applications to be used normally.
Special Applications. This feature, also called Port Triggering, allows you to use
Internet applications which normally do not function when used behind a firewall.
Virtual Servers. This feature allows Internet users to access Internet servers on your
LAN. The required setup is quick and easy.
Dynamic DNS Support. DDNS, when used with the Virtual Servers feature, allows
users to connect to Servers on your LAN using a Domain Name, even if you have a
dynamic IP address which changes every time you connect.
URL Filter. Use the URL Filter to block access to undesirable Web sites by LAN users.
Firewall. As well as the built-in firewall to protect your LAN, you can define Firewall
Rules to determine which incoming and outgoing traffic should be permitted.
Scheduling. Both the URL Filter and Firewall rules can be scheduled to operate only at
certain times. This provides great flexibility in controlling Internet -bound traffic.
Logs. Define what data is recorded in the Logs, and optionally send log data to a Syslog
Server. Log data can also be E-mailed to you.
VPN Pass through Support. PCs with VPN (Virtual Private Networking) software
using PPTP, L2TP and IPSec are transparently supported - no configuration is required.
Wireless Features
Standards Compliant. The TEW-435BRM complies with the IEEE802.11g (DSSS)
specifications for Wireless LANs.
Supports both 802.11b and 802.11g Wireless Stations. The 802.11g standard
provides for backward compatibility with the 802.11b standard, so both 802.11b and
802.11g Wireless stations can be used simultaneously.
Speeds to 54Mbps. All speeds up to the 802.11g maximum of 54Mbps are supported.
WEP support. Support for WEP (Wired Equivalent Privacy) is included. Key sizes of
64 Bit and 128 Bit are supported. WEP encrypts any data before transmission, providing
protection against snoopers.
WPA-PSK support. Like WEP, WPA-PSK encrypts any data before transmission,
providing protection against snoopers. The WPA-PSK is a later standard than WEP, and
provides both easier configuration and greater security than WEP.
Wireless MAC Access Control. The Wireless Access Control feature can check the
MAC address (hardware address) of Wireless stations to ensure that only trusted Wireless
Stations can access your LAN.
Simple Configuration. If the default settings are unsuitable, they can be changed
quickly and easily.
Introduction
3
LAN Features
4-Port Switching Hub. The TEW-435BRM incorporates a 4-port 10/100BaseT
switching hub, making it easy to create or extend your LAN.
DHCP Server Support. Dynamic Host Configuration Protocol provides a dynamic IP
address to PCs and other devices upon request. The TEW-435BRM can act as a DHCP
Server for devices on your local LAN and WLAN.
Configuration & Management
Easy Setup. Use your WEB browser from anywhere on the LAN or WLAN for
configuration.
Configuration File Upload/Download. Save (download) the configuration data from
the TEW-435BRM to your PC, and restore (upload) a previously-saved configuration file
to the TEW-435BRM.
Remote Management. The TEW-435BRM can be managed from any PC on your LAN
or Wireless LAN. And, if the Internet connection exists, it can also (optionally) be
configured via the Internet.
Network Diagnostics. You can use the TEW-435BRM to perform a Ping or DNS
lookup.
Security Features
Password - protected Configuration. Password protection is provided to prevent
unauthorized users from modifying the configuration data and settings.
Wireless LAN Security. WPA-PSK, WEP and Wireless access control by MAC
address are all supported. The MAC-level access control feature can be used to prevent
unknown wireless stations from accessing your LAN.
NAT Protection. An intrinsic side effect of NAT (Network Address Translation)
technology is that by allowing all LAN users to share a single IP address, the location and
even the existence of each PC is hidden. From the external viewpoint, there is no network,
only a single device - the TEW-435BRM.
Firewall. All incoming data packets are monitored and all incoming server requests are
filtered, thus protecting your network from malicious attacks from external sources.
Protection against DoS attacks. DoS (Denial of Service) attacks can flood your
Internet connection with invalid packets and connection requests, using so much
bandwidth and so many resources that Internet access becomes unavailable. The TEW-
435BRM incorporates protection against DoS attacks.
Package Contents
The following items should be included. If any of these items are damaged or missing, please
contact your dealer immediately.
The TEW-435BRM Unit
1 Cat-5 Ethernet (LAN) cable
1 RJ-11 (ADSL) cable
1 RJ-11 to RJ45 cable (Germany only)
Power Adapter
Quick Installation Guide
CD-ROM containing the on-line manual.
Wireless ADSL Router User Guide
4
Physical Details
Front-mounted LEDs
Figure 2: Front Panel
Power LED
(Green)
On - Power on.
Off - No power.
Status LED
(Yellow)
Off - Normal operation.
Blinking - This LED blinks during start up, and during a Firmware Up-
grade.
LAN
For each port, there are 2 LEDs, to indicate the connection speed
(10BaseT or 100BaseT) of each port.
100BT - This will be ON if the LAN connection is using 100BaseT,
and Blinking if data is being transferred via the corresponding LAN
port.
10BT - This will be ON if the LAN connection is using 10BaseT, and
Blinking if data is being transferred via the corresponding LAN port.
If neither LED is on, there is no active connection on the correspond-
ing LAN port.
WLAN LED On - Wireless enabled.
Off - No Wireless connections currently exist.
Flashing - Data is being transmitted or received via the Wireless access
point. This includes "network traffic" as well as user data.
WAN On - ADSL connection established. (This is a low-level connection, it
does not mean Internet access is available.)
Off - No ADSL connection currently exists.
Flashing - Data is being transmitted or received via the ADSL connec-
tion.
Internet On - Internet connection is available.
Off - No Internet connection available.
Flashing - Data is being transmitted or received via the ADSL connec-
tion.
Introduction
5
Rear Panel
Figure 3: Rear Panel
Reset Button
(Reset to Defaults)
This button will reset the TEW-435BRM to the factory default
settings.
To do this, press and hold the Reset Button for five (5) seconds, until
the Status LED is lit, then release the Reset Button, and wait the
TEW-435BRM to restart using the factory default values.
Power port
Connect the supplied power adapter here.
Power switch
Press IN for power ON, OUT for power OFF.
10/100BaseT
LAN connections
Use standard LAN cables (RJ45 connectors) to connect your PCs to
these ports.
Note:
Any LAN port on the TEW-435BRM will automatically function as
an "Uplink" port when required. Just connect any port to a normal
port on the other hub, using a standard LAN cable.
WAN port
(ADSL port)
Connect this port to your ADSL line.
6
Chapter 2
Installation
This Chapter covers the physical installation of the TEW-435BRM.
Requirements
Network cables. Use standard 10/100BaseT network (UTP) cables with RJ45 connectors.
TCP/IP protocol must be installed on all PCs.
For Internet Access, an Internet Access account with an ISP, and a DSL connection.
To use the Wireless Access Point, all Wireless devices must be compliant with the IEEE
802.11g or IEEE 802.11b specifications.
Procedure
Figure 4: Installation Diagram
1. Choose an Installation Site
Select a suitable place on the network to install the TEW-435BRM.
For best Wireless reception and performance, the TEW-
435BRM should be positioned in a central location with
minimum obstructions between the TEW-435BRM and the
PCs.
Also, if using multiple Access Points, adjacent Access
Points should use different Channels.
2
Installation
7
2. Connect LAN Cables
Use standard LAN cables to connect PCs to the Switching Hub ports on the TEW-
435BRM. Both 10BaseT and 100BaseT connections can be used simultaneously.
If required, connect any port to a normal port on another Hub, using a standard LAN cable.
Any LAN port on the TEW-435BRM will automatically function as an "Uplink" port
when required.
3. Connect ADSL Cable
Connect the supplied ADSL cable from to the WAN port on the TEW-435BRM (the RJ11
connector) to the ADSL terminator provided by your phone company.
4. Power Up
Connect the supplied power adapter to the TEW-435BRM. Use only the power adapter
provided. Using a different one may cause hardware damage.
Power up by pressing the rear-mounted power switch IN. ( IN is ON, OUT is OFF )
5. Check the LEDs
The Power LED should be ON.
The Status LED should flash, then turn Off. If it stays on or blinking after 60 seconds,
there is a hardware error.
For each LAN (PC) connection, one of the LAN LEDs should be ON (provided the PC is
also ON.)
The WLAN LED should be ON.
The WAN LED should be ON if ADSL line is connected.
The Internet LED may be OFF. After configuration, it should come ON.
For more information, refer to Front-mounted LEDs in Chapter 1.
8
Chapter 3
Setup
This Chapter provides Setup details of the TEW-435BRM.
Overview
This chapter describes the setup procedure for:
Internet Access
LAN configuration
Wireless setup
Assigning a Password to protect the configuration data.
PCs on your local LAN may also require configuration. For details, see Chapter 4 - PC
Configuration.
Other configuration may also be required, depending on which features and functions of the
TEW-435BRM you wish to use. Use the table below to locate detailed instructions for the
required functions.
To Do this: Refer to:
Configure PCs on your LAN. Chapter 4:
PC Configuration
Check TEW-435BRM operation and Status. Chapter 5:
Operation and Status
Use any of the following Advanced features:
Internet
Dynamic DNS
Firewall Rules
Firewall Servies
Schedule
Virtual Servers
Chapter 6:
Advanced Features
Use any of the following Administration Configuration
settings or features:
PC Database
Config File
Logging
E-mail
Diagnostics
Remote Admin
Routing
Upgrade Firmware
Chapter 7
Advanced Administration
3
Setup
9
Configuration Program
The TEW-435BRM contains an HTTP server. This enables you to connect to it, and configure
it, using your Web Browser. Your Browser must support JavaScript.
The configuration program has been tested on the following browsers:
Netscape 7.1 or later
Internet Explorer V5.5 or later
Preparation
Before attempting to configure the TEW-435BRM, please ensure that:
Your PC can establish a physical connection to the TEW-435BRM. The PC and the TEW-
435BRM must be directly connected (using the Hub ports on the TEW-435BRM) or on
the same LAN segment.
The TEW-435BRM must be installed and powered ON.
If the TEW-435BRM's default IP Address (192.168.0.1) is already used by another device,
the other device must be turned OFF until the TEW-435BRM is allocated a new IP
Address during configuration.
Using your Web Browser
To establish a connection from your PC to the TEW-435BRM:
1. After installing the TEW-435BRM in your LAN, start your PC. If your PC is already
running, restart it.
2. Start your WEB browser.
3. In the Address box, enter "HTTP://" and the IP Address of the TEW-435BRM, as in this
example, which uses the TEW-435BRM's default IP Address:
HTTP://192.168.0.1
4. When prompted for the User name and Password, enter values as follows:
User name admin
Password password
Wireless ADSL Router User Guide
10
If you can't connect
If the TEW-435BRM does not respond, check the following:
The TEW-435BRM is properly installed, LAN connection is OK, and it is
powered ON. You can test the connection by using the "Ping" command:
Open the MS-DOS window or command prompt window.
Enter the command:
ping 192.168.0.1
If no response is received, either the connection is not working, or your
PC's IP address is not compatible with the TEW-435BRM's IP Address.
(See next item.)
If your PC is using a fixed IP Address, its IP Address must be within the range
192.168.0.2 to 192.168.0.254 to be compatible with the TEW-435BRM's
default IP Address of 192.168.0.1. Also, the Network Mask must be set to
255.255.255.0. See Chapter 4 - PC Configuration for details on checking your
PC's TCP/IP settings.
Ensure that your PC and the TEW-435BRM are on the same network segment.
(If you don't have a router, this must be the case.)
Ensure you are using the wired LAN interface. The Wireless interface can
only be used if its configuration matches your PC's wireless settings.
Setup Wizard
The first time you connect to the TEW-435BRM, you should run the Setup Wizard by clicking
the Setup Wizard link on the main menu.
1. Step through the Wizard until finished.
You need the data supplied by your ISP. Most connection methods require some data
input.
The common connection types are explained in the following table.
2. On the final screen of the Wizard, run the test and check that an Internet connection can
be established. Also, the Internet LED on the front panel should be now be ON.
3. If the connection test fails:
Check all connections.
Check that you have entered all data correctly.
Setup
11
Common Connection Types
Type Details ISP Data required
Dynamic
IP Address
Your IP Address is allocated
automatically, when you connect
to you ISP.
a) ADSL parameters (VPI and
VCI) may be required, if they
cannot be detected automatically.
b) Some ISP's may require you to
use a particular Hostname or
Domain name, or MAC
(physical) address.
Static (Fixed)
IP Address
Your ISP allocates a permanent
IP Address to you.
Usually, the connection is
"Always on".
a) ADSL parameters (VPI and
VCI) may be required, if they
cannot be detected automatically.
b) IP Address allocated to you,
and related information, such as
Network Mask, Gateway IP
address, and DNS address.
PPPoE, PPPoA You connect to the ISP only
when required. The IP address is
usually allocated automatically.
a) ADSL parameters (VPI and
VCI) may be required, if they
cannot be detected automatically.
b) User name and password are
always required.
c) If using a Static (Fixed) IP
address, you need the IP address
and related information (Network
Mask, Gateway IP address, and
DNS address)
IPoA
(IP over ATM)
Normally, the connection is
"Always on".
a) ADSL parameters (VPI and
VCI) may be required, if they
cannot be detected automatically.
b) IP Address allocated to you,
and related information, such as
Network Mask, Gateway IP
address, and DNS address.
Wireless ADSL Router User Guide
12
Home Screen
After finishing the Setup Wizard, you will see the Home screen. When you connect in future,
you will see this screen when you connect. An example screen is shown below.
Figure 5: Home Screen
Main Menu
The main menu, on the left, contains links to the most-commonly used screen. To see the links
to the other available screens, click "Advanced" or "Administration".
The main menu also contains two (2) buttons:
Log Out - When finished, you should click this button to logout.
Restart - Use this if you wish to restart the TEW-435BRM. Note that restarting the
Router will break any existing connections to or through the Router.
Navigation & Data Input
Use the menu bar on the left of the screen, and the "Back" button on your Browser, for
navigation.
Changing to another screen without clicking "Save" does NOT save any changes you may
have made. You must "Save" before changing screens or your data will be ignored.
On each screen, clicking the "Help" button will
display help for that screen.
Setup
13
LAN Screen
Use the LAN link on the main menu to reach the LAN screen. An example screen is shown
below.
Figure 6: LAN Screen
Data - LAN Screen
TCP/IP
IP Address
IP address for the TEW-435BRM, as seen from the local LAN. Use
the default value unless the address is already in use or your LAN is
using a different IP address range. In the latter case, enter an unused IP
Address from within the range used by your LAN.
Subnet Mask
The default value 255.255.255.0 is standard for small (class "C")
networks. For other networks, use the Subnet Mask for the LAN
segment to which the TEW-435BRM is attached (the same value as
the PCs on that LAN segment).
DHCP Server
If Enabled, the TEW-435BRM will allocate IP Addresses to PCs
(DHCP clients) on your LAN when they start up. The default (and
recommended) value is Enabled.
If you are already using a DHCP Server, this setting must be
Disabled, and the existing DHCP server must be re-configured to
treat the TEW-435BRM as the default Gateway. See the following
section for further details.
The Start IP Address and Finish IP Address fields set the values
used by the DHCP server when allocating IP Addresses to DHCP
clients. This range also determines the number of DHCP clients
supported.
See the following section for further details on using DHCP.
DHCP
What DHCP Does
A DHCP (Dynamic Host Configuration Protocol) Server allocates a valid IP address to a
DHCP Client (PC or device) upon request.
The client request is made when the client device starts up (boots).
Wireless ADSL Router User Guide
14
The DHCP Server provides the Gateway and DNS addresses to the client, as well as
allocating an IP Address.
The TEW-435BRM can act as a DHCP server.
Windows 95/98/ME and other non-Server versions of Windows will act as a DHCP client.
This is the default Windows setting for the TCP/IP network protocol. However, Windows
uses the term Obtain an IP Address automatically instead of "DHCP Client".
You must NOT have two (2) or more DHCP Servers on the same LAN segment. (If your
LAN does not have other Routers, this means there must only be one (1) DHCP Server on
your LAN.)
Using the TEW-435BRM's DHCP Server
This is the default setting. The DHCP Server settings are on the LAN screen. On this screen,
you can:
Enable or Disable the TEW-435BRM's DHCP Server function.
Set the range of IP Addresses allocated to PCs by the DHCP Server function.
You can assign Fixed IP Addresses to some devices
while using DHCP, provided that the Fixed IP Addresses
are NOT within the range used by the DHCP Server.
Using another DHCP Server
You can only use one (1) DHCP Server per LAN segment. If you wish to use another DHCP
Server, rather than the TEW-435BRM's, the following procedure is required.
Disable the DHCP Server feature in the TEW-435BRM. This setting is on the LAN screen.
Configure the DHCP Server to provide the TEW-435BRM's IP Address as the Default
Gateway.
To Configure your PCs to use DHCP
This is the default setting for TCP/IP for all non-Server versions of Windows.
See Chapter 4 - Client Configuration for the procedure to check these settings.
Setup
15
Wireless Screen
The TEW-435BRM's settings must match the other Wireless stations.
Note that the TEW-435BRM will automatically accept both 802.11b and 802.11g connections,
and no configuration is required for this feature.
To change the TEW-435BRM's default settings for the Wireless Access Point feature, use the
Wireless link on the main menu to reach the Wireless screen. An example screen is shown
below.
Figure 7: Wireless Screen
Data - Wireless Screen
Identification
Region
Select the correct domain for your location. It is your responsibility to
ensure:
That the TEW-435BRM is only used in domains for which is
licensed.
That you select the correct domain, so that only the legal channels
for that domain can be selected.
Station name
This is the same as the "Device Name" for the TEW-435BRM.
SSID
(ESSID)
If using an ESS (Extended Service Set, with multiple access
points) this ID is called an ESSID (Extended Service Set
Identifier).
To communicate, all Wireless stations should use the same
SSID/ESSID.
Wireless ADSL Router User Guide
16
Options
802.11 Mode
Select the desired mode:
802.11g & 802.11b - Both 802.11.g and 802.11b Wireless stations
will be able to use the TEW-435BRM.
802.11g only - Only 802.11g Wireless stations can use the TEW-
435BRM.
802.11b only - Only 802.11b connections are available. 802.11g
Wireless Stations will only be able to use the TEW-435BRM if
they are fully backward-compatible with the 802.11b standard.
Channel No.
Select the Channel you wish to use on your Wireless LAN.
If you experience interference (shown by lost connections and/or
slow data transfers) you may need to experiment with different
channels to see which is the best.
If using multiple Access Points, adjacent Access Points should use
different Channels to reduce interference.
Broadcast SSID
If enabled, the TEW-435BRM will broadcast its SSID. This allows
PCs and other wireless stations to detect this Access Point and use the
correct SSID.
If disabled, PC users will have to manually enter the SSID and other
details of the wireless interface before they can connect to this Access
Point.
Wireless Security
Current Settings
The current Wireless security is displayed. The default value is
disabled.
Configure
Button
Click this button to access the Wireless security sub-screen, and view
or change the settings. See the following section for details.
Access Point
Enable Wireless
Access Point
Enable this if you want to use Wireless Access Point function. If
disabled, no Wireless stations can use the Access Point function, and
all connections must be make via the wired LAN.
Allow access
by …
Use this feature to determine which Wireless stations can use the
Access Point. The options are:
All Wireless Stations - All wireless stations can use the access
point, provided they have the correct SSID and security settings.
Trusted Wireless stations only - Only wireless stations you
designate as "Trusted" can use the Access Point, even if they have
the correct SSID and security settings.
This feature uses the MAC address to identify Wireless stations.
The MAC address is a low-level network identifier which is
unique to each PC or network device.
To define the trusted wireless stations, use the "Set Stations"
button.
Set Stations
Button
Click this button to manage the trusted PC database.
Setup
17
Wireless Security
This screen is accessed by clicking the "Configure" button on the Wireless screen. There are 3
options for Wireless security:
Disabled - no data encryption is used.
WEP - data is encrypted using the WEP standard.
WPA-PSK - data is encrypted using the WPA-PSK standard. This is a later standard than
WEP, and provides much better security than WEP. If all your Wireless stations support
WPA-PSK, you should use WPA-PSK rather than WEP.
WEP Wireless Security
Figure 8: WEP
Data - WEP Screen
WEP Data Encryption
Authentication
Type
Normally, this should be left at the default value of "Automatic". If
changed to "Open System" or "Shared Key", ensure that your Wireless
Stations use the same setting.
WEP Data
Encryption
Select the option to match other Wireless Stations:
64 Bit - data is encrypted, using the default key, before being
transmitted. You must enter at least the default key. For 64 Bit
Encryption, the key size is 10 chars in HEX (0~9 and A~F).
128 Bit - data is encrypted, using the default key, before being
transmitted. You must enter at least the default key. For 128 Bit
Encryption, the key size is 26 chars in HEX (0~9 and A~F).
Default Key
Select the key you wish to be the default. Transmitted data is
ALWAYS encrypted using the Default Key; the other Keys are for
decryption only.
You must enter a Key Value for the Default Key.
Wireless ADSL Router User Guide
18
Key Value Enter the key value or values you wish to use. The Default Key is
required, the other keys are optional. Other stations must have the
same key.
Passphrase
If desired, you can generate a key from a phrase, instead of entering
the key value directly. Enter the desired phrase, and click the
"Generate Keys" button.
WPA-PSK Wireless Security
Figure 9: WPA-PSK
Data - WPA-PSK Screen
Security
System
WPA-PSK
Like WEP, data is encrypted before transmission. WPA is more
secure than WEP, and should be used if possible. WPA-PSK is the
version of WPA, which does NOT require a Radius Server on your
LAN.
PSK
Enter the PSK (network key). Data is encrypted using a key derived
from the network key. Other Wireless Stations must use the same
network key. The PSK must be from 8 to 63 characters in length.
Encryption
The WPA-PSK standard allows different encryption methods to be
used. Select the desired option. Wireless Stations must use the same
encryption method.
Setup
19
Trusted Wireless Stations
This feature can be used to prevent unknown Wireless stations from using the Access Point.
This list has no effect unless the setting Allow access by trusted stations only is enabled.
To change the list of trusted wireless stations, use the Modify List button on the Access
Control screen. You will see a screen like the sample below.
Figure 10: Trusted Wireless Stations
Data - Trusted Wireless Stations
Trusted Wireless
Stations
This lists any Wireless Stations which you have designated as
“Trusted”.
Other Wireless
Stations
This list any Wireless Stations detected by the Access Point, which
you have not designated as "Trusted".
Name
The name assigned to the Trusted Wireless Station. Use this when
adding or editing a Trusted Station.
Address
The MAC (physical) address of the Trusted Wireless Station. Use
this when adding or editing a Trusted Station.
Buttons
<<
Add a Trusted Wireless Station to the list (move from the "Other
Stations" list).
Select an entry (or entries) in the "Other Stations" list, and
click the " << " button.
Enter the Address (MAC or physical address) of the wireless
station, and click the "Add " button.
>>
Delete a Trusted Wireless Station from the list (move to the "Other
Stations" list).
Select an entry (or entries) in the "Trusted Stations" list.
Click the " >> " button.
Wireless ADSL Router User Guide
20
Edit
1. To change an existing entry in the "Trusted Stations" list,
select it and click this button.
2. Select the Station in the Trusted Station list.
3. Click the Edit button. The address will be copied to the
"Address" field, and the Add button will change to Update.
4. Edit the address (MAC or physical address) as required.
5. Click Update to save your changes.
Add (Update)
To add a Trusted Station which is not in the "Other Wireless
Stations" list, enter the required data and click this button.
When editing an existing Wireless Station, this button will change
from Add to Update.
Clear
Clear the Name and Address fields.
Setup
21
Password Screen
The password screen allows you to assign a password to the TEW-435BRM.
Figure 11: Password Screen
Old Password
Enter the existing password in this field.
New password
Enter the new password here.
Verify password
Re-enter the new password here.
You will be prompted for the password when you connect, as shown below.
Figure 12: Password Dialog
The "User Name" is always admin
Enter the password for the TEW-435BRM, as set on the Password screen above.
Wireless ADSL Router User Guide
22
Mode Screen
Use this screen to change the mode between Router mode and Modem (Bridge) mode.
Figure 13: Mode Screen
Select the desired option, and click "Save".
Router
Both the ADSL Modem and the Router features are operational. In this
mode, this device can provide shared Internet Access to all your LAN users.
Also, by default, it acts a DHCP Server, providing an IP address and related
information to all Wireless and LAN users.
Modem
Only the ADSL Modem component is operational.
All Router features are disabled. This device is "transparent" - it does
not perform any operations or make any changes to the network traffic
passing through it.
You need to have a DHCP Server on your LAN to provide IP addresses
to the Wireless clients using this Access Point.
All traffic received on either the Wireless or LAN interface will be sent
over the ADSL connection.
Notes:
Generally, you should NOT use modem mode. Only select this mode if you are sure this
is what you want.
After changing the mode, this device will restart, which will take a few seconds. The
menu will also change, depending on the mode you are in.
The Wireless Access Point can function in either Router or Modem mode. But generally it
is not a good idea to combine a Modem with an Access Point, because all data received
from the wireless stations will be sent over the modem connection. (Since the modem is
transparent, it does not examine the traffic to determine whether the traffic is for the LAN
or the WAN.)
For details on using Modem Mode, see Chapter 8.
23
Chapter 4
PC Configuration
This Chapter details the PC Configuration required on the local ("Internal")
LAN.
Overview
For each PC, the following may need to be configured:
TCP/IP network settings
Internet Access configuration
Wireless configuration
Windows Clients
This section describes how to configure Windows clients for Internet access via the TEW-
435BRM.
The first step is to check the PC's TCP/IP settings.
The TEW-435BRM uses the TCP/IP network protocol for all functions, so it is essential that
the TCP/IP protocol be installed and configured on each PC.
TCP/IP Settings - Overview
If using the default TEW-435BRM settings, and the default Windows
TCP/IP settings, no changes need to be made.
By default, the TEW-435BRM will act as a DHCP Server, automatically providing a
suitable IP Address (and related information) to each PC when the PC boots.
For all non-Server versions of Windows, the default TCP/IP setting is to act as a DHCP
client.
If using a Fixed (specified) IP address, the following changes are
required:
The Gateway must be set to the IP address of the TEW-435BRM
The DNS should be set to the address provided by your ISP.
If your LAN has a Router, the LAN Administrator must re-
configure the Router itself. Refer to Chapter 8 -
Advanced Setup for details.
4
Wireless ADSL Router User Guide
24
Checking TCP/IP Settings - Windows 9x/ME:
6. Select Control Panel - Network. You should see a screen like the following:
Figure 14: Network Configuration
7. Select the TCP/IP protocol for your network card.
8. Click on the Properties button. You should then see a screen like the following.
Figure 15: IP Address (Win 95)
Ensure your TCP/IP settings are correct, as follows:
Using DHCP
To use DHCP, select the radio button Obtain an IP Address automatically. This is the default
Windows setting. Using this is recommended. By default, the TEW-435BRM will act as a
DHCP Server.
Restart your PC to ensure it obtains an IP Address from the TEW-435BRM.
Using "Specify an IP Address"
If your PC is already configured, check with your network administrator before making the
following changes:
PC Configuration
25
On the Gateway tab, enter the TEW-435BRM's IP address in the New Gateway field and
click Add, as shown below. Your LAN administrator can advise you of the IP Address
they assigned to the TEW-435BRM.
Figure 16: Gateway Tab (Win 95/98)
On the DNS Configuration tab, ensure Enable DNS is selected. If the DNS Server Search
Order list is empty, enter the DNS address provided by your ISP in the fields beside the
Add button, then click Add.
Figure 17: DNS Tab (Win 95/98)
Wireless ADSL Router User Guide
26
Checking TCP/IP Settings - Windows NT4.0
1. Select Control Panel - Network, and, on the Protocols tab, select the TCP/IP protocol, as
shown below.
Figure 18: Windows NT4.0 - TCP/IP
2. Click the Properties button to see a screen like the one below.
PC Configuration
27
Figure 19: Windows NT4.0 - IP Address
3. Select the network card for your LAN.
4. Select the appropriate radio button - Obtain an IP address from a DHCP Server or Specify
an IP Address, as explained below.
Obtain an IP address from a DHCP Server
This is the default Windows setting. Using this is recommended. By default, the TEW-
435BRM will act as a DHCP Server.
Restart your PC to ensure it obtains an IP Address from the TEW-435BRM.
Specify an IP Address
If your PC is already configured, check with your network administrator before making the
following changes.
1. The Default Gateway must be set to the IP address of the TEW-435BRM. To set this:
Click the Advanced button on the screen above.
On the following screen, click the Add button in the Gateways panel, and enter the
TEW-435BRM's IP address, as shown in Figure 20 below.
If necessary, use the Up button to make the TEW-435BRM the first entry in the
Gateways list.
Wireless ADSL Router User Guide
28
Figure 20 - Windows NT4.0 - Add Gateway
2. The DNS should be set to the address provided by your ISP, as follows:
Click the DNS tab.
On the DNS screen, shown below, click the Add button (under DNS Service Search
Order), and enter the DNS provided by your ISP.
Figure 21: Windows NT4.0 - DNS
PC Configuration
29
Checking TCP/IP Settings - Windows 2000:
1. Select Control Panel - Network and Dial-up Connection.
2. Right - click the Local Area Connection icon and select Properties. You should see a
screen like the following:
Figure 22: Network Configuration (Win 2000)
3. Select the TCP/IP protocol for your network card.
4. Click on the Properties button. You should then see a screen like the following.
Figure 23: TCP/IP Properties (Win 2000)
Wireless ADSL Router User Guide
30
5. Ensure your TCP/IP settings are correct, as described below.
Using DHCP
To use DHCP, select the radio button Obtain an IP Address automatically. This is the default
Windows setting. Using this is recommended. By default, the TEW-435BRM will act as a
DHCP Server.
Restart your PC to ensure it obtains an IP Address from the TEW-435BRM.
Using a fixed IP Address ("Use the following IP Address")
If your PC is already configured, check with your network administrator before making the
following changes.
Enter the TEW-435BRM's IP address in the Default gateway field and click OK. (Your
LAN administrator can advise you of the IP Address they assigned to the TEW-435BRM.)
If the DNS Server fields are empty, select Use the following DNS server addresses, and
enter the DNS address or addresses provided by your ISP, then click OK.
PC Configuration
31
Checking TCP/IP Settings - Windows XP
1. Select Control Panel - Network Connection.
2. Right click the Local Area Connection and choose Properties. You should see a screen
like the following:
Figure 24: Network Configuration (Windows XP)
3. Select the TCP/IP protocol for your network card.
4. Click on the Properties button. You should then see a screen like the following.
Wireless ADSL Router User Guide
32
Figure 25: TCP/IP Properties (Windows XP)
5. Ensure your TCP/IP settings are correct.
Using DHCP
To use DHCP, select the radio button Obtain an IP Address automatically. This is the default
Windows setting. Using this is recommended. By default, the TEW-435BRM will act as a
DHCP Server.
Restart your PC to ensure it obtains an IP Address from the TEW-435BRM.
Using a fixed IP Address ("Use the following IP Address")
If your PC is already configured, check with your network administrator before making the
following changes.
In the Default gateway field, enter the TEW-435BRM's IP address and click OK. Your
LAN administrator can advise you of the IP Address they assigned to the TEW-435BRM.
If the DNS Server fields are empty, select Use the following DNS server addresses, and
enter the DNS address or addresses provided by your ISP, then click OK.
PC Configuration
33
Internet Access
To configure your PCs to use the TEW-435BRM for Internet access:
Ensure that the DSL modem, Cable modem, or other permanent connection is functional.
Use the following procedure to configure your Browser to access the Internet via the LAN,
rather than by a Dial-up connection.
For Windows 9x/ME/2000
1. Select Start Menu - Settings - Control Panel - Internet Options.
2. Select the Connection tab, and click the Setup button.
3. Select "I want to set up my Internet connection manually, or I want to connect through a
local area network (LAN)" and click Next.
4. Select "I connect through a local area network (LAN)" and click Next.
5. Ensure all of the boxes on the following Local area network Internet Configuration screen
are unchecked.
6. Check the "No" option when prompted "Do you want to set up an Internet mail account
now?".
7. Click Finish to close the Internet Connection Wizard.
Setup is now completed.
For Windows XP
1. Select Start Menu - Control Panel - Network and Internet Connections.
2. Select Set up or change your Internet Connection.
3. Select the Connection tab, and click the Setup button.
4. Cancel the pop-up "Location Information" screen.
5. Click Next on the "New Connection Wizard" screen.
6. Select "Connect to the Internet" and click Next.
7. Select "Set up my connection manually" and click Next.
8. Check "Connect using a broadband connection that is always on" and click Next.
9. Click Finish to close the New Connection Wizard.
Setup is now completed.
Accessing AOL
To access AOL (America On Line) through the TEW-435BRM, the AOL for Windows
software must be configured to use TCP/IP network access, rather than a dial-up connection.
The configuration process is as follows:
Start the AOL for Windows communication software. Ensure that it is Version 2.5, 3.0 or
later. This procedure will not work with earlier versions.
Click the Setup button.
Select Create Location, and change the location name from "New Locality" to "TEW-
435BRM".
Click Edit Location. Select TCP/IP for the Network field. (Leave the Phone Number
blank.)
Click Save, then OK.
Configuration is now complete.
Before clicking "Sign On", always ensure that you are using the "TEW-435BRM"
location.
Wireless ADSL Router User Guide
34
Macintosh Clients
From your Macintosh, you can access the Internet via the TEW-435BRM. The procedure is as
follows.
1. Open the TCP/IP Control Panel.
2. Select Ethernet from the Connect via pop-up menu.
3. Select Using DHCP Server from the Configure pop-up menu. The DHCP Client ID field
can be left blank.
4. Close the TCP/IP panel, saving your settings.
Note:
If using manually assigned IP addresses instead of DHCP, the required changes are:
Set the Router Address field to the TEW-435BRM's IP Address.
Ensure your DNS settings are correct.
Linux Clients
To access the Internet via the TEW-435BRM, it is only necessary to set the TEW-435BRM as
the "Gateway".
Ensure you are logged in as "root" before attempting any changes.
Fixed IP Address
By default, most Unix installations use a fixed IP Address. If you wish to continue using a
fixed IP Address, make the following changes to your configuration.
Set your "Default Gateway" to the IP Address of the TEW-435BRM.
Ensure your DNS (Name server) settings are correct.
To act as a DHCP Client (recommended)
The procedure below may vary according to your version of Linux and X -windows shell.
1. Start your X Windows client.
2. Select Control Panel - Network
3. Select the "Interface" entry for your Network card. Normally, this will be called "eth0".
4. Click the Edit button, set the "protocol" to "DHCP", and save this data.
5. To apply your changes
Use the "Deactivate" and "Activate" buttons, if available.
OR, restart your system.
Other Unix Systems
To access the Internet via the TEW-435BRM:
Ensure the "Gateway" field for your network card is set to the IP Address of the TEW-
435BRM.
Ensure your DNS (Name Server) settings are correct.
PC Configuration
35
Wireless Station Configuration
This section applies to all Wireless stations wishing to use the TEW-435BRM's Access Point,
regardless of the operating system which is used on the client.
To use the Wireless Access Point in the TEW-435BRM, each Wireless Station must have
compatible settings, as follows:
Mode
The mode must be set to Infrastructure (rather than Ad-hoc)
Access points only operate in Infrastructure mode.
SSID (ESSID)
This must match the value used on the TEW-435BRM. The default
value is Wireless
Note! The SSID is case sensitive.
Wireless
Security
By default, Wireless security on the TEW-435BRM is disabled.
If Wireless security remains disabled on the TEW-435BRM, all
stations must have wireless security disabled.
If Wireless security is enabled on the Wireless Router (either WEP
or WPA-PSK), each station must use the same settings as the
Wireless ADLS Router.
Wireless Configuration on Windows XP
If using Windows XP to configure the Wireless interface on your PC, the configuration
procedure is as follows:
1. Open the Network Connections folder. (Start - Settings - Network Connections).
Figure 26: Network Connections (Windows XP)
2. Right-click the Wireless Network Connection, check that it is enabled (menu option says
Disable, rather than Enable) and then select View Available Wireless Networks.
3. You will then see a list of wireless networks.
Wireless ADSL Router User Guide
36
Figure 27 Wireless Networks (Windows XP)
If the "Broadcast SSID" setting on the TEW-435BRM has
been disabled, its SSID will NOT be listed.
See the following section "If the SSID is not listed" for
details of dealing with this situation.
4. The next step depends on whether or not Wireless security has been enabled on the TEW-
435BRM.
If Wireless Security is Disabled
If Wireless security on the TEW-435BRM is disabled, Windows will warn you that the
Wireless network is not secure.
Figure 28 Wireless Networks (Windows XP)
To connect:
Check the checkbox Allow me to connect to the selected wireless network, even though it
is not secure.
  • Page 1 1
  • Page 2 2
  • Page 3 3
  • Page 4 4
  • Page 5 5
  • Page 6 6
  • Page 7 7
  • Page 8 8
  • Page 9 9
  • Page 10 10
  • Page 11 11
  • Page 12 12
  • Page 13 13
  • Page 14 14
  • Page 15 15
  • Page 16 16
  • Page 17 17
  • Page 18 18
  • Page 19 19
  • Page 20 20
  • Page 21 21
  • Page 22 22
  • Page 23 23
  • Page 24 24
  • Page 25 25
  • Page 26 26
  • Page 27 27
  • Page 28 28
  • Page 29 29
  • Page 30 30
  • Page 31 31
  • Page 32 32
  • Page 33 33
  • Page 34 34
  • Page 35 35
  • Page 36 36
  • Page 37 37
  • Page 38 38
  • Page 39 39
  • Page 40 40
  • Page 41 41
  • Page 42 42
  • Page 43 43
  • Page 44 44
  • Page 45 45
  • Page 46 46
  • Page 47 47
  • Page 48 48
  • Page 49 49
  • Page 50 50
  • Page 51 51
  • Page 52 52

Trendnet TEW-435BRM User guide

Category
WLAN access points
Type
User guide

Ask a question and I''ll find the answer in the document

Finding information in a document is now easier with AI