Page is loading ...

Assembly Instructions
Caution: You must read this before you proceed
Read all instructions before assembling and using this product
1. Select ideal location. Set out all parts on a clear and level surface prior to assembly. Ideally, the
Gazebo should be set up in the desired location to avoid moving it after assembly.
2. Team Work. We recommend 4-5 adults and it may require 2 to 3 hours to fully assemble the
Gazebo. If possible, please use safety ladders.
3. Use caution. During the entire assembly process, especially when lifting heavy or large parts or
using ladders, pay attention to safety. No one other than the adult assistants should be allowed in
the work area.
4. Check all available parts. Before assembling your Gazebo Frame, make sure that you have all
the parts described in the Parts List.
5. Ensure that ALL BOLTS are fully and securely bolted in before you proceed to attach the
Canopies.
6. Keep children away. Children shouldn’t be allowed in the work area. Do not let them handle
parts and tools. Do not allow children to climb the Gazebo.
7. It is recommended that the curtain and mosquito netting be removed during strong windy
conditions.
Gazebo
Noble House Home Furnishing LLC
Page 1 OF 9

Label Picture Description QTY
A Top Connector 1
B Top Tube 4
C Connector 4
D Leg Tube 4
E Base 4
F Side Tube Connector 4
G Side Tube 4
H Side Tube 4
I Big Cover 1
J Small Cover 1
K Sidewall 4
L Mosquito Netting 4
M Small Top Tube 4
Parts List
Noble House Home Furnishing LLC
Page 2 OF 9

Label Picture Description QTY
① Bolt (M6*16mm) 65
② Bolt (M6*40mm) 9
③ Bolt (M8*65mm) 9
④ Washer (M6) 73
⑤ Nut (M6) 9
⑥ Spanner (M6) 2
⑦ Spanner (M8) 2
⑧ Nail 9
⑨ Hook 65
⑩ Washer (M8) 9
⑪
Nut (M8) 9
Hardware
Noble House Home Furnishing LLC
Page 3 OF 9

Before
Beginning
Assembly:
Assembly Preparation
Overview
Assembly Steps
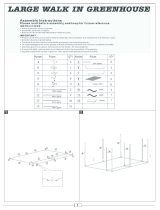
This Gazebo has multiple parts and may require up to 3 hours to assemble. To give you an
overview of the Gazebo parts, the above picture is to help you put the various parts into
perspective. Please read through the instructions below to familiarise yourself with the parts and
steps before assembly.
Small Cover (J)
Leg Tube (D)
Big Cover (I)
Sidewall (K)
Base (E)
Mosquito
Netting (L)
Side Tube (G/H)
Top Tube (B)
Small Top Tube (M)
Noble House Home Furnishing LLC
Page 4 OF 9

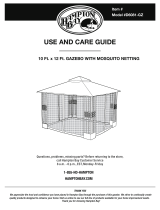
Step 1
Step 2
1.1) Attach Small Top Tubes(M) to Top Tubes(B) using Bolts(⑤), Washers(④) and Nuts(②) with
Spanners(⑥).
1.2) Connect the Top Tubes(B) to Top Connector(A).
Tighten the Bolts and Nuts in a sequential manner.
Insert Side Tube Connector(F) between Side Tube(G) and Side Tube(H) and align mounting
positions.
Attach Side Tube Connector(F) to Side Tube(G) and Side Tube(H) using Bolts(①) and
Washers(④) with Spanner(⑥).
Tighten the Bolts in a sequential manner.
Repeat the same process with the remaining Side Tube Connectors(F), Side Tubes(G) and Side
Tubes(H).
Step 1.1
Step 1.2
Noble House Home Furnishing LLC
Page 5 OF 9

Step 3
Step 4
Connect Top Tubes(B) to Connectors(C).
Repeat the same process with the remaining (B) and (C).
3.1) Slide four Hooks(⑨) into both sides of each Side Tube(G). Slide four Hooks(⑨) into both
sides of each Side Tube(H).
3.2) Attach Side Tube(G) and Side Tube(H) to Connector(C) using Bolts(①) and Washers(④)
with Spanner(⑥).
Tighten the Bolts in a sequential manner.
Repeat the same process with the remaining Side Tubes(G), Side Tubes(H) and Connectors(C).
Noble House Home Furnishing LLC
Page 6 OF 9

Step 5
Step 6
Place the Big Cover(I) onto the Top Tubes(B).
Then put the Small Cover(J) onto the Small Top Tubes(M).
6.1)Attach Leg Tubes(D) to Connectors(C) using Bolts(③),Washers(⑩) and Nuts(⑪) with
Spanners(⑦).
6.2)Connect Leg Tubes(D) to Bases(E) using Bolts(③), Washers(⑩) and Nuts(⑪) with
Spanners(⑦).
Tighten the Bolts and Nuts in a sequential manner.
Step 6.1
Step 6.2
C
D
D
Noble House Home Furnishing LLC
Page 7 OF 9

Step 7
Step 8
Caution:
1. Check stability and then tighten the Bolts.
2. DO NOT tighten any Bolt fully and then move on towards the next one. Rather, in a sequential
manner, gradually tighten each Bolt until all Bolts are evenly secured. This methodology will
ensure maximum evenness once all Bolts are fully tightened.
3. Inspect it and make sure all parts are adequately connected.
4. Ensure all Bolts are fully locked into position.
5. This Gazebo can only be used on a flat, level surface.
Warning!! If the Gazebo is not Stable, it could lead to damage to the product, and could
cause injury to any occupants.
Secure the Gazebo to the ground by inserting Nails(⑧) through the Bases(E).
8.1) Install the Mosquito Netting(L) along the inside of the Gazebo on the Hooks(⑨).
8.2) Install the Sidewall(K) along the outside of the Gazebo on the Hooks(⑨).
Your Gazebo is ready for use.
This Gazebo can only be used on a flat, level surface.
Step 8.1
Step 8.2
Noble House Home Furnishing LLC
Page 8 OF 9

Questions & Answers about Proposition 65
• What is Proposition 65?
Proposition 65 requires businesses to provide warnings to Californians about significant exposures to chemicals
that cause cancer, birth defects or other reproductive harm. These chemicals can be in the products that
Californians purchase, in their homes or workplaces, or that are released into the environment. By requiring that
this information be provided, Proposition 65 enables Californians to make informed decisions about their
exposures to these chemicals.
Proposition 65 also prohibits California businesses from knowingly discharging significant amounts of listed
chemicals into sources of drinking water.
Proposition 65 requires California to publish a list of chemicals known to cause cancer, birth defects or other
reproductive harm. This list, which must be updated at least once a year, has grown to include approximately 900
chemicals since it was first published in 1987.
• What types of chemicals are on the Proposition 65 list?
The list contains a wide range of naturally occurring and synthetic chemicals that include additives or ingredients
in pesticides, common household products, food, drugs, dyes, or solvents. Listed chemicals may also be used in
manufacturing and construction, or they may be byproducts of chemical processes, such as motor vehicle
exhaust.
• What does a warning mean?
If a warning is placed on a product label or posted or distributed at a workplace, a business, or in rental housing,
the business issuing the warning is aware or believes that it is exposing individuals to one or more listed
chemicals.
By law, a warning must be given for listed chemicals unless the exposure is low enough to pose no significant risk
of cancer or is significantly below levels observed to cause birth defects or other reproductive harm.
• Where can I get more information on Proposition 65?
If you have specific questions on the administration or implementation of Proposition 65, you can contact
OEHHA's Proposition 65 program at [email protected], or by phone at (916) 445-6900.
Noble House Home Furnishing LLC
Page 9 OF 9
/