Page is loading ...

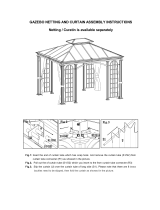
GAZEBO NETTING AND CURTAIN ASSEMBLY INSTRUCTIONS
Netting / Curtain is available individually
Fig.1: Pull the Netting and Curtain Rods (U) out of the Netting and Curtain Rods connecting 1 (T1). (Press
the snap hook down firstly before pull the tube out).
Fig.2: Disassemble Netting and Curtain Rods (U) from Netting and Curtain Rods connecting 2 (T2).
Fig.3: Assemble Netting or Curtain to Netting and Curtain Rods (U). Note: tube inseart into the buckle of
the Netting / Curtain, the flod way as Fig.3 shows.
Netting or Curtain

Fig.4: Assemble remain Netting / Curtain to another Netting and Curtain Rods (U). The same flod
way as Fig. 4 shows.
Fig.5: Lift up the assembled Netitng / Curtain and Netting and Curtain Rods (U). See as the picture
shows to inseart Netting and Curtain Rods (U) into Netting and Curtain Rods connecting 2&3 (T2&t3).
Note: make sure it is insert totally.
Fig.6: Counter pull the inserted Netting and
Curtain Rods (U) to the snap hook fix area,
then make it’s another side insert into Netting
and Curtain Rods connecting 1 (T1) .
Netting or Curtain
Netting
or
Netting or
Netting or Curtain
/