
Getting Started
Recommended Tools
Measuring Tape
Pencil
Level
Screwdriver
Power drill (1/4” hex driver and drill bit)
Installation & Maintenance
Instructions
Cellular Shade
Customer Service: 1-800-666-1779
Made in Taiwan
Finished in China
65101-10212
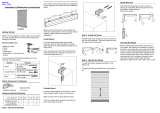
Step 3. Operate the Shade
Inside Mount Outside Mount
Step 4. Install Hold Down Bracket and Cord
Cleat
Remove the cellular shade from the package. Be sure to keep the
packaging until the shade operates to your satisfaction. Please take
a moment to review the following installation guide for proper installation.
NOTE: Prior to installation, please make sure your hands are clean and
free from any dirt or oil that could cause damage to the fabric
You will need to use the following fasteners for your particular mounting
surfaces:
Mounting Surface
Wood
1 1/4” Rounded Head Screw
(Provided)
Drywall/Plaster
Wall Anchors, Expansion Bolts
(Not Provided)
Metal
Sheet Metal Screws
(Not Provided)
Fastener
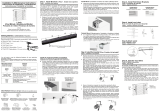
Step 1. Install Brackets
Inside Mount
Before installation, make sure the end caps are retrieved from the
hardware box and assembled to the rails.
Measure 2”~4” from both ends of the headrail. Mark the bracket
location on the mounting surface (applies to both inside and
outside mount installation) and make sure the bracket is not in
obstruction with the cordlock inside the headrail.
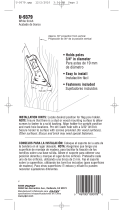
For shade to operate properly when inside mounted, check to
make sure there is enough depth clearance for the installation
bracket and no obstructions.
If you would like your shade to be flush with the wall, the distance
from the wall to center of 1st screw hole needs to be ¾”.
Disengage the cord lock by pulling
the cord towards the center of the
fabric to lower and raise the shade.
Engage the cord lock by moving the
cord away from the center of the
shade to lock in desired position.
Hold Down Brackets: Check both brackets are level. Lower the
shade and make sure the pins on the brackets are aligned with the
holes on the bottom rail end caps.
For easy installation and proper shade operation, use a level to
ensure all brackets are in alignment.
Outside Mount
The bottom of the installation bracket can be flush with top edge
of window opening or higher. Make sure all brackets are at the
same level.
Step 2. Install and Uninstall the Shade
Position the shade so the front
(side with pull cord) is facing you.
Step (1): Insert the headrail at an angle (as shown in the following
pictures) and hook the front of the headrail to the bracket. Step (2):
Rotate and push the headrail upward, then release after snapping
into place.
Double check all brackets are snapped into place before operating
the shade.
Fully raise the shade if you want to remove. Remove the shade by
pushing the latch back. Release the shade by rotating the headrail
towards you and lifting upward to unhook the rail from the bracket.
See steps 1 to 4.
Cord Cleat: Install the cord cleat to
secure cords out of reach of children.
Wrap excess cord around the cleat
every time the shade is raised/lowered.
Step 5. Safety Warning
Warning! Children can be strangled in window shade cords. Keep all
cords out of children’s reach. Move cribs and other furniture away from
window coverings with cords. The following devices are recommended:
Safety Cord Consolidator
This device breaks apart when minimal pressure is exerted onto the
cords. It acts as a safety feature to break the loop(s) above the cord
consolidator, which may cause harm to young children.
Step 6. Cleaning the Shade
Routine cleaning will help maintain the beauty of your shade. The
shade can be cleaned by using a duster, vacuumed with a low suction
hand-held vacuum, cleaned ultrasonically (specify that a mild solution
must be used and that the headrail should never be immersed in liquid),
or dampen a clean cloth with a warm water and mild detergent solution
to dab the spot until it’s gone (do not rub!).
Step 7. Q & A
Q: My shade will not snap into the mounting brackets, what do I do?
A: Check that the mounting brackets are aligned.
Q: My shade will not raise and lower evenly, what do I do?
A: Check that the cords are not stuck or tangled
Q: The shade will not raise
A: If hold down brackets are being used, check that they have been
released.
To assemble, place the knot of each pull cord into the area ‘A’ as
shown, and snap the cover back into place. Each cord needs to have
its own individual knots. Do not tie cords together.
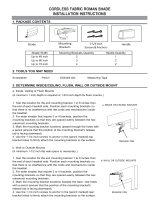
Check Hardware
Check your package for contents needed for proper installation.
Installation
Bracket
Headrail
Endcap
Bottom Rail
Endcap
Screws
Cord Cleat
Clip/Clamp
Tie the cord to itself
Use any tie-down device
Headrail
Cord Lock Assembly
Headrail End Cap
Safety Cord Consolidator
Tassel
Bottom Rail End Cap
Bottom Rail
Hold Down
Bracket
Cord
Cleat
A
For Shades with Three (3) or Four (4) Cords:
For Shades with Two (2) Cords:
Latch

Ensamblaje de Bloqueo
Introducción
Instrucciones de Instalación
y Mantenimiento
Persiana Celular
Retire la persiana celular del paquete. Le sugerimos guardar el
paquete hasta que la persiana funcione satisfactoriamente.
Dedique un poco de su tiempo a repasar la siguiente guía de
instalación para instalar la persiana correctamente.
NOTA: Antes de la instalacion, por favor asegurese que sus manos esten
limpias de cualquier polvo o aceite que pueda causar algun dañar a la tela.
Revise los Componentes
Verifique que el paquete contenga todos los elementos necesarios
para una adecuada instalación.
Soporte de
Instalación
Cabecera De
Riel Superior
Cabecera de
Riel Inferior
Tornillos
Herramientas Recomendadas:
Cinta Métrica
Lápiz
Nivel
Destornillador
Taladro eléctrico (llave hexagonal de 1/4” y broca para taladro)
Deberá utilizar los siguientes sujetadores de acuerdo con la superficie
particular de montaje:
Superficie de Montaje
Madera
Tornillo de Cabeza Redonda 1-1/4"
(Incluido)
Drywall / Yeso
Anclajes de Pared, Pernos de Expansión
(No Incluidos)
Metal
Tornillos de Metal Laminados
(No Incluidos)
Sujetador
Paso 1. Ensamble los Soportes de Instalación
Montaje Interior
Antes de la instalación, asegúrese de retirar las cabeceras de la caja
de herrajes y ensamblarlas en los rieles.
Mida de 2” a 4” hacia dentro, desde los dos extremos del riel
superior, y marque la ubicación del soporte sobre la superficie
de montaje (se aplica tanto a la instalación del montaje interior y
exterior); asegúrese de que el soporte no esté obstruido con el
seguro de la cuerda dentro del riel superior.
Para que la persiana funcione correctamente cuando se realiza
el montaje interior, verifique que exista suficiente profundidad de
espacio para instalar el soporte y que no haya obstrucciones.
Si desea que la persiana y la pared estén al ras, la distancia
desde la pared al primer orificio para el tornillo debe ser de ¾".
Para una instalación fácil y un funcionamiento correcto de la persiana,
utilice un nivel para asegurarse que los soportes estén alineados.
Montaje Exterior
La parte inferior del soporte de instalación puede estar al ras con
el extremo superior de la abertura de la ventana o más arriba.
Asegúrese de que todos los soportes estén al mismo nivel.
Paso 2. Instale y Desinstale la Persiana
Coloque la persiana con el frente
mirando hacia usted.
Paso (1): Inserte el riel superior a un ángulo como el que se
muestra en las siguientes imágenes, enganche el frente del riel
superior al sujetador. Paso (2): Gire y empújelo hacia arriba,
luego suéltelo cuando encaje en el lugar.
Seguro
Paso 3. Haga Funcionar la Persiana
Montaje Interior Montaje Exterior
Paso 4. Instale el Soporte de Sujeción y el
Gancho para la Cuerda
Para desbloquear el seguro, tire de
la cuerda hacia el centro de la tela
para bajar y subir la persiana.
Para bloquear el seguro, tire de la cuerda
hacia fuera del centro de la tela para que
se trabe en la posición deseada.
Soportes de Sujeción: Verifique que ambos soportes estén al mismo
nivel. Baje la persiana; asegúrese de que las clavijas en los soportes
estén alineadas con los orificios sobre las cabeceras del riel inferior.
Compruebe dos veces que todos los soportes hayan encajado en
su lugar antes de hacer funcionar la persiana.
Si desea extraer la persiana, levántela por completo. Para sacar la
persiana, retire hacia atrás el seguro, libere la persiana haciendo
girar el riel superior hacia usted y levantándolo hacia arriba para
desenganchar el riel del soporte. Consulte los pasos 1 al 4.
Gancho para la Cuerda: Coloque el gancho para la cuerda de
manera que éstas queden fuera del alcance de los niños. Enrolle la
cuerda de sobra alrededor del gancho cada vez que la persiana esté
levantada / baja.
Paso 5. Advertencia de Seguridad
¡Advertencia! Los niños pueden estrangularse con la cuerda de la
persiana de la ventana. Mantenga todas las cuerdas fuera del alcance
de los niños. Aleje las cunas y otros muebles de las cubiertas de
ventana con cuerdas. Se recomiendan los siguientes dispositivos:
Cerradura
Abra
Servicio de Atención al Cliente: 1-800-666-1779
Hecho en Taiwán
Terminado en China
65101-10212
Consolidador de Cuerda de Seguridad
Este dispositivo se separa cuando se ejerce una mínima presión
sobre las cuerdas. Actúa como dispositivo de seguridad para separar
la o las anillas sobre el consolidador de la cuerda, que puede dañar
a los niños pequeños.
Paso 6. Limpieza de la Persiana
La limpieza habitual ayudará a mantener la belleza de sus persianas.
Limpie el polvo de la persiana con un plumero, una aspiradora portátil
de succión suave, un limpiador ultrasónico (siempre especifique
utilizar una solución suave y que el riel superior nunca debe sumer-
girse) o aplique un paño limpio húmedo con agua tibia y un detergente
suave sobre las manchas hasta que desaparezcan (sin frotar).
Paso 7. Preguntas y Respuestas
P: La persiana no encaja en los soportes de montaje.
R: Verifique que los soportes de montaje estén alineados.
P: La persiana no sube ni baja en forma uniforme.
R: Verifique que las cuerdas no estén trabadas o enredadas.
P: La persiana no sube.
R: Si se utilizan soportes de sujeción, verifique si han sido liberados.
Para ensamblar, coloque el nudo ajustado de cada cuerda para jalar
en el área A como se muestra, y vuelva a insertar la tapa en su lugar.
Cada cuerda debe tener sus propios nudos individuales; no ate las
cuerdas juntas.
Riel Superior
Cabecera del Riel
Superior
Consolidador de la
Cuerda de Seguridad
Borla
Cabecera del Riel
Inferior
Riel Inferior
Gancho para la cuerda
Sujetador / Abrazadera
Ate la cuerda sobre sí misma
Utilice un dispositivo de amarras
Soporte de
Sujeción
Gancho para
la Cuerda
A
Para Persianas con Tres o Cuatro Cuerdas:
Para Persianas con Dos Cuerdas:
-
 1
1
-
 2
2


Home Decorators Collection 10793478625703 Operating instructions
- Type
- Operating instructions
- This manual is also suitable for
Ask a question and I''ll find the answer in the document
Finding information in a document is now easier with AI
in other languages
Related papers
-
Home Decorators Collection 10793478563333 Installation guide
-
Home Decorators Collection 0275272-700x48 Installation guide
-
Home Decorators Collection 10793478858415 Installation guide
-
Home Decorators Collection 10793478357604 Installation guide
-
Home Decorators Collection 24566 Installation guide
-
Home Decorators Collection 10793478759330 Installation guide
-
Home Decorators Collection 10793478374489 Installation guide
-
Home Decorators Collection 10793478796397 Installation guide
-
Home Decorators Collection 10793478331765 Installation guide
-
Other documents
-
 Veneta Classic Cordless Cellular Installation guide
-
Arlo Blinds 04HCA285600 User manual
-
Unbranded 10793478517602 Installation guide
-
Achim CSTD39AL06 Installation guide
-
Achim RSBC29GY04 Installation guide
-
 Arlo Blinds 04ULA324600 User manual
-
 Hampton Bay 10793478516445 Installation guide
-
 Prime-Line U 9379 Operating instructions
-
Elegant Home Fashions RSND4864G Installation guide
-
SelectBlinds Cordless Lift and Lock User manual


