Page is loading ...

Questions, problems, missing parts? Before returning to your retailer, call
our customer service department at 1-866-573-0674, 8:00 am - 4:45 pm EST,
Monday through Friday or email [email protected]
BFH1
BLACK FIREPLACE HOOD
INSTALLATION INSTRUCTIONS
WARNING: Fireplace hood becomes very
hot during replace operation. Do not touch
replace hood. Severe burns could occur.

www.usaprocom.com
200498-01A2
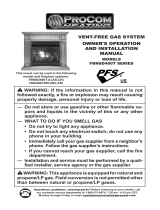
REPLACEMENT PARTS LIST
If any of these pieces are missing or damaged call ProCom Heating, Inc. at 1-866-573-0674
for referral information.
Part Description Part # Qty
A Fireplace Hood Assembly
B Fireplace Hood (Left) BFH1-03 1
C Fireplace Hood (Middle) BFH1-01 1
D Fireplace Hood (Right) BFH1-02 1
E Mounting Bracket BFH1-04 2
Part Hardware Contents Qty
AA Metal Screws 4
BB Masonry Screws 4
B
C
A
D
E
BB
AA
PREPARATION
Before beginning assembly of product, make sure all parts are present. Compare parts with
package contents lists. If any part is missing or damaged, do not attempt to assemble the
product. Contact customer service for replacement parts.
Estimated Assembly Time: 1 hour
Tools Required
• Phillips Screwdriver
• Tape Measure
• Adhesive Tape
• Pencil or Marker
• Metal Cutting Saw

www.usaprocom.com
3200498-01A
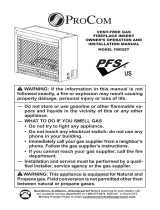
SIZING THE FIREPLACE HOOD TO THE FIREPLACE OPENING OR
GLASS DOOR FRAME
ASSEMBLY INSTRUCTIONS
The replace hood assembly is adjustable
from 28" to 48". The hood assembly must
be opened wide enough to cover the entire
replace opening. The hood can be opened
wider if desired. Fore best appearance, make
sure center section of the hood assembly is
centered with the replace opening. Follow
the instructions below to properly size the
replace hood assembly.
1. Measure width of replace opening or
glass door frame (see Figure 1). Use
work space below to gure proper size
for replace hood.
Measurement "A"__________________
Subtract 24"
(width or hood center section)
_________
Subtotal = _______________________
Divide by 2 ______________________
Measurement "B"__________________
Measurement "B" is the distance from
the outside edges of the adjustable
outer-hood assembly sections (see Fig-
ure 2). When adjustable outer sections
are extended to this measurement, hood
assembly will be correct size. The overall
width of the hood assembly will equal
the width of the replace opening. If you
have glass doors and would like the hood
assembly to hang beyond the edge of the
door frame, add 1/2" to measurement "B".
Make sure that the hood provides room
for opening doors.
2. Place center-hood section face down on
a smooth, soft surface.
3. Measure in from the outside ends of the
adjustable outer-hood sections. Place a
piece of tape on the bent-under ange
of the adjustable outer-hood sections to
mark the distance of measurement "B"
(see Figure 3).
4. Slide the adjustable outer-hood sections
into center section. Stop when the edge
of the center-hood section is even with the
tape (see Figure 4). Place pieces of tape
across adjustable outer-hood sections
and center-hood section to hold in place.
IMPORTANT: Tape must be removed before
operating the replace.
Measurement ”A”
Fireplace Opening
Measurement ”A”
Glass Door Frame
Measurement ”B”
Adjustable Outer-Hood
Sections
Center-Hood
Section
Figure 2
Figure 3
Figure 4
Figure 1
Tape
Adjustable Outer-
Hood Sections
Measurement ”B”
Edge of Center-
Hood Section

www.usaprocom.com
200498-01A4
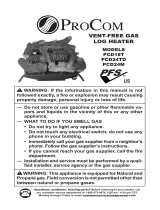
ASSEMBLY INSTRUCTIONS
Follow the instructions below that best de-
scribes your replace.
Masonry With Glass Doors
1. Loosen clamps that hold glass door frame
to replace. Slide the mounting brackets
(E) behind the glass door frame (see
Figure 5). Place mounting brackets near
ends of horizontal glass door frame.
Note: If frame is too tall, the bottom of the
mounting bracket will not slide under the
linter (top) of the replace. If so, cut mounting
bracket off at point "Y" (see Figure 6).
2. Slide mounting bracket (E) into glass door
frame (see Figure 7). Tighten glass door
lintel clamps. This will secure the mount-
ing brackets.
3. Slide the replace hood assembly (A) over
the mounting brackets (E). See Figure 8.
INSTALLING HOOD TO MASONRY FIREPLACE
Figure 5
Figure 6
Figure 7
Figure 8
E
Glass
Door
Frame
Bottom of
Mounting
Bracket
E
Masonry Without Glass Doors
1. Tape the mounting brackets (E) near
the ends of the replace opening. Make
sure to position mounting brackets (E) as
shown in Figure 9. Mark screw locations
on replace lintel (top) through the slots
on the bottom of each mounting bracket
(E) as shown in Figure 9.
2. Remove mounting brackets (E) and drill a
5/32" diameter hole into the replace lintel
at each marked location.

www.usaprocom.com
5200498-01A
ASSEMBLY INSTRUCTIONS
Figure 9
Figure 10
Figure 11
BB
E
Lintel
E
A
BB
4. Slide replace hood assembly (A) over
mounting brackets (E). See Figure 10.
3. Use the 4 masonry screws (BB) provided
to fasten the brackets to the lintel (see
Figure 9).
INSTALLING HOOD TO MANUFACTURED FIREPLACE
WARNING: Many manufac-
tured fireplaces have louver
openings for ventilation. Do not
cover any louver openings with
replace hood. Do not mount
replace hood above any louver
openings. Only mount replace
hood below louver openings.
Covering louver openings or
mounting replace hood above
louver openings will cause the
replace to overheat and could
cause property damage, per-
sonal injury, or death due to re.
You may need to alter or discard the mounting
brackets to install the replace hood to the
manufactured replace.
Installing Above Manufactured
Fireplace Opening
1. Cut mounting bracket off at point "X" (see
Figure 6, page 4).
2. Tape mounting bracket (E) to replace
housing. Make sure top of mounting
bracket is 6" above replace opening (see
Figure 11).
3. Mark screw locations through slots in
mounting bracket (E).
4. Remove mounting bracket (E) and drill a
1/8" diameter hole into replace housing
at each marked location.
5. Use the 4 metal screws (AA) provided to
fasten brackets to replace housing (see
Figure 11).
6. Slide replace hood assembly (A) over
mounting brackets (E) (see Figure 11).
IMPORTANT: Tape must be removed before
operating the replace.
E
6"
AA
A
Manufactured
Fireplace
Fireplace Opening
IMPORTANT: Tape must be removed before
operating the replace.

www.usaprocom.com
200498-01A6
ASSEMBLY INSTRUCTIONS
Installing Into Manufactured
Fireplace Opening
1. Discard the mounting brackets.
2. Place the replace hood assembly (A)
inside replace opening (see Figure 12).
3. Hold the replace hood assembly (A) in
place and drill 4 holes through the hood
and into the channel on the fireplace
opening (see Figure 13). Make sure holes
are evenly spaced and cover most of the
hood's length.
14. Use the 4 sheet metal screws provided to
fasten the replace hood assembly (A) to
the replace opening.
IMPORTANT: Tape must be removed before
operating the replace.
A
Manufactured
Fireplace
Fireplace
Opening
Figure 12
Figure 13
A
Manufactured Fireplace
Manufactured Fireplace
Fireplace
Opening
Fireplace
Opening
Fireplace
Hood
Fireplace
Cross
Section
Approximate Screw
Locations

www.usaprocom.com
7200498-01A
Note: Use only original replacement parts. This will protect your warranty coverage for parts
replaced under warranty.
PARTS UNDER WARRANTY
Contact authorized dealers of this product. If they can’t supply original replacement parts, call
Customer Service toll free at 1-866-573-0674 for referral information.
When calling Customer Service or your dealer, have ready:
• Your name
• Your address
• Model and serial number of your heater
• How heater was malfunctioning
• Type of gas used (Propane or Natural gas)
• Purchase date
Usually, we will ask you to return the defective part to the factory
PARTS NOT UNDER WARRANTY
Contact authorized dealers of this product. If they can’t supply original replacement part(s)
call Customer Service toll free at 1-866-573-0674 for referral information.
When calling Customer Service have ready:
• Model number of your heater
• The replacement part number
REPLACEMENT PARTS

200498-01
Rev. A
09/18
REGISTER YOUR PRODUCT AT WWW.USAPROCOM.COM
IMPORTANT: We urge you to register your product within 10 days of date of installation, complete
with entire serial number which can be found on the rating plate. Please ll out the warranty infor-
mation above for your personal records. Retain this manual for future reference.
Always specify model and serial numbers when communicating with customer service.
We reserve the right to amend these specications at any time without notice. The only warranty applicable
is our standard written warranty. We make no other warranty, expressed or implied.
LIMITED WARRANTY
ProCom Heating, Inc. warrants this product to be free from defects in materials and components for ONE
(1) year from the date of rst purchase, provided that the product has been properly installed by a qualied
installer in accordance with all local codes and instructions furnished with the unit, operated and main-
tained in accordance with all applicable instructions. To make a claim under this warranty, the Bill of Sale
or cancelled check must be presented.
RESPONSIBILITY OF OWNER
This warranty is extended only to the original retail purchaser. This warranty covers the cost of part(s)
required to restore this heater to proper operating condition. Warranty part(s) MUST be obtained through
ProCom Heating, Inc. who will provide original factory replacement parts. Failure to use original factory
replacement parts voids this warranty. The heater MUST be installed by a qualied installer in accordance
with all local codes and instructions furnished with the unit.
WHAT IS NOT COVERED
This warranty does not apply to parts that are not in original condition because of normal wear and tear or
parts that fail or become damaged as a result of misuse, accidents, lack of proper maintenance or defects
caused by improper installation. Travel, diagnostic cost, labor, transportation and any and all such other
costs related to repairing a defective heater will be the responsibility of the owner.
TO THE FULL EXTENT ALLOWED BY THE LAW OF THE JURISDICTION THAT GOVERNS THE SALE
OF THE PRODUCT, THIS EXPRESS WARRANTY EXCLUDES ANY AND ALL OTHER EXPRESSED
WARRANTIES AND LIMITS THE DURATION OF ANY AND ALL IMPLIED WARRANTIES. INCLUDING
WARRANTIES OF MERCHANTABILITY AND FITNESS FOR A PARTICULAR PURPOSE TO ONE (1)
YEAR ON ALL COMPONENTS FROM THE DATE OF FIRST PURCHASE. PROCOM HEATING, INC.'S
LIABILITY IS HEREBY LIMITED TO THE PURCHASE PRICE OF THE PRODUCT AND PROCOM HEAT-
ING, INC. SHALL NOT BE LIABLE FOR ANY OTHER DAMAGES WHATSOEVER INCLUDING INDIRECT.
INCIDENTAL OR CONSEQUENTIAL DAMAGES.
Some states do not allow a limitation on how long an implied warranty lasts or an exclusion or limitation of
accidental or consequential damages, the above limitation on implied warranties, or exclusion or limitation
on damages may not apply to you.
This warranty gives you specic legal right, and you may also have other rights that vary from state to state.
WARRANTY
KEEP THIS WARRANTY
Model _______________________________
Serial No. ____________________________
Date Purchased _______________________
Keep receipt for warranty verication.
ProCom Heating, Inc.
Bowling Green, KY 42101
www.usaprocom.com
1-866-573-0674
/