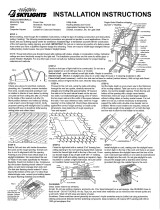
Velux VS C08 2004FS00X Installation guide

Type
Installation guide
2 VELUX
®
ENGLISH: Index
Page 2 Installation check list
Pages 2-3 Important installation requirements
Page 6 Warning (VSE only)
Pages 7-8 Planning
Pages 9-11 Preparing roof and mounting sky-
light
Pages 12-14 Installing underlayment
Pages 15-17 Flashing
Pages 18-19 Electrical connection (VSE only)
ESPAÑOL: Índice
Página 3 Lista de verificación de instalación
Páginas 3-4 Requisitos importantes de instala-
ción
Página 6 Advertencia (VSE solamente)
Páginas 7-8 Planificación
Páginas 9-11 Preparación del techo y montaje
del tragaluz
Páginas 12-14 Instalación de la lámina de soporte
Páginas 15-17 Tapajuntas
Páginas 18-19 Conexión eléctrica (VSE solamente)
FRANÇAIS : Index
Page 4 Liste de vérification préinstallation
Pages 4-5 Spécifications d'installation impor-
tantes
Page 6 Avertissement (VSE seulement)
Pages 7-8 Planification
Pages 9-11 Préparation de la toiture et mon-
tage du puits de lumière
Pages 12-14 Installation de la membrane de
toiture
Pages 15-17 Solin
Pages 18-19 Connexion électrique (VSE seule-
ment)
ENGLISH: Installation check list
Installer should verify that:
Deck mounted skylights VS and VSE are installed in roof pitches from
14° to 85°.
Rough opening is dimensioned correctly according to these installa-
tion instructions.
Skylight/skylight curb is properly wrapped in VELUX adhesive
skylight underlayment according to installation instructions supplied
with skylight, flashing or underlayment.
Proper VELUX flashing for the actual roofing material is installed ac-
cording to installation instructions supplied with the flashing.
Skylight cladding is properly secured and counter-flashed over all
flashing on the skylight frame.
Although removal of sash is not recommended, test and check that
the sash is properly attached at the top and bottom of the skylight
frame if sash was removed.
Skylight and accessories operate properly.
Customer is informed of the required
maintenance of the product as found at www.velux.com.
Customer is informed of the warranty claim procedure. For full
VELUX warranty, go to www.velux.com.
IMPORTANT: Failure to install the skylight, flashing and blinds in strict ac-
cordance with these VELUX instructions shall void the VELUX warranty.
Important installation requirements
Roof pitch
VS/VSE is designed for roof pitches 14° - 85° (3:12 - 137:12).
In case of roof pitches below 14° (3:12), please contact your VELUX sales
company for installation guidelines.
Importance of proper installation
Satisfactory product performance depends on proper installation.
Seller accepts no responsibility whatsoever for failure of an installer to
install VELUX
®
roof windows and skylights in accordance with these
installation instructions. Although VELUX roof windows and skylights are
designed and manufactured to the highest standards, severe climatic ex-
posure as well as adverse indoor conditions (ie high humidity) may produce
temperature conditions which exceed product performance standards. In
these cases, special preventive measures may be necessary.
Seller reserves the right to implement product changes for improvement
without prior notification.
Caution: Removal of sash during installation of the skylight is not recom-
mended.
However, if sash is removed, test and check that the sash is properly at-
tached at the top and bottom of the skylight frame. If working from an
interior room, close the skylight completely. To verify that it is properly at-
tached, carefully push outward on the sash. If working from the roof, close
the skylight completely. To verify that it is properly attached, carefully try
to lift the sash away from the skylight.
A: If the chain is disconnected at the bottom of the skylight, reconnect the
chain to the sash.
B: If the sash and frame hinges are not properly engaged at the top of the
skylight, ensure the sash is properly engaged by trying to push or lift up the
top of the sash near the hinge.
Operation and accessories
VS: Deck mounted skylight VS is designed for manual operation and pre-
pared for solar accessories.
VSE: Deck mounted skylight VSE is designed for electrical operation and
prepared for electrical accessories.
Refer to instructions for accessory type in question or contact your VELUX
sales company for further information.
Vapor barrier
Where a vapor barrier is part of the roof construction, this barrier must be
extended and connected to the skylight finish groove.
Treatment of wooden frame
Most VELUX skylights are pre-painted white but the option exists to order
stain grade skylights. These stain grade skylights received a temporary
treatment against mold and mildew. Further treatment with wood stain,
paint etc is necessary and can be done prior to installation or shortly after
installation. Care should be taken to ensure wood stain, paint etc is not
applied to gaskets.
Consult local jurisdictions and authorities for recycling and proper
disposal of removed skylights and materials.
NOTICE
Skylights and interior surfaces in older homes may have been painted
with lead-based paint, and removal of the skylights may disturb this
paint. Take proper precautions to minimize exposure to dust and debris.
For more information on the proper removal of lead paint go to
www.epa.gov/lead.
Seller assumes no obligation whatsoever for failure of an architect,
installer or building owner to comply with all applicable laws, ordi-
nances, building codes and safety requirements.
NOTICE
In rare circumstances, all glass may be subject to unexpected and spon-
taneous breakage due to imperfections in the glass that are undetectable
during the manufacturing and inspection process by the manufacturer of
the glass and the VELUX factory.
Your VELUX sales company offers the choice of laminated or tempered
glass skylights. Laminated glass is a combination of two or more glass
sheets with one or more interlayers of plastic (PVB) or resin. In case of
breakage, the interlayer is designed to hold the fragments together.
VELUX
®
3
Tempered glass does not contain an interlayer to hold the fragments to-
gether. Instead, tempered glass is designed to break into small, pebble-like
pieces. When tempered glass breaks, pieces of glass come loose and may
strike an individual.
Consult local regulations and/or building material consultants to
determine which type of glass is right for you or if laminated glass is
required in your application.
Important installation requirements for the USA
VELUX
®
series A21 skylights are designed and engineered to be installed
with VELUX flashing systems. VELUX flashing systems include VELUX ad-
hesive skylight underlayment in a quantity sufficient to install one skylight
of the size for which the flashing system was designed.
The VELUX "No Leak" installation warranty is based upon installation
strictly in accordance with VELUX deck or curb mounted skylight and re-
lated deck or curb mounted flashing installation instructions, which specify
the use and proper installation of the VELUX adhesive skylight underlay-
ment packaged with the flashing system.
If VELUX adhesive skylight underlayment is not used or is not properly in-
stalled and a service issue occurs related to underlayment omission, failure,
or its proper installation as detailed in the VELUX deck or curb mounted
skylight and deck or curb mounted flashing installation instructions, the
VELUX "No Leak" installation warranty is void.
VELUX America Inc. understands that there are other types of adhesive
underlayment that are of equal or higher quality than what is provided
by VELUX America Inc. However, VELUX America Inc. cannot approve
or validate that any specific type of adhesive underlayment is better or
worse. Thus, VELUX America Inc. places the risk of using an alternative
adhesive underlayment onto the specifier by stating that if the alternative
underlayment becomes a failure point for the skylight or flashing system
even if installed according to our instructions, then the VELUX "No Leak"
installation warranty cannot be honored. Further, the alternative underlay-
ment must not in any way obstruct, alter or prevent the proper functioning
of the complete skylight and flashing installation, such as increasing the
overall flashing system thickness beyond prescribed dimensions.
VELUX America Inc. affirms that if a high quality alternative adhesive
underlayment, installed per our instructions, does not fail but a leak occurs
in some other VELUX skylight or flashing component due to no cause from
the alternative underlayment, then such a leak would be covered under the
terms of the VELUX "No Leak" installation warranty.
ESPAÑOL: Lista de verificación de instalación
El instalador debe verificar que:
Los tragaluces VS y VSE montados sobre tablero estén instalados en
techos con inclinación de 14° a 85°.
Las dimensiones del hueco sean las correctas según estas instruccio-
nes de instalación.
El tragaluz/el brocal del tragaluz esté correctamente envuelto con
lámina de soporte autoadhesiva para tragaluz VELUX según las
instrucciones de instalación provistas con el tragaluz, el tapajuntas o
la lámina de soporte.
El tapajuntas VELUX indicado para el material de cubierta correspon-
diente se instale según las instrucciones de instalación provistas con
el tapajuntas.
El recubrimiento del tragaluz esté correctamente colocado y reforza-
do alrededor de todo el tapajuntas sobre el marco del tragaluz.
Aunque no se recomienda quitar la hoja de la ventana, verifique y
haga la prueba de que la hoja de la ventana esté correctamente fijada
en la parte superior e inferior del marco del tragaluz si se retiró la
hoja.
El tragaluz y los accesorios funcionen correctamente.
El cliente esté informado del mantenimiento que requiere el producto
tal como se describe en www.velux.com.
El cliente esté informado del procedimiento de uso de la garantía.
Para obtener información completa sobre la garantía VELUX, visitar
www.velux.com.
IMPORTANTE: De no instalarse el tragaluz, el tapajuntas y las persianas
en estricto cumplimiento con las instrucciones VELUX, la garantía VELUX
será anulada.
Requisitos importantes de instalación
Inclinación del techo
VS/VSE está diseñado para techos con inclinación de 14° - 85°
(3:12 - 137:12). Para los techos con inclinación de menos de 14° (3:12),
ngase en contacto con su distribuidor VELUX para solicitar las pautas de
instalación.
Importancia de una instalación correcta
El rendimiento satisfactorio del producto depende de su correcta instala-
ción.
Las ventanas de tejado y los tragaluces VELUX
®
deben instalarse siguiendo
estas instrucciones. El proveedor no acepta responsabilidad alguna por
errores del instalador. Aunque las ventanas de tejado y los tragaluces
VELUX se han diseñado y fabricado para lograr los niveles de calidad más
altos, la exposición a condiciones climáticas severas e incluso a condiciones
interiores adversas (por ejemplo, humedad muy alta) pueden producir
niveles de temperatura que exceden las condiciones de desempeño del pro-
ducto. En estos casos puede ser necesario establecer medidas preventivas.
El proveedor se reserva el derecho a hacer modificaciones a los productos
sin notificación previa con el fin de mejorarlos.
Precaución: No se recomienda quitar la hoja de la ventana durante la
instalación del tragaluz.
Sin embargo, si se retira la hoja, verifique y haga la prueba de que la hoja
de la ventana esté correctamente fijada en la parte superior e inferior del
marco del tragaluz. Si está trabajando desde una habitación interna, cierre
el tragaluz por completo. Para verificar si la hoja está correctamente fijada,
presiónela hacia afuera con cuidado. Si está trabajando desde el techo,
cierre el tragaluz por completo. Para verificar que está correctamente
fijada, intente levantar la hoja del tragaluz con cuidado.
A: Si la cadena está desconectada en la parte inferior del tragaluz, vuelva a
conectarla a la hoja de la ventana.
B: Si la hoja y las bisagras del marco no están correctamente encajadas
en la parte superior del tragaluz, verifique que la hoja esté correctamente
colocada intentando presionar o levantar el extremo superior de la hoja en
la parte cercana a la bisagra.
Accionamiento y accesorios
VS: El tragaluz VS montado sobre tablero está diseñado para accionamien-
to manual y preparado para la instalación de accesorios solares.
VSE: El tragaluz VSE montado en tablero está diseñado para accionamien-
to eléctrico y preparado para instalación de accesorios eléctricos.
Consulte las instrucciones por tipo de accesorio o comuníquese con su
distribuidor VELUX para obtener más información.
Barrera de vapor
Cuando una barrera de vapor forma parte de la construcción de un techo,
debe extenderse y conectarse a la ranura de remate del tragaluz.
Tratamiento del marco de madera
La mayoría de los tragaluces VELUX vienen prepintados en blanco pero
se pueden pedir tragaluces barnizables. Los tragaluces barnizables han
recibido un tratamiento temporario que los protege del moho y los hongos.
Es necesario tratarlos con barniz, pintura, etc. antes de su instalación o in-
mediatamente después. Debe tenerse cuidado de no aplicar barniz, pintura,
etc. a las empaquetaduras.
6 VELUX
®
ENGLISH:
WARNING
Electrical connection
It is customer's responsibility:
To contact a qualified electrical installer.
To assure that the electrical installation is
adequate and in conformity with National
Electrical Code, ANSI/NFPA 70 - latest edi-
tion*, and all local codes and ordinances.
Failure to do so could result in fire, electrical
shock, other serious personal injury or death.
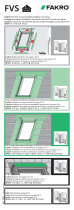
Deck mounted skylight VSE is designed for use in
both in-reach and out-of-reach places. To reduce
the risk of fire, personal injury and death:
Do not install the skylight in a location or at
a height where unsupervised children may be
present.
Always switch o power to the skylight op-
erator at the service panel when connecting
the skylight, when installing accessories and
whenever the operator cover is removed.
On suspicion of malfunction, switch o power
and call for service.
Observe that the rain sensor activates closing
function when getting wet.
Never let children play with the skylight. Keep
remote control away from children.
Beware of potential for serious personal injury
or death.
There are no serviceable parts inside the
skylight operator. Accessories are to be
connected according to VELUX installation
instructions.
Electrical Shock Hazard
The skylight operator is a class I product.
Disconnect power to the junction or outlet
box before servicing the skylight.
Do not have a fuse in the neutral circuit. This
could result in a fire, electrical shock or other
personal injury.
*National Fire Protection Association, Battery-
march Park, Quincy Massachusetts 02269.
Save these installation instructions. Consult
user manual for important safety warnings.
io-homecontrol
®
provides advanced and secure radio technology that is easy to install.
io-homecontrol
®
labelled products communicate with each other, improving comfort,
security and energy savings.
www.io-homecontrol.com
ESPAÑOL:
ADVERTENCIA
Conexión eléctrica
Es responsabilidad del cliente:
Ponerse en contacto con un instalador eléctri-
co calificado.
Asegurarse de que la instalación eléctrica sea
adecuada y cumpla con las normas del Código
Eléctrico Nacional, ANSI/NFPA 70 - última
edición*, y con todas las reglamentaciones y
ordenanzas locales.
En caso de no hacerlo, puede producirse un
incendio, electrocución u otras lesiones serias
o muerte.
El tragaluz VSE montado sobre tablero es
diseñado para usarse en lugares de fácil alcance
y lugares que no son de fácil alcance. Para reducir
los peligros de incendio, lesiones personales y
muerte:
No instalar en lugares o a una altura que los
niños puedan alcanzar sin supervisión.
Siempre desconecte la alimentación eléctrica
del motor de apertura del tragaluz en el panel
de servicio al conectar el tragaluz, instalar los
accesorios y cada vez que se retire la cubierta
del motor.
Si el motor de apertura no funciona normal-
mente, desconecte la alimentación y llame al
servicio de reparación.
Verifique que el sensor de lluvia active la
función de cierre al mojarse.
Nunca permita que los niños jueguen con
el tragaluz. Mantenga el mando a distancia
fuera del alcance de los niños.
Esté atento por el potencial de lesiones graves
o muerte.
El motor de apertura del tragaluz no contiene
partes reparables. Los accesorios deben
conectarse de acuerdo con las instrucciones
de instalación VELUX.
Peligro de descarga eléctrica
El motor de apertura del tragaluz es un pro-
ducto de clase I.
Desconecte la alimentación de la caja de
empalmes o distribución antes se realizar
reparaciones en el tragaluz.
No coloque un fusible en el circuito neutro.
Esto podría provocar un incendio, descarga
eléctrica u otras lesiones personales.
*Asociación Nacional de Protección contra Incen-
dios, Batterymarch Park, Quincy Massachusetts
02269.
Conserve estas instrucciones de instalación.
Consulte el manual del usuario para verificar
advertencias de seguridad importantes.
io-homecontrol
®
proporciona tecnología avanzada de radio frecuencia, segura y fácil de
i
nstalar. Los productos etiquetados io-homecontrol
®
se comunican entre , mejorando
el confort, la seguridad y el ahorro de energía.
www.io-homecontrol.com
FRANÇAIS :
AVERTISSEMENT
Connexion électrique
Il incombe aux clients :
De communiquer avec un installateur élec-
trique compétent.
De s'assurer que l'installation électrique est
adéquate et conforme aux normes du Code
national de l'électricité, ANSI/NFPA 70 -
dernière édition*, ainsi qu'aux normes et aux
règlements locaux en vigueur.
Le défaut de suivre ces directives pourrait
occasionner un incendie, une décharge élec-
trique, des blessures graves ou la mort.
Le puits de lumière VSE à cadre intégré monté
directement sur la toiture a été conçu pour une
installation à pore ou hors de portée. Pour
réduire les risques d'incendie, de blessures ou de
mort :
Ne pas installer dans un endroit ou à hauteur
accessible aux enfants non supervisés.
Coupez toujours l'alimentation électrique
du moteur d'ouverture du puits de lumière
sur le panneau de service au moment de la
connexion au puits de lumière, de l'installation
d'accessoires et du retrait du couvercle du
moteur.
Si le moteur d'ouverture ne fonctionne pas
comme il se doit, coupez l'alimentation et
appelez un représentant de service.
Vérifiez si le détecteur de pluie entraîne la
fermeture du puits de lumière lorsqu'il devient
mouillé.
Ne laisser jamais des enfants jouer avec le
puits de lumière. Gardez la télécommande
hors de portée des enfants.
fiez-vous des risques de blessures corpo-
relles graves ou pouvant causer la mort.
Le moteur d'ouverture du puits de lumière ne
contient aucune pièce pouvant être réparée.
Les accessoires doivent être raccordés selon
les instructions d'installation VELUX.
Risque d'électrocution
Le moteur d'ouverture du puits de lumière est
un produit de classe I.
Coupez l'alimentation au btier de raccor-
dement avant de faire l'entretien du puits de
lumière.
Il ne faut pas de fusible dans le conducteur
neutre, car cela pourrait occasionner un
incendie, des décharges électriques ou des
blessures.
*National Fire Protection Association, Battery-
march Park, Quincy Massachusetts 02269.
Conservez ces instructions d'installation.
Consultez le manuel de l'utilisateur pour des
avertissements importants de sécurité.
io-homecontrol
®
repose sur une technologie avane, sécurisée et sans-fil, facile à
installer. Les produits io-homecontrol
®
communiquent entre eux pour offrir plus de
confort, de sécurité et d'économies d'énergie.
www.io-homecontrol.com
VSE
VELUX
®
7
12"
300 mm
12"
300 mm
12"
300 mm
12"
300 mm
18"
450 mm
24"
600 mm
18"
450 mm
24"
600 mm
BA C
ENGLISH: Maintain illustrated clearances
between skylight frame and critical areas such as
valleys, ridges, slope changes and roof-to-wall-
intersections.
When installing skylights side by side within the
span 2½" - 12" (65 mm - 300 mm), please refer to
VELUX combi-flashing instructions.
ESPAÑOL: Respete los espacios libres ilustrados
entre el marco del tragaluz y áreas críticas como
limahoyas, cumbreras, cambios de inclinación e
intersecciones de techo y pared.
Cuando instale tragaluces contiguos a una distan-
cia de 2½" - 12" (65 mm - 300 mm) entre ellos,
consulte las instrucciones de tapajuntas adosados
de VELUX.
FRANÇAIS : Respectez le dégagement illustré
entre le cadre du puits de lumière et les endroits
critiques tels que noue, ftage, variation d'inclinai-
son et intersection de toiture et mur.
Lors d'installation de puits de lumière VELUX côte
à côte avec espacement de 2½" - 12" (65 mm -
300 mm), veuillez vous référer aux instructions
portant sur les solins combinés VELUX.
TOOLS
HERRAMIENTAS
OUTILS
ENGLISH: Planning and clearance around
installations
ESPAÑOL: Planificación y espacio libre
alrededor de las instalaciones
FRANÇAIS : Planification et dégagement
requis autour de l'installation
ENGLISH: For skylights provided with an insect
screen, a flared light shaft is required to remove
the insect screen. See details.
ESPAÑOL: Para poder retirar las mosquiteras es
necesario que los tragaluces tengan un recercado
de paredes oblicuas. Vea los dibujos.
FRANÇAIS : Pour les puits de lumière munis d'une
moustiquaire, il faut une ouverture évasée pour
enlever celle-ci. Consultez les détails.
8 VELUX
®
ENGLISH: Light shaft application ESPAÑOL: Aplicación del hueco de luz FRANÇAIS : Pourtour du puits de lumière
Roof rafter
Viga
Chevron
Framing
Armazón
Renforcement
Drywall
Tablaroca
Finition
Vapor barrier
Barrera de vapor
Coupe-vapeur
Insulation
Aislamiento
Isolation
VELUX
®
9
Skylight size
Tamaño del
tragaluz
Taille du puits
de lumière
Rough opening
Medida del hueco
Dimensions de
l'ouverture brute
C01
21" x 26
7
8"
533 mm x 682 mm
C04
21" x 37
7
8"
533 mm x 962 mm
C06
21" x 45
3
4"
533 mm x 1162 mm
C08
21" x 54
7
16"
533 mm x 1382 mm
M04
30
1
16" x 37
7
8"
763 mm x 962 mm
M06
30
1
16" x 45
3
4"
763 mm x 1162 mm
M08
30
1
16" x 54
7
16"
763 mm x 1382 mm
S01
44
1
4" x 26
7
8"
1123 mm x 682 mm
S06
44
1
4" x 45
3
4"
1123 mm x 1162 mm
W
H
W
H
1
min 12"
min 300 mm
min 12"
min 300 mm
min 12"
min 300 mm
ENGLISH: Cut rough opening according to the
measurements in the chart.
Roof with battens:
Clear away battens from rough opening to allow
for proper installation of underlayment.
ESPAÑOL: Corte el hueco de acuerdo a las medi-
das en la tabla.
Techo con rastreles:
Quite los rastreles del hueco para permitir la cor-
recta instalación de la lámina de soporte.
FRANÇAIS : Coupez l'ouverture brute selon les
dimensions du tableau.
Toiture avec voliges :
Retirez les lattes de toit de l'ouverture brute
pour permettre une installation adéquate de la
membrane.
10 VELUX
®
2
3
4½"
113 mm
4½"
113 mm
7"
180 mm
1½"
38 mm
X
X
ENGLISH: Remove existing roofing underlayment
around the rough opening as shown.
ESPAÑOL: Retire la lámina de soporte existente
de la zona alrededor del hueco tal como se indica.
FRANÇAIS : Retirez la membrane de toiture exis-
tante autour de l'ouverture brute, tel qu'illustré.
ENGLISH: Mark corners of the rough opening.
ESPAÑOL: Marque las esquinas alrededor del
hueco.
FRANÇAIS : Marquez les coins de l'ouverture
brute.
ENGLISH: Roof with battens: Place 1½"
(38 mm) wide battens around rough opening.
Batten thickness around rough opening should
be equal to thickness of battens used for roofing
material.
ESPAÑOL: Techo con rastreles: Coloque rastre-
les de 1½" (38 mm) de ancho alrededor del hueco.
Los rastreles a colocar sobre el hueco deben tener
el mismo grosor que los usados para el material de
cubierta.
FRANÇAIS : Toiture avec voliges : Placez
des lattes de largeur 1½" (38 mm) autour de
l'ouverture brute. L'épaisseur des lattes utili-
es autour de l'ouverture devrait être égale à
l'épaisseur des lattes utilisées pour le matériel de
toiture.
12 VELUX
®
6
½"
13 mm
6"
150 mm
6"
150 mm
ENGLISH: To ensure waterproofing, skylight
frames should be completely wrapped in VELUX
adhesive skylight underlayment supplied with
the flashing. This underlayment must be applied
before installing the flashing.
Note: If snow accumulation on the roof is likely,
waterproofing is achieved by installing a continu-
ous self-adhesive waterproof membrane beneath
the roofing material and flashing material. VELUX
adhesive skylight underlayment around the
skylight frame must be properly integrated with
waterproof membrane on roof decking.
Peel off backing from VELUX adhesive skylight
underlayment prior to applying it to roof decking
and skylight frame. Ensure that surfaces are clean,
dry and free of debris.
Wrap the bottom frame and corners of the
skylight with the underlayment and create water-
shedding laps over roofing underlayment.
Note: Observe the measurements stated.
ESPAÑOL: Para garantizar la impermeabilidad, los
marcos del tragaluz deben estar completamente
envueltos con la lámina de soporte autoadhesiva
VELUX que viene con el tapajuntas. La lámina
debe aplicarse antes de instalar el tapajuntas.
Nota: Si se acumula nieve sobre el techo, se logra
la impermeabilidad instalando una membrana im-
permeable autoadhesiva continua por debajo del
material de cubierta y del material del tapajuntas.
La lámina de soporte autoadhesiva VELUX
colocada alrededor del marco del tragaluz debe
integrarse correctamente con la membrana imper-
meable del tablero.
Despegue la protección del reverso de la lámina de
soporte autoadhesiva VELUX antes de aplicarla al
tablero del techo y el marco del tragaluz. Verifique
que las superficies estén limpias, secas y sin resi-
duos.
Envuelva las esquinas y marco inferior del tragaluz
con la lámina de soporte para crear solapas imper-
meabilizantes sobre la lámina de soporte del techo.
Nota: Respete las medidas especificadas.
FRANÇAIS : Pour en assurer son étanchéité, les
cadres du puits de lumière devraient être com-
plètement enveloppés à l'aide de la membrane de
toiture autocollante pour puits de lumière VELUX
fournie avec le solin. Cette membrane doit être
appliquée avant l'installation du solin.
Note : Si des accumulations de neige sont
probables, l'étanchéité sera assurée en instal-
lant une membrane autocollante à l'épreuve des
intempéries en continu sous le matériel de toiture
et sous les solins. La membrane de toiture autocol-
lante pour puits de lumière VELUX autour du cadre
du puits de lumière doit être proprement intégrée
à la membrane étanche du tablier de toiture.
Retirez le papier protecteur de la membrane de
toiture autocollante pour puits de lumière VELUX
avant de l'appliquer à la toiture et au cadre du
puits de lumière. Assurez-vous que les surfaces
sont propres, sèches et sans débris.
Enveloppez le cadre inférieur et les coins du puits
de lumière avec la membrane autocollante et
formez des rebords pour l'évacuation de l'eau par-
dessus la membrane de toiture.
Note : Respectez les dimensions illustrées.
VELUX
®
13
8
9a 9b
1
2
ENGLISH: Wrap the top frame and corners of the
skylight with VELUX adhesive skylight underlay-
ment and create proper water-shedding lap.
ESPAÑOL: Envuelva las esquinas y marco superior
del tragaluz con la lámina de soporte autoadhesiva
VELUX para crear solapas impermeabilizantes
apropiadas.
FRANÇAIS : Enveloppez la partie supérieure et
les coins du puits de lumière avec la membrane de
toiture autocollante pour puits de lumière VELUX
et formez des rebords pour l'évacuation de l'eau.
7
½"
13 mm
6"
150 mm
½"
13 mm
6"
150 mm
6"
150 mm
ENGLISH: To allow for proper drainage, inter-
weave VELUX adhesive skylight underlayment as
shown in
9a
for new construction applications.
For retrofit applications, interweave VELUX adhe-
sive skylight underlayment as shown in
9b
.
ESPAÑOL: Para lograr un drenaje adecuado,
intercale la lámina de soporte autoadhesiva para
tragaluz VELUX como se indica en
9a
para con-
strucciones nuevas. Para aplicaciones posteriores,
intercale la lámina de soporte autoadhesiva para
tragaluz VELUX como se indica en
9b
.
FRANÇAIS : Pour assurer un drainage adéquat,
entrecroisez la membrane de toiture autocollante
pour puits de lumière VELUX, tel qu'illustré à la
figure
9a
dans le cas d'une installation sur une
nouvelle construction. Pour une installation sur
une toiture existante, entrecroisez la membrane de
toiture autocollante pour puits de lumière VELUX,
tel qu'illustré à la figure
9b
.
.
ENGLISH: Wrap the side frames and corners
of the skylight with VELUX adhesive skylight
underlayment and create water-shedding laps over
roofing underlayment.
Note: Observe the measurements stated.
ESPAÑOL: Envuelva las esquinas y lados del mar-
co del tragaluz con la lámina de soporte autoadhe-
siva VELUX para crear solapas impermeabilizantes
sobre la lámina de soporte del techo.
Nota: Respete las medidas especificadas.
FRANÇAIS : Enveloppez les côtés du cadre et les
coins du puits de lumière avec la membrane de
toiture autocollante pour puits de lumière VELUX
et formez des rebords pour l'évacuation de l'eau
par-dessus la membrane de toiture.
Note : Respectez les dimensions illustrées.
14 VELUX
®
10
1 2
ZOZ
216
ENGLISH: Installing VELUX adhesive skylight
underlayment on roof with battens:
Refer to installation instructions included with
VELUX adhesive skylight underlayment.
ESPAÑOL: Instalación de la lámina de soporte
autoadhesiva para tragaluz VELUX en techos
con rastreles:
Consulte las instrucciones de instalación incluidas
con la lámina de soporte autoadhesiva VELUX.
FRANÇAIS : Installation de la membrane de toi-
ture autocollante pour puits de lumière VELUX
sur toiture avec voliges :
Veuillez vous référer aux instructions d'installation
fournies avec la membrane de toiture autocollante
pour puits de lumière VELUX.
ENGLISH: You are now ready to install the flash-
ing. If the flashing is not to be installed immedi-
ately, reinstall cladding.
ESPAÑOL: Ya puede instalar el tapajuntas. Si no
va a instalar el tapajuntas inmediatamente, vuelva
a colocar el recubrimiento.
FRANÇAIS : Vous êtes maintenant prêt à installer
les solins. Si les solins ne sont pas installés immé-
diatement, réinstallez le revêtement.
2
2
1
VELUX
®
15
A B
11
ENGLISH:
Caution: Removal of sash during installation of
the skylight is not recommended.
However, if sash is removed, test and check that
the sash is properly attached at the top and
bottom of the skylight frame. If working from an
interior room, close the skylight completely. To
verify that it is properly attached, carefully push
outward on the sash. If working from the roof,
close the skylight completely. To verify that it is
properly attached, carefully try to lift the sash
away from the skylight.
A: If the chain is disconnected at the bottom of
the skylight, reconnect the chain to the sash.
B: If the sash and frame hinges are not properly
engaged at the top of the skylight, ensure the
sash is properly engaged by trying to push or
lift up the top of the sash near the hinge.
ESPAÑOL:
Precaución: No se recomienda quitar la hoja de la
ventana durante la instalación del tragaluz.
Sin embargo, si se retira la hoja, verifique y haga
la prueba de que la hoja de la ventana esté correc-
tamente fijada en la parte superior e inferior del
marco del tragaluz. Si está trabajando desde una
habitación interna, cierre el tragaluz por completo.
Para verificar si la hoja está correctamente fijada,
presiónela hacia afuera con cuidado. Si está
trabajando desde el techo, cierre el tragaluz por
completo. Para verificar que está correctamente
fijada, intente levantar la hoja del tragaluz con
cuidado.
A: Si la cadena está desconectada en la parte
inferior del tragaluz, vuelva a conectarla a la
hoja de la ventana.
B: Si la hoja y las bisagras del marco no están
correctamente encajadas en la parte supe-
rior del tragaluz, verifique que la hoja esté
correctamente colocada intentando presionar
o levantar el extremo superior de la hoja en la
parte cercana a la bisagra.
FRANÇAIS :
Avertissement : L'enlèvement du volet lors de
l'installation de puits de lumière n'est pas recom-
mandé.
Toutefois, si le volet est enlevé, assurez-vous
de tester et de vérifier que le volet est attaché
correctement en haut et en bas du cadre du puits
de lumière. Si vous travaillez à partir d'un espace
intérieur, fermez complètement le puits de lumière.
Pour vérifier qu'il est correctement attaché,
poussez délicatement sur le volet vers l'extérieur.
Si vous travaillez sur le toit, fermez complètement
le puits de lumière. Pour vérifier qu'il est attaché
correctement, soigneusement essayer de soulever
le volet loin du puits de lumière.
A: Si la chaîne est détachée du bas du puits de
lumière, rattachez la chaîne au volet.
B: Si le volet et les charnières du cadre ne sont pas
correctement enclenchés dans la partie supé-
rieure du puits de lumière, assurez-vous que le
volet est correctement enclenché en essayant
de pousser ou de soulever le haut du volet à
proximité de la charnière.
VELUX
®
19
A
B
14
ENGLISH: Power cable
(supplied with skylight):
20 ft (6 m)
ESPAÑOL: Cable de
alimentación (suminis-
trado con el tragaluz):
20 pies (6 m)
FRANÇAIS : Câble
électrique (fourni avec
le puits de lumière) :
20 pi (6 m)
ENGLISH: Junction or
outlet box (not provided
with skylight)
ESPAÑOL: Caja de em-
palmes o distribución
(no suministrada con el
tragaluz)
FRANÇAIS : Boîtier
de raccordement (non
fourni avec le puits de
lumre)
VSE
A
B
ENGLISH: A junction box or an outlet box (not
provided with skylight) is required for permanent
connection of the 20 ft (6 m) skylight power cable.
A single phase 120 V, 60 Hz, 40 W branch circuit
(continuous electrical feed) is required. The branch
circuit must be protected by a 15 A circuit breaker
or time delay fuse.
The junction or outlet box in which the skylight
power cable is terminated must be accessible for
inspection after installation is complete. A listed
junction or outlet box and listed wire nuts must be
used for the connection to the branch circuit.
Refer to KLR 200 quick start guide for registration
and operation of skylight.
ESPAÑOL: Para conectar el cable de alimentación
permanente de 20 pies (6 m) del tragaluz hace
falta una caja de empalmes o distribución (no
suministrada con el tragaluz).
Se requiere un circuito derivado monofásico de
120 V, 60 Hz, 40 W (alimentación eléctrica con-
tinua). El circuito derivado debe estar protegido
por un disyuntor de 15 amperios o un fusible
temporizado.
La caja de empalmes o distribución donde se
conecta el cable de alimentación del tragaluz debe
estar en un lugar accesible para su inspección una
vez completada la instalación. Debe usarse una
caja de empalmes o distribución listada y tuercas
para alambre listadas para la conexión al circuito
derivado.
Consulte la guía rápida de KLR 200 para registrar
y operar el tragaluz.
FRANÇAIS : Un boîtier de raccordement (non
fourni avec le puits de lumière) est nécessaire pour
la connexion permanente du câble électrique du
puits de lumière de 20 pi (6 m).
Un circuit de dérivation monophasé de 120 V,
60 Hz, 40 W d'alimentation électrique continue
est nécessaire. Le circuit de dérivation doit être
protégé par un mécanisme à retardement ou un
disjoncteur de 15 ampères.
Le boîtier de raccordement auquel câble électrique
du puits de lumière est connecté doit pouvoir être
inspecté lorsque l'installation est terminée. Il faut
utiliser le boîtier de raccordement et les écrous
de câble énumérés pour la connexion au circuit de
dérivation.
Veuillez vous référer au guide de démarrage rapide
du KLR 200 pour la synchronisation et le fonction-
nement du puits de lumière.
VS/VSE DECK MOUNTED SKYLIGHT INSTALLATION INSTRUCTIONS. ©2010, 2016 VELUX GROUP ® VELUX AND THE VELUX LOGO ARE REGISTERED TRADEMARKS USED UNDER LICENSE BY THE VELUX GROUP
INSTRUCTION D'INSTALLATION DU PUITS DE LUMIÈRE VS/VSE À CADRE INTÉGRÉ MONTÉ DIRECTEMENT SUR LA TOITURE. ©2010, 2016 VELUX GROUP ®VELUX ET LE LOGO VELUX SONT DES MARQUES DE COMMERCE DÉPOSÉES ET EMPLOYÉES SOUS LICENCE DE VELUX GROUP
US: VELUX America LLC
1-800-88-VELUX
CA: VELUX Canada Inc.
1 800 88-VELUX (888-3589)
www.velux.com
ENGLISH:
Home owner information
Please complete and give to home owner.
Date: ...................................................................................................................................................................................................................................................................
Product number: ............................................................................................................................................................................................................................................
(stamped on product exterior)
Quantity: ...........................................................................................................................................................................................................................................................
Flashing: ............................................................................................................................................................................................................................................................
Accessories installed: ...................................................................................................................................................................................................................................
Model ................ Size ............... Variant code ..........................
Roofing material: ...........................................................................................................................................................................................................................................
Installation contractor: ................................................................................................................................................................................................................................
Dealer purchased from: ...............................................................................................................................................................................................................................
ESPAÑOL:
Información del propietario
Completar y entregar al propietario.
Fecha: ................................................................................................................................................................................................................................................................
Número de producto: ....................................................................................................................................................................................................................................
(impreso en la parte externa del producto)
Cantidad: ..........................................................................................................................................................................................................................................................
Tapajuntas: ......................................................................................................................................................................................................................................................
Accesorios instalados: ..................................................................................................................................................................................................................................
Modelo ............... Tamaño .............. Código de variante ..........................
Material de cubierta: ..................................................................................................................................................................................................................................
Instalador: ........................................................................................................................................................................................................................................................
Distribuidor al que se compró el producto: ...........................................................................................................................................................................................
FRANÇAIS :
Information pour le propriétaire occupant
Veuillez compléter et remettre au propriétaire occupant.
Date : ..................................................................................................................................................................................................................................................................
Numéro de produit : .....................................................................................................................................................................................................................................
(étampé sur la partie exrieure du produit)
Quanti : ..........................................................................................................................................................................................................................................................
Solin : .................................................................................................................................................................................................................................................................
Accessoires installés : ..................................................................................................................................................................................................................................
Modèle ................ Dimension ............... Code ..........................
Matériel de toiture : .....................................................................................................................................................................................................................................
Entrepreneur en installation : ...................................................................................................................................................................................................................
Détaillant : .......................................................................................................................................................................................................................................................
  • Page 1 1
  • Page 2 2
  • Page 3 3
  • Page 4 4
  • Page 5 5
  • Page 6 6
  • Page 7 7
  • Page 8 8
  • Page 9 9
  • Page 10 10
  • Page 11 11
  • Page 12 12
  • Page 13 13
  • Page 14 14
  • Page 15 15
  • Page 16 16
  • Page 17 17
  • Page 18 18
  • Page 19 19
  • Page 20 20

Velux VS C08 2004FS00X Installation guide

Type
Installation guide

Ask a question and I''ll find the answer in the document

Finding information in a document is now easier with AI