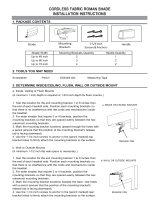
ASSEMBLY INSTRUCTIONS/INSTRUCTIONS POUR L’ASSEMBLAGE/INSTRUCCIONES DE ENSAMBLAJE
1a.
For outside mounting, clip
themounting bracket (AA) onto
the headrail of shade (A). Hold
shade (A) level at the height
desired and center it over the
window opening. Mark the exact
location of each mounting
bracket (AA) with a pencil.
Remove the mounting brackets
(AA) from the headrail of shade
1b.
2.
3. Attach the handle (BB) to the
center of the bottom rail of shade
(A). Check carefully to assure
that the handle (BB) is properly
snapped into place.
3
Fixez la poignée (BB) au centre
de la traverse inférieure du store
(A). Vérifiez soigneusement
que poignée (BB) est bien fixée.
Fije la manija (BB) al centro del riel inferior de
persiana (A). Verifique con cuidado para asegurarse
de manija (BB) haya ingresado en su lugar.
A
BB
1a
AA
CC
1b
AA
CC
2
click
déclic
escuche un clic
A
(A). Predrill the screw holes and then securing bracket (AA)
to the wall or window molding with wood screws (CC).
Pour une installation à l’extérieur du châssis, fixez les
charnières (AA) au caisson du store (A). Maintenez le store
(A) à la hauteur désirée et centrez-le par rapport à la
fenêtre. Marquez l’empacement de chaque charnière (AA)
à l’aide d’un crayon. Retirez les charnières (AA) du
caisson (A) et placez l’extrémité de chacune d’entre elle à
l’endroit marqué. Percez des avant-trous pour les vis.Fixez
chaque charnière (AA) à l’aide des vis à bois (CC).
Para montaje exterior, coloque la abrazadera de montaje
(AA) sobre el cortinero de persiana (A). Sostenga la
persiana (A) a la altura deseada y céntrela sobre la aber
tura de la ventana. Use un lápiz para marcar la ubicación
exacta de cada abrazadera de montaje (AA).Retire las
abrazaderas de montaje (AA) del cortinero de persiana (A).
Taladre previamente los orificios para los tornillos. Atornille
cada abrazadera de montaje (AA) en la pared o en la
moldura de la ventana con los tornillos para madera (CC).
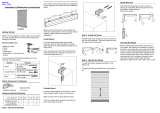
For inside mounting, clip the
mounting brackets (AA) onto the
headrail of shade (A). Hold
shade(A) in place and make
pencil mark at the rear of each
mounting bracket(AA). Remove
the mounting brackets (AA) from
the headrail. Predrill the screw
holes and then secure the
mounting bracket (AA) to the wall
or window molding with wood screws (CC).
Pour une installation à l’intérieur du châssis, fixez les
charnières (AA) au caisson du store (A). Miantenez le store
(A) à la hauteur désirée et marquez l’arrière de chaque
charnière (AA) à l’aide d’un crayon. Retirez les charnières
(AA) du caisson et alignez-les en fonction des marques.
Percez des avant-trous pour les vis. Fixez chaque charière
(AA) à l’aide des vis à bois (CC).
Para montaje interior, coloque la abrazadera de montaje
(AA) sobre el cortinero de persiana (A). Sostenga la
persiana (A) en su lugar y usando un lápiz haga una marca
en la parte posterior de cada abrazadera de montaje
(AA).Saque las abrazaderas de montaje (AA) del cortinero
y alíneelas con las marcas. Taladre previamente los
orificios para los tornillos. Fije cada abrazadera de montaje
(AA) con los tornillos para madera (CC).
Lift the headrail of shade (A)
into position such that the
inner front edge of the
headrail slides into the slot at
the front of each mounting
bracket (AA). Push the
headrail upward until the
flexible tab at the bottom of
each mounting bracket (AA)
snaps onto the back of the
headrail. Check carefully to assure each mounting
bracket (AA) is properly snapped into place.
Soulevez le caisson du store (A) de façon à ce que son
rebord intérieur avant glisse dans la fente située à
l’avant de chaque charnière (AA). Poussez le caisson
vers le haut jusqu’à ce que la languette souple située au
bas de las charnière (AA). Vérifiez soigneusement que
chaque charière (AA) est bien fixée.
Levante el continero de persiana (A) hasta colocarlo de
tal forma que el extremo frontal interior del continero se
deslice en la ranura en la parte frontal de cada abraza-
dera de montaje (AA). Presione el continero de persi-
ana hacia arriba hasta que la lengüeta flexible en la
parte inferior de cada abraza-dera de montaje (AA)
ingrese en la parte posterior del continero de persiana.
Verifique con cuidado para asegurarse de que cada
abrazadera de montaje (AA) haya ingresado en su
lugar.