
GERMAN AUDIO ENGINEERING
USER MANUAL
CEILING MOUNT
Order No.: 31102500

2
CEILING MOUNT
→
Installation and assembly must be carried out by a qualified specialist.
→
The following information is exclusively for the use of the specialist,
who should be able to carry out their task correctly. This
specialist‘s training must include the ability to identify possible
hazards and assess risks in order to implement all appropriate
health and safety measures.
→ Please read the installation and safety instructions thoroughly.
When transferring ownership or use of this product, this manual
must always be included.
→ Read the operating instructions for the speaker system,
which is to be mounted on this mounting device, and follow its
installation notes.
→
Only use accessories and spare parts from the ADAM Audio range.
→
Observe all relevant regional, national and international regulations
and guidelines when installing.
→
Use the ADAM Audio ceiling mount and other mounting accessories
only to attach speakers weighing up to 40,6 kg [89.5 lbs].
→ The ceiling mount must not be exposed to vibrations.
IMPORTANT NOTES
ON INSTALLATION AND SAFETY

A
D [4 mm]
C
B
3
CEILING MOUNT
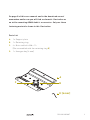
On page 8 of this user manual and in the download area of
www.adam-audio.com you will find a schematic illustration as
an aid for mounting ADAM Audio’s accessories. Only use those
fastening materials shown in this illustration.
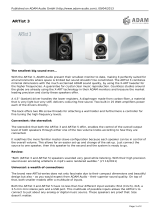
Parts List
A: 1 x Support plate
B: 1 × Retaining ring
C: 4 × Nuts and bolts M8 × 10
[Pre-assembled with the retaining ring B]
D: 1 × Hexagon key [4 mm]

4
CEILING MOUNT
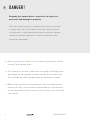
DANGER!
Dropping the support plate A may result in injuries to
personnel and damage to property.
Until the support plate A is properly and correctly secured
or fixed, they can still fall down. Until the support plate A
is
attached to a load-bearing horizontal surface a second
similarly qualified specialist to the first one must hold
those the component.
→ Attach the support plate A to a load bearing horizontal surface
using all 6 mounting holes.
→ This area must be able to bear the total weight
resulting from
the weight of the speaker system and the
accessories used.
Also consider possible leverage when calculating
this weight.
→ When selecting the fastening elements [not included], please
ensure that they can be anchored permanently to the material
of the selected horizontal surface, and can carry the calculated
total weight.

5
CEILING MOUNT
→
Do not place the loudspeaker into the desired angle of inclination
until it is fully connected to the ceiling bracket and mounting
hardware and the securing screws are tightened.
→
Attach the loudspeaker provided with mounting accessories to
the ceiling bracket. Please follow the instructions below.
→
Loosen the 4 threaded pins C on the retaining ring B and
slide it upwards. Tighten one of the threaded studs so that
the retaining ring can not slide off [Fig. 1].
→
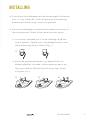
Attach the mounting hardware, e.g. Adapter Plate For
Mounting Bracket, attached to the speaker system to the
telescopic boom A. Please follow the three steps shown
in Figures 2 to 4.
INSTALLING
1]
2] 3] 4]

5] 6]
6
CEILING MOUNT
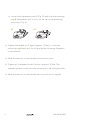
→ Loosen the tightened screw C [Fig. 5] and slide the retaining
ring B downwards until it rests on the top of the mounting
accessory [Fig. 6].
→ Tighten the thread pin C again [approx. 10 Nm], so that the
retaining ring B does not slip off during the following alignment
of the monitor.
→ Move the monitor to the desired horizontal position.
→ Tighten all 4 threaded studs C with a torque of 15 Nm. The
speaker system is now securely connected to the ceiling bracket.
→ Move the monitor to the desired vertical position [tilt angle].

7
CEILING MOUNT
DANGER!
Dropping the speaker system may cause injury and
property damage.
There is a risk that the speaker system could fall down until
the mounting accessories on the ceiling mount A are finally
fixed. As long as this installation has not yet been carried out,
the speaker system must be held by another qualified specialist
.
The above requirements also apply to this specialist. In addition,
you must provide an additional safety means to prevent the
speaker from falling down.
Technical Specifications
Ceiling Mount
Weight: 1,8 kg [4.0 lbs]
Dimensions:
62 x 190 x 230
mm [H x W x D]
[2.4″ x 7.5″ x 9.1″]
Max. load: 40,6 kg [89.5 lbs]
Warranty
Our current warranty conditions may be found at
www.adam-audio.com

6
8
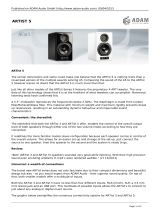
CEILING MOUNT
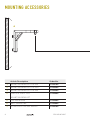
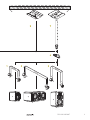
Article Description Order No.
1 MOUNTING BRACKET FOR S2V 31102100
2 MOUNTING BRACKET FOR S3H 31102200
3 MOUNTING BRACKET FOR S3V 31102300
4 ADAPTER PLATE FOR
MOUNTING BRACKET
31102400
5 CEILING MOUNT 31102500
6 WALL MOUNTING 31102600
7 TELESCOPIC CEILING MOUNT 31102700
MOUNTING ACCESSORIES

5 7
4
3
1
2
9
CEILING MOUNT

10
CEILING MOUNT
OFFICIAL REQUIREMENTS:
THE FOLLOWING SHOULD BE
STRICTLY ADHERED TO
1. At least every 3 months, check that the ceiling mount, mounting
hardware, fuse ropes and their connectors, as well as the
monitor itself, are in serviceable condition. Check that all screws
are tightened.
2.
Ensure that all power, audio and coupling cabling attached to
the monitor system have no strain exerted on them, i.e.: any
and all cables must never bear any of the weight of the monitors
or their accesssories including brackets and telescopic
assemblies etc.
Should you deviate from any of the above installation and safety
instructions, or should any of the items
become damaged, you must
immediately uninstall the entire system.

11
CEILING MOUNT
© ADAM Audio GmbH 2018
Even if all efforts have been made to ensure the correctness of
the information contained herein, the ADAM Audio GmbH cannot be
held responsible for potential errors or missing information.
All specifications are subject to change without notice.

-
 1
1
-
 2
2
-
 3
3
-
 4
4
-
 5
5
-
 6
6
-
 7
7
-
 8
8
-
 9
9
-
 10
10
-
 11
11
-
 12
12


Ask a question and I''ll find the answer in the document
Finding information in a document is now easier with AI
Related papers
-
Adam Telescopic Ceiling Mount User manual
-
-
-
-
-
Adam S5V Quick start guide
-
-
Adam Wall Mount [Discontinued]Wall Mount Owner's manual
-
-
Other documents
-
 Adam Audio ARTist 3 Datasheet
-
 Adam Audio ARTIST5ZWART Datasheet
-
Neumann LH 25 Owner's manual
-
 ATD Tools ATD-7160 User manual
-
Naim N-SUB User manual
-
 ATD Tools ATD-7162 User manual
-
 ATD Tools ATD-7102 User manual
-
 Hamilton Home Products DGH30 User manual
-
Winchester DGH 45 Installation guide
-
Martin Audio CDD-LIVE! Series User manual


