Page is loading ...


1
S SERIES MANUAL [ENGLISH]
CONGRATULATIONS!
...on the purchase of your new ADAM Audio S Series monitors. The result of several
years of research and development, the S Series is designed to provide musical, extremely
accurate reference monitoring for audio production to the highest possible standards,
building on ADAM Audio‘s established reputation as a manufacturer of precision tools
for audio professionals.
This manual will help you to connect, install and start using your speakers, and explain
how to adjust them to best suit your working environment. It will also explain how to
solve the most commonly occurring problems that users encounter when trying to install
new monitors. Manufacturer contact information and a full technical specification are
also included for reference purposes.
Nevertheless, if you encounter problems you can‘t solve, or have questions this
manual doesn‘t provide answers to, please either contact your local dealer, or email
our Berlin-based support team at [email protected]. We pride ourselves on
remaining approachable and helpful to our customers at all times.
We wish you many years of happy listening with your new S Series monitors.
The Team at ADAM Audio

2
S SERIES MANUAL [ENGLISH]
CONTENTS
Page
CONGRATULATIONS! 1
CONTENTS 2
1. IMPORTANT SAFETY INSTRUCTIONS 3
2. WHY CHOOSE ADAM AUDIO? 5
3. INTRODUCING S SERIES 5
4. CONNECTIONS 6
5. GETTING STARTED 7
6. ACHIEVING OPTIMUM LOUDSPEAKER PLACEMENT 8
7. LOUDSPEAKER VOICING OVERVIEW 10
8. S SERIES DSP FUNCTIONS IN FULL 11
9. TROUBLESHOOTING 19
10. MAINTENANCE 20
11. SHIPPING 20
12. ENVIRONMENTAL INFORMATION 21
13. EU DECLARATION OF CONFORMITY 21
14. WARRANTY TERMS 22
15. TECHNICAL DATA 23

3
S SERIES MANUAL [ENGLISH]
Please read the following safety instructions before setting up your system. Keep the
instructions for further reference. Please heed the warnings and follow the instructions.
Caution: To reduce the risk of electric shock, do not open the loudspeaker. There
are no user-serviceable parts inside. Refer servicing to qualified service personnel.
This product, as well as all attached extension cords, must be terminated with an
earth ground three-conductor AC mains power cord like the one supplied with the
product. To prevent shock hazard, all three components must always be used.
Never replace any fuse with a value or type other than those specified. Never
bypass any fuse.
Ensure that the specified voltage matches the voltage of the power supply you
use. If this is not the case do not connect the loudspeakers to a power source!
Please contact your local dealer or national distributor.
Always switch off your entire system before connecting or disconnecting any
cables, or when cleaning any components.
To completely disconnect from AC mains, unplug the power supply from the
power socket. The monitor should be installed near the mains connection and it
should be easy to access the socket and disconnect the device if necessary.
Protect the power cord from being walked on or pinched particularly at plugs,
sockets, and the point where it exits from the apparatus.
Unplug this apparatus during lightning storms or when unused for long periods
of time. Always keep electrical equipment out of the reach of children.
Do not expose this product to rain or moisture, never wet the inside with any
liquid and never pour or spill liquids directly onto this unit. Please do not put
any objects filled with liquids [e.g. vases, etc.] onto the speaker.
Use only with stands, tripods or brackets specified by the manufacturer, or sold
with the apparatus. When moving the loudspeakers on a trolley, avoid injuries;
take care and do not over-balance the trolley.
The speakers must be positioned on a solid surface or a stand.
1. IMPORTANT SAFETY INSTRUCTIONS
Caution
Risk of electrical shock
Do not open
Risque de shock electrique
Ne pas ouvrier
CAUTION: TO REDUCE THE RISK OF FIRE OR ELECTRIC SHOCK,
DO NOT REMOVE BACK COVER OR ANY OTHER PART.
NO USER-SERVICABLE PARTS INSIDE.
DO NOT EXPOSE THIS EQUIPMENT TO RAIN OR MOISTURE.
REFER SERVICING TO QUALIFIED PERSONNEL.

4
S SERIES MANUAL [ENGLISH]
Always use fully checked cables. Defective cables can harm your speakers. They
are a common source for any kind of noise, hum, crackling etc.
Never use flammable or combustible chemicals for cleaning audio components.
Install in accordance with the manufacturer‘s instructions.
Never expose this product to extremely high or low temperatures.
Never operate
this product in an explosive atmosphere.
High SPLs may damage your hearing! Please do not get close to the
loudspeakers when using them at high volumes.
Please note that the diaphragms emit a magnetic field.
Please keep
magnetically sensitive items at least 0.5 m away from the speaker.
Assure free airflow behind the speakers to maintain sufficient cooling by
keeping a distance of at least 100 mm [4″] to the wall.
No naked flame sources, such as lit candles, should be placed on the speaker.
Do not use this apparatus near water.
Use a dry cloth for cleaning.
Do not install near any heat sources such as radiators, hot air vents, stoves, or
other equipment [including amplifiers] that produces heat.
Do not disconnect the earth wire in an earthed plug. An earthed plug has live
and neutral prongs, plus a third prong for grounding purposes which is included
for your safety. If the provided plug does not fit into your socket, consult an
electrician to have your socket replaced.
Only use attachments/accessories specified by the manufacturer.
S2V, S3H and S3V only: When using the wall or ceiling mount option, only mount
this product onto dry and non-conducting wood/plaster panel walls. To prevent
injury, this loudspeaker must be securely attached to the wall in accordance with
the installation instructions of each separate mounting accessory.
Refer all servicing to qualified service personnel. Servicing is required when the
apparatus has been damaged in any way, for example if the power-supply cord
or plug is damaged, liquid has been spilled or objects have fallen into the
apparatus, or if the apparatus has been exposed to rain or moisture, does not
operate normally, or has been dropped.

5
S SERIES MANUAL [ENGLISH]
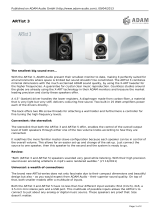
2. WHY CHOOSE ADAM AUDIO?
For over 15 years, since its foundation in Berlin in 1999, ADAM Audio has been an
internationally respected manufacturer of extremely accurate reference loudspeakers for
the professional audio market. Following rapid recognition, success and growth in the
early years of the 21st century, ADAM Audio now makes acclaimed products that can be
found in the favorite studios of the world‘s finest producers, audio and mix engineers.
ADAM Audio‘s loudspeaker products are based on sound engineering principles and
technological innovation in the skilled crafts of cabinet construction, power amplification,
and driver design, including the refinement of the established folded accelerated ribbon
tweeter concept into the high-performance, extremely accurate ART, X-ART and now
S-ART treble drivers. The company proudly considers itself a contributor to Germany‘s
much-admired heritage in the fields of precision tool making and advanced industrial design.
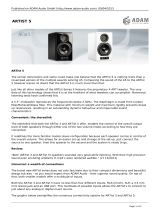
3. INTRODUCING S SERIES
The five-strong S Series, ADAM Audio‘s new flagship loudspeaker range, incorporates
many technical innovations in the realms of electroacoustics and mechanical engineering,
the results of taking the concept of the reference monitor back to the drawing board to
create better products. There are totally new bass and mid-range drivers, new waveguides,
and tightened manufacturing tolerances for ADAM Audio‘s unique high-frequency
folded-ribbon driver, alongside digital connectivity and a newly developed, forward-thinking
DSP engine. Even the cabinets and bass-reflex ports, which may seem familiar to
existing users of ADAM Audio loudspeakers, have been completely redesigned.
Custom-developed in Berlin without off-the-shelf speaker components, these are
lou
dspeakers without compromise, offering an excellent dynamic response, extreme
flexibility in operation, and a transparent, unfatiguing sound, making them essential
equipment for audio professionals.
The range currently consists of the nearfield S2V, the larger S3V and S3H, and the S5V
and S5H, the largest in the range. ʻHʼ denotes a speaker designed optimally for horizontal
use, ʻVʼ the version designed for vertical use.

6
S SERIES MANUAL [ENGLISH]
4. CONNECTIONS
Despite all the power and flexibility the S Series monitors have to offer, setting them
up is very straightforward. The only choice you have to make is whether to drive them
digitally or with a traditional analog signal. This selection is made via the rear-
panel
OLED display and its adjacent dual-function push-button/rotary encoder, which allow
access to the S Series DSP settings [see page 11].
OLED display
Dual-function push-
button/rotary encoder
XLR analog input
AES 3 In
AES 3 Out
USB jack
Blank panel covering
an Options slot for
future expansion
IEC mains connector

7
S SERIES MANUAL [ENGLISH]
In addition to a standard IEC mains connector, the simple S Series rear panel features
traditional AES XLR analog inputs and AES3 digital Input and Thru connectors [the latter
are for multi-channel arrays where multiple speakers are being driven using the same
signal]. There‘s also a USB jack to facilitate internal software upgrades and the use of
computer-based remote setting software, and a blank panel covering an Options slot
that will hold two RJ45 connectors for future expansion options.
NOTE: Always use AES/EBU-compatible, shielded twisted-pair cables for digital connections.
5. GETTING STARTED
Before using your new speakers, you should let them settle at the ambient temperature
of your listening environment by leaving them in position for an hour or so after unpacking
them. We recommend that the S Series speakers are driven on a solid, stable surface
for best results. For more on optimal placement, see page 8. Please also be aware that
before optimum performance can be attained, it always takes some hours of continuous
usage to ʼbreak inʻ factory-fresh reference monitors.
With the speakers connected to your audio source but turned off, and with the audio input
to the monitors turned all the way down, the amplifiers should be connected to AC mains
power via the supplied standard IEC cable. The switched-mode power amplifiers in the
S Series loudspeakers can handle mains electricity from anywhere in the world, with a
voltage and frequency range of 100-240 volts AC, 50 /60 Hz, so you can plug the monitors
in without having to worry about mains transformers or overheating. Then simply turn
on the loudspeakers, start your playback audio, and gradually increase the output level
of your audio source. You should now start to hear sound through your S Series speakers.
If this is not the case, turn to page 19 and the section on troubleshooting.

8
S SERIES MANUAL [ENGLISH]
6. ACHIEVING OPTIMUM
LOUDSPEAKER PLACEMENT
Assuming your room has been acoustically treated to a reasonable degree to remove
the worst effects of unwanted reflections and room modes, much of loudspeaker placement
is common sense, but there are a few basic points that should be followed:
→ Ensure that all your speakers are level with one another in the vertical plane [except
subwoofers, for which placement is much less critical], and that the tweeters are
roughly level with your ears. If a speaker needs to be placed higher or lower due to
spatial constraints, it should be angled accordingly, but tilts of 15 degrees or more
should be avoided [see diagram]. Angles that result in reflections from your mixing
console or other significant studio furniture should also be avoided.
→ Make sure that that nothing partially or totally obscures your monitors. You should
have a clear line of sight to them; this will also guarantee that nothing comes between
them and your ears.
→
Place each of your monitors at least 400 mm [16 inches] from the nearest wall to
minimize back reflections, which can adversely affect your chances of accurately
monitoring
low-frequency information. If at all possible, avoid placing loudspeakers
near room corners for the same reason: with two reflective surfaces in close proximity,
the chances of unwanted reflections affecting your low-frequency audio are even greater.

9
S SERIES MANUAL [ENGLISH]
→
For stereo audio production, your ears should be placed as near as possible to
one corner of an equilateral triangle, with the two speakers at the other corners
[see below].
→ Precise idealized placements of speakers for surround audio production depend on
the number of channels [and therefore speakers] you are using, and whether your
audio is being produced for musical or film use. The International Telecommunication
Union recommendations on ideal loudspeaker placement for a variety of audio formats
and applications can be found in detail at their web site, www.itu.int. However, as
general guidance and in common with stereo placement, a symmetrical listening
position is recommended, with all speakers a] situated at least 400 mm [16 inches]
from the nearest wall to minimize back reflections, and b] pointing as much as possible
toward the listener‘s ears.

10
S SERIES MANUAL [ENGLISH]
7. LOUDSPEAKER VOICING OVERVIEW
Once your S Series speakers are correctly positioned, you may wish to slightly adjust
their frequency response to suit your personal audio preferences and specific monitoring
environment. All professional studios undertake this process, often known as tuning
or voicing, when they install new reference monitors; the acoustics of every room are
slightly different, and even in well-constructed, acoustically treated rooms that have
been custom-designed to exclude unwanted resonances, users will all have slightly
dif
fering ideas about how their speakers should optimally sound.
NOTE: Adjustments to voicing with the built-in S Series EQs should be carried out with
caution, as the overall sound of your monitors in your room may be significantly affected
.
We recommend making small incremental adjustments and auditioning as you go with
a variety of your favorite audio reference material.
The advanced DSP engine in the S Series offers a comprehensive array of voicing
options. Via the rotary encoder and OLED display on the rear panel of the monitors,
control is offered over overall output level, and a pair of shelving filters may be applied
to the output [one for the low end, the other for the highs]. Six further fully parametric
EQs with variable Q, center frequency and gain may also be dialed up via the display
and encoder interface to boost or cut level at specific frequencies.
Five memories are also provided to store voicing/EQ presets. On most S Series models,
two of these are non-editable factory settings. The remaining three are available to
store users‘ own personal voicing presets. On the S3H, the situation is slightly different:
the non-editable ADAM Audio factory settings occupy the first three presets, and the
final two
are available for user presets. The third memory, ‘Classic’, emulates the on-axis
frequency response of what is possibly ADAM Audio‘s best-known monitor, the highly
re
garded S3A.
Of course, if you‘d rather not make any voicing adjustments at all, you have the option
of leaving the EQs set ‘flat’ by selecting the so-called ‘Pure’ preset – that is, to neither
boost nor cut.

11
S SERIES MANUAL [ENGLISH]
8. S SERIES DSP FUNCTIONS IN FULL
With the exception of the extra ‘Classic’ voicing preset in the S3H noted on the previous
page, the DSP functions on all S Series models are the same. In each case, the functions
are accessed from within nested menus on the rear-panel, five-line OLED display by
means of the adjacent dual-function rotary encoder/button.
8.1 Navigation & Parameter Editing
Throughout the S Series DSP interface, tapping the encoder briefly moves DOWN
through the menu structure [or confirms the selection of a parameter, as we will see],
while clicking and holding the encoder down for more than half a second steps back
UP through the nested levels.
When you turn the speakers on, the heading for a general system-wide Settings menu
appears on the display. If you tap the encoder while ‘Settings’ is displayed, you descend
into the list of individual options in the Settings menu, of which more in a moment. If
you instead simply rotate the encoder while ‘Settings’ is displayed, you leave the Settings
menu behind and step instead through the headings for the numbered voicing/EQ
presets 1 to 5 [after ‘Preset 5’ is reached on the display, one more turn of the encoder
loops you back to the ‘Settings’ menu heading, where you came in when the monitors
were powered up]. The individual parameters for the voicing presets can be viewed
[and, in the case of the user presets, edited] by descending into those presets: so to
ac
cess Preset 4, you rotate the encoder until ‘Preset 4’ is shown on the display, and
then tap the encoder to activate the preset and bring up the parameters, whose values
you may then edit.
Settings Menu
Preset
Pure
Preset
UNR
Preset
User1
Preset
User2
Preset
User3
Settings
Menu (2)
Preset
Menu (3)
Preset
Menu (3)
Preset
Menu (3)
Preset
Menu (3)
Preset
Menu (3)
rotate
rotate
long
click click
long
click click
click
long
click click
long
click
long
click
click
long
click
click
rotate rotate rotate rotate rotate
rotate rotate rotate rotate rotate
Top Menu [1]: The highest level of the S Series DSP module menus, offering access to
the Settings Menu and the five EQ presets.

12
S SERIES MANUAL [ENGLISH]
Throughout the DSP user interface, once you’re happy with the value you’ve selected for
a given parameter, tapping the rotary encoder one more time will store the new value. A
small star will then appear briefly at the top of the display to indicate that your change
has been written into memory. If before storing the new value, you press and hold the
encoder
for
more than half a second, indicating that you want to step up out of editing
the cur
rently selected parameter, the display will show that the parameter has returned
to its previously stored value. So don’t forget to store your changes by briefly tapping
the encoder once you’ve adjusted parameters to your satisfaction, and to check that
the star appears at the top of the display to indicate that your changes have been stored
before moving on.
8.2 Settings Menu
As explained above, tapping the rotary encoder when ‘Settings’ is shown in the display
offers access to the most important system settings for the S Series, in the following
order: Monitor input selection [i.e. analog or digital AES3], overall output Volume, and
system Delay. There’s also a Factory Reset option. Again, once the desired option – for
example Volume – is shown in the display, tapping the encoder takes you down into
the editable parameters for that option, whose values may then be changed by rotating
the encoder. Sometimes, of course, there is only one editable parameter per system
setting, as with Volume and Delay.
Input
Volume
Delay
Reset
Input
Menu (7)
Volume
Menu (8)
Delay
Menu (9)
Reset
Menu (10)
rotate
rotate
long
click click
long
click click
click
long
click
long
click
click
rotate rotate rotate
rotate rotate rotate
Top
Menu (1)
long
click
long
click
long
click
long
click
Settings Menu [2]: Input, Volume, Delay & Reset options in the Settings Menu.

13
S SERIES MANUAL [ENGLISH]
Input Selection
In addition to their traditional analog inputs, the S Series models all have AES3 digital
inputs. This setting allows users to choose which inputs are currently active, and cycles
between ‘Analog’ and ‘AES L’ and ‘AES R’ in the display. The latter two settings allow
you to define which of your speakers is the Left and which the Right when driving them
with an AES3 digital input in a ‘daisy-chain’ configuration [see diagram below].
AES3 Setup
Left Channel Right Channel
AES3 out
AES3 in
AES3 in
AES L AES R
Source
XLR
AES3 out

14
S SERIES MANUAL [ENGLISH]
Volume
The overall monitor output level is adjustable from -60 to +12 dB in 0.1 dB increments.
The Input Selection Menu [7, left] and Volume Menu [8, right].
Delay
Monitor output can be delayed by up to 5 milliseconds in 0.1 ms increments, which
can be useful when compensating for latency and other delays in your recording and
monitoring environment.
Factory Reset
The final item in the Settings menu is a Reset option. There are just two options here,
‘Yes’ and ‘No’, and rotating the encoder cycles between them. If you tap the encoder
while ‘Yes’ is displayed, all of the parameters in your monitor will be restored to their
original factory settings.
AES L
AES R
Confirm Confirm
click click
rotate rotate
rotate rotate
Settings
Menu (2)
long
click
long
click
Analog
Confirm
click
rotate
rotate
long
click
Volume/dB
Confirm
click
rotate
rotate
Settings
Menu (2)
long
click

15
S SERIES MANUAL [ENGLISH]
Delay/ms
Confirm
click
rotate
rotate
Settings
Menu (2)
long
click
Yes / No
Confirm
click
rotate
rotate
Settings
Menu (2)
long
click
The Delay Menu [9, left] and Reset Menu [10, right].
8.3 Voicing Presets
As discussed earlier, if you rotate the encoder while ‘Settings’ is shown on the display
after power-up, you leave the Settings menu behind and step instead through your
monitor’s five voicing presets. As explained on page 11, on all S Series models, the
first two of these are factory presets: the first, ‘Pure’ is the highly accurate ADAM Audio
factory response. The second, entitled ‘UNR’ [Uniform Natural Response™] is a dynamic,
natural-sounding response curve of ADAM Audio‘s own design. On the S3H, as already
noted, the third preset emulates the response of the classic ADAM S3A monitor, while
the final two memories are entirely user-editable. On the S Series models other than
the S3H, the final three memories are all user-editable.

16
S SERIES MANUAL [ENGLISH]
Preset 1
Pure
Preset 2
UNR
Preset3
Classic/User1
Preset 4
User1/User2
Preset 5
User2/User3
activate
activate activate
click click click click click
rotate rotate rotate rotate rotate
rotate rotate rotate rotate rotate
EQ Menu
(4)
click
long
click
activate
EQ Menu
(4)
click
long
click
activate
EQ Menu
(4)
click
long
click
Top
Menu (1)
long
click
long
click
long
click
long
click
long
click
Preset Menu [3]: The EQ Preset selection menu. Note that Preset 3 is the S3A-emulating
‘Classic’ preset on the S3H, but is User Preset 1 on all the other S Series models.
When one of the user presets is shown in the display, tapping the encoder activates that
preset. A second tap on the encoder accesses the next menu layer down, where the
specific EQ settings for that preset may be adjusted. Rotating the encoder at this level
brings up the low shelving filter, then each of the six parametric EQs in turn [logically
numbered EQ 1, EQ 2 and so on], and finally the high shelving filter. Selecting one of these
filters takes you down to the lowest levels of the menu interface, where the individual
parameters for each filter can be changed. Selecting one of the shelving filters leads
to options for corner frequency in Hz and a Gain [Boost or Cut] setting, calibrated from
-12 to +12
dB in 0.5
dB increments. Of course, when you select one of the six parametric
EQs, there is also a Q [bandwidth] setting in addition to the turnover frequency and Gain
settings. As always, once these parameters have been set to your satisfaction, pressing
the rotary encoder stores the selected settings [accompanied by the brief appearance
of the star at the top of the display], while pressing and holding the encoder down for a
short time moves you back up one level in the menu structure.

17
S SERIES MANUAL [ENGLISH]
Low Shelf
EQ 1
EQ 2
EQ 3
F / G
Menu (5)
F / Q / G
Menu (6)
F / Q / G
Menu (6)
F / Q / G
Menu (6)
rotate
rotate
long
click click
long
click click
click
long
click
long
click
click
rotate rotate rotate
rotate rotate rotate
Preset
Menu (3)
long
click
long
click
long
click
long
click
EQ 4
F / Q / G
Menu (6)
click
long
click
rotate
rotate
long
click
EQ 5
F / Q / G
Menu (6)
click
long
click
rotate
rotate
long
click
EQ 6
F / Q / G
Menu (6)
click
long
click
rotate
rotate
long
click
High Shelf
F / G
Menu (5)
long
click
click
long
click
rotate
rotate
Frequency
Gain
Edit Edit
click click
confirm/
cancel
confirm/
cancel
rotate rotate
rotate rotate
EQ
Menu (5)
long
click
long
click
Q Factor
Gain
Edit Edit
click click
confirm/
cancel
confirm/
cancel
rotate rotate
rotate rotate
EQ
Menu (5)
long
click
long
click
Frequency
Edit
click
confirm/
cancel
rotate
rotate
long
click
EQ Menu [4]: This is where users access the two shelving and six parametric EQs. On this
diagram, F = Frequency, G = Gain and Q = Q Factor on the parametric EQs.
Schematics for the Shelving EQ Menu [5, left] and Parametric EQ Menu [6, right]

18
S SERIES MANUAL [ENGLISH]
Finally, it‘s worth noting that you don‘t have to physically adjust all of these DSP settings
from the back panel of your monitors. The USB connection next to the monitor inputs
allows you to connect your S Series monitors to a Mac or PC and make changes to
your speaker settings via editing software available for download from the ADAM Audio
website [www.adam-audio.com]. This option is particularly handy for users who wish
to soffit-mount their S Series monitors; these users will not usually have access to the
rear panel of their monitors.
/