Xerox Pro 232/238 Installation guide

Type
Installation guide

This manual is also suitable for

Version 3.0
09/11
Xerox
®
Smart Card
Installation Guide
Xerox
®
WorkCentre and
WorkCentre Pro232/238/245/255/265/275
©2011 Xerox Corporation. All Rights Reserved. Unpublished rights reserved under the copyright laws of the United States. Contents
of this publication may not be reproduced in any form without permission of Xerox Corporation.
XEROX® and XEROX and Design® are trademarks of Xerox Corporation in the United States and/or other countries.
Changes are periodically made to this document. Changes, technical inaccuracies, and typographic errors will be corrected in
subsequent editions.
Document version 3.0: September 2011
Xerox® Smart Card
Installation Guide
3
Table of Contents
1Introduction
Compatibility . . . . . . . . . . . . . . . . . . . . . . . . . . . . . . . . . . . . . . . . . . . . . . . . . . . . . . . . . . . . . . . . . . . . . . . . . . . . .6
Supported Card Types . . . . . . . . . . . . . . . . . . . . . . . . . . . . . . . . . . . . . . . . . . . . . . . . . . . . . . . . . . . . . . . . . . . . .7
Supported Card Readers . . . . . . . . . . . . . . . . . . . . . . . . . . . . . . . . . . . . . . . . . . . . . . . . . . . . . . . . . . . . . . . . . . .7
Documentation and Support . . . . . . . . . . . . . . . . . . . . . . . . . . . . . . . . . . . . . . . . . . . . . . . . . . . . . . . . . . . . . . .8
2Preparation
Server Specifications . . . . . . . . . . . . . . . . . . . . . . . . . . . . . . . . . . . . . . . . . . . . . . . . . . . . . . . . . . . . . . . . . . . . 10
Electrical Requirements . . . . . . . . . . . . . . . . . . . . . . . . . . . . . . . . . . . . . . . . . . . . . . . . . . . . . . . . . . . . . . . . . . 10
3Installation
Software Installation . . . . . . . . . . . . . . . . . . . . . . . . . . . . . . . . . . . . . . . . . . . . . . . . . . . . . . . . . . . . . . . . . . . . 12
Configuring the Smart Card . . . . . . . . . . . . . . . . . . . . . . . . . . . . . . . . . . . . . . . . . . . . . . . . . . . . . . . . . . . . . . 16
Hardware Installation . . . . . . . . . . . . . . . . . . . . . . . . . . . . . . . . . . . . . . . . . . . . . . . . . . . . . . . . . . . . . . . . . . . 25
Using Smart Card . . . . . . . . . . . . . . . . . . . . . . . . . . . . . . . . . . . . . . . . . . . . . . . . . . . . . . . . . . . . . . . . . . . . . . . 33
4 Troubleshooting
Fault Clearance . . . . . . . . . . . . . . . . . . . . . . . . . . . . . . . . . . . . . . . . . . . . . . . . . . . . . . . . . . . . . . . . . . . . . . . . . 36
Locating the Serial Number . . . . . . . . . . . . . . . . . . . . . . . . . . . . . . . . . . . . . . . . . . . . . . . . . . . . . . . . . . 36
Troubleshooting Tips . . . . . . . . . . . . . . . . . . . . . . . . . . . . . . . . . . . . . . . . . . . . . . . . . . . . . . . . . . . . . . . . 37
A Retrieving the Certificate from a Domain Controller or OCSP Server
B Determining the Domain in which your Card is Registered
C Downloading the Xerox WorkCentre Software
Xerox® Smart Card
Installation Guide
4
Xerox® Smart Card
Installation Guide
5
1
Introduction
The Xerox Smart Card solution brings an advanced level of security to sensitive information.
Organizations can restrict access to the walk-up features of a Xerox device. This ensures only
authorized users are able to copy, scan, email and fax information.
The key benefit of this solution is its two-factor identification requirement. Users must insert their
access card and enter a unique Personal Identification Number (PIN) at the device. This provides
added security in the event that a card is lost or stolen.
Once validated, a user is logged into the Xerox device for all walk-up features. The system allows for
functions to be tracked for an added layer of security.
The Xerox Smart Card enablement kit integrates with Xerox multifunction printers and existing smart
and personal identity verification cards and readers.
This guide explains how to install and configure the Smart Card solution. It identifies the resources and
equipment required to complete a successful installation.
Should you require any further information, please contact your Local Xerox Representative.
Introduction
Xerox® Smart Card
Installation Guide
6
Compatibility
This solution is compatible with the following Xerox WorkCentre and WorkCentre Pro
232/238/245/255/265/275 configurations:
To identify the software level on your machine, perform the following steps:
1. Press the button on the control panel.
2. Select Machine Details.
The System Software Version number displays.
Configuration Software Level
WorkCentre Basic Multifunction
12.xx.xxx.xxx
WorkCentre Pro Advanced Multifunction
13.xx.xxx.xxx
WorkCentre Basic Multifunction with PostScript
14.xx.xxx.xxx
Introduction
Xerox® Smart Card
Installation Guide
7
Supported Card Types
The customer is responsible for purchasing and configuring the access cards. The following card types
are recommended:
Gemalto TOP DL GX4 144K V2.6.2b Applets
Oberthur ID-One Cosmo v5.2 128K V2.6.2 Applets
Oberthur ID-One Cosmo v5.2 72K V2.6.1 Applets
Oberthur ID-One Cosmo v5.2D 72K V2.6.1 Applets
Oberthur ID-One Cosmo v5.2 72K V2.6.2 Applets
Gemalto GemCombiXpresso R4 dual interface 72K V2.6.2 Applets
Axalto Access 64KV1
Axalto Access 64KV1
Gemplus GXP3 64V2N V2.6.1 Applets
Gemalto Cyberflex Access V2C 64K V2.6.1 Applets
Oberthur ID-One Cosmo V5.2D 64K
Oberthur OCS Galactic V1 32K V1 Applets
Oberthur Cosmo V4 32K V1 Applets
Schlumberger / Axalto Cyberflex V2 32K V1 Applets
Other card types may function with the solution, but have not been validated.
Supported Card Readers
The customer is responsible for providing a card reader for each Xerox WorkCentre device. The
following card readers are compatible with the solution:
Gemplus GemPC USB SL
•Gemplus GEMPC Twin
•SCM Micro SCR3310
•SCM Micro SCR3311
OmniKey Cardman 3021 USB
OmniKey Cardman 3121 USB
ActivCard USB Reader V2 with SCR-331 firmware
Other CCID compliant readers may function with the solution, but have not been validated.
Additional information from your System Administrator may be required to validate which card reader
works best in your environment.
Introduction
Xerox® Smart Card
Installation Guide
8
Documentation and Support
The following information resources are also available:
System Administration CD (CD1)
Contained in the CD Pack delivered with your machine, the System Administration CD (CD1) offers
detailed information on configuring your machine for network printing and instructions on
installing any of the optional features.
The System Administration CD (CD1) is intended for System/Machine Administrators.
Training and Information CD (CD2)
For detailed information on any of the features or functions available on your machine, please
refer to the Training and Information CD (CD2), contained in the CD Pack delivered with your
machine.
Utilities CD (CD3)
Contained in the CD Pack, the Utilities CD (CD3) contains a utility for upgrading to new versions of
software on the machine.
Xerox Welcome Center
For further information or advice, contact the Xerox Welcome Center.
Xerox® Smart Card
Installation Guide
9
2
Preparation
This section explains the preparation and resources required to install the Smart Card.
The installation will take approximately one hour for each device. The following items are required in
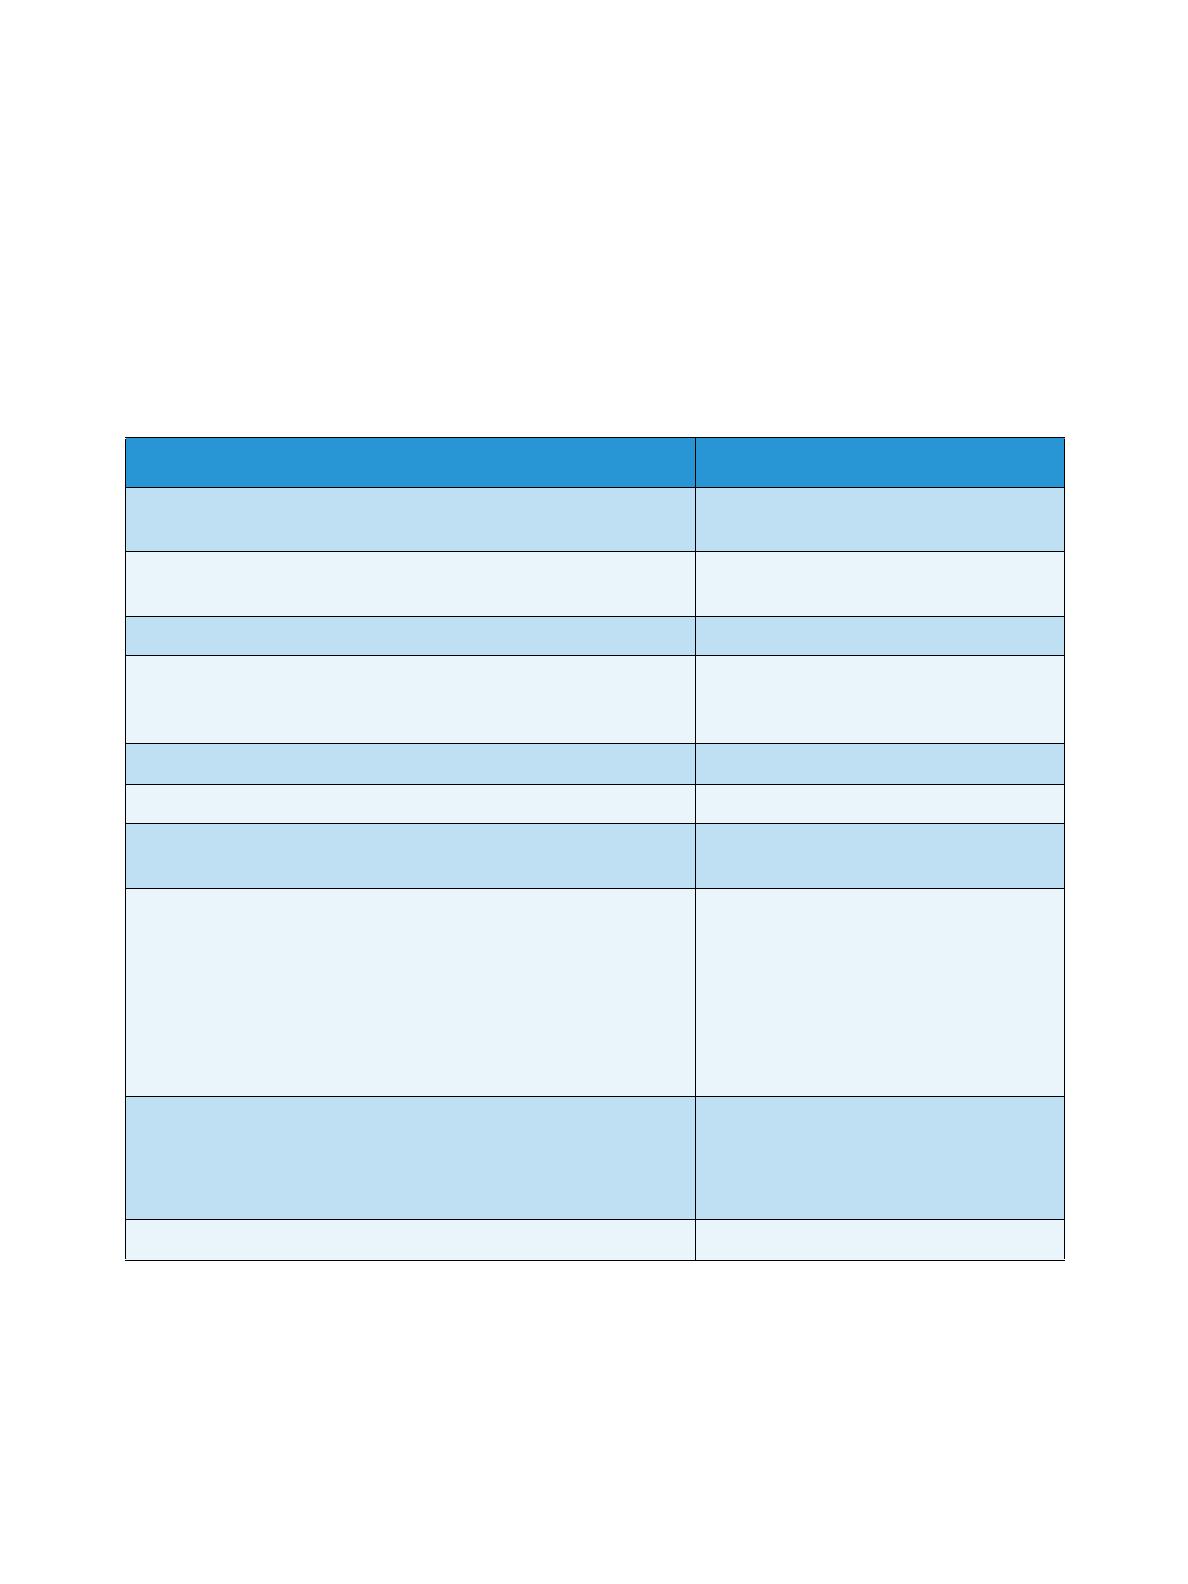
order to complete the installation:
To set up the Domain Controller (DC) validation, you will need to determine if your site validates the
DC against the OCSP server. Many sites use OCSP to validate individuals, but do not register the DC
with it. If you set up the Xerox WorkCentre device to validate the DC and it isn't registered, the
procedure will fail.
Item Supplier
Compatible Card Reader (refer to Supported Card Types on
page 7)
Customer
Compatible Access Card (refer to Supported Card Readers on
page 7)
Customer
Smart Card Enablement Kit 498K17541 Xerox
WorkCentre Software Upgrade Files
(refer to Downloading the Xerox WorkCentre Software on page 47
for download instructions)
Xerox / Customer
TCP/IP enabled on the WorkCentre Customer
DNS Host name or static IP address assigned Customer
Network Settings to be checked to ensure network is fully
functional
Customer
Domain Controller (DC) information:
Domain Controller authentication environment
lP address or Host Name
Domain information
Domain Controller Root and Intermediate certificates
Check that all certificates are in 64 bit X.509 format
Determine if the DC is registered with the OCSP at this site
Customer
OCSP Server Information:
•OCSP Server URL
OCSP - Root and Intermediate Certificates
Check that all certificates are in 64 bit X.509 format
Customer
Proxy Server configuration details Customer
Preparation
Xerox® Smart Card
Installation Guide
10
If your site does register the DC with OCSP, you will need to decide whether:
to validate the DC against OCSP before validation of the user, or
to validate the DC after validation of the user
The first method requires installation of the DC certificate as part of this procedure and is the more
accepted method for validation. The second method retrieves the DC certificate automatically for each
authentication and doesn't require installation of the DC certificate onto the Xerox WorkCentre device.
An additional option is to combine the first and second options and compare the retrieved DC
certificate to the one stored at installation. This provides the most security as it prevents rogue DCs
masquerading as the real DC.
Note: Certificates are often obtained from the Information Technology professionals that support
your organization. If you are unable to obtain the required certificates, refer to the process
outlined in Appendix A. You can determine the domain that you are registered in using the process
outlined in Appendix B.
Server Specifications
Prior to installation, ensure your network infrastructure supports Smart Card or Personal Identification
Verification (PIV).
Names or IP addresses of all servers and domains are required during setup.
Electrical Requirements
The USB port on the back of the Xerox WorkCentre network controller provides the power required for
any of the supported card readers.
Xerox® Smart Card
Installation Guide
11
3
Installation
This section provides instructions for installing and configuring the Smart Card solution.
There are 4 main installation procedures to follow in sequence.
Software Installation:
Upgrading the Xerox WorkCentre software to enable the Smart Card to be configured.
Configuring Smart Card:
Enabling the Smart Card function and customizing the settings.
Hardware Installation:
Unpacking the Smart Card enablement kit and installing the card reader device.
Using the Smart Card:
Instructions on how to use the card reader device to access the Xerox WorkCentre functions.
Installation
Xerox® Smart Card
Installation Guide
12
Software Installation
Ensure you have downloaded the Xerox WorkCentre software required prior to performing these
instructions. For further information, refer to Downloading the Xerox WorkCentre Software on page 47.
If your policy is to use a Proxy Server to reach external addresses, ensure the proxy is turned off at your
browser before beginning the software install process. You also have the option of sending the Xerox
WorkCentre to the list of exceptions that do not use the Proxy Server.
Follow the instructions below to install the Xerox WorkCentre software.
Note: Some of the steps shown may require the System Administration password for the Xerox
WorkCentre to be entered.
1. Access CentreWare Internet Services
a. At the workstation open your web browser.
b. In the URL field, enter http:// followed by the IP Address of the device. For example: If the IP
Address is 192.168.100.100, enter the following into the URL field: http://192.168.100.100.
c. Press the Enter key on your workstation keyboard.
The default Status window displays.
Installation
Xerox® Smart Card
Installation Guide
13
2. Enable software upgrades
a. To ensure software Upgrades is enabled, select Properties. A pop-up window prompts for
administrator log on.
b. Enter User name and Password and select OK.
c. Once authenticated, select Services.
d. Select Machine Software then Upgrades.
e. Ensure the Enabled box is checked, then select Apply.
Installation
Xerox® Smart Card
Installation Guide
14
3. Locate the software
a. To locate the software file for uploading, select Properties then Services.
b. Select Machine Software then Manual Upgrade.
c. Browse to the location of the software which was downloaded from the Xerox website and
select the file.
The path to the software file displays in the browse window.
Installation
Xerox® Smart Card
Installation Guide
15
4. Install the software on the Xerox WorkCentre
a. Select Install Software.
The software file is uploaded and takes approximately 10 minutes.
Once the software file has been uploaded a pop-up window displays File has been Submitted.
The status of the upgrade is shown at the Xerox WorkCentre and the CentreWare Internet Services
interface is no longer accessible.
b. Close the browser.
5. Check the upgrade status
a. At the Xerox WorkCentre local user interface,
the xxx.dlm job appears and starts
processing. The software upgrade begins.
b. Once the software has been upgraded, the
Xerox WorkCentre reboots automatically.
Note: The system may reboot more than once,
depending on the software level of the machine
before the upgrade.
c. Once the installation is complete, the Xerox WorkCentre prints a Software Upgrade Report to
indicate a successful upgrade.
d. A Configuration Report is also printed which shows the new software level.
Note: These reports only print if the Printing Configuration Reports setting has been enabled.
The Smart Card settings are now ready for configuring using the CentreWare Internet Services
interface.
Installation
Xerox® Smart Card
Installation Guide
16
Configuring the Smart Card
Once the Xerox WorkCentre has received the software upgrade, the Smart Card can be configured and
enabled using CentreWare Internet Services.
Follow the instructions below to enable and configure the Smart Card:
1. Access CentreWare Internet Services
a. At the workstation open your web browser.
b. In the URL field, enter http:// followed by the IP Address of the device. For example: If the IP
Address is 192.168.100.100, enter the following into the URL field: http://192.168.100.100.
c. Press the Enter key on your workstation keyboard.
The default Status window displays.
Installation
Xerox® Smart Card
Installation Guide
17
2. Configure the date and time to update automatically
a. Prior to configuring the date and time to update automatically, the Network Time Protocol
(NTP) must be enabled on a hidden web page.
b. Go to http://device IP Address/diagnostics/ntpaccess.dhtml.
c. Select the Enabled checkbox and then
select Apply.
d. At the CentreWare Internet Services screen,
select Properties then General Setup.
e. Select Date and Time.
Note: A pop-up window may appear requiring you to login.
f. Ensure the NTP Enabled box is checked for the Network Time Protocol option, then enter the
IP Address or the NTP Host Server Name.
In most cases this will be your DHCP server, and it will provide the time in Greenwich which must
be corrected for your time zone by the GMT offset.
g. Select Apply.
h. At the Offset of Local Time Zone option select the GMT offset that is correct for your region.
Note: The sign in front of the number is important. Most of Europe is plus of Greenwich Mean
Time, while North America is minus.
Note: If Network Time Protocol is not available, check that the time set on the device matches the
network time on the Domain Controller Authentication Server.
i. Exit General Setup.
Installation
Xerox® Smart Card
Installation Guide
18
j. To determine the network time, view the time as displayed on your computer. To observe or
set the time on the machine use the following instructions:
At the Xerox WorkCentre, press the
Access button on the control panel.
Input your User Name and/or
Password.
Select Go to Tools.
Select System Settings.
Select Time and Date.
Select Set Date and Time.
Select Set Time.
Observe the time and if it is not correct,
validate that the GMT offset is correct
for your region.
Installation
Xerox® Smart Card
Installation Guide
19
3. Configure the CAC settings
a. Select Security and then General.
b. Select Authentication Server and then CAC/PIV.
c. Select the Feature Coverage required:
All Features restricts access to all features, including Scanning.
Scanning Features Only restricts access to all features managed by the network
controller e.g. Scan to File, E-mail, Server Fax and Internet Fax. Copy and Embedded Fax
are not restricted. This option is the default setting.
d. Enter the Smart Card Timeout required between 1 and 120 minutes. The default setting is 5
minutes.
If the machine is inactive for the period of time specified, it will end the session automatically.
Installation
Xerox® Smart Card
Installation Guide
20
4. Domain Controller validation
If your site does not register the DC with OCSP:
a. Uncheck all three Domain Controller Validation boxes and add the required Domain
Controller(s).
If you wish to validate the DC against OCSP before validation of the user:
b. Check the box for Validate the Domain Controller Before CAC/PIV Authentication.
c. Enter the OCSP Server Service URL details.
Note: Depending on your environment, these details may be case sensitive.
If you wish to validate the DC against OCSP after validation of the user:
d. Check the box for Validate Domain Controller Certificate via OCSP after CAC/PIV User
Authentication.
e. Enter the OCSP Server Service URL details.
f. If you wish to validate the DC certificate retrieved as part of the user authentication process
against the one stored during installation, check the box for Domain Controller Signature
must match uploaded Domain Controller Certificate.
  • Page 1 1
  • Page 2 2
  • Page 3 3
  • Page 4 4
  • Page 5 5
  • Page 6 6
  • Page 7 7
  • Page 8 8
  • Page 9 9
  • Page 10 10
  • Page 11 11
  • Page 12 12
  • Page 13 13
  • Page 14 14
  • Page 15 15
  • Page 16 16
  • Page 17 17
  • Page 18 18
  • Page 19 19
  • Page 20 20
  • Page 21 21
  • Page 22 22
  • Page 23 23
  • Page 24 24
  • Page 25 25
  • Page 26 26
  • Page 27 27
  • Page 28 28
  • Page 29 29
  • Page 30 30
  • Page 31 31
  • Page 32 32
  • Page 33 33
  • Page 34 34
  • Page 35 35
  • Page 36 36
  • Page 37 37
  • Page 38 38
  • Page 39 39
  • Page 40 40
  • Page 41 41
  • Page 42 42
  • Page 43 43
  • Page 44 44
  • Page 45 45
  • Page 46 46
  • Page 47 47
  • Page 48 48
  • Page 49 49
  • Page 50 50
  • Page 51 51
  • Page 52 52

Xerox Pro 232/238 Installation guide

Type
Installation guide
This manual is also suitable for

Ask a question and I''ll find the answer in the document

Finding information in a document is now easier with AI