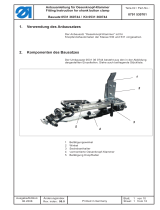
Komponenten des Bausatzes
Der Teilesatz 0510 590134 besteht aus den in der Abbildung
abgebildeten Komponenten.
Components of the mounting kit
The set of parts 0510 590134 consists of the components shown in the
illustration.
Vorsicht Verletzungsgefahr !
Hauptschalter ausschalten.
Teilesatz der Klammerabfrage nur bei ausgeschaltetem Nähautomat
montieren und einstellen.
Caution: Risk of injury !
Switch the main switch off.
Mount and adjust the clamp query kit only with the sewing automate
switched off.
Achtung !
Anbau in Reihenfolge der Abbildungen (1- 20) vornehmen
Ein falscher Anbau führt zur Fehlfunktion, d.h. die Nadel kann in den
Fadenwischer schlagen.
Attention !
Mount the parts in the order of the figures (1- 20).
Wrong mounting leads to malfunction, i.e. the needle may hit the
thread wiper.
An bau an lei tung für Klammerabfrage
Tei le satz 0510 590134
Fit ting In struc ti on for clamp que ry
Kit 0510 590134
Tei le-Nr./ Part-No.:
0791 510702
Aus ga be/Edi ti on:
01. 2006
Blatt: von
Sheet: 1 from 6
Prin ted in Fe de ral Re pub lic of Ger ma ny

1 2
Feder (Abb. 1+2) nur vorne aushängen
Winkel (Abb. 3) abschrauben.
Stellring (Abb. 4-7) lösen und entfernen.
Unhook the spring (fig. 1+2) at the front only.
Unscrew angle (fig. 3).
Loosen and remove the adjusting ring (fig. 4-7).
4 5
6 7
An bau an lei tung für Klammerabfrage
Tei le satz 0510 590134
Fit ting In struc ti on for clam p query
Kit 0510 590134
Aus ga be/Edi ti on:
01. 2006
Tei le-Nr./ Part-No.:
0791 510702
Blatt: von
Sheet: 2 from 6
Prin ted in Fe de ral Re pub lic of Ger ma ny

8
Schaltfahne und Abstandsbolzen (Abb. 8) einbauen,
dazu Feder (Abb. 9) zur Seite schieben und den
Abstandsbolzen mit Schraubenschlüssel (Abb. 10)
anschrauben.
Mount switch lug and spacer bolt (fig. 8),push spring
(fig. 9) aside and fasten the spacer bolt with a
wrench (fig. 10).
9 10
Stellring (Abb. 11) wieder montieren 11
Beide Schrauben (Abb. 12 u. 13) festziehen
Remount the adjusting ring (fig. 11)
Tighten both screws (fig. 12 and 13).
(Fotoübersicht
Montageeinbau)
(Photos assembly)
12 13
An bau an lei tung für Klammerabfrage
Tei le satz 0510 590134
Fit ting In struc ti on for clamp que ry
Kit 0510 590134
Tei le-Nr./ Part-No.:
0791 510702
Aus ga be/Edi ti on:
01. 2006
Blatt: von
Sheet: 3 from 6
Prin ted in Fe de ral Re pub lic of Ger ma ny

14
Ausgebauten Winkel (siehe Abb. 3) mit Winkel, den
Zylinderschrauben, sowie dem Induktivgeber vor-
montieren (Abb. 14).
Schaltfahne und Induktivgeber (Abb. 15) justieren,
Einen Abstand zwischen Schalter und Schaltfahne von
max. 1mm (Abb. 16) einstellen. Die Schaltfahne darf den
Induktivgeber nicht verdecken.
Preassemble removed angle (see fig. 3) with angle, the
cheese-head screws as well as the inductive
transmitter (fig. 14).
Adjust switch lug and inductive transmitter (fig. 15).
Adjust a distance of max. 1mm (fig. 16) between switch
and switch lug.
The switch lug must not hide the inductive transmitter.
15 16
17
Leitung (Abb. 17 und 18) anschliessen.
Stecker vom Induktivgeber verbinden und die Kabel
verlegen.
Connect cable (fig. 17 and 18).
Connect the plug of the inductive transmitter and lay
the cables.
18 19
An bau an lei tung für Klammerabfrage
Tei le satz 0510 590134
Fit ting In struc ti on for clam p query
Kit 0510 590134
Aus ga be/Edi ti on:
01. 2006
Tei le-Nr./ Part-No.:
0791 510702
Blatt: von
Sheet: 4 from 6
Prin ted in Fe de ral Re pub lic of Ger ma ny
mm 1

20
Nähautomat einschalten.
Im Eingangstest S8 unbedingt die
Funktion prüfen (manuell).
Anzeigesymbol “-” muss über “+” in
der Mittelstellung wieder “-” in der
Endstellung anzeigen (Abb.20).
Switch the sewing automate on.
Test the function with the input test S8
by all means (manually).
The display symbol ”-” must indicate ”+” in
the centre position and ”-” again in
the final position (fig. 20).
Anzeige Eingangstest S8:
Display input test S8:
Fadenwischerposition: links mittig rechts
Thread wiper position: left central right
Schaltfahne über dem Schaltfahne verdeckt den Schaltfahne unter dem
Induktivgeber Induktivgeber Induktivgeber
Switch lug above the Switch lug hides the Switch lug under the
inductive transmitter inductive transmitter inductive transmitter
An bau an lei tung für Klammerabfrage
Tei le satz 0510 590134
Fit ting In struc ti on for clamp que ry
Kit 0510 590134
Tei le-Nr./ Part-No.:
0791 510702
Aus ga be/Edi ti on:
01. 2006
Blatt: von
Sheet: 5 from 6
Prin ted in Fe de ral Re pub lic of Ger ma ny

Maß nah men bei Auf tre ten des Feh lers 9906 (Über wa chungs chal ter nicht er kannt)
mit Überwachungsschalter:
– prüfen, ob der Abstand zwischen Schaltfahne und Schalter
maximal 1mm beträgt
– über Leuchtdiode prüfen, ob der Schalter schaltet
– über Multitest/Auto-Eingangstest prüfen, ob Schalter
funktionsfähig ist (ggf. Verkabelung prüfen)
ohne Überwachungsschalter (z.B. nach Tauschen der Steuerung):
Der interne Merker “Überwachungsschalter vorhanden“ muß
zurückgesetzt werden
– nach Einschalten der Maschine über Taste “F” Service-Ebene
betreten.
– im Menü “Init” Menüpunkt Maschinenparameter über Taste “OK”
anwählen und Sicherheitsabfrage mit Taste “®” bestätigen.
– Service-Ebene mit Taste “ESC” verlassen.
Die Maschine startet.
Maß nah men bei Auf re ten des Feh lers 3410 (Klam mer fuß nicht oben)
oder 3411 (Klam mer fuß nicht un ten)
– Mechanik prüfen: Schwergängigkeit, Blockierung
– Abstand Schaltfahne Überwachungsschalter prüfen:
maximal 1mm
– Überwachungsschalter prüfen (Leuchtdiode)
– Verkabelung Überwachungsschalter prüfen
(Multitest/Auto-Eingangstest)
– Netzspannung prüfen: ggf. Transformator DAC III gegen
30V-Typ tauschen (F 3410)
Mea su res when fault 9906 is in di ca ted (su per vi si on switch not re cog ni zed)
with supervision switch:
– Check whether the distance between switch lug and switch
amounts to 1 mm max.
– Check via light-emitting diode whether the switch functions.
– Check via Multitest/Auto input test whether the switch is in
functioning condition (check wiring, if required).
without supervision switch (e.g. after exchanging the control):
The internal marker “supervision switch available” has to be reset.
– Enter the service level via key “F” after switching the machine on.
– Select menu item “machine parameter” via key “OK” in the
menu “Init” and confirm safety query with key “®”.
– Quit the service level with key “ESC”. The machine starts.
Mea su res when fault 3410 is in di ca ted (clam ping foot not in top po si ti on) or 3411 (clam ping
foot not in bot tom po si ti on)
– Check the mechanics: sluggishness, blocking.
– Check distance between switch lug and supervision switch:
1 mm max.
– Check the supervision switch (light-emitting diode).
– Check wiring of the supervision switch (Multitest/Auto input test).
– Check mains voltage: exchange transformer DAC III against
30V type, if required (F 3410).
An bau an lei tung für Klammerabfrage
Tei le satz 0510 590134
Fit ting In struc ti on for clam p query
Kit 0510 590134
Aus ga be/Edi ti on:
01. 2006
Tei le-Nr./ Part-No.:
0791 510702
Blatt: von
Sheet: 6 from 6
Prin ted in Fe de ral Re pub lic of Ger ma ny
/


