Roche Multiplate 5 Analyzer Reference guide

Type
Reference guide

Roche Multiplate 5 Analyzer is a compact instrument for point-of-care hemostasis testing. It enables rapid and reliable assessment of platelet function and coagulation in just 5 minutes using whole blood. The analyzer integrates easily into your laboratory workflow, providing results directly on the instrument's screen or via the optional Multiplate BCS software for data management and connectivity.

Roche Multiplate 5 Analyzer is a compact instrument for point-of-care hemostasis testing. It enables rapid and reliable assessment of platelet function and coagulation in just 5 minutes using whole blood. The analyzer integrates easily into your laboratory workflow, providing results directly on the instrument's screen or via the optional Multiplate BCS software for data management and connectivity.

Multiplate
®
analyzer
Quick Reference Guide version 3.0
Software version 2.06
Roche Diagnostics
Multiplate® analyzer · Software version 2.06 · Quick Reference Guide · version 3.0
2
Publication information
Edition notice This information is intended for operators of the
Multiplate
®
analyzer. It provides basic information to start
working with the analyzer.
Every effort has been made to ensure that all the
information is correct at the time of publishing. However,
Roche reserves the right to make any changes necessary
without notice as part of ongoing product development.
If not otherwise stated, the information in this document
is valid for both the Multiplate e-line Pipette and the
Multiplate Transferpette.
u For more comprehensive information, refer to the
Multiplate analyzer Operator’s Manual.
Copyright © 2017–2020, F. Hoffmann-La Roche Ltd. All rights
reserved.
Contact addresses
Publication version Software version Revision date Change description
1.0 2.04 January 2013 First publication
2.0 2.04 May 2013 Adapted to software version 2.04
2.1 2.04 April 2015 Adapted to include Multiplate Transferpette.
Test procedures adapted.
3.0 2.06 June 2020 New page layout
y Revision history
Roche Diagnostics GmbH
Sandhofer Strasse 116
68305 Mannheim
Germany
Made in Germany
Roche Diagnostics
Multiplate® analyzer · Software version 2.06 · Quick Reference Guide · version 3.0
3
Table of contents
Getting started . . . . . . . . . . . . . . . . . . . . . . . . . . . . . . . . 4
Reagent handling . . . . . . . . . . . . . . . . . . . . . . . . . . . . . . 6
Reagent storage conditions . . . . . . . . . . . . . . . . . . . . . 7
Unopened reagent vials. . . . . . . . . . . . . . . . . . . . . . 7
Reconstituted reagents . . . . . . . . . . . . . . . . . . . . . . 7
Handling of pre-heating tubes . . . . . . . . . . . . . . . . . . . 8
Using the electronic pipette . . . . . . . . . . . . . . . . . . . . . 9
Performing tests using the electronic pipette. . . . . . . 11
Electronic pipette: avoiding handling errors . . . . . . . . 14
Avoiding operator errors . . . . . . . . . . . . . . . . . . . . . . . . 15
Performing tests using a manual pipette . . . . . . . . . . 16
Test procedures for hirudinized blood. . . . . . . . . . . . . 18
Test procedures for citrated blood . . . . . . . . . . . . . . . . 18
Multiplate – Parameters. . . . . . . . . . . . . . . . . . . . . . . . . 19
Maintenance of the electronic pipette . . . . . . . . . . . . 20
Roche Diagnostics
Multiplate® analyzer · Software version 2.06 · Quick Reference Guide · version 3.0
4 Getting started
Getting started
The Multiplate software uses the Windows 10 operating
system. A password is not required in order to start the
Multiplate software.
The software then starts up automatically and begins
heating the measurement block up to 37 °C. The current
temperature is displayed in the status bar. The instrument
will reach the specified temperature range within 10
minutes.
Roche recommends performing an electronic control
measurement before the first measurement of a shift
(Multiplate® > Start electronic QC). The system must
run for at least 20 minutes before starting the electronic
control measurement. Prepare the reagents. Fill the
preheating tubes with diluent solution (0.9% NaCl;
NaCl/CaCl2 when using citrated blood), place into
position, and prepare the tips. Before using the electronic
pipette inspect the filter and replace it if necessary.
Prepare your test cells (check expiry date and the
magnetic stirrer inside), and store the collected blood at
room temperature (e.g. in the reagent holder). Samples
should be analyzed within the period of 0.5–3 hours after
blood collection. Never put the sample tubes on a rotating
mixer.
A Menu bar C Quick access buttons
B Status bar D Channel display for 5 channels
A
B
C
D
Roche Diagnostics
Multiplate® analyzer · Software version 2.06 · Quick Reference Guide · version 3.0
Getting started 5
WARNING
!
Infection by samples and associated materials
Contact with samples containing material of human origin
may result in infection. All materials and mechanical
components associated with samples of human origin are
potentially biohazardous.
r Exercise the normal precautions required for handling
all laboratory reagents and samples. Disposal of all
waste material should be in accordance with local
guidelines.
To open the Quick Reference Guide or the Operator’s
Manual on the analyzer, choose the Start PDF Reader
menu.
The files are available under the following link:
C:\Users\Operator\Documents\Multiplate\Multiplate
Documents
u Related topics
For information on how to change the pipette filter,
see Maintenance of the electronic pipette (20)
Roche Diagnostics
Multiplate® analyzer · Software version 2.06 · Quick Reference Guide · version 3.0
6 Reagent handling
Reagent handling
r To prepare reagents
1
Carefully reconstitute the contents of one vial of the
reagent by adding 1.0 mL of distilled or deionized
water.
2
Gently swirl reagent and allow vial to stand closed for
10 minutes at 18-25 °C.
3
Swirl the vial carefully to produce a homogeneous
solution before use.
I Avoid the formation of foam.
r To aliquot into single day portions
1
To achieve maximum stability after reconstitution,
pipette 100 L aliquots of the reagent into aliquot
vials for daily use.
2
Store the aliquots appropriately.
Aliquot vials must be closed between
measurements to avoid evaporation as this will
create concentration fluctuations. For this reason
the manufacturer does not recommend aliquots of
less than 100 L.
3
Once the reagent is divided into the aliquot vials close
the safety cap tightly. The following pages describe
storage conditions.
I The reagent vials should be marked with the date
of reconstitution. Do not refreeze reagents.
Original vials of reconstituted reagent should be
refrigerated unless in use, and stored as per
manufacturer’s instructions.
A Safety cap
B Original reagent vial
C Aliquot vial
1
A
B
C
Roche Diagnostics
Multiplate® analyzer · Software version 2.06 · Quick Reference Guide · version 3.0
Reagent storage conditions 7
Reagent storage conditions
In this section
Unopened reagent vials (7)
Reconstituted reagents (7)
Unopened reagent vials
Store unopened reagent vials at 2–8 °C. The lyophilized
reagents are stable up to the stated expiration date.
Reconstituted reagents
Once reconstituted the reagents are stable between 24
hours and 7 days at 2–8 °C (in the original reagent vial).
q Verify the test-specific use time for reconstituted
reagents in the corresponding Instructions for Use.
Storage at -15 to -25 °C increases stability to 4 weeks.
After one time thawing the reagent is stable for 24 hours
at 18–25 °C.
ADPtest TRAPtest ASPItest Prostaglandin E1 Reagent
Roche Diagnostics
Multiplate® analyzer · Software version 2.06 · Quick Reference Guide · version 3.0
8 Handling of pre-heating tubes
Handling of pre-heating tubes
Fill the tube with diluent solution (0.9% NaCl; NaCl/CaCl2
when using citrated blood) at the beginning of a
Multiplate session and place it into one of the pre-heating
positions on the analyzer.
WARNING
!
Erroneous results due to inappropriate pre-heating
tubes
Using inappropriate pre-heating tubes can lead to
erroneous test results.
r Pre-heating tubes must be used, otherwise the correct
temperature of diluent solution cannot be guaranteed.
WARNING
!
Contamination of NaCl (and presence of
preservatives)
Contamination of NaCl (and presence of preservatives)
could influence aggregation results.
r Tubes should be replaced regularly and filled with
sterile saline solution (0.9% NaCl).
Roche Diagnostics
Multiplate® analyzer · Software version 2.06 · Quick Reference Guide · version 3.0
Using the electronic pipette 9
Using the electronic pipette
The following procedures show you the general handling
of the electronic pipette.
q This procedure shows you the general handling of
the electronic pipette.
r To use the electronic pipette for
pipetting
1
Attach a tip.
I Use Roche recommended tips only. Ensure that
the tip is securely seated.
Pipette tips are disposable items.
2
Hold the pipette vertically and immerse the tip into the
liquid.
I Make sure that the pipette tip does not touch the
stirrer bar.
3
Press the Start button to aspirate the liquid into the
tip.
I To avoid the intake of air, leave the tip immersed
into the liquid for approximately one second.
f The arrow in the display points upwards to indicate
aspiration of liquid.
f
f When aspiration is completed, the arrow in the
display points downwards to indicate that the
pipette is ready for dispensing.
f
2
3
Roche Diagnostics
Multiplate® analyzer · Software version 2.06 · Quick Reference Guide · version 3.0
10 Using the electronic pipette
4
Insert the pipette into the test cell or reagent vial.
To dispense the liquid into a test cell:
insert the pipette vertically into the test cell, when
pipetting diluent, blood, or Liquid Control
Solution 1 (1
st
step). Liquid Control Solution 1 (2
nd
step) and Liquid Control Solution 2 have to be
added onto the surface of Solution 1 to avoid air
bubbles.
To dispense liquid into a reagent vial using the
Liquidtrans function, hold the pipette vertically
over the reagent vial.
5
Press the Start button to dispense the liquid into the
test cell or reagent vial.
I The arrow in the display points downwards to
indicate the dispensing of liquid.
Make sure that the pipette tip does not touch the
stirrer bar.
f The liquid is completely discharged and a blowout
is performed.
f
6
Hold the pipette over a suitable waste container and
press the Eject button to eject the tip into the waste
container.
5
6
Roche Diagnostics
Multiplate® analyzer · Software version 2.06 · Quick Reference Guide · version 3.0
Performing tests using the electronic pipette 11
Performing tests using the electronic
pipette
r To perform tests using the electronic
pipette
1
Choose the Auto pipette button.
2
Enter the sample ID and select the desired test.
Up to five tests can be run simultaneously. User
defined tests are marked with [ud] in the list of
tests.
3
Choose the Check and start measurement series
button.
4
Place test cells into the measuring positions that are
listed on the screen.
2
3
4
Roche Diagnostics
Multiplate® analyzer · Software version 2.06 · Quick Reference Guide · version 3.0
12 Performing tests using the electronic pipette
5
Connect the sensor cable(s) to the test cell(s).
6
Choose the Start pipetting program button.
Instructions are shown on the screen.
7
Press the Start button on the electronic pipette to
execute each pipetting step.
An arrow indicates the current pipette step.
Subsequent steps are marked with a dot, executed
steps with a tick.
8
Pipette the diluent solution and the blood sample into
the test cells.
The 3-minute incubation time starts automatically.
An acoustic signal sounds at the end of each
incubation period and the operator is asked to add
the appropriate reagent to the test cells
immediately.
9
Add the appropriate reagent to the test cells.
Measurement starts automatically when the last
pipetting step of each channel is completed.
10
In the channel display the status icons show the
progress:
Running
Completed : The measurement is complete
and the data is stored.
5
6
77
8
9
Roche Diagnostics
Multiplate® analyzer · Software version 2.06 · Quick Reference Guide · version 3.0
Performing tests using the electronic pipette 13
11
After the tests are complete, print the results, if
required.
Choose the F6: Print button.
Select the channels whose results you want to
print.
Choose the Print button. When printing is
complete, the icon on the left is displayed.
12
Remove the test cells and discard them according to
the local regulatory standards.
13
Clear channels.
Choose the F7: Clear channels button.
Select the channels you want to clear.
Choose the Clear button.
13
Roche Diagnostics
Multiplate® analyzer · Software version 2.06 · Quick Reference Guide · version 3.0
14 Electronic pipette: avoiding handling errors
Electronic pipette: avoiding handling errors
Continuously pressing the Start button during
communication between the pipette and the analyzer may
interfere with the communication, therefore it is
necessary to wait until the next instruction is displayed on
the screen before proceeding. Always follow the
instructions displayed on screen.
The last step must be completed and the next pipette
instruction must be displayed on the screen before using
the eject function. Care and patience are required when
handling the electronic pipette.
q Do not press any key on the pipette during
initialization of the electronic pipette.
Hold the pipette vertically and immerse the tip into the
liquid.
q Make sure that the pipette tip does not touch the
stirrer bar.
Execute all of the pipetting steps sequentially, according
to the instructions on the screen.
A visual inspection of the aspirated volume in the pipette
tip is recommended before adding the solution into the
test cell.
This avoids operating errors due to aspirated air or other
malfunctions.
The images illustrate the accurate pipette tip fill levels for
the volumes 20 L and 300 L.
A 20 L
B 300 L
A
B
Roche Diagnostics
Multiplate® analyzer · Software version 2.06 · Quick Reference Guide · version 3.0
Avoiding operator errors 15
Avoiding operator errors
Store blood samples at room temperature (18–25 °C), do
not heat the sample.
Never put the sample tubes on a rotating mixer.
Do not remove the magnetic stirrer! Ensure that a stirrer
is present in the test cell.
Diluent solution (0.9% NaCl; NaCl/CaCl2 when using
citrated blood) must be pre-heated for a minimum of 10
minutes before use.
Place the test cell firmly into the measuring position.
After manually pipetting the reagent it is important to
start the test immediately. Pipette the reagent deep into
the test cell.
Roche Diagnostics
Multiplate® analyzer · Software version 2.06 · Quick Reference Guide · version 3.0
16 Performing tests using a manual pipette
Performing tests using a manual pipette
r To perform tests using a manual
pipette
1
Place the test cells into the measuring positions.
I Ensure that the magnetic stirrer is inside the test
cell and rotates. If the magnetic stirrer does not
rotate, lock the affected channel and contact your
Roche Service representative.
2
Connect the sensor cable(s) to the test cell(s).
Squeeze the rear part of the front plug to loosen it
and pull the sensor cable out of its parking
position.
Push it gently into the jack area of the test cell. The
plug should snap firmly into the test cell.
3
Perform the pipetting. Pipette:
•300 L 0.9% NaCl + 300 L hirudinized blood
•300 L 0.9% NaCl/CaCl2 + 300 L citrated blood
4
Start the timer for incubation (warming and
equilibration): Choose the F2: Start timer button.
5
The 3-minute countdown is displayed in the status bar
of the main window.
When the standard 3-minute incubation time has
elapsed, an acoustic signal is sounded.
6
After incubation, pipette the reagent deep into the test
cell.
I Adding the reagent and starting the test must be
performed simultaneously and separately for each
channel.
7
Stop the timer to cancel the acoustic signal.
1
2
3
5
6
Roche Diagnostics
Multiplate® analyzer · Software version 2.06 · Quick Reference Guide · version 3.0
Performing tests using a manual pipette 17
8
Select the channel (using the mouse or the keys 1-5)
and confirm with the Start button or Enter button.
Analysis begins for the selected channel.
9
Choose the F4: Enter test/ID button to enter a
sample ID and select a test name for every started
channel.
10
Observe the status icons.
I The icon is displayed when the measurement
is complete and the data is stored.
11
When the tests are complete, print the results, if
required.
Choose the F6: Print button.
Select the channels whose results you want to
print.
Choose the Print button. When printing is
complete, the icon on the left is displayed.
12
Remove the test cells and discard them according to
the local regulatory standards.
13
Clear channels.
Choose the F7: Clear channels button.
Select the channels you want to clear.
Choose the Clear button.
8
13
Roche Diagnostics
Multiplate® analyzer · Software version 2.06 · Quick Reference Guide · version 3.0
18 Test procedures for hirudinized blood
Test procedures for hirudinized blood
Test procedures for citrated blood
1
Pipette
300 μL saline 0.9% (37 ºC) + 300 μL hirudinized blood
Pipette
3a
20 μL Prostaglandin E1
Pipette
3b
20 μL ADPtest
2
Incubation
3 minutes
4
Measuring
6 minutes
3
Pipette
20 μL TRAPtest
20 μL ADPtest
20 μL ASPItest
For ADPtest HS (high sensitivity)
1
Pipette
300 μL saline 0.9%/3mM CaCl
2
(37 ºC)
+ 300 μL citrated blood
1
Pipette
300 μL saline 0.9% (37 ºC)
+ 300 μL citrated blood
4
Measuring
6 minutes
2
Incubation
3 minutes
4
Measuring
6 minutes
2
Incubation
3 minutes
3
Pipette
20 μL TRAPtest
20 μL ADPtest
3
Pipette
20 μL ASPItest
Roche Diagnostics
Multiplate® analyzer · Software version 2.06 · Quick Reference Guide · version 3.0
Multiplate – Parameters 19
Multiplate – Parameters
The Multiplate
®
analyzer continuously records platelet
aggregation. The adhesion and aggregation of platelets
onto the Multiplate sensors generate an increase in
impedance which is transformed into arbitrary
aggregation units (AU) and plotted against time.
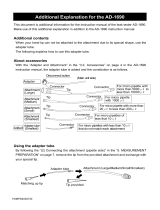
The most important parameter is the area under the
aggregation curve (AUC). It is affected by the total height
of the aggregation curve as well as by its slope and is
best suited to express the overall platelet activity. Two
AUC units are used: U and AU*min. The first unit (U) is
the preferred one.
Two more parameters are calculated: The aggregation
(Agg) is the increase of impedance during analysis. The
velocity (Vel) is the maximum slope of the aggregation
curve.
Two curves are assessed using the two independent
sensors in the Multiplate test cell. The parameters
calculated by the software are the mean values of the
data of each curve.
Above the curve the AUC bars with reference and target
ranges are displayed. Within the AUC bars the black bars
(A) indicate the actually measured AUC result. The green
zones (B) represent the reference and the target range
that have been programmed for the test.
Press Ctrl+K or choose Switch curve mode from the
Measurements menu to toggle between the overlapped
curves (representing the duplicate measurements) or the
filled curve (reflecting the mean value of the
measurements).
Time [min]
Aggregation [AU]
Velocity [AU/min
]
Area under the curve [U]
A
B
Roche Diagnostics
Multiplate® analyzer · Software version 2.06 · Quick Reference Guide · version 3.0
20 Maintenance of the electronic pipette
Maintenance of the electronic pipette
The electronic pipette filter (tip cone filter) should be
inspected frequently. Cleanliness helps to prevent clots
forming on the filter and maintain accurate tip fill levels.
r To replace the tip cone filter on the
Multiplate e-line Pipette
1
Grip the filter using the forceps and pull it out of the
pipette.
2
Using the forceps pick up a new filter and insert it into
the pipette cone. Push it firmly against the stop
position.
I Make sure not to soil the new filter while you
install it.
r To replace the tip cone filter on the
Multiplate Transferpette
1
Grip the filter using the forceps and pull it out of the
pipette.
2
Using the forceps pick up a new filter and insert it into
the pipette cone.
I Make sure not to soil the new filter while you
install it.
1
2
1
2
  • Page 1 1
  • Page 2 2
  • Page 3 3
  • Page 4 4
  • Page 5 5
  • Page 6 6
  • Page 7 7
  • Page 8 8
  • Page 9 9
  • Page 10 10
  • Page 11 11
  • Page 12 12
  • Page 13 13
  • Page 14 14
  • Page 15 15
  • Page 16 16
  • Page 17 17
  • Page 18 18
  • Page 19 19
  • Page 20 20

Roche Multiplate 5 Analyzer Reference guide

Type
Reference guide

Roche Multiplate 5 Analyzer is a compact instrument for point-of-care hemostasis testing. It enables rapid and reliable assessment of platelet function and coagulation in just 5 minutes using whole blood. The analyzer integrates easily into your laboratory workflow, providing results directly on the instrument's screen or via the optional Multiplate BCS software for data management and connectivity.

Ask a question and I''ll find the answer in the document

Finding information in a document is now easier with AI