Page is loading ...

The Trusted Source
®
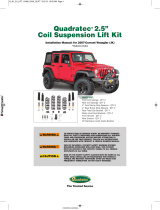
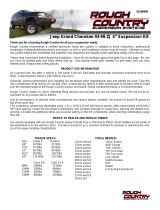
Quadratec®3.5”
Coil Suspension Lift Kit
TO REDUCE RISK OF SERIOUS INJURY OR PROPERTY DAMAGE:
READ ALL SAFETY MESSAGES AND UNDERSTAND ALL INSTRUC-
TIONS AND PROCEDURE NOTICES BEFORE ATTEMPTING TO
INSTALL OR USE THIS PRODUCT. FOLLOW ALL INSTRUCTIONS
AND WARNINGS WITH PRODUCT & VEHICLE OWNERS MANUAL.
THIS KIT INCLUDES A COCKPIT SAFETY WARNING STICKER
REGARDING INCREASED ROLLOVER RISK. THIS STICKER
MUST BE AFFIXED IN THE COCKPIT, VISIBLE TO ALL VEHICLE
OCCUPANTS AT ALL TIMES.
RISK OF EYE INJURY! SAFETY GLASSES MUST BE WORN AT ALL
TIMES WHILE INSTALLING OR MAINTAINING THIS PRODUCT.
TORQUE AND RECHECK FASTENERS AFTER 250 MILES AND
FREQUENTLY THEREAFTER. DO NOT USE IF DAMAGED.
Installation Manual: for 2007-Current Wrangler (JK)
#16400.0X4X
PARTS LIST:
Front Coil Springs - QTY 2
Rear Coil Springs - QTY 2
2” Front Bump Stop Spacers - QTY 2
2” Rear Bump Stop Spacers - QTY 2
Front Track Bar Bracket - QTY 1
Rear Track Bar Bracket - QTY 1
Rear Track Bar Bracket Brace - QTY 1
Rear Sway Bar Links – 2
Brake Line Drop Brackets - QTY 4
E-Brake Drop Bracket - QTY 1
Full Kit Hardware Listed Inside Booklet
Q_JK_3.5_LIFT_16400_0X4X_WORK_QLIFT 3/12/15 11:15 AM Page 1
03122015111940

INSTALLATION OF THIS PRODUCT ON YOUR JEEP®WILL MODIFY AND EN-
HANCE ITS SUSPENSION AND OFF-ROAD PERFORMANCE. IT MAY HANDLE
DIFFERENTLY THAN AS FACTORY-EQUIPPED INCLUDING; INCREASED RIDE-
HEIGHT; REDUCED LATERAL STABILITY; AND HIGHER RISK OF ROLL-OVER
OR OTHER ACCIDENT. ALSO, OWNER’S CHOICE OF LARGER TIRE/WHEEL
COMBINATIONS MAY REQUIRE ADDITIONAL PEDAL PRESSURE OR IN-
CREASED DISTANCE TO STOP; CAUSE SPEEDOMETER TO READ SLOW AND
MAY REDUCE VISIBILITY AROUND THE VEHICLE. CHOICE OF TIRE/WHEEL
COMBINATIONS OTHER THAN AS TESTED OR RECOMMENDED MAY
COMPROMISE FMVSS 126 COMPATIBILITY.
FAMILIARIZE YOURSELF WITH VEHICLE HANDLING AND REVIEW ALL VEHI-
CLE MANUFACTURERS AND QUADRATEC®WARNINGS, INSTRUCTIONS AND
LIMITED WARRANTIES BEFORE DRIVING A MODIFIED SUSPENSION JEEP®.
FOLLOW ALL RECOMMENDED MAINTENANCE PROCEDURES AND ROUTINELY
INSPECT YOUR VEHICLE COMPONENTS FOR UNUSUAL WEAR OR OFF-ROAD
DAMAGE.
DO NOT DRIVE UNDER ANY SPEED OR MANEUVERING CONDITIONS WHICH
MAY CAUSE THE VEHICLE TO TRIP, ROLL, LOSE TRACTION OR COMPROMISE
YOUR ABILITY TO SAFELY BRAKE IN AN EMERGENCY. QUADRATEC®DOES
NOT RECOMMEND COMBINED USE OF SUSPENSION KITS, BODY LIFTS,
OTHER LIFTING DEVICES OR COMPONENTS ALTERING THE INTENDED RIDE-
HEIGHT OR FUNCTION OF ITS PRODUCTS. MANY STATES HAVE LAWS RE-
STRICTING THE EXTENT OF VEHICLE MODIFICATIONS. OWNER/DRIVER IS
RESPONSIBLE FOR MODIFICATIONS CONSISTENT WITH STATE LAWS AND
GOOD SENSE.
The Trusted Source
®
2
Before You Begin Installation:
Congratulations on your purchase of
the Quadratec 3.5” Coil Spring Lift Kit
for 2007-Current JK Wrangler Vehicles.
When unpacking, check to make sure all
parts are included and not damaged due
to shipping. If any part is missing or
broken, please call Customer Service
at 800-745-6037 as soon as possible.
a hazardous situation which, if not avoided, could result in death or
serious injury. You CAN be KILLED or SERIOUSLY HURT if you don’t
follow instructions.
a hazardous situation which, if not avoided, could result in minor or
moderate injury. You CAN be moderately HURT and also may suffer
property damage if you don’t follow instructions.
Careful attention is required to this instruction or operation but does
generally not relate to personal injury. Damage to your Quadratec®
product or other property may result if you don’t follow instructions.
IMPORTANT PRODUCT SAFETY TIPS
A Few Words About Product Safety:
Your Quadratec Suspension product is
intended to enhance the utility and
enjoyment of your off road capable
vehicle. Before installation, please
review the following safety information
and installation recommendations.
Throughout these instructions impor-
tant safety information is generally
preceded by one of three signal words
indicating the relative risk of injury,
property damage or adverse conse-
quence. The signal words mean:
Q_JK_3.5_LIFT_16400_0X4X_WORK_QLIFT 3/12/15 11:15 AM Page 2
03122015111940

3.5” KIT PARTS LIST:
Front Coil Springs - QTY 2
Rear Coil Springs - QTY 2
2” Front Bump Stop Spacers - QTY 2
10mm Button Head Bolts - QTY 2
3⁄8” SAE Washers - QTY 2
10mm Locknuts - QTY 2
2” Rear Bump Stop Spacers - QTY 2
5⁄16” x 1 Fine Thread Bolts - QTY 4
5⁄16” SAE Washers - QTY 8
5⁄16” Fine Thread Locknuts - QTY 4
Front Track Bar Bracket - QTY 1
7⁄16” x 21⁄2” Fine Thread Bolts - QTY 2
7⁄16” SAE Washers - QTY 2
7⁄16” Fine Thread Locknuts - QTY 2
9⁄16” x 3 Coarse Thread Bolt - QTY 1
9⁄16” SAE Washers - QTY 2
9⁄16” Coarse Thread Locknut - QTY 1
Rear Track Bar Bracket - QTY 1
½” x 11⁄4” Fine Thread Bolt - QTY 1
½” SAE Washer - QTY 1
½” Fine Thread Locknut - QTY 1
7⁄16” x 1 Fine Thread Bolt - QTY 1
7⁄16” SAE Washer - QTY 1
7⁄16” Fine Thread Locknut - QTY 1
9⁄16” x 3 Fine Thread Bolt - QTY 1
9⁄16” SAE Washers - QTY 2
9⁄16” Fine Thread Locknut - QTY 1
Crush Sleeve
Rear Track Bar Bracket Brace - QTY 1
5⁄16” Coarse Thread Bolts - QTY 3
5⁄16” Extra Thick Flat Washers - QTY 3
5⁄16” Grade 8 Lock Washers - QTY 3
Rear Sway Bar Links – 2
½” x 2½” Coarse Thread
Button Head Bolts - QTY 4
½” SAE Washers - QTY 4
½” USS Washers - QTY 4
½” Coarse Thread Locknut - QTY 4
Hourglass Bushings - QTY 4
11⁄4” Long Sleeves - QTY 4
Brake Line Drop Brackets - QTY 4
¼” x 1 Fine Thread Bolts - QTY 4
¼” SAE Washers - QTY 8
¼” Fine Thread Locknuts - QTY 4
E-Brake Drop Bracket - QTY 1
¼” x 1 Fine Thread Bolts - QTY 2
¼” SAE Washers - QTY 4
¼” Fine Thread Locknuts - QTY 2
Cam Bolts - QTY 4
REQUIRED TOOLS:
Safety Glasses
Hand Drill
5⁄64” Drill Bit
15⁄32” Drill Bit
7⁄16” Drill Bit
7⁄32” Allen Wrench
5⁄16” Allen Wrench
7⁄16” Socket
½” Socket
5⁄8” Socket
10, 15, 16, 18, 19, 21mm Sockets
7⁄8” Socket
7⁄16” Open End Wrench
½” Open End Wrench
9⁄16” Open End Wrench
5⁄8” Open End Wrench
18mm Open End Wrench
19mm Open End Wrench
7⁄8” Open End Wrench
Locking Pliers (I.E. Vise Grips)
Diagonal Wire Cutters
Paint Pen or Marker
Hammer
Punch
The Trusted Source
®
3
IMPORTANT PRODUCT SAFETY TIPS
QUADRATEC®RECOMMENDS PROFESSIONAL INSTALLATION OF THIS
PRODUCT.
Q_JK_3.5_LIFT_16400_0X4X_WORK_QLIFT 3/12/15 11:15 AM Page 3
03122015111941

The Trusted Source
®
4
PARK THE VEHICLE ON FLAT, LEVEL GROUND AND SET EMERGENCY
BRAKE. ALWAYS SUPPORT FRAME RAILS USING JACK STANDS.
3.5” Coil Spring Lift Kit Installation: Front
Caution: Park the vehicle on flat, level
ground and set emergency brake. Put
on safety glasses. Raise the front of the
vehicle and support frame rails using
jack stands. Do not lower the axle at
this time. Remove front tires/wheels.
Disconnect the front sway bar end links
using a 18mm socket and open end
wrench. Disconnect front track bar
using a 21mm socket. (see FIG 1 & 2)
Figure 1
Figure 1 Figure 2
Disconnect the bottom end of the front
shocks using an 18mm socket and open
end wrench. (see FIG 3)
Disconnect brake line bracket from
frame using a 10mm socket. (see FIG 4)
Figure 3 Figure 4
Figure 4
Q_JK_3.5_LIFT_16400_0X4X_WORK_QLIFT 3/12/15 11:15 AM Page 4
03122015111942

The Trusted Source
®
5
Remove bracket using a 10mm socket
and discard (see FIG 7).
Remove original equipment front shock
absorbers. Locate the shocks fasteners
as shown.
On 2011 and newer models disconnect
the ABS lines from brake line bracket
(see FIG 5)
Using locking pliers, separate the
bracket from brake line (FIGS 6 & 7).
Figure 5 Figure 6
Figure 7
Figure 7 Figure 8
Figure 5
3.5” Coil Spring Lift Kit Installation: Front
Figure 8
Q_JK_3.5_LIFT_16400_0X4X_WORK_QLIFT 3/12/15 11:15 AM Page 5
03122015111942

Disconnect axle vent line. (see FIG 11) Gently lower axle housing towards the
ground and remove original coil springs.
(see FIG 12)
The Trusted Source
®
6
3.5” Coil Spring Lift Kit Installation: Front
Disconnect the top end of the front
shocks using two 5/8” open end
wrenches. (see FIG 9)
Mark the front drive shaft position with
a paint marker and remove 4 bolts using
a 15mm socket. (see FIG 10)
THE COIL SPRINGS MAY BE UNDER TENSION. REMOVE CAREFULLY.
Figure 9
Figure 9 Figure 10
Figure 10
Figure 11
Figure 11 Figure 12
Figure 12
Q_JK_3.5_LIFT_16400_0X4X_WORK_QLIFT 3/12/15 11:15 AM Page 6
03122015111943

7
The Trusted Source
®
Using a 19mm open end wrench and
18mm socket remove front sway bar
end links and discard. Your original
equipment rear swaybar endlinks will
be used in their place. (see FIG 13)
Locate front lower axle housing control
arm mounting bolt and remove using a
21mm socket and open end wrench.
(see FIG 14)
3.5” Coil Spring Lift Kit Installation: Front
Figure 13
Figure 13 Figure 14
Figure 14
Using a punch and hammer, remove the
knock-outs on either side of mounting
hole surfaces, transforming each hole
into a slot. (see FIG 15)
On each side, install new cam bolts and
tighten to 125 ft lbs. (see FIG 16).
Figure 15 Figure 16
Q_JK_3.5_LIFT_16400_0X4X_WORK_QLIFT 3/12/15 11:15 AM Page 7
03122015111944

The Trusted Source
®
8
For ’07-’10 model years only: Using a
7/16” open end wrench and socket,
install brake line drop brackets and
separate ABS line from top of brake line
using ¼” fine thread bolts, washers and
locknuts as shown. (see FIG 17)
Locate the new front bump stop in the
kit. Using the bump stop as a template,
mark the center of the bump stop pad
located on the front axle. Consider
drilling pilot holes. Carefully drill the
bump stop pad using a 25/64” drill bit.
(see FIG 18)
3.5” Coil Spring Lift Kit Installation: Front
Figure 17
Figure 17 Figure 18
Figure 18
With axle in drop position, place bump
stop in coil springs, and position the
new coil springs. (see FIG 19 & 20)
Attach bump stop to axle using
the 10mm button head bolts and one
washer under the 10mm nut, as shown
(see FIG 19 & 20). Perform this on both
sides of the vehicle.
Figure 19
Figure 19 Figure 20
Figure 20
Drop
Bracket
Q_JK_3.5_LIFT_16400_0X4X_WORK_QLIFT 3/12/15 11:15 AM Page 8
03122015112000

The Trusted Source
®
9
Locate front axle housing track bar
mount and drill-out the two outer holes
to 7/16”. (see FIG 21)
Install front track bar bracket using
OEM bolt loosely at this time along with
7/16” x 2 1/2” fine thread bolts, washers
and locknuts using 5/8” socket and
open end wrench. (see FIG 22)
3.5” Coil Spring Lift Kit Installation: Front
Figure 21
Figure 21 Figure 22
Figure 22
Assemble your new front shocks as
shown in FIG 23a, 23b & 23c. Install the
shock boots and secure with zip-ties.
Clip off zip-tie tail.
Assemble the shock top bushings
exactly as shown (see FIG 23).
Figure 23a Figure 23b
Q_JK_3.5_LIFT_16400_0X4X_WORK_QLIFT 3/12/15 11:15 AM Page 9
03122015112001

The Trusted Source
®
10
Press in the bottom end bushings as
shown (see FIG 24).
As shown in FIG 25, Install the top end
of the new front shocks using a 9/16”
open end wrench. Using factory hard-
ware, re-attach bottom end of shock
and torque to 56 ft lbs.
Re-attach the driveshaft and torque to
81 ft. lbs. Also re-attach the axle vent
line at this time.
Finally, raise the axle using a floor jack
so the full weight of vehicle is on the
new coil springs.
NOTICE: Your original rear sway bar
links will be relocated to the front and
will need to be torqued to 60 ft lbs.
This can be done with the vehicle on the
ground.
Install wheels/tires and torque to 105 ft
lbs. Finally, remove jack stands and
lower vehicle onto the ground.
Re-attach track bar using a 7/8” socket
and open end wrench with 9/16” x 3”
coarse thread bolt, washers and locknut
and torque to 111 ft lbs. (see FIG 26)
After you relocate the rear swaybar
links to the front, the installation work
on the front end of the vehicle will be
complete.
3.5” Coil Spring Lift Kit Installation: Front
Figure 24
Figure 26
Figure 25
Figure 25
Figure 26
Q_JK_3.5_LIFT_16400_0X4X_WORK_QLIFT 3/12/15 11:15 AM Page 10
03122015112001

The Trusted Source
®
11
3.5” Coil Spring Lift Kit Installation: Rear
Moving to the rear of the vehicle: Raise
rear end and properly support using
jack stands. Disconnect the rear track
bar bracket from axle using 21mm
socket, remove rear lower shock bolts
and sway bar end links using a 18mm
socket and open end wrench (FIG 27).
Now disconnect the top end shock bolts
shown above using a 16mm socket.
(see FIG 28).
Disconnect ABS line from frame and dis-
connect brake line from frame using a
10mm socket. (see FIG 29)
Disconnect axle housing vent line.
(see FIG 30)
Figure 27
Figure 29
Figure 28
Figure 30
ALWAYS SUPPORT FRAME RAILS USING JACK STANDS.
Figure 28
Q_JK_3.5_LIFT_16400_0X4X_WORK_QLIFT 3/12/15 11:16 AM Page 11
03122015112002

The Trusted Source
®
12
3.5” Coil Spring Lift Kit Installation: Rear
Safely lower the rear axle in order to
remove the original rear springs. Install
the new coil springs in position. Gently
raise axle to hold new springs in place.
Remove factory emergency brake cable
retainer using a 10mm socket. Install the
supplied drop bracket using ¼” x 1 fine
thread bolts, washers and locknut. (see
FIG 31) Install brake line drop brackets
using the original bolt to the frame, and
the supplied ¼” fine thread bolts, wash-
ers and locknuts as shown with a 7/16”
socket and open end wrench.
(see FIG 32)
Install new bump stops with 5/16” fine
thread bolts, washers and locknuts as
shown using ½” socket and open end
wrench. (see FIG 33)
Using a 19mm open end wrench and
18mm socket remove rear sway bar end
links and after rear work is complete,
relocate these to the front of vehicle.
(see FIG 34 & FIG 1)
Figure 31
Figure 33
Figure 32
Drop
Bracket
Figure 34
Q_JK_3.5_LIFT_16400_0X4X_WORK_QLIFT 3/12/15 11:16 AM Page 12
03122015112003

The Trusted Source
®
13
3.5” Coil Spring Lift Kit Installation: Rear
Locate rear upper axle housing control
arm mounting bolt and remove using a
21mm socket and open end wrench.
(see FIG 35)
Using a punch and hammer, remove the
knock-outs on either side of mounting
hole surfaces, transforming each hole
into a slot. as performed in FIG 15.
Install new cam bolts and tighten to
125 ft lbs. (see FIG 36 & 15)
Figure 35 Figure 36
Place supplied rear track bar bracket
over axle housing. Install OEM bolt and
crush sleeve, but do not tighten at this
time. Carefully drill a hole through the
track bar bracket into axle housing
bracket as shown using a 15/32” drill bit.
Consider drilling pilot holes. (see FIG 37)
Install supplied 7/16” fine thread bolt,
and washer into the hole you have just
drilled. Secure from the underside with
the supplied locknut, do not tighten at
this time. (see FIG 37b)
Figure 37
Bolt Sleeve Figure 37b
7/16”
Bolt
Figure 35
Q_JK_3.5_LIFT_16400_0X4X_WORK_QLIFT 3/12/15 11:16 AM Page 13
03122015112003

Mark location on the center of the new
bracket face with paint marker as
shown (see FIG 27). Consider drilling a
pilot hole. It will be necessary to care-
fully drill through the drivers side of the
new bracket and the axle housing
mount using a 17/32” drill bit.
Install supplied ½” x 11/4” fine thread
bolt, washer and locknut loosely at
this time. Tighten OEM track bar bolt
followed by the 7/16” and ½” bolts.
1/2”
Bolt
OEM Bolt
3.5” Coil Spring Lift Kit Installation: Rear
Figure 38a Figure 38b
Locate the 3 differential cover bolts
that will be removed for track bar
brace installation. (see FIG 39)
Loosely install brace with supplied 5/16”
coarse thread bolts, thick washers and
lock washers using a ½” socket.
(see FIG 40)
Figure 39 Figure 40
The Trusted Source
®
14
Q_JK_3.5_LIFT_16400_0X4X_WORK_QLIFT 3/12/15 11:16 AM Page 14
03122015112004

Assemble new rear extended sway bar
links using supplied bushings and
sleeves. (see FIG 41)
Install new links with supplied ½”
button head bolts, larger washers under
head of bolt, small washers under nut
and locknut using a 5/16” allen wrench
and 19mm socket. (see FIG 42)
Assemble your new rear shocks as
shown in FIG 43, 44 & 45. Install the
shock boots and secure with zip-ties.
Clip off zip-tie tail. (see FIG 43).
Assemble the shock bottom bushings
exactly as shown (see FIG 44).
Figure 43 Figure 44
3.5” Coil Spring Lift Kit Installation: Rear
The Trusted Source
®
15
Figure 41 Figure 42
Figure 42
Q_JK_3.5_LIFT_16400_0X4X_WORK_QLIFT 3/12/15 11:16 AM Page 15
03122015112004

3.5” Coil Spring Lift Kit Installation: Rear
Push the mounting plate with bushing
through the top eyelet of the rear shocks
(see FIG 45).
Install the top end of the new rear
shocks using a 16mm socket.
Finally, raise the axle using a floor jack
so the full weight of vehicle is on the
new coil springs.
Using factory hardware, re-attach bot-
tom end of shocks and torque to 56 ft
lbs. Install wheels/tires and torque to
105 ft lbs. Finally, remove jack stands
and lower vehicle onto the ground.
Re-attach track bar using the included
9/16” x 3” bolt, washer and locknut in
upper mounting hole for 3.5” lifts and
torque to 111 ft lbs. (see FIG 47)
This completes the installation work
on the rear end of the vehicle.
Figure 45 Figure 46
Figure 47
The Trusted Source
®
16
Figure 47
Q_JK_3.5_LIFT_16400_0X4X_WORK_QLIFT 3/12/15 11:16 AM Page 16
03122015112005

COMPLETE INSTALLATION BY CAREFULLY INSPECTING AND
CONFIRMING CLEARANCE OF CHOSEN TIRE/WHEELS THROUGH
FULL STEERING SWEEP AND SUSPENSION TRAVEL. ASSURE
BRAKE LINES CLEAR AND NOT RUBBING AGAINST ANY SUR-
FACE, ABS FITTING AND OTHER FASTENERS SECURED. CHECK
SPEEDOMETER READINGS AND IF NECESSARY RECALIBRATE.
HAVE ALIGNMENT SETTINGS CHECKED AND IF INDICATED,
RE-ALIGN AT SHOP WITH EQUIPMENT SUITED FOR MODIFIED
SUSPENSION JEEP VEHICLES.
INSTALL COCKPIT WARNING STICKER ON VISOR OR OTHER
LOCATION VISIBLE TO ALL DRIVERS.
3.5” Coil Spring Lift Kit Installation: Rear
Install cockpit warning sticker on visor
or other location visible to all drivers
and occupants.
The Trusted Source
®
17
Q_JK_3.5_LIFT_16400_0X4X_WORK_QLIFT 3/12/15 11:16 AM Page 17
03122015112005

Satin Black
Baja Xtreme
Gun Metal Gray
Clear PolishedSilver Finish
Quadratec®Baja XtremeTM Wheels
>Classic styling with a cool & modern update
>8 oversized speed holes w/deep Lug pockets
>Custom Hub Style ABS Q Logo center caps
>Aluminum castings with CNC machined surfaces
>Easy to keep clean with no hidden nooks & crannies
>Quadratec Warranty: Lifetime Structural/1 Year Finish
>4 great finishes: Silver, Satin Black, Gun Metal Gray, Polished
17” x 8” for '07-'15 Wrangler #92615.22XX…from $139.99 each
each sold individually
Satin Black Gun Metal Gray
Silver Finish
Quadratec® Rubicon XtremeTM Wheels
>Classic 5 - Spoke Pattern in 17” x 9”
>4.75” back-spacing w/deep Lug pockets
>Accepts genuine Mopar center caps (sold separately)
>Aluminum castings with CNC machined surfaces
>Easy to keep clean with no hidden nooks & crannies
>Quadratec Warranty: Lifetime Structural/1 Year Finish
>3 great finishes: Silver, Satin Black, Gun Metal Gray
17” x 9” for '07-'15 Wrangler #92615.23XX…from $149.99 each
each sold individually
Rubicon Xtreme
Satin Black
Moab Style
Gun Metal Gray
Machine FacedSilver Finish
Quadratec®Moab Style Wheels
>5 Spoke with classic, clean and strong looks
>Totally transform the look of your Wrangler!
>Custom Color matched snap-in center caps
>Aluminum castings with CNC machined surfaces
>Easy to keep clean with no hidden nooks & crannies
>Quadratec Warranty: Lifetime Structural/1 Year Finish
>4 great finishes: Satin Black, Silver, Machine Faced & Gun Metal Gray
17” x 8.5” for '07-'15 Wrangler #92615.21XX…from $129.99 each
each sold individually
baja xtreme wheel
from
$139.99
baja xtreme wheel
from
$139.99
new!
Rubicon Xtreme
Wheels
new!
Rubicon Xtreme
Wheels
Order
Today!
NEW! Wheels for JK
NEW! Wheels for JK
*FREE SHIPPING!
Q_JK_3.5_LIFT_16400_0X4X_WORK_QLIFT 3/12/15 11:16 AM Page 18
03122015112021

NEW! VersaHitch™Cargo Rack
>Unprecedented rigidity and stability with two arms instead of one
>Dual arms virtually eliminates loaded cargo rack wobble
>Even with cargo rack installed (folded) you can still tow with 2” receiver*
>Can be folded forward (empty) to open tailgate or for towing.
>Aluminum & steel construction offers excellent strength
VersaHitch Cargo Rack #12033.3000…$249.99
*VersaHitch Extended Ball Mount Kit #92018.0002…$24.99
Required for towing with folded Cargo Rack Installed
Essentials®
Essentials®
NEW! From Quadratec
®
The Receiver hitch redefined!
NEW! From Quadratec
®
The Receiver hitch redefined!
DUAL
ULTRA
STABLE
accessory
receivers
plus
class II
receiver
SAVE $20.00
with our QuadraPac
VersaHitch
Kit for ’07-‘15 Wrangler #12015.1012 …$139.97
ALL NEW! VersaHitch™
for ’07-’15 JK Wrangler
>Full function 2” Class II Receiver Hitch
>Patented Dual 1.5” Accessory Receiver Tubes
>Designed & engineered for Custom Accessories
>Made to provide the ULTIMATE in cargo stability
>3500 lb Tow Rating (for 4 door Wrangler)
>Easy no-drill installation with simple instructions
>Plug & Play Wiring Harness (Sold Separately)
>Quadratec Limited 3 Year Limited Warranty
VersaHitch for ’07-‘15 Wrangler #12015.1002 …$119.99
Plug-n-Play Hitch wiring for ’07-’15 JK #92015.8001 …$24.99
Jeep® Logo Hitch Plug #12019.700 ...$14.99
Please Note: VersaHitch is NOT compatible with ’13-‘15 Rubicon
models with factory modular STEEL bumpers.
NEW! VersaHitch™Bike Rack
>Optimized for Wrangler, offers unprecedented rigidity and stability
>Haul your bikes using the two VersaHitch 1.5” receiver ports
>Dual arms virtually eliminate lurching and wobble of loaded rack
>Even with bike rack installed you can still tow with 2” receiver*
>Soft rubber cradles, hold downs and pedal straps are bike-friendly
>Unloaded rack folds to allow tailgate access
>Holds up to 4 bikes, up to 140 lbs total
>Quadratec Limited 3 Year Limited Warranty
VersaHitch Bike Rack #92034.3000…$199.99
Optional Y-Frame Adapter #92034.1010…$24.99
*VersaHitch Extended Ball Mount Kit #92018.0002…$24.99
Required for towing with Bike Rack Installed
VERSAHITCH
VersaHitch, plug-n-play hitch wiring & hitch plug.
Special Kit
includes:
carry up
to 4 bikes!
extended
ball mount
measures
20 inches to
clear bike &
cargo rack
versahitch
Cargo Rack
carries up
to 300 lbs!
versahitch
Cargo Rack
carries up
to 300 lbs!
quadratec
exclusive
quadratec
exclusive
Dual Ultra Stable receivers
on all VERSAHITCH accessories
provide the ultimate in stability!
Dual Ultra
Stable receivers:
the ultimate
in stability!
20” x 48”
Cargo floor
®
25 Years
The terms Quadratec, QuadraTop and Essentials are Registered Trademarks of Quadratec Incorporated, Registered at U.S. Patent
and Trademark Office. Quadratec, Inc., an independent supplier of accessories for spor t utility vehicles, has no af filiation with
Fiat Chrysler Automobiles (FCA). Jeep, Wrangler, Cherokee, and the Jeep Grille Design are registered trademarks of FCA and are
used for identification purposes only. *Free Shipping program details & restrictions available online @ www.
Q
uadratec.com
*Free Shipping program details & restrictions
available online @ www.
Q
uadratec.com
800-745-5337
Call Free!
CODE QJKLIFT3
Offers valid until 12-31-2015. Copyright 2015 Quadratec, Inc.
Mon - Thurs 8AM -12AM, Fri 8AM -9PM & Sat 9AM -5PM EST
%
24 Hour ordering
@ quadratec.com
Q_JK_3.5_LIFT_16400_0X4X_WORK_QLIFT 3/12/15 11:16 AM Page 19
03122015112021

The Trusted Source
®
20
Quadratec® Exclusive
Limited Lifetime Warranty
Your Quadratec®branded accessories are
covered by the following Limited Warranty
provided exclusively by Quadratec, Inc.,
1028 Saunders Lane, West Chester PA 19380.
This Limited Warranty is the only warranty made
in connection with your purchase. Quadratec
neither assumes nor authorizes any vendor, re-
tailer or other person or entity to assume for it any
other obligation or liability in connection with this
product or Limited Warranty. This Limited War-
ranty does not apply and is not cumulative to
any accessory or part distributed by Quadratec
for which the Manufacturer provides a separate
written warranty.
What is Covered: Subject to the terms, exclusions
and limitations herein and with respect only to
Quadratec branded accessories first sold in the
United States, Quadratec warrants to the initial
retail purchaser only that your Quadratec acces-
sory shall be free of defects in material and work-
manship: for as long as the original purchaser
owns the vehicle. The Warranty on bushings and
other serviceable wear items (including shock
absorbers) is limited to 1 year from date of retail
purchase. This Limited Warranty is not assignable
and shall terminate upon sale of the vehicle upon
which the Quadratec accessory is installed or
other transfer third persons.
All other warranties are hereby disclaimed, except
to the extent prohibited by applicable law in
which case any implied warranty of merchantabil-
ity or fitness for a particular purpose on this
limited to for as long as the original purchaser
owns the vehicle. Quadratec reserves the rights to:
(a.) require invoice or other proof your accessory
is within the terms of this Limited Warranty as
a condition of warranty service and, (b.) make
future revisions to this product and Limited
Warranty without prior notice or obligation
to upgrade your product.
What is Not Covered:
Your Quadratec Limited Warranty does not cover
products or parts Quadratec determines to have
been damaged by or subjected to: (a.) installation
damage, alteration, modification, combination
with other parts, failure to maintain or improper
repair or service, (b.) defects or use which
pre-dates installation of Quadratec®accessory
or suspension kit by authorized dealer or shop,
(c.) normal wear & tear or gradual reduction in
expected performance of vehicle or components,
(d.) emissions control or electronic stability sys-
tems or components, (e.) cosmetic damage or
damage from moisture or water immersion,
(f.) fleet, rental or commercial use, (g.) Acts of
God, accidents, misuse, negligence, inadequate
mounting or impact with vehicle(s), obstacles
or other aspects of the environment, (h.) theft,
vandalism or other intentional damage.
(i.) use in competition or racing.
Other Exclusions: Surface finish of exposed
suspension components is not covered under
this Limited Warranty.
Remedy Limited to Repair/Replacement:
The exclusive remedy provided hereunder shall,
upon Quadratec inspection and at Quadratec’s
option, be either repair or replacement of product
or parts (new or refurbished) covered under this
Limited Warranty. Customers requesting warranty
consideration should first contact Quadratec to
obtain a RGA number (610-701-3336). All labor,
removal, shipping and installation costs are
customer’s responsibility.
Other Limitations - Exclusion of Damages
- Your Rights Under State Law:
In consideration of the purchase price paid,
neither Quadratec nor any independent Quadratec
distributor/licensee are responsible for any time
loss, rental costs, or for any incidental, consequen-
tial, punitive or other damages you may have or
incur in connection with any part or product
purchased. Your exclusive remedy hereunder for
covered parts is repair/replacement as described
above.
This Limited Warranty gives you specific rights.
You may also have other rights that vary from
state to state. For example, some states do not
allow limitations of how long an implied warranty
lasts and /or do not allow the exclusion or limita-
tion of incidental or consequential damages, so
the limitations and exclusions herein may not
apply to you.
©Quadratec, Inc. 2015. All Rights Reserved.
2.27.15 LTR Version Part #12999.9033
Q_JK_3.5_LIFT_16400_0X4X_WORK_QLIFT 3/12/15 11:16 AM Page 20
03122015112022
/