SUNCO T8 Installation guide

Type
Installation guide
Specifications subject to change without notice. Photos and line
drawings may not be to scale and are for general reference only.
LED T8 HYBRID • 15W
INSTALL INSTRUCTIONS (UL TYPE A & B)
!
WARNING DISCONNECT POWER BEFORE INSTALLING OR SERVICING.
PLEASE FIND A QUALIFIED ELECTRICIAN FOR INSTALLATION. Please read the instructions before you install and use the linear tube(s).
GENERAL: ALL ELECTRICAL CONNECTIONS MUST BE IN ACCORDANCE WITH LOCAL AND NATIONAL ELECTRICAL CODE (N.E.C.) STANDARDS. IF YOU
ARE UNFAMILIAR WITH PROPER ELECTRICAL WIRING CONNECTIONS OBTAIN THE SERVICES OF A QUALIFIED ELECTRICIAN. REMOVE THE TRIM
FROM THE BOX AND MAKE SURE THAT NO PARTS ARE MISSING.
WARNING - Risk of fire or electric shock. LED Retrofit Kit installation requires knowledge of luminaires electrical systems. If not qualified, do
not attempt installation. Contact a qualified electrician.
WARNING - Risk of fire or electric shock. Install these tubes only in luminaires that have the construction features and dimensions shown in
the photographs and/or drawings and where the input rating of the retrofit kit does not exceed the input rating of the luminaire.
WARNING - To prevent wiring damage or abrasion, do not expose wiring to edges of sheet metal or other sharp objects.
WARNING - Do not make or alter any open holes in an enclosure of wiring or electrical components during kit installation.
SAFETY INFORMATION
Check the lamp before installation, if there is any damage caused during transportation, do not install.
Maintenance should be carried out by technical personnel only.
Do not stare and the light source with bare eyes or long periods of time, do not shine into others eyes.
Do not place objects on the lamp.
Keep lamp away from flames or high temperature objects.
Risk of electrical shock - Only replace with same type of LED tube.
Suitable for damp locations.
This device is not intended for use with emergency exit fixtures or battery backups.
OPERATIONAL MODES
UL TYPE A - Direct replacement (Plug & Go™) compatible with select electronic ballasts.
UL TYPE B - Direct Wire (Ballast Bypass) directly connects to the main: 120-277V 50/60Hz, single or double ended.
UL TYPE A - DIRECT REPLACEMENT (Plug & Go™) INSTALLATION
WARNING - Risk of Shock: Disconnect power before installation.
WARNING
- Risk of Fire: Use only in place of fluorescent lamps specified on label.
LED T8 lamp for use only with products described and installed in accordance with product specifications. LED T8 lamp to be operated with
qualified T8 fluorescent electronic ballast; check ballast compatibility list before installation.
Do not install this lamp in a pre-heat luminaire.
This lamp only operates on electronic ballasts. If the lamp does not light when the luminaire us energized, remove lamp from luminaire and
contact lamp manufacturer or qualified electrician.
CAUTION - Risk of Fire: If the lamp or luminaire exhibits undesirable operation (buzzing, flickering, etc.) Immediately turn off power, remove
lamp from luminaire and contact manufacturer.
1.
Make sure power is OFF.
2.
Remove lens or diffuser (if applicable).
3.
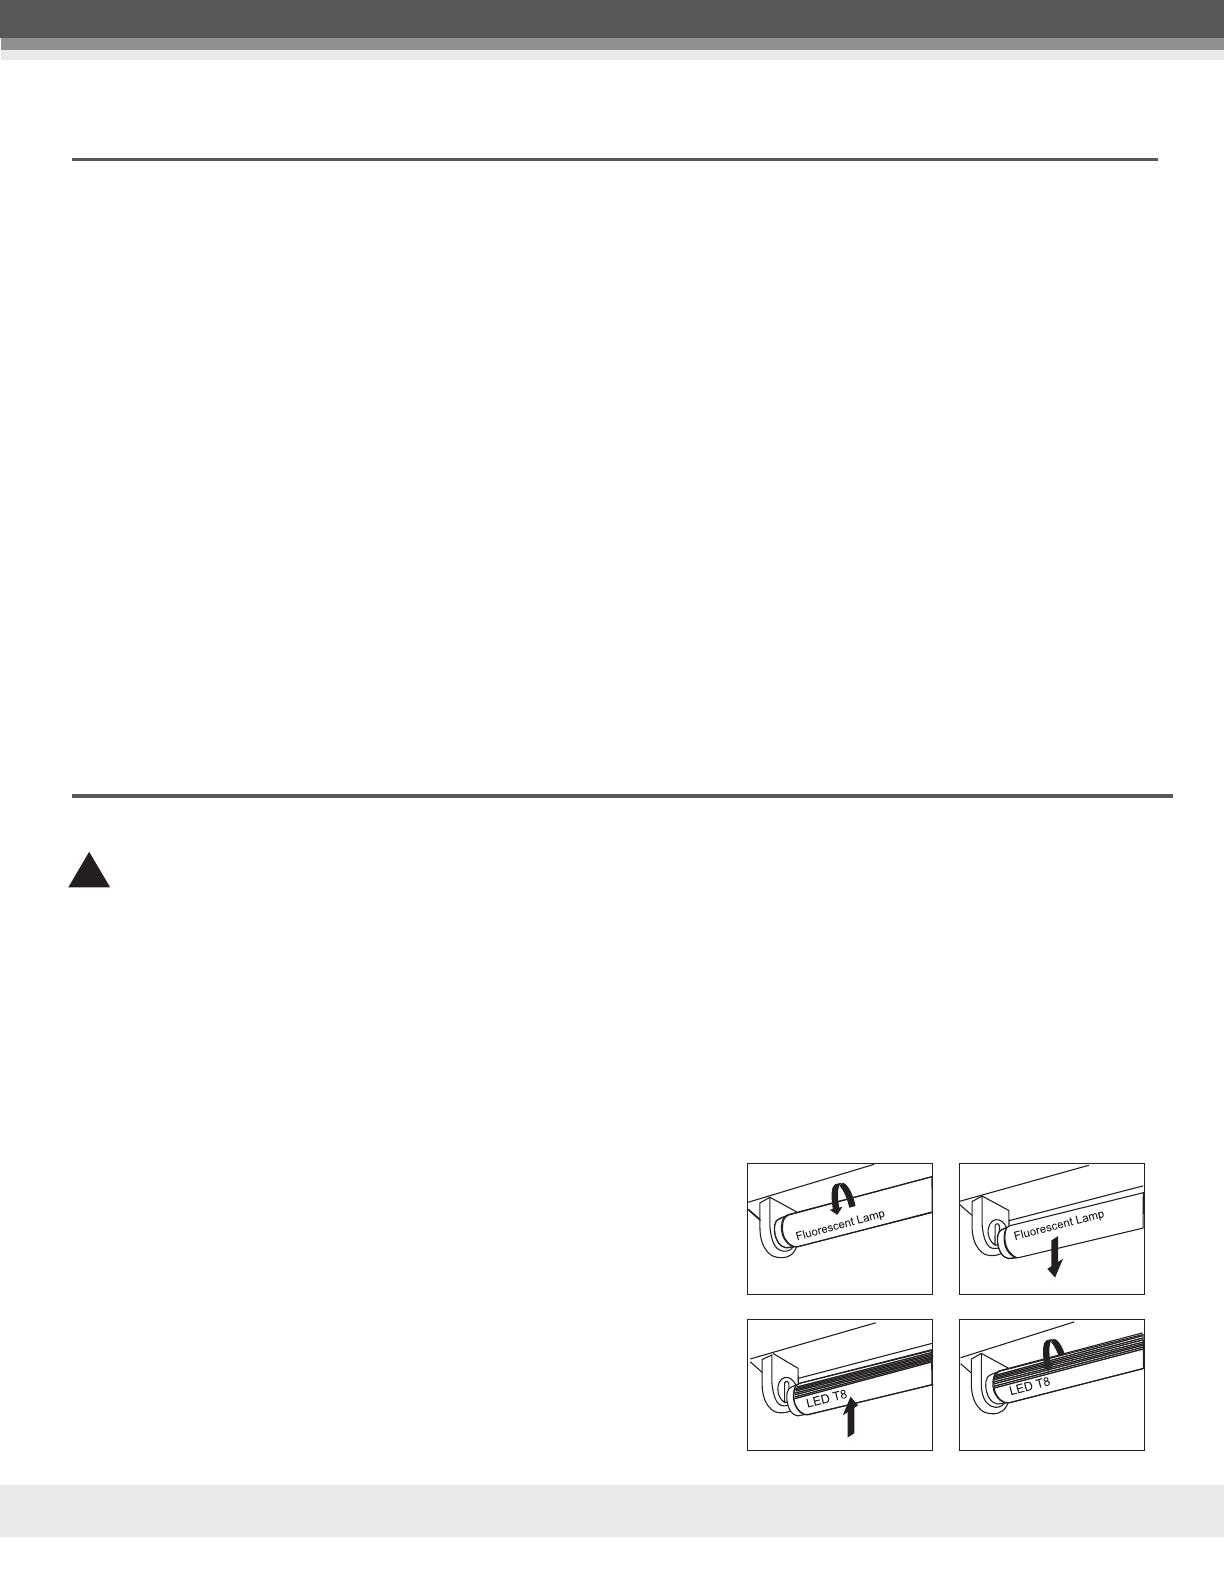
Remove existing fluorescent lamps from the luminaire. Note: Verify that the
fluorescent tube type is listed on the LED lamp label. Check ballast compatibility
list before installation, only use lamp with qualified T8 fluorescent ballast.
4.
Place LED lamp in luminaire and insert lamp pins into luminaire lampholders.
5.
Rotate LED lamp until lamp locks in place. Ensure that the LED lamp front points
away from the back of the luminaire.
6.
Note: Install one LED T8 replacement lamp for each fluorescent lamp removed.
7.
Place lens or diffuser back in place (if applicable).
8.
Power On.
Specifications subject to change without notice. Photos and line
drawings may not be to scale and are for general reference only.
RETROFIT LUMINAIRE WITH ONE LAMP
Electronic
Ballast
Fluorescent Lamp LED Lamp
PROGRAM START
OR
RAPID START
Electronic
Ballast
Fluorescent Lamp
LED Lamp
INSTANT START
Electronic
Ballast
Fluorescent Lamp
Fluorescent Lamp
LED Lamp
LED Lamp
RETROFIT LUMINAIRE WITH TWO LAMPS
INSTANT START
!
WARNING DISCONNECT POWER BEFORE INSTALLING OR SERVICING.
UL TYPE B - DIRECT WIRE (Ballast Bypass) DOUBLE ENDED INSTALLATION
TYPE B LAMP intended for operation in luminaires with traditional fluorescent-type lampholders wired directly to the branch circuit.
This includes both factory-wired luminaries as well as those converted for this purpose under a retrofit program.
Read all WARNINGS before continuing this section.
This item is rated at 120-277VAC. Installer must determine whether line voltage 120-277V is available at the luminaire before installation.
Make sure POWER IS TURNED OFF AT THE SOURCE. Do not simply switch off fixture.
1.
Remove existing covers from the light fixtures according to the light fixture manufacturer’s instructions. Carefully remove the existing
fluorescent tubes and dispose of them according to federal, state and local laws.
2.
Cut off wires connected to ballast, and remove ballast (and starter if present). Dispose of removed ballast according to federal, state
and local laws.
3.
Connect Line (L) from power source into lamp holder. This will be “Line In”.
4.
Connect Neutral (N) from power source into opposite end lamp holder. This will be “Neutral In”.
5.
If installing a single tube refer to typical wiring diagrams on the following page. If connecting multiple lamps, continue reading.
6.
Connect separate Line wire into “Line out” from primary source lamp holder and connect that wire into “Line in” on the adjacent tube.
7.
Connect separate neutral wire into “Neutral out” from primary source lamp holder and connect that wire into “Neutral in” on the
adjacent tube. Refer to typical wiring diagrams on the following page.
8.
This fixture is now powered as double-ended, for use with bypass tubes where opposite ends are marked with L and N, respectively.
9.
Install double-ended bypass lamp into the wired lamp holders.
10.
Visibly affix “Modification Sticker” and reinstall housing cover and lens if applicable. CAUTION: “This luminaire has been modified to
operate LED lamps. Do not attempt to install or operate fluorescent lamps in this luminaire,” shall be marked on the retrofit luminaire
where readily visible by the user during normal maintenance including re-lamping.
11.
Return power back to source and installation is now completed.
If dimming is required (Type B), only operate with specific dimmer manufactured by Lutron; NTELV-300, CTELV-303P, DVELV-303P, or
SELV-300P. Dimmers only operates on 120V.
DOUBLE ENDED - The below ballast wiring represents typical configuration. The actual ballast wiring varies according to the ballast
model. It is not a requirement to change the sockets (if in good condition) to operate double ended tubes, regardless of the socket type.
Please make sure one side of the fixture is connected to Line (L) and the other side to Neutral (N).
LED T8 HYBRID 15W
INSTALL INSTRUCTIONS (UL TYPE A & B)
Specifications subject to change without notice. Photos and line
drawings may not be to scale and are for general reference only.
Electronic
Ballast
Fluorescent Lamp
Fluorescent Lamp
LED Lamp
LED Lamp
PROGRAM START
OR
RAPID START
RETROFIT LUMINAIRE WITH TWO LAMPS (cont’d)
RETROFIT LUMINAIRE WITH THREE LAMPS
Electronic
Ballast
Fluorescent Lamp
Fluorescent Lamp
Fluorescent Lamp
LED Lamp
LED Lamp
LED Lamp
INSTANT START
Electronic
Ballast
Fluorescent Lamp
Fluorescent Lamp
Fluorescent Lamp
LED Lamp
LED Lamp
LED Lamp
PROGRAM
START OR
RAPID START
Electronic
Ballast
Fluorescent Lamp
Fluorescent Lamp
Fluorescent Lamp
Fluorescent Lamp
LED Lamp
LED Lamp
LED Lamp
LED Lamp
Electronic
Ballast
Fluorescent Lamp
Fluorescent Lamp
Fluorescent Lamp
Fluorescent Lamp
LED Lamp
LED Lamp
LED Lamp
LED Lamp
RETROFIT LUMINAIRE WITH FOUR LAMPS
INSTANT START
PROGRAM
START OR
RAPID START
!
WARNING DISCONNECT POWER BEFORE INSTALLING OR SERVICING.
UL TYPE B - DIRECT WIRE (Ballast Bypass) DOUBLE ENDED INSTALLATION
LED T8 HYBRID 15W
INSTALL INSTRUCTIONS (UL TYPE A & B)
Specifications subject to change without notice. Photos and line
drawings may not be to scale and are for general reference only.
!
WARNING DISCONNECT POWER BEFORE INSTALLING OR SERVICING.
1.
Remove existing covers from the light fixtures according to the light fixture
manufacturer’s instructions. Carefully remove the existing fluorescent
tubes and dispose of them according to federal, state and local laws.
2.
Cut off wires connected to ballast, and remove ballast (and starter if
present). Dispose of removed ballast according to federal, state and local
laws.
3.
Connect Line (L) from power source into one side of the non-shunted lamp
holder. This will be “Line In”.
4.
Connect Neutral (N) from power source into the other side of the non-
shunted into lamp holder. This will be “Neutral In”.
5.
6.
7.
If installing a single tube refer to typical wiring diagrams on the following
page. If connecting multiple lamps, continue reading.
Connect separate Line wire into “Line out” from primary source lamp
holder and connect that wire into “Line in” on the adjacent tube.
Connect separate neutral wire into “Neutral out” from primary source lamp
holder and connect that wire into “Neutral in” on the adjacent tube. Refer
to typical wiring diagrams on the following page.
8. This fixture is now powered at one end only, for use with bypass tubes
where one end is marked with both L and N, for each pin respectively. (Fig. 2)
9.
Install lamp with the L and N markings into the wired lamp holder end.
10. Visibly affix “Modification Sticker” and reinstall housing cover and lens if
applicable.
CAUTION: “This luminaire has been modified to operate LED lamps. Do not
attempt to install or operate fluorescent lamps in this luminaire,” shall be
marked on the retrofit luminaire where readily visible by the user during
normal maintenance including re-lamping.
11. Return power back to source and installation is now completed.
If dimming is required (Type B), only operate with specific dimmer
manufactured by Lutron; NTELV-300, CTELV-303P, DVELV-303P, or SELV-300P.
Dimmers only operates on 120V.
Non-Shunted Shunted
Fig. 1
Single Tube Wiring
L
N
BALLAST
L N
Fig. 3
Multiple Tube Wiring
InOut
Hot
InOut
Neutral
Power
Source
L
N
BALLAST
L N L N L N L N
Fig. 4
Connect power to end with
L and N markings
Fig. 2 Connecting End
L N
TYPE B LAMP – intended for operation in luminaires with traditional fluorescent-type lampholders wired directly to the branch circuit. This
includes both factory-wired luminaries as well as those converted for this purpose under a retrofit program.
This wiring method requires NON-SHUNTED lampholders. (Fig. 1)
Read all WARNINGS before continuing this section.
This item is rated at 120-277VAC. Installer must determine whether line voltage 120-277V is available at the luminaire before installation.
Make sure POWER IS TURNED OFF AT THE SOURCE. Do not simply switch off fixture.
UL TYPE B - DIRECT WIRE (Ballast Bypass) SINGLE END INSTALLATION
LED T8 HYBRID 15W
INSTALL INSTRUCTIONS (UL TYPE A & B)
  • Page 1 1
  • Page 2 2
  • Page 3 3
  • Page 4 4

SUNCO T8 Installation guide

Type
Installation guide

Ask a question and I''ll find the answer in the document

Finding information in a document is now easier with AI