INSTRUCTIONS
LED T8 Tube Series-Ballast Bypass Single-Ended
RAB Lighting is committed to creating high-quality, a ordable, well-designed and energy-e cient LED lighting and controls that make it easy for electricians to install
and end users to save energy. Wed love to hear your comments. Please call the Marketing Department at 888-RAB-1000 or email: [email protected]
INSTALLATION INSTRUCTIONS (cont’d)
WARNINGS:
• Make certain power is OFF before installing or maintaining fi xture.
• RISK OF FIRE. USE ONLY IN PLACE OE FLUORESCENT LAMPS SPECIFIED ON LABEL.
• RISK OF ELECTRIC SHOCK. DO NOT USE WHERE DIRECTLY EXPOSED TO WATER. SUITABLE FOR DAMP LOCATIONS.
• The luminaire wiring has now been modied and will no longer operate uorescent lamps.
Do not use with dimmers.
This device is not intended for use with emergency exits.
SAFETY INFORMATION:
(1) To prevent wiring damage or abrasion, do not expose wiring to edges of sheet metal or other sharp objects.
(2) Please examine all parts that are not intended to be replaced by the retrot kit for damage and replace any damaged parts prior
to installation of the retrot kit.
(3) Do not make or alter any open holes in an enclosure of wiring or electrical components during kit installation.
(4) Installers should not disconnect existing wires from lampholder terminals to make new connections at lampholder terminals.
Instead installers should cut existing lampholder leads away from the lampholder and make new electrical connections to
lampholder lead wires by employing applicable connectors.
If lamp does not light when the luminaire is energized, remove lamp from luminaire and contact a qualied electrician. This device is
NOT intended for use with emergency exit xtures or emergency exit lights. Lamps must be operated within an ambient xture
temperature of -20°C and 45°C to ensure UL compliance.
INSTALLATION INSTRUCTIONS
7. LED T8 lamps are designed for single sided connections
only To install, please wire non-shunted sockets
by connecting one wire from the lamp holder to branch
circuit L (LIVE) and the other wire at the opposite end to the
branch circuit N (NEUTRAL). Do not connect opposite side to
power. Use appropriate wires for connection.
1) Make sure the circuit breaker that supplies the power to the
xture is turned o.
2. Remove lens or diuser cover (if applicable) and existing
uorescent lamps.
3. Open/Remove ballast wiring compartment cover.
4. Identify the line and neutral wires running from the
breaker box to the ballast and conrm the power is o
using a voltmeter.
5. Cut all wires connected to ballast, and remove ballast (and
starter if present). Dispose of removed ballast and uorescent
lamps in accordance with government regulations in your area.
6. Ensure that the xture contains non-shunted G13 bi-pin lamp
holders If socket lamp holders are internally shunted,
then replace with new non-shunted socket lamp holders. If
socket lamp holders are shunted with a jumper wire, remove
wire to convert into non-shunted sockets.
- Non-shunted & Shunted Lamp Holder
- Single sided connection
Note: These instructions do not cover all details or variations in equipment nor do they provide for every possible situation during installation, operation or maintenance.
IMPORTANT
READ CAREFULLY BEFORE INSTALLING FIXTURE. RETAIN THESE INSTRUCTIONS FOR FUTURE REFERENCE.
RAB LED tubes must be wired in accordance with the National Electrical Code and all applicable local codes. Proper grounding is
required for safety. THIS PRODUCT MUST BE INSTALLED IN ACCORDANCE WITH THE APPLICABLE INSTALLATION CODE BY A PERSON
FAMILIAR WITH THE CONSTRUCTION AND OPERATION OF THE PRODUCT AND THE HAZARDS INVOLVED.
Fig: 1
Fig: 2
(Fig. 1).
(Fig. 2).
INSTRUCTIONS
LED T8 Tube Series-Ballast Bypass Single-Ended
RAB Lighting is committed to creating high-quality, aordable, well-designed and energy-ecient LED lighting and controls that make it easy for electricians to install
and end users to save energy. Wed love to hear your comments. Please call the Marketing Department at 888-RAB-1000 or email: [email protected]
INSTALLATION INSTRUCTIONS (cont’d)
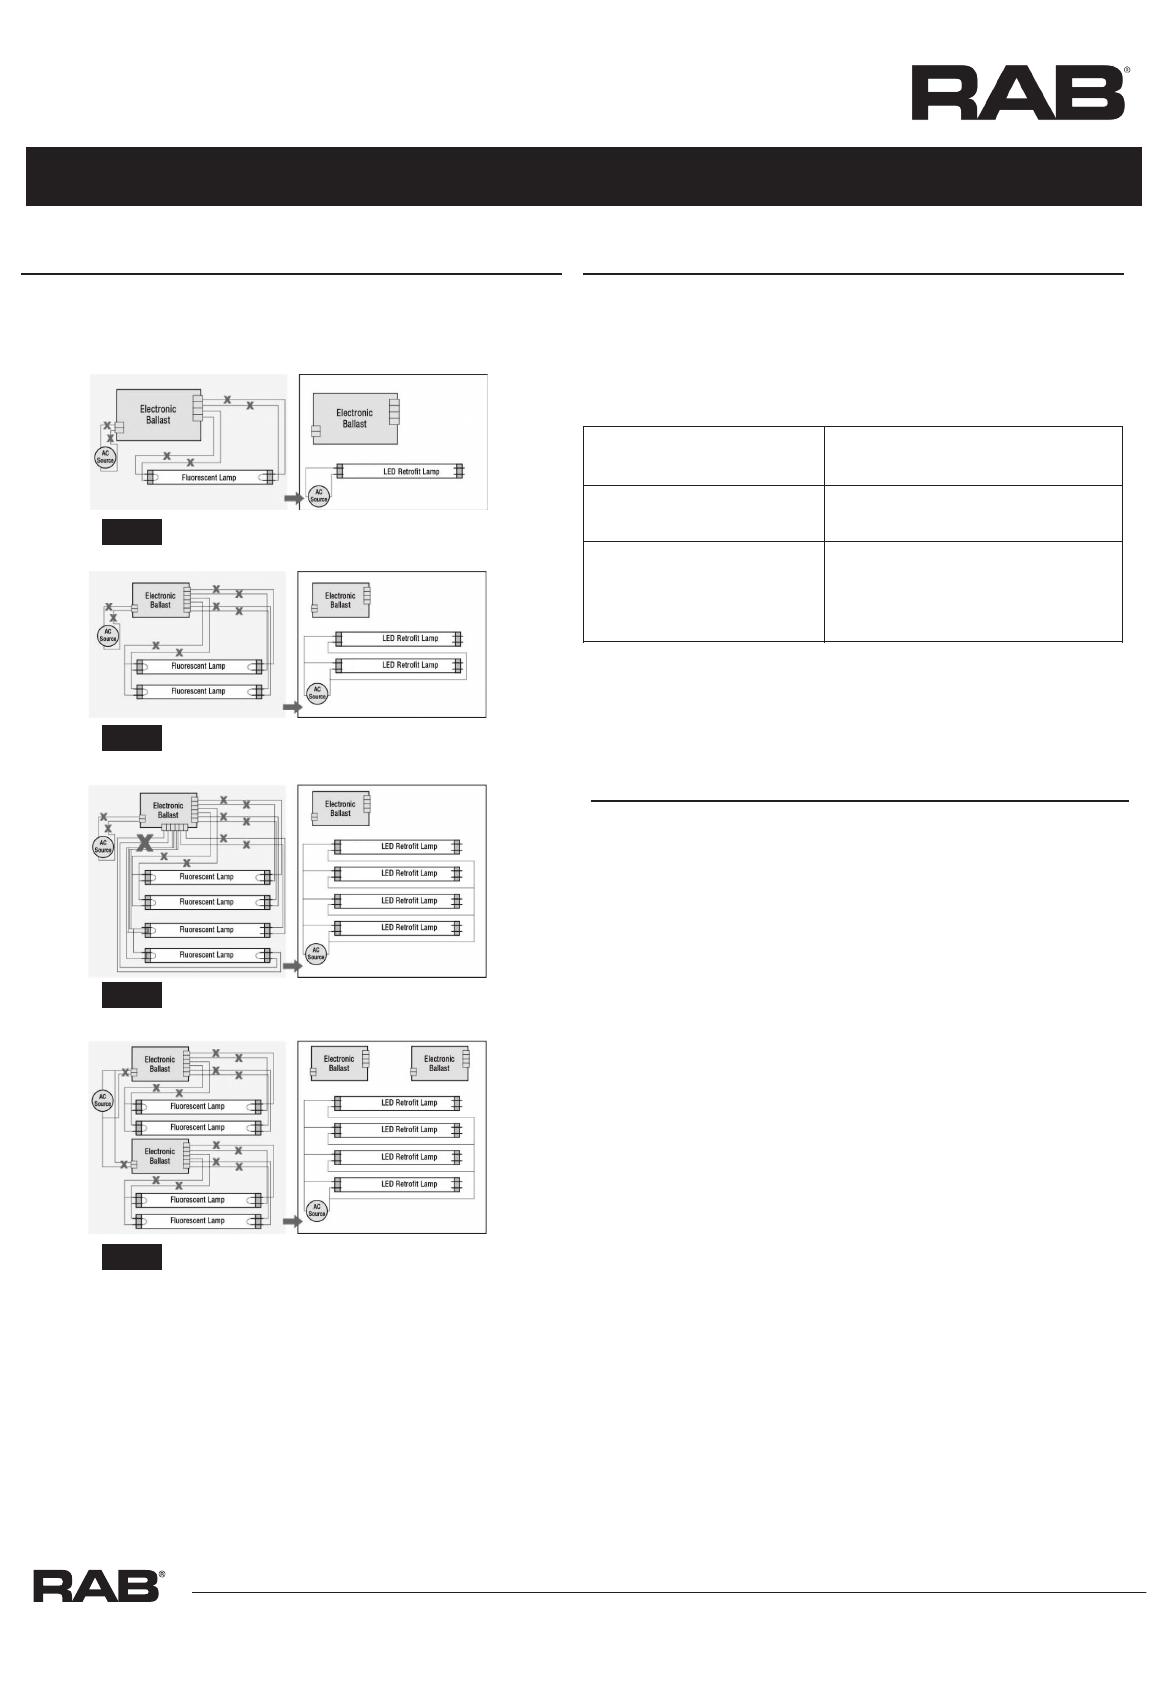
8. Make sure all sockets are replaced and wired according to
the appropriate wiring diagram. .
Figure 3. - Retrot with One Lamp
- Retrot with Two Lamps
- Retrot with Three/Four Lamps
- Retrot with Three/Four Lamps &
Two Ballasts
9. Reinstall the ballast cover to hide all wires.
10. Install your new LED T8 replacement lamps.
11. Apply Relamping Label on a visible location inside the xture.
12. Reinstall lens or diusion cover on the light xture.
13. Turn power on at the breaker box.
14. Turn on the lights.
WARNING
RISK OF FIRE OR ELECTRIC SHOCK
RISK OF FIRE OR ELECTRIC SHOCK. Install this kit only in
luminaires that have the construction features and dimensions
shown in the photographs and/or drawings and where the input
rating of the retrot kit does not exceed the input rating of the
luminaire.
. LED Retrot Kit installation
requires knowledge of luminaires electrical systems. If not qualied,
do not attempt installation. Contact a qualied electrician.
CAUTION RISK OF FIRE. To avoid potential re or shock hazard,
do not use this retrot kit in luminaires employing shunted bi-
pin lampholders. Note: Shunted lamp holders are found only in
uorescent luminaires with Instant-Start ballasts. Instant-start
ballasts can be identied by the words "Instant Start" or "I.S."
marked on the ballast. This designation may be in the form of a
statement pertaining to the ballast itself, or may be combined with
the marking for the lamps with which the ballast is intended to be
used, for example F40T12/IS. For more information, contact the LED
luminaire retrot kit manufacturer.
THIS RETROFIT KIT IS ACCEPTED AS A COMPONENT OF A LUMINAIRE
WHERE THE SUITABILITY OF THE COMBINATION SHALL BE
DETERMINED BY AUTHORITIES HAVING JURISDICTION.
Ballast Bypass Single-Ended
Easy Answers
rablighting.com
Visit our website for product info
Tech Help Line
Call our experts: 888 722-1000
e-mail
Answered promptly - sales@rablighting.com
Free Lighting Layouts
Answered online or by request
© 2019 RAB LIGHTING Inc.
Northvale, New Jersey 07647 USA
RAB WARRANTY: RAB’s warranty is subject to all terms and conditions found at rablighting.com/warranty.
Fig: 6
Fig: 5
Fig: 4
(Fig. 2, 3, 4, 5)
PRODUCT NOTES
The products covered in this report are intended to retrot Type
IC or Non-IC recessed mount Listed Fluorescent luminaires with
instructions to remove the existing trim. They use maximum four
straight tubular lamps with or without a diuser.
The minimum lamp compartment dimensions are tabulated below:
Model Number
T20021/T20022/T20023/T20024
T8-8-24-8XX-SE-BYP
61 x 57 x 5
124 x 57 x 5
Replace LED lamp only with model: T8-8-24G-8XX-SE-BYP;
T8-12-48G-8XX-SE-BYP; T8-15-48G-H-8XX-SE-BYP. Manufactured by
RAB Lighting Inc.
MINIMUM LAMP COMPARTMENT
DIMENSIONS (cm)
T20025/T20026/T20027/T20028
T8-12-48G-8XX-SE-BYP
T20029/T20030/T20031/T20032
T8-15-48G-H-8XX-BYP
Fig: 3
  • Page 1 1
  • Page 2 2

Ask a question and I''ll find the answer in the document

Finding information in a document is now easier with AI