Instruction
Manual
Cylinder Pressure
Sensor
Type 7614CG1/CG2
ä
7614CG_002-663e-07.22


Foreword
7614CG_002-663e-07.22 Page 1
Foreword
Thank you for choosing a Kistler quality product
characterized by technical innovation, precision and long
life.
Information in this document is subject to change without
notice. Kistler reserves the right to change or improve its
products and make changes in the content without
obligation to notify any person or organization of such
changes or improvements.
© 2013 … 2022 Kistler Group. Kistler Group products are
protected by various intellectual property rights. For more
details visit www.kistler.com. The Kistler Group includes
Kistler Holding AG and all its subsidiaries in Europe,
Asia, the Americas and Australia.
Kistler Group
Eulachstraße 22
8408 Winterthur
Switzerland
Tel. +41 52 224 11 11
info@kistler.com
www.kistler.com

Content
Page 2 7614CG_002-663e-07.22
Content
1.
Introduction ........................................................................................................................................ 3
1.1
Disposal instructions for electrical and electronic equipment .................................................. 4
2.
Description.......................................................................................................................................... 5
2.1
Introduction ...................................................................................................................................... 5
2.2
Dimensions Type 7614CG1/CG2 ................................................................................................. 6
2.3
Working principle ............................................................................................................................ 7
3.
Installation .......................................................................................................................................... 9
3.1
General ............................................................................................................................................ 9
3.2
Recommended Mounting ............................................................................................................... 10
3.2.1
Sealing ............................................................................................................................. 10
3.2.2
Installing the sensor ....................................................................................................... 10
3.2.3
Installing the charge amplifier ....................................................................................... 11
3.2.4
Cable between charge amplifier and data acquisition unit ....................................... 11
3.2.5
Electric block diagram .................................................................................................... 12
3.2.6
Pin connections .............................................................................................................. 12
3.2.7
Mounting tools ................................................................................................................. 12
5.2.8
Accessories ..................................................................................................................... 12
4.
Operation .......................................................................................................................................... 13
5.
Maintenance ..................................................................................................................................... 14
6.
Trouble shooting ............................................................................................................................. 15
6.1
Repair ............................................................................................................................................. 15
Total pages 17

Introduction
7614CG_002-663e-07.22 Page 3
1. Introduction
Please take the time to thoroughly read this instruction
manual. It will help you with the installation, maintenance,
and use of this product.
To the extent permitted by law Kistler does not accept
any liability if this instruction manual is not followed or
products other than those listed under Accessories are
used.
Kistler offers a wide range of products for use in
measuring technology:
Piezoelectric sensors for measuring force, torque,
strain, pressure, acceleration, shock, vibration and
acoustic-emission
Strain gage sensor systems for measuring force and
torque
Piezoresistive pressure sensors and sensors
Signal conditioners, indicators and calibrators
Electronic control and monitoring systems as well as
software for specific measurement applications
Data transmission modules (telemetry)
Kistler also develops and produces measuring solutions
for the application fields engines, vehicles, manufac-
turing, plastics and biomechanics sectors.
Our product and application brochures will provide you
with an overview of our product range. Detailed data
sheets are available for almost all products.
If you need additional help beyond what can be found
either on-line or in this manual, please contact Kistler's
extensive support organization.

Cylinder Pressure Sensor, Type 7614CG1/CG2
Page 4 7614CG_002-663e-07.22
1.1 Disposal instructions for electrical and electronic equipment
Do not discard old electronic instruments in municipal
trash. For disposal at end of life, please return this
product to an authorized local electronic waste
disposal service or contact the nearest Kistler
Instrument sales office for return instructions.

Description
7614CG_002-663e-07.22 Page 5
2. Description
2.1 Introduction
Measuring chain consisting of a life time optimized
piezoelectric pressure sensor linked by a robust
fluoropolymer cable to a charge amplifier with MIL
connector. The rugged design and high temperature
resistance allows for flush mounting and enables reliable
knock detection. The sensor can be installed either by
using shoulder sealing or front sealing. The good linearity
and stability of the sensors ensures reliable and
repeatable measurements over a long period of time. The
charge amplifier provides a galvanic isolated three wire
type current output.
The integrated charge amplifier provides a current output
signal in a range of 4 … 20 mA. The sensor has a zero
line of about 6.5 mA (at dynamic pressure 0 bar). The
output is ac-coupled, so static pressure measurements
are not possible.
Type 7614CG1 has a time constant >10 s
and is recommended for medium speed engines.
Type 7614CG2 has a time constant >110s and is
recommended for low speed engines.
All other technical data are identical.

Cylinder Pressure Sensor, Type 7614CG1/CG2
Page 6 7614CG_002-663e-07.22
2.2 Dimensions Type 7614CG1/CG2
Fig 1: Dimensions of Type 7614CG1/CG2

Description
7614CG_002-663e-07.22 Page 7
2.3 Working principle
The cylinder pressure is acting on the diaphragm. The
diaphragm converts the pressure in proportional force on
the sensor element. The piezoelectric sensor element
converts the force into a charge. The charge is converted
by a charge amplifier into a current.
The complete measuring chain is designed for easy
operation and very long life time.
The advantage piezoelectric principle is:
Operates safe up to high temperatures and therefore
ideally suited for accurate measurements in harsh
conditions
Very small sensitivity change over temperature range
High stiffness, results in small diaphragm stress
High reproducibility since the piezoelectric constant
of the measuring element is a constant of the
material and does not change over time
Fig 2: Schematic cross section of sensor element

Cylinder Pressure Sensor, Type 7614CG1/CG2
Page 8 7614CG_002-663e-07.22
2
4
6
8
10
12
14
16
18
20
22
time
output signal [mA]
upper border
bias current
low er border
signal 4-stroke
signal 2-stroke
Example of output signal from
2- and 4-stroke engine with signal span 12.5 mA
Fig. 3: Example of sensor output signal for 2- and 4-stroke engine

Installation
7614CG_002-663e-07.22 Page 9
3. Installation
3.1 General
The quality of the measurement and the life time
depends very much of a correct mounting.
The mounting hole must be manufactured within the
tolerances
Avoid mounting at the end of long tubes, it creates
pipe ringing and overheating of the sensor
Ideal is a mounting hole in the cylinder head with
about 10 … 15 mm distance from the combustion
chamber
Sensor must be tightened according the mounting
torque of 25 N·m
The cable must not be twisted during installation/
removal of the sensor
If there are any question regarding installation please
contact Kistler.

Cylinder Pressure Sensor, Type 7614CG1/CG2
Page 10 7614CG_002-663e-07.22
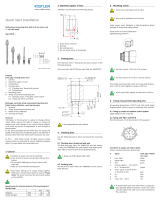
3.2 Recommended Mounting
Fig. 4a: Mounting bore for conical sealing Fig. 4b: Mounting bore for shoulder sealing
Mounting torque: 25 ±5 N·m Mounting torque: 25 ±5 N·m
3.2.1 Sealing
A leak proof mounting of the sensor is essential to
prevent overheating of the sensor by leaking hot gases.
Good sealing is obtained by
fine-machined sealing surface on the engine (for
surface roughness, flatness and squareness)
all sealing surfaces (on engine and on sensor) must
be clean and free of any burrs (e.g. combustion
residuals, sooth, etc.)
3.2.2 Installing the sensor
Clean all parts and apply a light film of grease to the thread
and the sealing surface. Use high-temperature paste
MoS2 (e.g. Molycote P74 or 1 000) or copper grease.
Insert the sensor into mounting bore with a torque of 25
N·m.
Use a torque wrench for sensor mounting. After installing
the sensor, check if there is no leaking when engine runs
on idle speed.

Installation
7614CG_002-663e-07.22 Page 11
3.2.3 Installing the charge amplifier
Charge amplifier should be fixed with two vibrations
damping clamps as shown in the picture below. Select a
location where the temperature does certainly not exceed
110 °C. Route and fix the integrated cable between
sensor and charge amplifier so it is protected against
mechanical damage. Keep it away from any source of
heat such as the exhaust or hot fuel lines.
Picture shows an example of Charge Amplifier installation
with Stauff’s damping clamps fixed with clamp body with
rubber insert with film hinge. Clamp Assembly order code
is 419 PAR.
Clamp body, order code 4 PAR:
Standard type
Basic Material – Polyamide
Temperature Resistance -40 °C ... +120 °C /
-40 °F ... +248 °F
Rubber insert with film hinge, order code RI 19 (4+4S):
Exact outside diameter D = 19 mm:
Basic Material – Thermoplastic Elastomer (73 Shore-A)
Temperature Resistance -40 °C ... +125 °C /
-40 °F ... +257 °F
Recommended is to use a product that is intended for the
extra vibration/noise reducing installation of pipes and
tubes or the extra gentle installation of hoses and cables.
3.2.4 Cable between charge amplifier and data acquisition unit
We recommend using cable type 1700B69A…, which is
available in different lengths (for more detailed infor-
mation see datasheet of Type 7614CG1/CG2, doc. no.
003-044).
This cable can be made by the user. Use a shielded
cable; otherwise the sensor is not conform with CE rules.
The wiring must be done according to the electric block
diagram shown in chapter 5.2.5

Cylinder Pressure Sensor, Type 7614CG1/CG2
Page 12 7614CG_002-663e-07.22
3.2.5 Electric block diagram
3.2.6 Pin connections
Connector
1 Exct GND
2 don’t connect
3 don’t connect
4 don’t connect
5 Signal output
6 don’t connect
7 don’t connect
8 +Exct (18 … 32V)
Fig 5: View on M12 connector of amplifier
3.2.7 Mounting tools
Tubular socket Hex 19/24, l = 350 mm Type 1300A145
5.2.8 Accessories
Dummy plug shoulder sealed Type 7441A

Operation
7614CG_002-663e-07.22 Page 13
4. Operation
After the starting up the engine check for any gas
leakage at once. If there is any gas leaking out, stop the
engine and rectify the mounting to achieve a complete
sealing (see chapter 5).
Warning:
If the sensor is mounted in an indicator valve:
When the engine is operating do not open the
indicator valve for more than one working circle as
otherwise the sensor may be overheated.

Cylinder Pressure Sensor, Type 7614CG1/CG2
Page 14 7614CG_002-663e-07.22
5. Maintenance
After installation, the sensor needs no maintenance. Do
not use a steam or high-pressure cleaner for cleaning
purposes.
Never use wire brushes, screw drivers or any other sharp
pointed instrument for cleaning the diaphragm.

Trouble shooting
7614CG_002-663e-07.22 Page 15
6. Trouble shooting
In case the sensor does not give a proper output signal,
please disconnect the cable for a couple of seconds and
connect it again.
The amplifier works with a so-called time constant to
ensure a reliable signal without drift, because of this time
constant it can happen that the sensor is out of range for
a short while. To overcome this cable should be
disconnected. Otherwise it may take 1 … 2 minutes until
the signal is within the specified signal range.
6.1 Repair
The sensor cannot be repaired on site. In case of
incorrect functions or broken parts the sensor must be
sent to factory.
/