Habitat GFW Canyon Lamp Table User manual
- Type
- User manual

CANYON OAK LAMP TABLE ASSEMBLY INSTRUCTIONS
Thank you for purchasing the Canyon Oak Lamp Table.
Please read the instructions carefully to ensure safe operation of the item.
Batch No. 221511
Page 1 of 8
PLEASE READ this sheet prior to assembly to familiarise yourself with the various stages of construction.
Carefully open the pack supplied and check the contents against the parts and fittings check list. Do not
destroy any of the packaging until you are certain that you have all the necessary parts for the assembly.
CAUTION: There are small components used in the construction of this unit. These loose items should be
kept away from young children whilst assembling your unit to avoid the danger of choking.
Tools Required
Number of people
x1
0.5 Hour
Set Up
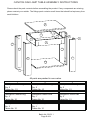
Size: 47 x 47 x 56 cm (WDH)
Colours: Canyon Oak
Finish: Paper Veneer

CANYON OAK LAMP TABLE ASSEMBLY INSTRUCTIONS
CARE INFORMATION
Never use scourers, abrasives or chemical cleaners.
IMPORTANT - READ CAREFULLY - RETAIN THESE INSTRUCTIONS FOR
FUTURE REFERENCE.
Batch No. 221511
Page 2 of 8
INFORMATION
We recommend that this unit is assembled in the room intended for use.
When you are ready to start, make sure that you have the right tools, plenty of space and a
clean, dry area for assembly.
Unwrap all packaging materials and place the components on top of the carton box or on a
clean floor to prevent it from scratching.
Check the pack and make sure you have all the parts listed.
Ensure that this product is fully assembled as illustrated before use.
Check all screws or bolts are tightened and inspect regularly.
Tools not included unless specified in parts list.
WARNINGS
This product should only be used on a firm and level floor.
Keep small parts out of reach of children.
Make sure the legs remain in contact with the floor.
DO NOT use power tools to construct this product.
DO NOT tighten screws until parts are assembled or as advised in this guide.
DO NOT over-tighten screws or bolts.
DO NOT use this product if parts are missing, damaged or worn.
DO NOT sit or stand on the product.
To clean, wipe with a damp sponge and warm soapy water. Do not use solvent based
cleaners or detergents as they can bleach or damage the product.
This product is designed to support 10kg. Do not exceed this weight.

CANYON OAK LAMP TABLE ASSEMBLY INSTRUCTIONS
Batch No. 221511
Page 3 of 8
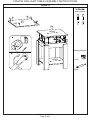
Please check the pack contents before assembling the product. If any components are missing,
please contact your retailer. The fittings pack contains small items that should be kept away from
small children.
123
Description: Wide Leg
Qty: 2
Carton No: 1/1
Description: Narrow Leg
Qty: 2
Carton No: 1/1
Description: Wide Leg
Qty: 2
Carton No: 1/1
4
5
6
Description: Base Panel
Qty: 1
Description: Narrow Leg
Qty: 2
Carton No: 1/1
Carton No: 1/1
Description: Decor Rail
Qty: 2
Carton No: 1/1
7
8
Description: Top Panel
Qty: 1
Description: Decor Cross rail
Qty: 2
Carton No: 1/1 Carton No: 1/1
All parts are packed in one carton
8
6
6
7
7
3
4
1
2
5
3
4
1
2

CANYON OAK LAMP TABLE ASSEMBLY INSTRUCTIONS
Batch No. 221511
Page 4 of 8
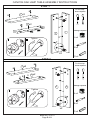
ytitnauQedoC
20A
20B
16D
16F
Item
Fittings (to scale)
Connection Screw
(M6x25mm)
Cam Bolt
Dowel (8x30mm)
Cam Lock
10 20 30 40 50 60 70 80 90
ytitnauQedoC
1C
Item
Fittings (not to scale)
Allen Key 4mm
General Hints & Tips
B24mm
B
B
A
Tighten
Stop when
Level

Batch No. 221511
Page 5 of 8
CANYON OAK LAMP TABLE ASSEMBLY INSTRUCTIONS
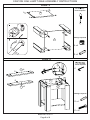
STEP 1
STEP 2
For this step:
Tools required
For this step:
Tools required
Fittings required
A x4
B x6
D x4
Fittings required
A x4
B x6
D x4
21
x2
1
B
B
x2
2
B
A
A
A
A
DD
x2
43
x2
3
x2
B
B
4
x2
B
D
D
A
Tighten
A
Tighten

Batch No. 221511
Page 6 of 8
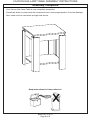
CANYON OAK LAMP TABLE ASSEMBLY INSTRUCTIONS
STEP 3
STEP 4
Fittings required
Tools required
D x4
E x16
Fittings required
For this step:
Tools required
A x4
D x4
C
7
D
x2
6
D
x2
7
6
6
7
E
E
E
EE
E
C
5
5
D
D
A
A
AA
D
D
A
Tighten

STEP 5
Tools required
Fittings required
CANYON OAK LAMP TABLE ASSEMBLY INSTRUCTIONS
B x8
A x8
Batch No. 221511
Page 7 of 8
7
8
8
B
B
BB
BB
B
GRAIN
B
A
A
A
A
A
A
GRAIN
A
Tighten

CANYON OAK LAMP TABLE ASSEMBLY INSTRUCTIONS
Assembly Completed
Your Canyon Oak Lamp Table is now completely assembled.
Periodically check to ensure that the components are in their proper position, free from damage.
Also, make sure the connectors are tight and secure.
Batch No. 221511
Page 8 of 8
Keep instructions for future reference
-
 1
1
-
 2
2
-
 3
3
-
 4
4
-
 5
5
-
 6
6
-
 7
7
-
 8
8


Habitat GFW Canyon Lamp Table User manual
- Type
- User manual
Ask a question and I''ll find the answer in the document
Finding information in a document is now easier with AI
Related papers
Other documents
-
Comfort Glow CCL3924NRA User manual
-
Craftsman 247797851 Owner's manual
-
-
-
RPG BRANDS MVQMKN User manual
-
Meade Model 4400 Owner's manual
-
Craftsman 247.796893 Owner's manual
-
-
-
 Mainstays MS18-D2-1011-10 User manual
