Page is loading ...

USER’S MANUAL

2 -
© 2020. All Rights Reserved.
NITRO 5
Covers: AN515-44 / AN515-55 / AN517-52
This revision: March 2020
Register your Acer product
If your new device runs on Windows OS, you may have had your
product registered automatically while you start up your device
with Windows OS.
Log in at www.acer.com/myproducts with the email address you
registered for Windows OS to review your product record. (Reset
your password if you do not know it.)
If the record is not found, please follow the steps below to
register.
1.Ensure you are connected to the Internet.
2.Go to www.acer.com/register-product.
3.Sign in or sign up for an Acer ID.
4. Enter S/N or SNID of your device to register it.
Important
This manual contains proprietary information that is protected by
copyright laws. The information contained in this manual is subject
to change without notice. Some features described in this manual
may not be supported depending on the Operating System version.
Images provided herein are for reference only and may contain
information or features that do not apply to your computer. Acer
Group shall not be liable for technical or editorial errors or
omissions contained in this manual.
Model number: ________________________________________
Serial number: _________________________________________
Date of purchase: _____________________________________
Place of purchase: _____________________________________

Table of contents - 3
TABLE OF CONTENTS
First things first 5
Your guides............................................... 5
Basic care and tips for using your
computer................................................... 6
Turning your computer off ....................... 6
Taking care of your computer.................. 6
Taking care of your AC adapter................ 7
Cleaning and servicing .............................. 7
Guidelines for safe battery usage............ 8
Internal battery ...................................... 10
Your Acer notebook tour 11
Screen view............................................. 11
Keyboard view ........................................ 12
Left view .................................................. 14
USB 3.2 information ................................ 14
Right view ............................................... 15
USB 3.2 information ................................ 15
Rear view................................................. 16
Base view ................................................ 17
Using the keyboard 18
Lock keys................................................. 18
Hotkeys...................................................... 18
Windows keys......................................... 19
Using the Precision Touchpad 20
Touchpad gestures ................................ 20
Changing touchpad settings ................ 22
Recovery 24
Creating a file history backup............... 24
Backing up your wireless and LAN
drivers...................................................... 27
Creating a factory default backup ....... 27
Restoring your computer...................... 32
Reset this PC and keep my files.............. 32
Reset this PC and remove everything ... 34
Using a Bluetooth connection 38
Enabling and disabling Bluetooth........ 38
Enable Bluetooth and add a device ....... 38
Connecting to the Internet 40
Connecting to a wireless network ....... 40
Connecting to a wireless LAN................. 40
Connecting with a cable........................ 43
Built-in network feature .......................... 43
Connecting to a cellular network......... 43
NitroSense 44
The NitroSense main screen................. 44
Fan Control ............................................... 45
Power Plan ................................................ 45
Monitoring ................................................ 46
NitroSense and Acer TrueHarmonyTM
settings...................................................... 46
Bluelight Shield 48
Securing your computer 50
Using a computer security lock............ 50
Using passwords.................................... 50
Entering passwords ................................. 51
BIOS utility 52
Boot sequence....................................... 52
Setting passwords................................. 52
Power management 53
Saving power ......................................... 53
Battery pack 55
Battery characteristics .......................... 55
Charging the battery................................ 55
Optimizing battery life ............................. 56
Checking the battery level ....................... 57
Battery-low warning................................. 57
Traveling with your computer 58
Disconnecting from the desktop......... 58
Moving around ...................................... 58
Preparing the computer .......................... 58
What to bring to meetings ...................... 59
Taking the computer home ................. 59
Preparing the computer .......................... 59
What to take with you .............................. 60
Special considerations ............................. 60
Setting up a home office.......................... 60
Traveling with the computer ............... 61
Preparing the computer .......................... 61
What to take with you .............................. 61
Special considerations ............................. 61
Traveling internationally ...................... 62
Preparing the computer .......................... 62
What to bring with you ............................ 62
Special considerations ............................. 62
Universal Serial Bus (USB) 64
USB Type-C port 65
Video and audio connectors 66
Connecting a monitor........................... 66
Headphones and microphone............. 66
HDMI 67
Frequently asked questions 69
Requesting service................................ 71
Tips and hints for using Windows 10.. 73
How do I get to Start? .............................. 73
How do I turn off my computer? ............ 73
How do I unlock my computer? .............. 73
How do I set the alarm? ........................... 75
Where are my apps?................................. 76
What is a Microsoft ID (account)? ........... 77
How do I check for Windows updates?.. 77
Where can I get more information? ....... 78
Troubleshooting.................................... 79
Troubleshooting tips................................ 79
Error messages ......................................... 79
Internet and online security 81
First steps on the net ............................ 81
Protecting your computer ....................... 81
Choose an Internet Service Provider ..... 81
Network connections ............................... 83
Surf the Net! .............................................. 85
Internet security software ....................... 85

Getting started...
In this section you will find:
• Useful information on caring for your computer and your
health
• Where to find the power button, ports and connectors
• Tips and tricks for using the touchpad and keyboard
• How to create recovery backups
• Guidelines for connecting to a network and using Bluetooth
• Information on using Acer’s bundled software

First things first - 5
FIRST THINGS FIRST
We would like to thank you for making this Acer notebook your
choice for meeting your mobile computing needs.
Your guides
To help you use your Acer notebook, we have designed a set of
guides:
First off, the Setup Guide helps you get started with setting up
your computer.
The Quick Guide introduces you to the basic features and
functions of your new computer. For more on how your computer
can help you to be more productive, please refer to the User’s
Manual. This guide contains detailed information on such
subjects as system utilities, data recovery, expansion options and
troubleshooting.
Once you have connected to the internet, you can download
updates for your computer from:
http://go.acer.com/?id=17883
1. The link will open the Acer Support webpage.
2. Scroll down to Drivers and Manuals and search for your model
by pasting in or manually entering the serial number, SNID, or
product model.
3. From this page you can also download and install the Acer
identification utility that will automatically detect your
computer’s serial number and SNID and allow you to copy it
to the clipboard.
4. Once you have found your product model, any updates, or
documents will be listed.

6 - First things first
Basic care and tips for using your computer
Turning your computer off
To turn the power off, do any of the following:
• Use the Windows shutdown command: Press the Windows key or
select the Windows Start button, select Power > Shut down.
• Right-click the Windows Start button > Shut down or sign out >
Shut down.
If you need to power down the computer for a short while, but
don’t want to completely shut it down, you can put it to Sleep by
doing any of the following:
• Press the power button.
• Press the sleep hotkey.
•Press the Windows key or select the Windows Start button, select
Power > Sleep.
• Right-click the Windows Start button > Shut down or sign out >
Sleep.
Taking care of your computer
Your computer will serve you well if you take care of it.
• Only use the adapter provided with your device, or an Acer-
approved adapter to power your device.
• Do not expose the computer to direct sunlight. Do not place it
near sources of heat, such as a radiator.
• Do not expose the computer to temperatures below 0º C (32º F)
or above 50º C (122º F).
• Do not subject the computer to magnetic fields.
• Do not expose the computer to rain or moisture.
Note
If you cannot power off the computer normally, press and hold the power
button for up to ten seconds to shut down the computer. If you turn off the
computer and want to turn it on again, wait at least two seconds before
powering up.

First things first - 7
• Do not spill water or any liquid on the computer.
• Do not subject the computer to heavy shock or vibration.
• Do not expose the computer to dust or dirt.
• Never place objects on top of the computer.
• Do not slam the computer display when you close it.
• Never place the computer on uneven surfaces.
Taking care of your AC adapter
Here are some ways to take care of your AC adapter:
• Do not connect the adapter to any other device.
• Do not step on the power cord or place heavy objects on top of
it. Route the power cord and any cables away from where
people walk.
• When unplugging the power cord, do not pull on the cord itself
but pull on the plug.
• The total ampere ratings of the equipment plugged in should
not exceed the ampere rating of the cord if you are using an
extension cord. Also, the total current rating of all equipment
plugged into a single wall outlet should not exceed the fuse
rating.
Cleaning and servicing
When cleaning the computer, follow these steps:
1.Turn off the computer.
2.Disconnect the AC adapter.
3.Use a soft, moist cloth. Do not use liquid or aerosol cleaners.
If your computer is dropped or visibly damaged, or does not work
normally, please contact your nearest authorized Acer service
center.

8 - First things first
Guidelines for safe battery usage
Precautions when charging batteries
The useful lifespan of a battery is adversely affected by the
following behavior:
• Constantly charging the battery/device when already at full
capacity.
• Charging the battery/device at temperatures above 35 °C (95 °F)
or below 0 °C (32 °F).
To prevent damage, follow these precautions:
• Stop charging the battery once it reaches 100% capacity;
regularly or frequently charging a fully charged battery for an
extended period of time may cause battery deformation or
damage. We recommend that you recharge the device when the
battery level drops below 70% capacity.
• Do not charge battery in temperatures above 35 °C (95 °F) or
below 0 °C (32 °F). Charging in abnormally high or abnormally
low temperatures can cause battery deformation or damage.
• The charging port must be clean and free from debris and
should only be used with Acer charging equipment. Use of a
non-Acer battery or charging equipment can cause damage to
the product and will void the warranty.
• If you plan to store the device for a long period of time, turn-off
the device, remove AC power and store the product at room
temperature (0 °C - 35 °C) in a dry (humidity: 45% - 80%), well-
ventilated area. Avoid direct sunlight, high temperatures and
high humidity. Do not leave your device’s battery completely
discharged for a long period of time; this may cause battery
Warning
When using a charging cart or a small space to simultaneously
charge or operate multiple devices , the area must be well-
ventilated and the temperature kept between 0 °C (32 °F) to 35 °C (95
°F) and battery charging must be stopped when 100% capacity is
reached.
Continuous charging can cause deformation or damage to the
battery/device.

First things first - 9
deformation or damage. We recommend that the battery is
checked and charged to approximately 50% capacity every 6
months.
• ONLY CHARGE THE BATTERY IN A CLEAN, WELL VENTILATED
AREA.
Precautions when replacing the battery
Improper replacement or mishandling could damage the battery,
cause overheating, result in injury, and risk fire or explosion.
• Device with built-in battery: A built-in battery must be replaced
by an authorized service center. Do not attempt to replace or
remove the battery by yourself.
• Device with removable battery: The battery should only be
replaced with parts approved by Acer. Do not replace the
battery with any parts other than approved ones.
This notebook uses a Lithium-based battery. Do not use it in a
humid, wet or corrosive environment. Do not put, store or leave
your product in or near a heat source, in a high temperature
location, in strong direct sunlight, in a microwave oven or in a
pressurized container, and do not expose it to temperatures over
50 °C (122 °F).
Failure to follow these guidelines may cause the battery to leak
acid, become hot, explode or ignite and cause injury and/or
damage. Do not pierce, open or disassemble the battery. If the
battery leaks and you come into contact with the leaked fluids,
rinse thoroughly with water and seek medical attention
immediately. For safety reasons, and to prolong the lifetime of
the battery, charging will must not occur at temperatures below 0
°C (32 °F) or above 35 °C (95 °F).
Warning
Batteries may explode if not handled properly.
Do not disassemble or dispose of batteries in fire.
Do not short external contacts, crush, puncture or otherwise
tamper with batteries. Keep batteries away from children.
Follow local regulations when disposing of used batteries.

10 - First things first
The full performance of a new battery is achieved only after two
or three complete charge and discharge cycles. The battery can
be charged and discharged hundreds of times, but it will
eventually wear out. When the operation time becomes
noticeably shorter than normal, check an authorized reseller to
purchase a new battery.
Use the battery only for its intended purpose. Never use any
charger or battery that is damaged. Do not short-circuit the
battery. Accidental short-circuiting can occur when a metallic
object such as a coin, clip or pen causes direct connection of the
positive (+) and negative (-) terminals of the battery. (These look
like metal strips on the battery.) This might happen, for example,
when you carry a spare battery in your pocket or purse. Short-
circuiting the terminals may damage the battery or the
connecting object.
The capacity and lifetime of the battery will be reduced if the
battery is left in hot or cold places, such as in a closed car in
summer or winter. Always try to keep the battery between 15
° C
and 25
° C (59° F and 77° F). A device with a hot or cold battery
may not work temporarily, even when the battery is fully charged.
Battery performance is especially limited in temperatures well
below freezing.
Do not dispose of batteries in a fire as they may explode.
Batteries may also explode if damaged. Dispose of batteries
according to local regulations. Please recycle when possible. Do
not dispose as household waste.
Wireless devices may be susceptible to interference from the
battery, which could affect performance.
Internal battery
• Do not attempt to replace a built-in rechargeable battery,
battery replacement must be done by an Acer- authorized
repair facility.
Recharge the battery by following the instruction included in the
product documentation.
Note
Please refer to www.acer.com for battery shipping documents.

Your Acer notebook tour - 11
YOUR ACER NOTEBOOK TOUR
After setting up your computer as illustrated in the Setup Guide,
let us show you around your new Acer computer.
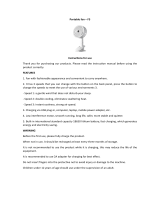
Screen view
# Icon Item Description
1Webcam
Web camera for video
communication.
A light next to the webcam indicates
that the webcam is active.
2 Microphones
Internal digital microphones for
sound recording.
3 Screen Displays computer output.
2
3
1


Your Acer notebook tour - 13
2Touchpad
Touch-sensitive pointing device.
The touchpad and selection buttons
form a single surface.
Press down firmly on the touchpad
surface to perform a left click.
Press down firmly on the lower right
corner to perform a right click.
3 NitroSense key Launches NitroSense application.
4 Power button Turns the computer on and off.
5
Battery
indicator
Indicates the computer’s battery
status.
Charging: The light shows amber
when the battery is charging.
Fully charged: The light shows blue
when in AC mode.
Power indicator
Indicates the computer’s power
status.
# Icon Item Description

14 - Your Acer notebook tour
Left view
USB 3.2 information
• USB 3.2 Gen 1 compatible ports are blue.
• Compatible with USB 3.2 Gen 1 and earlier devices.
• For optimal performance, use USB 3.2 Gen 1-certified devices.
• Defined by the USB 3.2 Gen 1 specification (SuperSpeed USB).
# Icon Item Description
1
Kensington lock
slot
Connects to a Kensington-
compatible security lock.
2
Ventilation and
cooling fan
Allows the computer to stay cool.
Do not cover or obstruct the
openings.
3
Ethernet (RJ-45)
port
Connects to an Ethernet 10/100/
1000-based network.
Pull the lip down to open the port
fully.
4 USB port Connects to USB devices.
5
Headset/
speaker jack
Connects to audio devices (e.g.,
speakers, headphones) or a
headset with microphone.
1 2 3 4 5

Your Acer notebook tour - 15
Right view
USB 3.2 information
• USB 3.2 Gen 2 compatible ports are blue.
• Compatible with USB 3.2 Gen 2 and earlier devices.
• For optimal performance, use USB 3.2 Gen 2-certified devices.
• Defined by the USB 3.2 Gen 2 specification (SuperSpeed USB).
# Icon Item Description
1
USB Type-C
port
Connects to USB devices with a
USB Type-C connector.
Supports USB 3.2 Type-C, Gen 2
with transfer speeds up to
10 Gbps.
2
USB port with
power-off
charging
Connects to USB devices.
3HDMI port
Supports high-definition digital
video connections.
4
Ventilation and
cooling fan
Allows the computer to stay cool.
Do not cover or obstruct the
openings.
1 23 4

16 - Your Acer notebook tour
Rear view
# Icon Item Description
1 DC-in jack
Connects to an AC adapter.
2
Ventilation and
cooling fan
Allows the computer to stay cool.
Do not cover or obstruct the
openings.
1
2

Your Acer notebook tour - 17
Base view
# Icon Item Description
1
Ventilation and
cooling fan
Allows the computer to stay cool.
Do not cover or obstruct the
openings.
2 Speakers Deliver stereo audio output.
1
2

18 - Using the keyboard
USING THE KEYBOARD
The keyboard has full-sized keys, a numeric keypad, separate
cursor, lock, Windows keys and hotkeys.
Lock keys
The keyboard has lock keys which you can use to turn keyboard
functions on and off.
Hotkeys
To activate hotkeys, press and hold the Fn key before pressing the
other key in the hotkey combination.
Lock key Description
Caps Lock
When Caps Lock is on, all alphabetic characters
typed are in uppercase.
Num Lock
When Num Lock is on, the keypad is in numeric
mode. The keys function as a calculator (complete
with the arithmetic operators +, -, *, and /). Use
this mode when you need to do a lot of numeric
data entry.
Scroll Lock
When Scroll Lock is on, the screen moves one line
up or down when you press the up or down arrow
keys respectively. Scroll Lock does not work with
some applications.
Hotkey Icon Function Description
Fn + F3 Flight mode
Turns on / off the computer's
network devices.
Fn + F4 Sleep
Puts the computer in Sleep
mode.
Fn + F5 Display toggle
Switches display output
between the display screen,
external monitor (if connected)
and both.

Using the keyboard - 19
Windows keys
The keyboard has two keys that perform Windows-specific
functions.
Fn + F6 Display off
Turns the display screen
backlight off to save power.
Press any key to return.
Fn + F7
Touchpad
toggle
Turns the built-in touchpad on
and off.
Fn + F8
Speaker
toggle
Turns the speakers on and off.
Fn + F9
Keyboard
backlight
decrease
Decreases the intensity of the
keyboard backlight.
Fn + F10
Keyboard
backlight
increase
Increases the intensity of the
keyboard backlight.
Fn + F12
Scr Lk
Scroll Lock Turns Scroll Lock on or off.
Fn + Del
Ins
Insert Turns Insert on or off.
Fn + Pg Up Play/Pause
Play or pause a selected media
file.
Fn + Pg Dn Previous
Return to the previous media
file.
Fn + End Next Jump to the next media file.
Fn + Brightness up
Increases the screen
brightness.
Fn +
Brightness
down
Decreases the screen
brightness.
Fn + Volume up Increases the sound volume.
Fn + Volume down Decreases the sound volume.
Hotkey Icon Function Description
Key Description
Windows key
Pressed alone it returns to the Start
screen or to return to the last open app.
Application key
This key has the same effect as clicking
the right mouse button.

20 - Using the Precision Touchpad
USING THE PRECISION TOUCHPAD
The touchpad controls the arrow (or 'cursor') on the screen. As
you slide your finger across the touchpad, the cursor will follow
this movement. The Precision Touchpad (PTP) is designed to
provide a more uniform, smooth, and accurate touchpad
experience. Many applications support precision touchpad
gestures that use one or more fingers, however, some gestures
may not be supported by the specific application or program you
are using.
Touchpad gestures
Single-finger slide
Slide a finger across the touchpad to move the cursor.
Single-finger press or tap
Press the touchpad down, or lightly tap the touchpad
with your finger, to perform a 'click', which will select or
start an item. Quickly repeat the tap to perform a
double tap or 'double click'.
Two-finger press
Lightly tap the touchpad with two fingers to perform a
'right click'. In the Start screen, this will toggle the
app commands. In most apps this will open a context
menu related to the selected item.
Two-finger slide
Swiftly scroll through web pages, documents and
playlists by placing two fingers on the touchpad and
moving both in any direction.
/