Page is loading ...

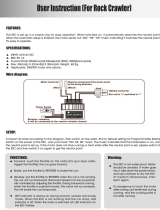
Battery
Battery positive +
Battery negative -
Switch
Receiver cable (TH)
Receiver
CH1: Servo
CH2: Speed Control
Servo
Sensor cable connector
How to connect the electronics
Throttle range
Neutral point
Neutral zone
Forward
Brake/reverse zone
Full throttle
Full brake/reverse
Full throttle
Neutral point
Neutral zone
Full brake/reverse
Forward
Rock Crawler: Backward Zone
Normal EP Car: Brake and backward zone
2

Step A
Connect Battery to ESC
Hold SET key 3s to save the
selected option into ESC
Red LED blinks once means the
1
st
option of 1
st
item
Hold SET
key for 3s
Release SET key to enter
Program Mode
Enter the 1
st
item
Green LED blinks once
Hold SET key for 1s
Then Green LED blinks
Switch on the ESC
Enter the 2
nd
item
Green LED blinks twice
Enter the M
th
item
Green LED blinks M times
Hold SET key for 5s to reset
all programmable items
Choose Programmable Item
Choose the wanted option of 2
nd
item by clicking SET key
Red LED blinks N times means
the N
th
option of 1
st
item
Red LED blinks twice means
the 2
nd
option of 1
st
item
Click SET key
Click SET key
Click SET key
Click SET key
Click SET key
Choose the wanted option of M
th
item by clicking SET key
Turn off ESC to quit Program
Mode or set other item from
STEP A
Hold SET
key for 3s
Hold SET
key for 3s
Choose The Wanted Option
…
…
How to program the ESC with the Setup key
www.teamorion.com

How to calibrate the speed control
1
2
3Vortex R-Series Speed Controls

Model 65103 / 65108 65104 / 65107
Type
65103 Sensorless 65104 Sensorless
65108 Sensor / Sensorless 65107 Sensor / Sensorless
Const. / peak Amp 100A / 520A 130A / 760A
Resistance 0.0007 ohm 0.0004 ohm
Function
forward/brake – forward/brake reverse forward/brake – forward/brake reverse
forward/reverse (for rock crawler) forward/reverse (for rock crawler)
Car type 1/10 Truggy / Buggy / Monster 1/8 Truggy / Buggy
Motor type
2S Lipo – up to 6000KV 2S Lipo up to 6000KV
3S Lipo up to 4000KV 3S Lipo up to 4000KV
4S Lipo up to 3000KV
Battery type
6-9 cells NiMH - NiCd 6-12 cells NiMH - NiCd
2-3 cells LiPo - LiFe 2-4 cells LiPo - LiFe
BEC 6V/3A 6V/3A
Size 53.5x36x36mm 53.5x36x36mm
Weight 74g 79g
Model 65106/65110
Type Sensorless
Const. / peak Amp 45A/290A
Resistance 0.0012 ohm
Function forward/brake – forward/brake reverse
Car type 1/10 on-road and off-road
Motor type
2S Lipo – up to 6000KV On-Road /
4000KV Off-Road
3S Lipo up to 4000KV On-Road /
2500KV Off-Road
Battery type
2-3 cells LiPo/LiFe or
4-9 cells NiMH/NiCd
BEC 6V/3A
Size 31.5x27.5x33mm
Weight 74g w/wires
Model 65109
Type Sensor / Sensorless
Const. / peak Amp 90A / 420A
Resistance 0.00055 ohm
Function
forward/brake – forward/brake reverse
forward/reverse (for rock crawler)
Car type
1/12 on-road, 1/10 on-road and
off-road, Short Course, Rock Crawler
Motor type
2S up to 5.5T
3S up to 10.5T
Up to 6000KV
Battery type
5-9 cells NiMH - NiCd
2-3 cells LiPo - LiFe
BEC 5.75V@3A, Linear mode
Size 41.5x30.5x20.2mm w/o fan
Weight 43g
Model 65111
Type Sensorless
Const. / peak Amp 60A/290A
Resistance 0.0012 ohm
Function forward/brake – forward/brake reverse
Car type 1/10 on-road and off-road
Motor type
2S Lipo – up to 6000KV On-Road /
4000KV Off-Road
3S Lipo up to 4000KV On-Road /
2500KV Off-Road
Battery type
2-3 cells LiPo/LiFe or
4-9 cells NiMH/NiCd
BEC 6V/3A
Size 31.5x27.5x33mm
Weight 74g w/wires
Technical Specifications
4 www.teamorion.com

Technical Specifications
Model 65101 65102
Type Sensor / Sensorless Sensor / Sensorless
Const. / peak Amp 120A / 760A 160A / 760A
Resistance 0.0003 ohm 0.0003 ohm
Function
forward/brake – forward/brake reverse
forward/brake – forward/brake
reverse
forward/reverse (for rock crawler) forward/reverse (for rock crawler)
Car type
1/12 on-road, 1/10 on-road and
off-road, Rock Crawler
1/12 on-road, 1/10 on-road and
off-road, Rock Crawler
Motor type
1S up to 3.5T 2S up to 2.5T
2S up to 4.5T 3S up to 5.5T
Up to 12000KV Up to 16000KV
Battery type
4-6 cells NiMH - NiCd 5-9 cells NiMH - NiCd
1-2 cells LiPo - LiFe 2-3 cells LiPo - LiFe
BEC 6V/2A, DC/DC Booster 5.75V/3A, Linear mode
Size 41.5x30.5x16.5mm w/o fan 41.5x30.5x20.2 mm w/o fan
Weight 40g 44g
Model 65105
Type Sensor / Sensorless
Const. / peak Amp 180A/950A
Resistance 0.0002 ohm
Function
forward/brake – forward/brake reverse
forward/reverse (for rock crawler)
Car type
1/8 off-road buggy, truggy and mon-
ster trucks, 1/8 on-road
Motor type
4S LiPo up to 3000KV
6S LiPo up to 2400KV
Battery type
2-6 cells LiPo/LiFe or 6-18 cells NiMH/
NiCd
BEC 5.75V/3A
Size 56x46.5x35mm
Weight 105g w/o wires
Model 65109
Type Sensor / Sensorless
Const. / peak Amp 90A / 420A
Resistance 0.00055 ohm
Function
forward/brake – forward/brake reverse
forward/reverse (for rock crawler)
Car type
1/12 on-road, 1/10 on-road and
off-road, Short Course, Rock Crawler
Motor type
2S up to 5.5T
3S up to 10.5T
Up to 6000KV
Battery type
5-9 cells NiMH - NiCd
2-3 cells LiPo - LiFe
BEC 5.75V@3A, Linear mode
Size 41.5x30.5x20.2mm w/o fan
Weight 43g
5Vortex R-Series Speed Controls

Programmable Items
Programmable Value
1 2 3 4 5 6 7 8 9
Basic Items
1. Running Mode
Forward
with Brake
Forward/
Reverse
with Brake
Forward/
Reverse
2. Drag Brake Force 0% 5% 10% 20% 40% 60% 80% 100%
3. Low Voltage
Cut-Off Threshold
Non-
Protection
2.6V
/Cell
2.8V
/Cell
3.0V
/Cell
3.2V
/Cell
3.4V
/Cell
4. Start Mode(Punch) Level 1 Level 2 Level 3 Level 4 Level 5 Level 6 Level 7 Level 8 Level 9
Advanced Items
5. Max Brake Force 25% 50% 75% 100% Disable
6. Max Reverse Force 25% 50% 75% 100%
7. Initial Brake Force
= Drag
Brake
Force
0% 20% 40%
8. Neutral Range
6%
(Narrow)
9%
(Normal)
12%
(Wide)
9. Timing
(Only for
sensorless motors)
0.00 ° 3.75 ° 7.50 ° 11.25 ° 15.00 ° 18.75 ° 22.50° 26.25°
10. Reserved Item
11. Reserved Item
12. Motor Rotation
Counter
Clockwise
Clockwise
13. Lipo Cells
Auto
Calculate
2 Cells 3 Cells 4 Cells 5 Cells 6 Cells
Programmable Items
Programmable Value
1 2 3 4 5 6 7 8
Basic Items
1. Running Mode
Forward
with Brake
Forward/
Reverse
with
Brake
2. Drag Brake Force 0% 5% 10% 15% 20% 25% 30% 40%
3. Low Voltage
Cut-Off Threshold
Non-
Protection
2.6V/Cell 2.8V/Cell 3.0V/Cell 3.2V/Cell 3.4V/Cell
4. Start Mode(Punch) Level1 Level2 Level3 Level4
5. Max Brake Force 25% 50% 75% 100%
ORI65103-65104-65105-65107-65108
ORI65106-ORI65110-ORI65111
Programmable Items
Programmable Value
1 2 3 4 5 6 7 8 9
Basic Items
1. Running Mode
Forward
with Brake
Forward/
Reverse
with Brake
Forward/
Reverse
2. Drag Brake Force 0% 5% 10% 20% 40% 60% 80% 100%
3. Low Voltage
Cut-Off Threshold
Non-
Protection
2.6V
/Cell
2.8V
/Cell
3.0V
/Cell
3.2V
/Cell
3.4V
/Cell
4. Start Mode(Punch) Level 1 Level 2 Level 3 Level 4 Level 5 Level 6 Level 7 Level 8 Level 9
Advanced Items
5. Max Brake Force 25% 50% 75% 100% Disable
6. Max Reverse Force 25% 50% 75% 100%
7. Initial Brake Force
= Drag
Brake
Force
0% 20% 40%
8. Neutral Range
6%
(Narrow)
9%
(Normal)
12%
(Wide)
9. Timing
(Only for
sensorless motors)
0.00 ° 3.75 ° 7.50 ° 11.25 ° 15.00 ° 18.75 ° 22.50° 26.25°
10. Reserved Item
11. Reserved Item
12. Motor Rotation
Counter
Clockwise
Clockwise
13. Lipo Cells
Auto
Calculate
2 Cells 3 Cells 4 Cells 5 Cells 6 Cells
Programmable Items
Programmable Value
1 2 3 4 5 6 7 8
Basic Items
1. Running Mode
Forward
with Brake
Forward/
Reverse
with
Brake
2. Drag Brake Force 0% 5% 10% 15% 20% 25% 30% 40%
3. Low Voltage
Cut-Off Threshold
Non-
Protection
2.6V/Cell 2.8V/Cell 3.0V/Cell 3.2V/Cell 3.4V/Cell
4. Start Mode(Punch) Level1 Level2 Level3 Level4
5. Max Brake Force 25% 50% 75% 100%
ORI65103-65104-65105-65107-65108
ORI65106-ORI65110-ORI65111
Programmable Items
6 www.teamorion.com

Programmable
Items
Programmable Value
1 2 3 4 5 6 7 8 9
Basic Items
1. Running Mode Forward
with
Brake
Forward/
Reverse
with
Brake
Foward/
Reverse
(For Rock
Crawler)
Zero Tim-
ing
Forward
with
Brake
Zero
Timing
Forward/
Reverse
with
Brake
Zero
Timing
Forward/
Reverse
(For Rock
Crawler)
2. Drag Brake Force
0% 5% 10% 15% 20% 25% 30% 100%
User set
in 1%
steps
3. Low Voltage
Cut-Off Threshold
Non-Pro-
tection
2.6V/Cell 2.8V/Cell 3.0V/Cell 3.2V/Cell 3.4V/Cell
User set
in 0.1V
steps
4. Start
Mode(Punch)
Level 1 Level 2 Level 3 Level 4 Level 5 Level 6 Level 7 Level 8 Level 9
Advanced Items
5. Max Brake Force 12.50% 25% 37.50% 50% 62.50% 75% 87.50% 100%
6. Max Reverse
Force
25% 50% 75% 100%
7. Initial Brake
Force
=Drag
Brake
Force
0% 20% 40%
8. Neutral Range 6%
(Narrow)
9%
(Normal)
12%
(Wide)
9. Over-heat
Protection
Enable Disable
10. Boost Timing 0° to 16° in 1° steps, default 0°
11. Boost Start RPM 1000RPM to 15000RPM in 1000RPM steps, default 5000PRM, Stock class specic software only
12. Boost Timing
Acceleration
50RPM/deg to 750RPM/deg in 50RPM steps, Stock class specic software only
13. Turbo Timing 0° to 20° in 1° steps, default 10°
14. Turbo Slope
Rate
3°/0.1s 6°/0.1s 12°/0.1s 18°/0.1s 24°/0.1s Fastest
15. Turbo Delay 0s/off 0.1s 0.2s 0.3s 0.4s 0.5s 0.6s 0.7s 0.8s
1-9 are manually adjustable with on/off switch | 10, 13, 14, 15 need program box to access these settings |
11, 12 need program box and rmware update to access these settings
*The Vortex R10 Race (ORI65109) has been developed for the fIxed 0-Timing class.
For this speed controller the programs 10-15 cannot be adjusted nor activated.
ORI65101-ORI65102-ORI65109*
Programmable Items
7Vortex R-Series Speed Controls

Thank you for purchasing a Team Orion Brushless ESC. This ESC features the latest brushless technologies.
Our World Championship winning development team has spent countless hours developing this ESC so that
you can experience ultimate performance.
Please read these instructions thoroughly before using the ESC.
FEATURES
• Designed for on-road and off-road use
• High precision speed and power control
• High power built-in BEC system for stable receiver and servo power supply
• Easy set-up via the setup button or optional digital program box
• Forward and reverse function
• Several adjustable parameters (see list on separate sheet)
• Multiple protection systems: battery low voltage cut-off, overheating, radio signal loss, stuck motor
ESC AND MOTOR CONNECTION (see picture on separate sheet)
Sensorless brushless motor (all ESC types)
When using a motor without sensors, the A-B-C wire order is not important, if the motor spins in the wrong direction,
simply reverse two of the wires.
Sensor brushless motor (select ESC types only)
When using a motor equipped with sensors, a sensor cable must be used to connect the motor to the ESC. The ESC
detects when a sensor cable is connected and switches to sensor mode.
WARNING! When using sensor equipped motors, you must respect the A-B-C wire connection order when
connecting the motor to the ESC, you can’t connect the wires randomly.
ESC CALIBRATION (see pictures on separate sheet)
In order to ensure proper function, the ESC must be calibrated to your transmitter inputs. It is recommended to center
the trims and reset all settings inside the transmitter before proceeding to the calibration.
Follow the procedure below to calibrate your ESC
A) Switch off the ESC and switch the transmitter on, set the throttle trim to neutral and set the throttle travel range to
100%”. Disable any special functions such as ABS, etc.
B) Press and hold the “SET” key (located on the switch or ESC), then switch on the ESC. Release the “SET” key as
soon as the red LED starts to flash.
C) Calibrate the throttle points by pressing the set button once after each step.
1. neutral point (1 flash)
2. full throttle (2 flashes)
3. full brakes/reverse (3 flashes)
D) The motor will run 3 seconds after the last step is completed.
STATUS LED FUNCTION
• In the neutral position, no LED are lit
• The red LED lights when the car is moving forward, backwards or is braking.
AUDIO WARNING TONES
1. Input voltage problem: ESC checks the input voltage as it is switched on, if a problem is detected, the ESC emits
repeatedly two beeps with a 1 second pause (xx-xx-xx).
2. Radio signal problem: ESC checks the radio signal input as it is switched on, if a problem is detected, the ESC
emits repeatedly a beep with a 2 second pause (x-x-x).
ESC ADVANCED SETUP
You can adjust several parameters by using the setup button located on the switch or ESC or by using the optional
digital program box (ORI65150).
Please note that depending on the ESC type you have purchased, the number of adjustable parameters may vary
(check the separate sheet for more information).
To adjust the parameters using the setup button, follow the procedure below (see picture on separate sheet).
A) Switch on the ESC.
B) Press and hold the setup button for one second until the green led starts flashing and then release the setup
button (holding the setup button for 5 seconds will restore the ESC to factory defaults).
C) Press the setup button once more.
D) The green LED blinks once repeatedly indicating that parameter nr.1 is currently selected.
E) By pressing on the setup button once more, you move to parameter nr.2 and so on until you have gone
through all the parameters. The process goes in a loop.
F) To change a parameter value, press and hold the setup button for 3 seconds while the green LED is flashing
the number of times corresponding to the parameter you wish to modify.
G) The red LED will flash indicating the actual setting. One flash means setting nr.1 is actually selected, two
flashes means setting nr.2 and so on.
H) Press the setup button to select the setting you wish to use for the current parameter. The process goes in a
loop.
I) Once you have selected the setting you wish to use, press and hold the setup button for 3 seconds to save the
change.
J) Switch the ESC off and back on to make the parameter change effective.
Please note : you can only change one setting at a time, after each modification you need to switch the ESC
off and back on both to make the parameter change effective and be able to modify another parameter.
PARAMETERS
Running Mode
1)“Forward Only with Brake” this mode is meant for competition use. In this mode the car can go forward and brake,
there is no reverse.
2)“Forward/Reverse with Brake” this is the basic all-around mode. In this mode the car can go forward and reverse
and can also brake. When you move the throttle to the reverse position while the car is moving forward, brakes are
applied until the car is fully stopped, reverse cannot engage while the car is moving. To engage reverse, once the car
has stopped, release the brakes and move the throttle to the reverse position again.
While braking or in reverse, if the throttle is moved to the forward position, the car will immediately accelerate forward.
3)“Forward/Reverse” this mode is meant for Rock Crawler use. In this mode there is no brake, the car can go from
forward to reverse immediately without any pause. Do not use this mode with other car types as it can overload and/or
damage the ESC.
Drag Brake Force
Sets the amount of brake automatically applied when the throttle is returned to the neutral position. This simulates the
engine breaking effect of a real car, it can help improve turn-in and the general feeling of the car.
Low Voltage Cut-off
This function helps to prevent battery over-discharge. The ESC continuously monitors the battery’s voltage. If the
voltage becomes lower than the threshold for 2 seconds, the output power is shut off and the red LED flashes twice
repeatedly.
The cutoff threshold calculation is based on LiPo individual cell voltage. For NiMH batteries, if the voltage battery pack
is higher than 9.0V, it will be considered as a 3 cell LiPo battery pack; If it is lower than 9.0V, it will be considered as a
2 cell LiPo battery pack. Example: for a 8.0V NiMH battery pack used with a 2.6V/cell threshold, it will be considered
as a 2 cell LiPo battery pack and the low-voltage cut-off threshold will be 5.2V (2.6x2=5.2).
Using the optional Digital Program box (ORI65150) you can adjust custom values for the cutoff threshold. Unlike the
preset values, custom cutoff values are for the total battery voltage not individual cell voltage.
8 www.teamorion.com
ENGLISH

Thank you for purchasing a Team Orion Brushless ESC. This ESC features the latest brushless technologies.
Our World Championship winning development team has spent countless hours developing this ESC so that
you can experience ultimate performance.
Please read these instructions thoroughly before using the ESC.
FEATURES
• Designed for on-road and off-road use
• High precision speed and power control
• High power built-in BEC system for stable receiver and servo power supply
• Easy set-up via the setup button or optional digital program box
• Forward and reverse function
• Several adjustable parameters (see list on separate sheet)
• Multiple protection systems: battery low voltage cut-off, overheating, radio signal loss, stuck motor
ESC AND MOTOR CONNECTION (see picture on separate sheet)
Sensorless brushless motor (all ESC types)
When using a motor without sensors, the A-B-C wire order is not important, if the motor spins in the wrong direction,
simply reverse two of the wires.
Sensor brushless motor (select ESC types only)
When using a motor equipped with sensors, a sensor cable must be used to connect the motor to the ESC. The ESC
detects when a sensor cable is connected and switches to sensor mode.
WARNING! When using sensor equipped motors, you must respect the A-B-C wire connection order when
connecting the motor to the ESC, you can’t connect the wires randomly.
ESC CALIBRATION (see pictures on separate sheet)
In order to ensure proper function, the ESC must be calibrated to your transmitter inputs. It is recommended to center
the trims and reset all settings inside the transmitter before proceeding to the calibration.
Follow the procedure below to calibrate your ESC
A) Switch off the ESC and switch the transmitter on, set the throttle trim to neutral and set the throttle travel range to
100%”. Disable any special functions such as ABS, etc.
B) Press and hold the “SET” key (located on the switch or ESC), then switch on the ESC. Release the “SET” key as
soon as the red LED starts to flash.
C) Calibrate the throttle points by pressing the set button once after each step.
1. neutral point (1 flash)
2. full throttle (2 flashes)
3. full brakes/reverse (3 flashes)
D) The motor will run 3 seconds after the last step is completed.
STATUS LED FUNCTION
• In the neutral position, no LED are lit
• The red LED lights when the car is moving forward, backwards or is braking.
AUDIO WARNING TONES
1. Input voltage problem: ESC checks the input voltage as it is switched on, if a problem is detected, the ESC emits
repeatedly two beeps with a 1 second pause (xx-xx-xx).
2. Radio signal problem: ESC checks the radio signal input as it is switched on, if a problem is detected, the ESC
emits repeatedly a beep with a 2 second pause (x-x-x).
ESC ADVANCED SETUP
You can adjust several parameters by using the setup button located on the switch or ESC or by using the optional
digital program box (ORI65150).
Please note that depending on the ESC type you have purchased, the number of adjustable parameters may vary
(check the separate sheet for more information).
To adjust the parameters using the setup button, follow the procedure below (see picture on separate sheet).
A) Switch on the ESC.
B) Press and hold the setup button for one second until the green led starts flashing and then release the setup
button (holding the setup button for 5 seconds will restore the ESC to factory defaults).
C) Press the setup button once more.
D) The green LED blinks once repeatedly indicating that parameter nr.1 is currently selected.
E) By pressing on the setup button once more, you move to parameter nr.2 and so on until you have gone
through all the parameters. The process goes in a loop.
F) To change a parameter value, press and hold the setup button for 3 seconds while the green LED is flashing
the number of times corresponding to the parameter you wish to modify.
G) The red LED will flash indicating the actual setting. One flash means setting nr.1 is actually selected, two
flashes means setting nr.2 and so on.
H) Press the setup button to select the setting you wish to use for the current parameter. The process goes in a
loop.
I) Once you have selected the setting you wish to use, press and hold the setup button for 3 seconds to save the
change.
J) Switch the ESC off and back on to make the parameter change effective.
Please note : you can only change one setting at a time, after each modification you need to switch the ESC
off and back on both to make the parameter change effective and be able to modify another parameter.
PARAMETERS
Running Mode
1)“Forward Only with Brake” this mode is meant for competition use. In this mode the car can go forward and brake,
there is no reverse.
2)“Forward/Reverse with Brake” this is the basic all-around mode. In this mode the car can go forward and reverse
and can also brake. When you move the throttle to the reverse position while the car is moving forward, brakes are
applied until the car is fully stopped, reverse cannot engage while the car is moving. To engage reverse, once the car
has stopped, release the brakes and move the throttle to the reverse position again.
While braking or in reverse, if the throttle is moved to the forward position, the car will immediately accelerate forward.
3)“Forward/Reverse” this mode is meant for Rock Crawler use. In this mode there is no brake, the car can go from
forward to reverse immediately without any pause. Do not use this mode with other car types as it can overload and/or
damage the ESC.
Drag Brake Force
Sets the amount of brake automatically applied when the throttle is returned to the neutral position. This simulates the
engine breaking effect of a real car, it can help improve turn-in and the general feeling of the car.
Low Voltage Cut-off
This function helps to prevent battery over-discharge. The ESC continuously monitors the battery’s voltage. If the
voltage becomes lower than the threshold for 2 seconds, the output power is shut off and the red LED flashes twice
repeatedly.
The cutoff threshold calculation is based on LiPo individual cell voltage. For NiMH batteries, if the voltage battery pack
is higher than 9.0V, it will be considered as a 3 cell LiPo battery pack; If it is lower than 9.0V, it will be considered as a
2 cell LiPo battery pack. Example: for a 8.0V NiMH battery pack used with a 2.6V/cell threshold, it will be considered
as a 2 cell LiPo battery pack and the low-voltage cut-off threshold will be 5.2V (2.6x2=5.2).
Using the optional Digital Program box (ORI65150) you can adjust custom values for the cutoff threshold. Unlike the
preset values, custom cutoff values are for the total battery voltage not individual cell voltage.
9Vortex R-Series Speed Controls
ENGLISH

Start mode “punch”
This parameter sets the initial throttle punch when the car accelerates. Level1 gives a very soft initial acceleration and
level 9 gives a very strong initial acceleration. When using levels 7, 8 or 9, you must use high power batteries. With
low power batteries, the battery might overload and cause poor performance or unexpected results.
Max Brake Force
This parameter adjusts the maximum breaking force. A higher value provides stronger braking, but it can also cause
the wheels to lock causing loss of control of the car.
Max Reverse Force
This parameter adjusts the maximum power when travelling in reverse.
Initial Brake Force (minimum brake)
This parameter adjusts the minimum amount of braking power when the brakes engage. The default value is equal to
the drag brake value. A high value can cause the wheels to lock immediately when the brake is used.
Neutral Range
This parameter adjusts the throttle sensitivity around the neutral point. A higher value means that the throttle will have
to be moved further for the car to move forward, backward or brake.
Timing
This parameter adjusts the motor drive current timing. More timing gives more performance but can lower efficiency
and cause damage to the motor and/or ESC by overload or overheating. Use with caution.
Overheating Protection
This parameter activates or deactivates the overheating protection. Output power will be cut-off if the temperature of
the ESC or the internal temperature of the motor goes (sensored only) over a factory preset value for 5 seconds.
When the protection is activated, the green LED flashes.
ESC overheating: green LED flashes x-x-x (single flash).
Motor overheating: green LED flashes as xx-xx-xx (double flash).
Please note that the motor overheating protection does not work with all brushless motor brands.
Motor Rotation
This parameter allows you to change the motor rotation direction.
LiPo cells
This parameter allows you to manually select the amount of cells inside the LiPo battery which is being used,
overriding the automatic detection.
Restore Default Settings
With the throttle in the neutral position, press and hold the “SET” key for 5 seconds, the red and green LED will flash
simultaneously indicating that the parameters have been reset to the factory default values.
SOFTWARE UPDATE
If available, updated software and recommended settings will be posted on our website www.teamorion.com.
To be able to update the ESC’s software you must purchase the optional digital programming box (ORI65150).
WARNINGS
- Do not let children use this product without the supervision of an adult.
- Never leave the ESC unsupervised while it is powered on.
- The ESC might get hot during use, be careful when handling it.
- Always disconnect the battery after use, do not store with the battery connected.
- Do not use near flammable materials.
- Do not expose to water or humidity.
- If the ESC has suspicious reactions, immediately disconnect the battery and discontinue use.
TROUBLESHOOTING
WARRANTY
Team Orion guarantees this product to be free from manufacturing and workmanship defects. The
warranty does not cover incorrect installation, components worn by use, or any other problem resulting
from incorrect use or handling of the product. No liability will be accepted for any damage resulting
from the use of this product. By the act of connecting and operating this product, the user accepts
all resulting liability. Is considered incorrect use:
• Failure to follow instructions.
• Improper use of the product (abusive use, out of spec, etc.).
• Failure to adapt settings for proper function (improper connections, wrong gearing, installation, setup, etc.).
• Overload, overheating (desoldering, melting, etc.).
• Running in inadequate conditions (damage or rust from rain, humidity, etc.).
• Improper maintenance (presence of dirt, etc.).
• Disassembly, modification by the user (modifying original connectors, wires, components, etc.).
• Mechanical damage due to external causes.
Symptom Possible cause Possible solution
Battery or connection problem.
Check battery and power connections, check
switch
Damaged switch
ESC switched ON, no motor function,
red LED lit.
Throttle radio signal problem
Check transmitter and receiver, check ESC
connection to receiver
Motor wiring error
System not compatible with the
car
If the red LED flashes, replace/recharge battery
If the green LED flashes, let ESC/motor cool
down, change setup to avoid overheating
Low power battery Use high power battery
Wrong gearing
Use shorter gearing, use slower motor or
change ESC setup
Check sensor cable connection between motor
and ESC
Sensors inside the motor are damaged, repair
or replace
The motor stutters and does not spin Motor wiring error
Damaged ESC
Check motor wiring and order
Contact support
Low voltage protection or
overheating protection system
activated
ESC switched ON, no motor function,
no audio tone.
ESC switched ON, no motor function,
two beeps tones with one second
pause.
Input voltage to high or too low
Check battery voltage
Motor cuts or stutters during
acceleration
With throttle at neutral, red and green
LED flash simultaneously
Issue with sensor signal
Motor runs in the wrong direction
Swap 2 of the 3 motor wires to reverse motor
rotation direction (SENSORLESS ONLY)
Use a different system to power your car.
Motor suddenly stops running
10 www.teamorion.com
ENGLISH

Start mode “punch”
This parameter sets the initial throttle punch when the car accelerates. Level1 gives a very soft initial acceleration and
level 9 gives a very strong initial acceleration. When using levels 7, 8 or 9, you must use high power batteries. With
low power batteries, the battery might overload and cause poor performance or unexpected results.
Max Brake Force
This parameter adjusts the maximum breaking force. A higher value provides stronger braking, but it can also cause
the wheels to lock causing loss of control of the car.
Max Reverse Force
This parameter adjusts the maximum power when travelling in reverse.
Initial Brake Force (minimum brake)
This parameter adjusts the minimum amount of braking power when the brakes engage. The default value is equal to
the drag brake value. A high value can cause the wheels to lock immediately when the brake is used.
Neutral Range
This parameter adjusts the throttle sensitivity around the neutral point. A higher value means that the throttle will have
to be moved further for the car to move forward, backward or brake.
Timing
This parameter adjusts the motor drive current timing. More timing gives more performance but can lower efficiency
and cause damage to the motor and/or ESC by overload or overheating. Use with caution.
Overheating Protection
This parameter activates or deactivates the overheating protection. Output power will be cut-off if the temperature of
the ESC or the internal temperature of the motor goes (sensored only) over a factory preset value for 5 seconds.
When the protection is activated, the green LED flashes.
ESC overheating: green LED flashes x-x-x (single flash).
Motor overheating: green LED flashes as xx-xx-xx (double flash).
Please note that the motor overheating protection does not work with all brushless motor brands.
Motor Rotation
This parameter allows you to change the motor rotation direction.
LiPo cells
This parameter allows you to manually select the amount of cells inside the LiPo battery which is being used,
overriding the automatic detection.
Restore Default Settings
With the throttle in the neutral position, press and hold the “SET” key for 5 seconds, the red and green LED will flash
simultaneously indicating that the parameters have been reset to the factory default values.
SOFTWARE UPDATE
If available, updated software and recommended settings will be posted on our website www.teamorion.com.
To be able to update the ESC’s software you must purchase the optional digital programming box (ORI65150).
WARNINGS
- Do not let children use this product without the supervision of an adult.
- Never leave the ESC unsupervised while it is powered on.
- The ESC might get hot during use, be careful when handling it.
- Always disconnect the battery after use, do not store with the battery connected.
- Do not use near flammable materials.
- Do not expose to water or humidity.
- If the ESC has suspicious reactions, immediately disconnect the battery and discontinue use.
TROUBLESHOOTING
WARRANTY
Team Orion guarantees this product to be free from manufacturing and workmanship defects. The
warranty does not cover incorrect installation, components worn by use, or any other problem resulting
from incorrect use or handling of the product. No liability will be accepted for any damage resulting
from the use of this product. By the act of connecting and operating this product, the user accepts
all resulting liability. Is considered incorrect use:
• Failure to follow instructions.
• Improper use of the product (abusive use, out of spec, etc.).
• Failure to adapt settings for proper function (improper connections, wrong gearing, installation, setup, etc.).
• Overload, overheating (desoldering, melting, etc.).
• Running in inadequate conditions (damage or rust from rain, humidity, etc.).
• Improper maintenance (presence of dirt, etc.).
• Disassembly, modification by the user (modifying original connectors, wires, components, etc.).
• Mechanical damage due to external causes.
Symptom Possible cause Possible solution
Battery or connection problem.
Check battery and power connections, check
switch
Damaged switch
ESC switched ON, no motor function,
red LED lit.
Throttle radio signal problem
Check transmitter and receiver, check ESC
connection to receiver
Motor wiring error
System not compatible with the
car
If the red LED flashes, replace/recharge battery
If the green LED flashes, let ESC/motor cool
down, change setup to avoid overheating
Low power battery Use high power battery
Wrong gearing
Use shorter gearing, use slower motor or
change ESC setup
Check sensor cable connection between motor
and ESC
Sensors inside the motor are damaged, repair
or replace
The motor stutters and does not spin Motor wiring error
Damaged ESC
Check motor wiring and order
Contact support
Low voltage protection or
overheating protection system
activated
ESC switched ON, no motor function,
no audio tone.
ESC switched ON, no motor function,
two beeps tones with one second
pause.
Input voltage to high or too low
Check battery voltage
Motor cuts or stutters during
acceleration
With throttle at neutral, red and green
LED flash simultaneously
Issue with sensor signal
Motor runs in the wrong direction
Swap 2 of the 3 motor wires to reverse motor
rotation direction (SENSORLESS ONLY)
Use a different system to power your car.
Motor suddenly stops running
11Vortex R-Series Speed Controls
ENGLISH

COPYRIGHT 2011 © TEAM ORION
/