Marmitek 20070419 User manual
- Category
- Security cameras
- Type
- User manual
This manual is also suitable for

Page is loading ...

3SD MEMORYCAM2™
SM10
AM12
LM12
UM7206
TM13MS13
EXTERNAL
MOTION DETECTOR / CONTACT
(NO/NC)
MARMITEK
X-10 SOLUTION
EXTERNAL MOTION DETECTOR
MARMITEK
X-10 SOLUTION
ALARM OUTPUT
DC ADAPTOR
ALARM
Fig. 7
Fig. 6D
Fig. 5
Fig. 6A
Fig. 6B Fig. 6C
Page is loading ...

5SD MEMORYCAM2™
ENGLISH
SD MEMORYCAM2
™
SAFETY WARNINGS
• To prevent short circuits, this product (except the outdoor camera) should only be used inside and
only in dry places. Do not expose the components to rain or moisture. Do not use the product close
to a bath, swimming pool etc.
• Do not expose the components of your system to extremely high temperatures or bright light sources.
• In case of improper use or if you have altered and repaired the product yourself, all guarantees will
expire. Marmitek does not accept any liability in the case of improper use of the product or when
the product is used for purposes other than specified. Marmitek does not accept responsibility for
additional damage other than covered by the legal product responsibility.
• This product is not a toy. Keep it out of children’s reach.
• Never open the product: The device may consist of parts carrying high voltage. The product should
only be repaired or serviced by a qualified repairman.
• Connect the adapter to the mains only after checking whether the mains voltage is the same as the
values on the identification tags. Never connect an adapter or power cord when it is damaged. In
that case, contact your supplier.
• Automatic switching devices provide comfort, but can also be dangerous. They can surprise people
or can ignite clothing hanging over an electric heat source. Please be careful and take appropriate
measures to avoid accidents.
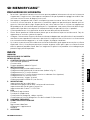
TABLE OF CONTENTS
PICTURES 2
SAFETY WARNINGS 5
INTRODUCTION 6
1. SET CONTENTS 6
Product description: 6
Features: 6
Product lay-out (see figure1): 6
2. INSTALLATION 8
Connecting the cameras: 8
Connecting the power adapters (see fig. 4): 8
Connecting to TV or monitor (see fig. 4): 8
Connecting to TV or monitor using a SCART adapter (option): 8
Connection to alarm: 8
Use of the external ‘trigger’ contact: 8
Insert SD card (not included): 9
3. SETTINGS 9
Setting time and date: 9
Setting motion detection ‘ON/OFF’: 9
Setting capture format photo/video: 10
Setting TV system NTSC/PAL: 10
4. USE OF THE SD MemoryCam2: 10
Record mode: 10
Play mode: 10
Delete pictures, videos and folders: 11
Delete all photos and videos from the SD card (formatting): 11
5. FREQUENTLY ASKED QUESTIONS 11
6. TECHNICAL DATA
11
Camera: 11
Video/Photo recorder: 12
Extra connection: 12
Memory: 12
7. OPTIONAL ACCESSORIES 12

6 © MARMITEK
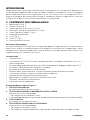
INTRODUCTION
Congratulations on your purchase of the Marmitek SD MemoryCam2™. Using this SD MemoryCam2,
you can record photos as well as videos onto a standard SD card (max. 2GB). This SD card can easily be
read on the SD recorder and a TV or on a PC. This way, the set can be employed widely for purposes such
as the surveillance of a guarded area. With images recorded on the SD card, you can always check who
has been there and when.
1. SET CONTENTS
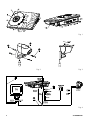
1x SD Recorder (Fig.1)
1x Colour camera (Fig.2)
1x Signal & DC cord (15 meters) (D/Fig.4)
1x DC power cord splitter (E/Fig.4)
1x A/V cable for video output (F/Fig.4)
1x Power adapter
2x Screws (B/Fig.2)
2x Anchors (C/Fig.2)
1x This user manual
Product description:
The SD MemoryCam2™ system includes one single channel digital event recorder and one outside colour
camera. It will automatically have image capture or video recording once motion is detected by software,
or manually by external alarm and will store it onto the SD card (not included).
Features:
• Auto electronic iris.
• LED illumination: 5 IR LEDs for extra night vision up to 1.5 metres in complete darkness.
• Composite video input and output connections, compatible with most CCTV cameras.
• Two video inputs, picture-in-picture monitoring.
• Software driven motion detection.
• Possibility of automatic recording on motion detection (with time and date).
• Live image replay in live mode.
• LED indication for motion detection mode.
• Recording onto SD card up to 2GB (SD card is not included).
• External alarm output and input connections.
• Easy to set up within minutes.
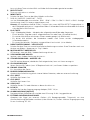
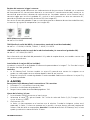
Product lay-out (see figure1):
1. OK SELECTION BUTTON:
To confirm/accept the option you select.
2. UP ARROW KEY/ MOTION DETECTION ON, OFF:
This button has got a double function.
1. To navigate upwards in the menu.
2. To switch motion detection ON/OFF when the SD recorder is on standby mode.
3. LEFT ARROW KEY:
To navigate to the left in the menu.
4. DOWN ARROW KEY/ IMAGE, VIDEO SWITCHING:
This button has got a double function.
1. To navigate downwards in the menu.
2. To switch between image and video when the SD recorder is in standby mode.
5. RIGHT ARROW KEY:
To navigate to the right in the menu.

7SD MEMORYCAM2™
ENGLISH
6. MENU BUTTON:
To enter the menu setting of the SD recorder.
7. MONITOR BUTTON:
To select live image reproduction.
Image 1/image 2/ image 1 in image 2 /image 2 in image 1 monitoring and switching (when two
cameras are connected).
Note:
- The SD recorder records only one selected picture. Therefore, while recording, never use the
picture-in- picture option.
- We do not recommend the use of picture-in-picture when motion detection is on.
8. PLAY BUTTON:
To review the captured pictures or videos.
Press it once to show the latest single image/video; (= reproduction mode)
Press it twice to show the last 6 shots; (= overview mode)
Press it three times to show the file folders by date; (= file folders mode)
Press it a fourth time to go back to the selected channel. (= live mode)
9. QUICK SHOT BUTTON/ DELETE:
This button has got a double function.
1. Press this button to take a quick shot manually.
2. Press this button to delete captured images from the SD card when SD recorder is in the standby
mode.
10. MOTION DETECTION INDICATOR LED:
LED flashes when picture capture is activated.
11. VIDEO CAPTURE ON LED:
LED flashes when video recording is activated.
12. POWER INDICATOR LED:
LED is on constantly when the SD recorder is switched on.
13. SD CARD SLOT:
Insert SD card (max. 2GB) to store the captured pictures/videos.
14. POWER SWITCH:
To turn the SD recorder on/off.
15. TRIGGER MODE:
To switch between motion captured by internal software or external triggering.
16. CH 1 INPUT:
Connection for camera 1.
17. CH 2 INPUT:
Connection for camera 2.
18. VIDEO OUTPUT:
Connection for TV.
19. DC IN 5V:
Connection for power adapter AC 100~240V, output 5VDC 1A.
20. ALARM OUTPUT:
An NO (normally open) output triggering signal will activate external alarms/devices for 10 seconds.
For connections, see specifications of your alarm system.
21. EXTERNAL TRIGGER INPUT:
Accepts triggering signal from external devices such as motion sensors or door contacts to activate
the SD recorder and the image/video recording.
Note: Maximum voltage for external trigger: DC 24V

8 © MARMITEK
2. INSTALLATION
Connecting the cameras:
• Secure the camera at any suitable wall that you desire (fig. 2, 3 and 4).
• Connect the 4 pin DIN plug of signal & DC cord ‘D’ to the camera (fig.4).
•
Connect the yellow RCA jack of signal & DC cord ‘D’ to the A/V terminal ‘CH1’ of the SD recorder (fig.4).
Connecting the power adapters (see fig. 4):
• Connect the DC plug of DC power cord splitter ‘E’ to ’DC IN’ connector of the SD recorder.
• Connect the female DC connector (plug with hole connector) of signal & DC cord ‘D’ to one of the
two remaining male DC plugs (plug with pin connectors) of DC power cord splitter ‘E’.
• Connect the female DC connector of DC power cord splitter ‘E’ to the DC adaptor.
Connecting to TV or monitor (see fig. 4):
• Connect the yellow RCA jack of A/V cable for video output ‘F’ to the A/V terminal on the back of the
SD recorder and connect the other yellow plug to the video-in connector of your TV.
• Connect the white RCA jack of signal & DC cord ‘D’ to the audio input of your TV.
Connecting to TV or monitor using a SCART adapter (option):
When your TV doesn’t have an RCA A/V input but it does have a SCART connector, then you can connect
the SD recorder using an optionally available SCART adapter (Art. no: 27023 Marmitek SCART adapter
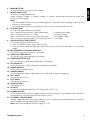
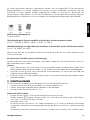
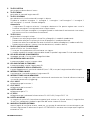
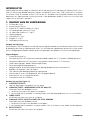
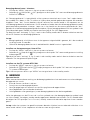
Receiver). (Please see fig. 5 for connection).
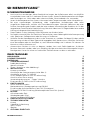
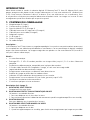
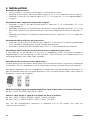
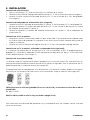
Connection to alarm output:
The NO (normally open) outgoing signal can activate an external alarm (the Normally Open contact closes for
about 10 sec. in case of an alarm). See the specifications of your alarm system for the connections (see fig. 6D).
Upon that, in combination with the Marmitek X-10 components, you can use this connection to switch a
(outside) light for example. Requirements for a simple connection are
(see fig. 6A)
:
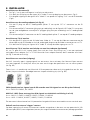
SM10 (converts the SD recorder signal into a X-10 signal and puts it on the mains)
Art nr. SM10: EU: 08943, UK: 09552
AM12 or LM12 (receives the X-10 signal and switches the lights on or off)
Art nr. AM12: G: 08915, U:08978, I:09052, F:08916, CH:09249
Art nr. LM12: G: 08910, U:08977, I:09051, F:08911, CH:09248
For more information on the X-10 protocol and the use of it, visit our website http://www.marmitek.com.
Use of the external ‘trigger’ contact:
Every alarm contact can be connected to this input, in the form of a potential-free NO (normally open)
or NC (normally closed) contact, e.g. magnetic door/window contacts, motion detectors, etc. Multiple
detectors can be connected to the trigger contact, to activate the SD recorder and to start a recording
(serial for NC, parallel for NO alarm contacts)
(see fig. 6C)
.
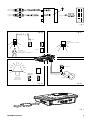
For example, to have the SD recorder start recording due to a signal from an external Marmitek motion
detector, you will need the following components
(see fig. 6B)
:
SM10 AM12 LM12

9SD MEMORYCAM2™
ENGLISHDEUTSCH
MS13 (detects motions).
Art nr. EU 09053
TM13 (receives signal from MS13 and puts it on the mains).
Art nr.: G: 09196, U: 09198, I: 09442, F: 09197, CH: 09574
UM7206 (receives signal from the mains and sends it to the SD recorder)
Art.nr: EU: 08944, UK: 09572
For more information on the X-10 protocol and the use of it, visit our website http://www.marmitek.com.
Insert SD card (not included):
Insert the SD card into the SD recorder, such as illustrated in fig. 7. The SD card will remain sticking out
of the SD recorder about 5mm.
Beware:
• The SD MemoryCam2 will function without the SD card too, but then it will not be possible to save
the images, in that case images are only displayed Live on the TV or monitor.
•
Do not remove the memory card while in recording mode; it may damage the memory card and image data.
3. SETTINGS
You need a TV or monitor for the settings of the SD MemoryCam2.
• Put on your TV and switch it to the video channel.
• Insert the power plug of the SD recorder into the power socket.
• Put the ‘ON/OFF’ switch on ‘ON’.
Setting time and date:
• Press ‘MENU’ button to enter the setup mode.
• Select this icon and press ‘OK’ button. Use ‘UP’, ‘DOWN’, ‘RIGHT’ and ‘LEFT’ arrow keys to adjust
date and time.
• Confirm by pressing ‘OK’.
The SD MemoryCam2 has an on screen clock which will print the date and time on recorded images
when movement is detected. During the reading of images on a PC, the date and time shall not be
displayed but rather a part of the file name. Every day has a new folder.
Note: The programmed time and date can only keep 12 hours when Mains is off i.e. when the power
adapter is unplugged.
Setting motion detection ‘ON/OFF’:
• Press ‘MENU’ button to enter setup mode.
• Select this or this icon and press ‘OK’ button to switch motion detection ‘ON’ or ‘OFF’.
When ‘motion detection’ is ‘ON’, the system will enter ‘self-learning mode’. The upper-left icon will flash
automatically for about 60 seconds. The ‘self-learning mode’ means the software will learn the current
camera status to minimize false triggering. The SD recorder will enter ‘self-learning mode’ every time
MS13
TM13
UM7206

10 © MARMITEK
when you turn the motion detection on. Don’t walk through the detection area when in ‘self-learning
mode’, because it will lower the detection sensitivity. When it triggers, the icon will become green and
a picture (jpg) or video (AVI) will be taken.
Note: ‘UP ARROW’ key (2, fig. 1) also functions as a direct assess for setting motion detection mode ‘ON’
and ‘OFF’ when the SD recorder is in standby mode.
Note:
• Motion detector will always be on when the appliance has been switched off, this is the SD recorder’s
default setting.
• Don’t use the motion detector when the picture-in-picture function is switched on too.
Setting capture format photo/video:
• Press ‘MENU’ button to enter setup mode.
• Select this or this icon and press ‘OK’ button to confirm the selected format.
Note: ‘DOWN ARROW’ key (4, fig. 1) also functions as a direct assess for selecting the format of photo
or video, when the SD recorder is in standby mode.
Setting TV system NTSC/PAL:
• Press ‘MENU’ button to enter setup mode.
• Select this or this icon and press ‘OK’ to switch TV system NTSC (America) or PAL (Europe).
Note: In setup mode, press ‘MENU’ to return to standby mode.
4. USE OF THE SD MEMORYCAM2
Record mode:
In order to prevent and avoid false triggers, we recommend:
• Do not aim camera at the sun.
• Aim away from constant moving objects.
• Avoid mirror and reflected light from bright surfaces.
• Avoid areas which have shadow variation.
• Bright areas will be more sensitive than dark areas.
When memory is full, the icon that is next to the motion detection icon will become red and the memory
will overlap (according to the FIFO principal ‘First in-First out’).
Note: Always restart the recorder when system malfunctions or crashes.
Play mode:
The pictures stored on the SD card can’t be displayed on general digital cameras. To view the recorded
images using the SD recorder, take the following steps.
1. Auto single- picture review:
Press ‘PLAY’ button to review captured images or videos. Press ‘RIGHT’ or ‘LEFT ARROW’ key to start
the slide show program to forward or reverse the pictures automatically. Press button again to stop
and stay at the picture you want to review. Press ‘RIGHT’ or ‘LEFT ARROW’ key again to continue
the slide show .
The date/time display may be hidden when you press on the ‘UP ARROW’ key in the play mode. Press
on this button again to make the date and time code visible again.
2. Six-picture review:
When the SD recorder is in the reproduction mode, press ‘PLAY’ to enter the overview mode. Use
‘UP’, ‘DOWN’, ‘RIGHT’ and ‘LEFT ARROW’ keys to select the picture you wish to review and then
press ‘OK’ to open it. Press ‘PLAY’ again to return to the overview mode.

11SD MEMORYCAM2™
ENGLISH
3. File folders mode:
When the SD recorder is in overview mode, press ‘PLAY’ button to enter file folders mode. Use arrow
keys to select the folder you want to review and then press ‘OK’ to open it.
Press ‘PLAY’ again to return to file folders mode.
Delete pictures, videos and folders:
Press ‘PLAY’ button to enter reproduction mode. Press ‘RIGHT’ or ‘LEFT ARROW’ key to start the slide
show. Press ‘OK’ to stop and stay at the picture you want to delete. Then press ‘ (QUICK SHOT)’
button, select ‘YES’ and press ‘OK’ button to delete.
When the SD recorder is in the reproduction mode, press ‘PLAY’ to enter overview mode and then press
‘PLAY’ button again to enter file folders mode. Use ‘UP’ and ‘DOWN ARROW’ keys to select the file folder
you want to delete. Then press ‘ (QUICK SHOT)’ button, select ‘YES’ and press ‘OK’ to delete.
Note: It may take a while to process when deleting folders if there are too many photos/videos in
folders.
Delete all photos and videos from the SD card (formatting):
Press ‘PLAY’ button to enter reproduction mode, and press ‘PLAY’ again to enter overview mode. Press
‘PLAY’ button once again to enter file folders mode. Press ‘ (QUICK SHOT)’ button, select ‘YES’ and
press ‘OK’ to delete all photos and videos.
Note: When you are in reproduction, overview or file folders mode, the SD recorder will return to live
mode automatically after 3 minutes if no functional keys are pressed.
5. FREQUENTLY ASKED QUESTIONS
Can I connect more than one camera to the SD recorder?
Basically, any video camera (max. 2) that uses a composite video signal, such the Marmitek MegaCam1™
colour camera, can be connected onto the SD recorder. Art no: 09635 is suitable for this (in that case the
extra camera must use its own power supply).
Do you still have questions? Please check out www.marmitek.com for more information.
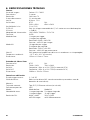
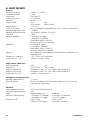
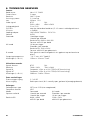
6. TECHNICAL DATA
Camera:
Image sensor: Colour 1/3” CMOS
Camera preset focus: 3 meters.
Resolution: 380 TV lines.
Scanning system: 2:1 interline.
Lens F6.0mm F2.0
Video signal NTSC PAL
510H x 492V 628H x 582V
Min. illumination 3 Lux (F1.2)
5 IR LED For extra night vision up to 1.5 metres
S/N Ratio: > 42dB(A)
Power adapter 100-240VAC 50/60Hz 5V DC/1A
Consumption: 0.65A
IP value IP44, splash waterproof , for mounting outside in a sheltered place
Ambient temperature: - 10° C to + 40° C (operation)
Dimensions: 125mm x 112mm x 72mm

12 © MARMITEK
Video/Photo recorder:
Signal format NTSC PAL
Resolution 704H x 240V 704H x 284V
Signal IN Composite 1.0Vp - p ± 10% 75Ω (RCA terminal x 2)
Signal UIT Composite 1.0Vp - p ± 10% 75Ω (RCA terminal x 1)
Dimensions 209mm x 134mm x 52mm
Extra connection:
EXT. trigger input 2 - 24V DC
Alarm output
Relay open circuit (NO: normally open, closed when detecting movement)
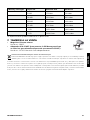
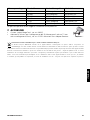
Memory:
Memory card type SD™ max. 2GB (not included)
Compression format JPEG
Modes Photo mode AVI mode
Recording speed 1 frame per sec 5 frames per sec
1 frame per trigger 10 sec. per trigger
Resolution DPI 640H x 480V 320H x 240V
±85 KB per frame ±640 KB per event
Memory card type SD card Photo mode AVI mode
32 MB 376 Pictures 50 Events
128 MB 1504 Pictures 200 Events
256 MB 3008 Pictures 400 Events
512 MB 6016 Pictures 800 Events
1 GB 12032 Pictures 1600 Events
2 GB 24064 Pictures 3200 Events
Specifications may be modified without prior notice.
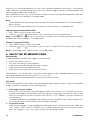
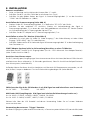
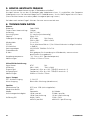
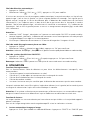
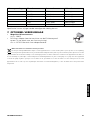
7. OPTIONAL ACCESSORIES
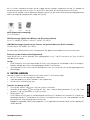
• MegaCam1 colour camera
Art nr.: 09635
• RCA-SCART adapter (to connect the SD Memorycam2 to a TV
with SCART connection)
Art. nr.: 027023 Marmitek SCART adapter Receiver
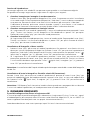
Environmental Information for Customers in the European Union
European Directive 2002/96/EC requires that the equipment bearing this symbol on the product and/or its packaging must not
be disposed of with unsorted municipal waste. The symbol indicates that this product should be disposed of separately from
regular household waste streams. It is your responsibility to dispose of this and other electric and electronic equipment via designated
collection facilities appointed by the government or local authorities. Correct disposal and recycling will help prevent potential negative
consequences to the environment and human health. For more detailed information about the disposal of your old equipment, please
contact your local authorities, waste disposal service, or the shop where you purchased the product.
MegaCam1
Page is loading ...
Page is loading ...
Page is loading ...
Page is loading ...
Page is loading ...
Page is loading ...
Page is loading ...
Page is loading ...
Page is loading ...
Page is loading ...
Page is loading ...
Page is loading ...
Page is loading ...
Page is loading ...
Page is loading ...
Page is loading ...
Page is loading ...
Page is loading ...
Page is loading ...
Page is loading ...
Page is loading ...
Page is loading ...
Page is loading ...
Page is loading ...
Page is loading ...
Page is loading ...
Page is loading ...
Page is loading ...
Page is loading ...
Page is loading ...
Page is loading ...
Page is loading ...
Page is loading ...
Page is loading ...
Page is loading ...
Page is loading ...
Page is loading ...
Page is loading ...
Page is loading ...
Page is loading ...
Page is loading ...
Page is loading ...
Page is loading ...
Page is loading ...
Page is loading ...
Page is loading ...
Page is loading ...
Page is loading ...
Page is loading ...

62 © MARMITEK
DECLARATION OF CONFORMITY
Hereby, Marmitek BV, declares that this SD MemoryCam2 is in compliance with the essential
requirements and other relevant provisions of the following Directives:
Council Directive 89/336/EEC of 3 May 1989 on the approximation of the laws of the Member States relating to electromagnetic
compatibility
Council Directive 73/23/EEC of 19 February 1973 on the harmonization of the laws of Member States relating to electrical equipment
designed for use within certain voltage limits
Hiermit erklärt Marmitek BV die Übereinstimmung des Gerätes SD MemoryCam2 den grundlegenden
Anforderungen und den anderen relevanten Festlegungen der Richtliniën:
Richtlinie 89/336/EWG des Rates vom 3. Mai 1989 zur Angleichung der Rechtsvorschriften der Mitgliedstaaten über die elektromagnetische
Verträglichkeit
Richtlinie 73/23/EWG des Rates vom 19. Februar 1973 zur Angleichung der Rechtsvorschriften der Mitgliedstaaten betreffend elektrische
Betriebsmittel zur Verwendung innerhalb bestimmter Spannungsgrenzen
Par la présente Marmitek BV déclare que l’appareil SD MemoryCam2 est conforme aux exigences
essentielles et aux autres dispositions pertinentes de la directives:
Directive 89/336/CEE du Conseil du 3 mai 1989 concernant le rapprochement des législations des États membres relatives à la compatibilité
électromagnétique
Directive 73/23/CEE du Conseil, du 19 février 1973, concernant le rapprochement des législations des États membres relatives au matériel
électrique destiné à être employé dans certaines limites de tension
Marmitek BV declara que este SD MemoryCam2 cumple con las exigencias
esenciales y con las demás reglas relevantes de la directriz:
Directiva 89/336/CEE del Consejo de 3 de mayo de 1989 sobre la aproximación de las legislaciones de los Estados Miembros relativas a
la compatibilidad electromagnética
Directiva 73/23/CEE del Consejo, de 19 de febrero de 1973, relativa a la aproximación de las legislaciones de los Estados Miembros sobre
el material eléctrico destinado a utilizarse con determinados límites de tensión
Con ciò, Marmitek BV, dichiara che il SD MemoryCam2 è conforme ai requisiti essenziali ed altre
disposizioni relative alla Direttiva :
Direttiva 89/336/CEE del Consiglio del 3 maggio 1989 per il ravvicinamento delle legislazioni degli Stati Membri relative alla compatibilità
elettromagnetica
Direttiva 73/23/CEE del Consiglio, del 19 febbraio 1973, concernente il ravvicinamento delle legislazioni degli Stati Membri relative al
materiale elettrico destinato ad essere adoperato entro taluni limiti di tensione
Bij deze verklaart Marmitek BV, dat deze SD MemoryCam2 voldoet aan de essentiële eisen en aan de
overige relevante bepalingen van Richtlijnen:
Richtlijn 89/336/EEG van de Raad van 3 mei 1989 betreffende de onderlinge aanpassing van de wetgevingen van de Lid-Staten inzake
elektromagnetische compatibiliteit
Richtlijn 73/23/EEG van de Raad van 19 februari 1973 betreffende de onderlinge aanpassing van de wettelijke voorschriften der Lid-Staten
inzake elektrisch materiaal bestemd voor gebruik binnen bepaalde spanningsgrenzen
MARMITEK BV - P.O. BOX 4257 - 5604 EG EINDHOVEN – NETHERLANDS

63SD MEMORYCAM2™
Copyrights
Marmitek is a trademark of Marmidenko B.V. , SD MemoryCam2 is a trademark of Marmitek B.V.
All rights reserved.
Copyright and all other proprietary rights in the content (including but not limited to model numbers, software, audio, video, text and
photographs) rests with Marmitek B.V. Any use of the Content, but without limitation, distribution, reproduction, modification, display
or transmission without the prior written consent of Marmitek is strictly prohibited. All copyright and other proprietary notices shall be
retained on all reproductions.
Page is loading ...
-
 1
1
-
 2
2
-
 3
3
-
 4
4
-
 5
5
-
 6
6
-
 7
7
-
 8
8
-
 9
9
-
 10
10
-
 11
11
-
 12
12
-
 13
13
-
 14
14
-
 15
15
-
 16
16
-
 17
17
-
 18
18
-
 19
19
-
 20
20
-
 21
21
-
 22
22
-
 23
23
-
 24
24
-
 25
25
-
 26
26
-
 27
27
-
 28
28
-
 29
29
-
 30
30
-
 31
31
-
 32
32
-
 33
33
-
 34
34
-
 35
35
-
 36
36
-
 37
37
-
 38
38
-
 39
39
-
 40
40
-
 41
41
-
 42
42
-
 43
43
-
 44
44
-
 45
45
-
 46
46
-
 47
47
-
 48
48
-
 49
49
-
 50
50
-
 51
51
-
 52
52
-
 53
53
-
 54
54
-
 55
55
-
 56
56
-
 57
57
-
 58
58
-
 59
59
-
 60
60
-
 61
61
-
 62
62
-
 63
63
-
 64
64


Marmitek 20070419 User manual
- Category
- Security cameras
- Type
- User manual
- This manual is also suitable for
Ask a question and I''ll find the answer in the document
Finding information in a document is now easier with AI
in other languages
- italiano: Marmitek 20070419 Manuale utente
- français: Marmitek 20070419 Manuel utilisateur
- español: Marmitek 20070419 Manual de usuario
- Deutsch: Marmitek 20070419 Benutzerhandbuch
- Nederlands: Marmitek 20070419 Handleiding
Related papers
-
Marmitek Marine Radio um7206 User manual
-
Marmitek OBSERVER25 Owner's manual
-
-
-
Marmitek easy icon 10rf User manual
-
Marmitek TM13 F User manual
-
-
-
Marmitek 300 User manual
-
Other documents
-
 Cables Direct 2SSB-2WAY Datasheet
-
Philips SWV4543S/10 User manual
-
Philips SWV4541S/10 User manual
-
Philips SWS4683S/10 User manual
-
DEXAPLAN DV 622 - 1 DU 9-11-2008 User manual
-
Philips SWS7683S User manual
-
Philips SWV4562S User manual
-
Abus TVAC18010A User guide
-
Cambridge Audio 640Hazur User manual
-
Salora CDC3350FD User manual
