Page is loading ...

SPECIFICATIONS
HB-480R2 Power Module
Voltages . . . . . . . . . . . . . . . . . . . . . . . . . .347/480VAC, 60Hz
Load Requirements
@ 480VAC, 60Hz . . . . . . . . . . . . . . . . . . .1200W ballast
@ 347VAC, 60Hz . . . . . . . . . . . . . . . . . . .1200W ballast
US Patents: . . . . . . . . . .4,787,722 • 4,874,962 • 5,124,566
* x indicates Control Module/Lens number. See Coverage Guide.
H B - 4 8 0 R 2 - x *
High Bay • Line Vo l t age • Pa s s i ve Infra r ed
O c cupancy Sensor Power Module
IMPORTANT START-UP INFORMATION
When the control module is installed and power is connected, it may take up
to a minute before the lights turn on due to a sensor warm-up period required
during initial power-up. This occurs during installation or after a power failure
of 5 minutes or more only.
If the power module is installed and powered, and no control module is in
place, the load comes on and remains on until the control module is installed.
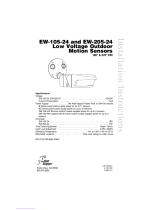
DESCRIPTION AND OPERATION
The HB-480R2-x occupancy sensors turn lighting on and off based on
occupancy. They are designed for warehouse and high bay applications.
Careful consideration must be given to sensor placement. Avoid placing the
sensor where shelving or other obstructions may block the sensor’s line of
sight.
The HB sensors are modular and are made up of two parts, a Power Module
(HB-480R2) and a Control Module (HB-x). The HB-480R2 operates at 480VAC
or 347VAC, 60 Hz.
COVERAGE
Coverage patterns, density and range, are determined by the type of Control
Module attached to the HB-480R2.
For a complete description of each Control Module’s coverage pattern, see
the HB-x Control Module COVERAGE GUIDE.
Fig 1: Ceiling Mount Assembly Fig 2: Fixture Mount Assembly
Control Module
(HB-2 shown)
HB-480R2
Power Module
Junction Box
Fixture
CP-1 J-Box
Adapter
Plate
1. Connect the existing wires to the sensor
leads.
• Do not allow bare wire to show.
• Make sure all connections are secure.
2. Remove the Control Module from the
HB-480R2 as shown in Fig. 7.
3a. Ceiling Mount (See Fig. 1):
• Secure the CP-1 J-Box adapter plate
to the junction box.
• Attach the sensor to the adapter plate
using four #6 x
3
/
4
” self tapping screws.
3b. Acoustic Tile or Fixture (See Fig. 2):
• Cut a hole in the mounting surface
using the “HB Cut-Out” template.
• Use four #6 x
3
/
4
” self tapping screws
to attach the sensor to the mounting
surface.
4. Reconnect the Control Module onto the
HB-480R2 as shown in Fig. 4.
• CAREFULLY align the four connector
pins on the HB-480R2 with the
receptacles on the Control Module.
• Snap the HB-480R2 Power Module to
the Control Module using firm pressure
until they click into position at the top
and bottom.
5. Restore power from the circuit breaker.
INSTALLATION
Fig 3: Fl ying lead
c o n n e c t i o n s
Fig 4: Connecting the
C o n t r ol Module to the
H B -480R2 Power Module.
CAUTION
TURN THE POWER OFF AT THE CIRCUIT
BREAKER BEFORE INSTALLING THE SENSOR.
Fig 5: 4 8 0 V AC wiring
WIRING
Fig 6: 3 4 7 V AC wiring
MOUNTING THE SENSOR

TROUBLESHOOTING
During the sensor warm-up period, which can last up to a minute after power
is applied to the Control Module (or after a power outage of 5 minutes or
more), the load can be either on or off, depending on the status of the relay
before the sensor was powered down. After warm-up, the sensor will open or
close the relay to correspond to the occupancy status of the room.
To quickly test the unit, turn the time delay to minimum. Wait for the warm-
up period to end. Move out of the sensor’s view. Lights should turn off after
30 seconds. Move into the sensor’s view. The sensor’s Red LED should blink
and the lights should turn on.
Control Module Connector Pins
The connector pins supply power and relay operation signals between the
modules. Always check to make sure that the modules are properly seated
and securely snapped together. If the pins are not aligned correctly and then
excessive force is used to snap the modules together, a pin can bend causing
the sensor to malfunction. Gently bend any bent pin back into proper
alignment before reconnecting the modules. Re-test to see if the problem is
solved. If the problem persists, go on to the next troubleshooting step.
Red LED on Control Module does not blink:
1. Remove Control Module and see Control Module Connector Pins, on the
previous page.
2. Check sensor wire connections. Verify the neutral wire is tightly secured.
Red LED blinks but lights do not turn on:
1. Remove Control Module and see Control Module Connector Pins, on the
previous page.
2. Check all sensor wire connections. Verify the load wire is tightly secured.
3. Check power connections to the light fixture.
4. If the control module has the light level feature (model number ends in
“D”), cover the sensor lens to simulate darkness. If the light turns on, the
light level setting needs to be adjusted. If set for minimum, more than 10fc
of ambient light causes the lights to be held off. See ADJUSTMENT: Light
Level Feature in the COVERAGE GUIDE.
Lights will not turn off:
1. If there is no motion in the sensor’s view but the red LED blinks, look for
an air blower nearby. Turn off the blower, or move the sensor.
2. Remove Control Module and see Control Module Connector Pins, on the
previous page. Before reconnecting the module, go to step 3.
3. Verify time delay. The time delay can be set from 30 seconds to 30
minutes. Ensure that the time delay is set to the desired delay and that
there is no movement within the sensor’s view for that time period.
4. Check sensor wire connections. Verify load and neutral wires are secure.
2800 De La Cruz Boulevard, Santa Clara, CA 95050
Technical Support: 800.879.8585 • 972.578.1699
www.wattstopper.com
04407r3 7/2005
WARRANTY INFORMATION
Watt Stopper/Legrand warranties its products to be free of defects in materials
and workmanship for a period of five (5) years. There are no obligations or
liabilities on the part of Watt Stopper/Legrand for consequential damages
arising out of, or in connection with, the use or performance of this product or
other indirect damages with respect to loss of property, revenue or profit, or
cost of removal, installation or reinstallation.
ORDERING INFORMATION
+
Add -C to the model number if you need a sensor designed for colder
ambient temperature applications: -4° to 131°F (-20° to 55°C).
All units are White.
Catalog # Description
HB-480R2-x
+
High bay, line voltage occupancy sensor consists of:
• HB-480R2 Power Module, 347/480VAC, 60Hz
• An HB Control Module, x indicates the Control Module
number (see COVERAGE GUIDE)
CP-1 4”x 4” junction box and adapter plate
MB-1 L-Plate industrial mounting bracket
MB-2 J-Plate HID mounting bracket
Visit our website for FAQs: www.wattstopper.com
ADJUSTMENT
All adjustments are made on the control module. Please see the COVERAGE
GUIDE for instructions on accessing the adjustment controls and setting the
adjustable features.
PASSIVE INFRARED SENSING IN WAREHOUSES
Warehouses can have ambient temperature variations that may affect sensor
detection and coverage areas. When specifiying high mount sensors, take
into account the temperature at the coverage location. High temperatures at
the covered area (above 89-92°F) reduce the detection zone of the sensor.
Consider adding more sensors if the ambient temperatures are expected to
be high. Additionally, high floor level temperature may require larger
movement for detection. In some cases, sensors mounted above 40’ may only
detect large heat signatures such as forklift trucks.
/