2
110497
1
2
3
4
5
6
7
8
Fig. 3
Installation
CAUTION: Make sure that the mounting surface is strong
enough to support the operating weight of the cooler when in
use. (For operating weight, see Specification Table.)
CAUTION: Never start cooler until installation is complete
and unit has been tested for rigidity.
CAUTION: This unit must be installed at a height of 10 feet
or greater from the floor.
Electrical Installation
NOTE: Local building code regulations must be observed.
WARNING: Disconnect all electrical service that will be
used for this unit before you begin the installation.
• Connect electrical. Cooler must be connected to the proper line
current, voltage and cycle, as indicated on the decal located at the
electrical service entrance. Connecting improper voltage to motor
will void motor warranty. See the wiring diagrams (figures 8 & 9)
on page 3 for wiring electrical connections.
NOTE: A separate 120 Volt, 60 Hz, 1 phase pump electrical circuit
is required to maintain the integrity of the GFCI pump protection
and to maintain the U.L. Listing of the evaporative cooler.
• Wire gage. The horse power, voltage, cycle, phase, current, and
length of wire required from switch to motor will determine the
gauge of wire to be used.
• Switches. Larger horsepower and three phase applications require
switches (not supplied) of proper current capacity and should be
installed by a competent electrician.
• Power Supply box. The
power supply box is lo-
cated in the upper inside
of the divider channel.
Remove the cover to ac-
cess wiring. (Fig. 1).
Connect wiring in box to
power supply wiring as
per wiring diagrams.
WARNING: Make sure that cooler cabinet is properly
grounded to a suitable ground connection for maximum safety.
• Connect water supply line. A water supply line should be run to
the cooler to supply an adequate amount of cold water to the unit.
The amount of water each cooler uses will depend on the weather
conditions in your area and the size of your unit. The hotter and
dryer your climate and the higher the capacity of your unit, the
more water will evaporate. For example: An FAD248 unit with a
2 hp motor will use approximately 85 gallons per hour in a hot and
dry climate like Las Vegas on a 105°F day with 10% humidity. The
same unit in a cooler climate with 95°F and 20% humidity would
use approximately 63 gph.
NOTE: Do not connect the water supply line to any soft water
applications.
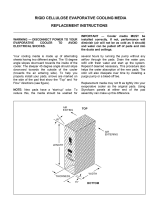
• Install float valve and fill pan. Refer to Fig. 3. Remove items 1,
2, 3, and 4. Insert float body (5) through hole in back post panel as
shown. Install washer (1) and nut
(2). Tighten to keep float from
turning. Place nut (4) and ferrule
(3) on water supply line. Con-
nect to float fitting and tighten until
water tight. Loosen screw (6) and
adjust rod (7) until water level is
within 1" of top of reservoir.
Tighten screw (6). Slide float
shield (8) up over float body (5)
until it snaps into place.
• Bleed-Off. Use of the bleed-off kit is recommended to prevent
scale build up by bleeding off small amounts of circulating water
during operation. Do not add any type of water treatment chemi-
cals to the water.
Maintenance
WARNING: Before doing any maintenance be sure to dis-
connect from power source. This is for your safety.
Spring Start-Up
• Check belt tension. A 3 lb. force
should deflect the belt 3/4 inches
(see Fig. 4). Readjust belt if
needed.
To adjust belt, loosen the two
hinge nuts and the locking nut on
the adjusting bolt as shown in
figure 5. Loosen or tighten the
adjustment nut until the belt is
at the right tension. Lock the
motor plate in place by tighten-
ing the locking nut and then
tighten the 2 hinge nuts.
• Grease bearings. The shaft
bearings in this unit should be
greased once a year with a good
grade of ball bearing grease.
• Clean pads. A clean pad is more absorbent, efficient and will give
more cool air. Annually, or when required, using a garden hose with
nozzle, back wash to clean out the openings, then clean off the inlet
face any scale or other obstruction to the passages. Slight scraping
may be required to remove hardened scale.
Rubber Washer
Overflow Pipe
Nipple
Bottom Pan
Nut
Fig. 2
Fig. 4
3 Lb.
3/4 Inches
Water Connection
• Pumps. Plug the pumps into the pump receptacles. There are
metal cord retaining clips on the corner post and motor cross braces
for retaining the pump cords.
CAUTION: The pump cord must be secured to prevent it
from dropping into water reservoirs or contacting moving com-
ponents.
• Install overflow assembly. Remove
nut and place nipple through the hole
in the pan, with the rubber washer
between the pan and the head of the
drain nipple (Fig. 2). Screw on nut
and draw up tight against bottom of
pan. Insert overflow pipe in nipple
to retain water. Overflow pipe may
be removed to drain pan when neces-
sary. A garden hose may be screwed on the drain nipple to drain
water away from your unit.
Hinge
Nut
Adjustment Nut
Lock-Nut
Hinge
Nut
Fig. 5
Cover
Power
Supply
Box
Fig. 1