Page is loading ...

WARNING
WE RECOMMEND INSTALLATION OF THIS LIGHTING FIXTURE BE DONE BY A LICENSED ELECTRICIAN.
WARNING *** SWITCH OFF THE MAIN ELECTRICAL SUPPLY FROM THE MAIN FUSE BOX/CIRCUIT
BREAKER BEFORE INSTALLATION.
INSPECT ITEM CAREFULLY BEFORE ATTEMPTING TO INSTALL. IF THERE IS ANY DAMAGE OR
OBVIOUS DEFECT, DO NOT INSTALL. ITEM MAY NOT BE RETURNED ONCE IT HAS BEEN INSTALLED.
CARE AND MAINTENANCE
Model#: JYL7900A JYL7900B
Product Dimensions: 27.25"W x34"-64"H
To clean the outside of the fixture, use a dry or slightly dampened clean cloth (use clean water, never a solvent) to wipe
the surface of the fixture.
To clean the inside of the fixture, first disconnect power to the fixture by turning off the circuit breaker or by removing the
fuse at the fuse box. Next, use a dry or slightly dampened clean clorth (use clean water, never a solvent) to wipe the
interior surface of the fixture.
Do not use any cleaners with chemical, solvents or harsh abrasives. Use only a dry soft cloth to dust or wipe carefully.
NOTICE& IMPORTANT SAFETY INSTRUCTIONS
* Please make sure that you have all parts indicated before you begin assembly of this item
* This item should be assembled on a soft surface to prevent scratching the finish during assembly
* To reduce the risk of fire, electrical shock or injury to persons or property, please follow the guideline below for safe use
and installation
*The external flexible cable or cord of this lamp cannot be replaced
If the cord is damaged, the lamp shall be destroyed
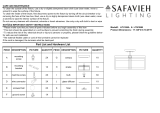
Part List and Hardware List
PIECE DESCRIPTION PICTURE QUANTITY PIECE DESCRIPTION PICTURE QUANTITY
AMounting
bracket
1X J Plain washer 1X
BGreen ground
screw
1X K Sleeves 1X
COutlet box
screw
2X L Longer stem 1X
D Wire nut 3X M Fixture body 1X
ECanopy unit 1X N Shorter stem 1X
F6" rod 2X O Sleeves 1X
G12" rod 2X P Decorative
finial
1X
HKnurled nut 1X Q Light bulb 8X
IMetal cup 1X R Canopy nut 2X
1/2

PREPARATION
Before beginning assembly of product, make sure all parts are present. Compare parts with package contents list and
hardware contents list. If any part is missing or damaged, do not attempt to assemble the product.
Estimated Assembly Time: 20 minutes.
1. Attach the mounting bracket (A) to the junction box with outlet box screw (C).
2. Spread the arms on the fixture body (M), adjust them to a proper position.
3. Raise the long stem (L) thread to the fixture body (M), then install the sleeves (K), plain washer (J) and
metal cup (I), finally secure with knurled nut (H).
Connect, Hot, Black or Red Outlet Supply Wire to:
Connect, Neutral, White Outlet Supply Wire to:
Black
White
* Parallel Cord (round & smooth)
* Parallel Cord (square & ridged)
Clear, Brown, Gold or Black without Tracer (colored stripes)
Clear, Brown, Gold or Black with Tracer (colored stripes)
Insulated Wire (not green) with copper metal conductor
Insulated Wire (not green) with Silver metal conductor.
*Note: When parallel wire ( SPT I & SPT II ) is used. The neutral wire is square shaped
and ridged and the hot wire will be round in shape and smooth. ( See Illustration on left. )
Grounding Instructions:
a) For installation in the United States: Wrap ground wire from outlet box around green
ground screw(B) on mounting bracket, no less than 2" from wire end. Tighten ground screw. If
fixture is supplied with a ground wire, connect to outlet ground wire with a wire nut.
b) For installation in Canada: If fixture is supplied with ground wire, wrap ground wire
around green grounding screw on mounting bracket. Tighten ground screw.
4. Connect the 12" rod and 6" rod together, lock it to the knurled nut (H), attach the swivel (E1) to the 6" rod (F),
then connect wires.
5. Raise the canopy unit (E) thread to the outlet box screws, secure with canopy nut (R).
6. Raise the short stem (N) thread to the fixture body (M), then install the sleeves (O), secure with decorative finial (P).
7. Install the light bulb (Q) to the socket.
specified on this fixture. Make sure that electrical current is turned off before changing bulbs.
PLEASE USE TYPE"B" BULB MAX 25-WATT OR CFL BULB MAX 9-WATT OR LED BULB MAX 5-WATT,
THERE IS LED 4-WATT BULB IN THE BOX
ENJOY YOUR LAMP
2/2
/