JONATHAN Y JYL9930 User manual

Type
User manual

The JONATHAN Y JYL9930 is a stylish and versatile lighting fixture that can enhance the ambiance of any room. It features a 12.5-inch diameter and 19-inch height, making it suitable for a variety of spaces. The fixture comes with all the necessary hardware for easy installation, including mounting screws, a canopy nut, and a closable link. The JYL9930 is designed to be durable and long-lasting, with a sturdy construction that ensures years of reliable use. Whether you're looking to illuminate your living room, bedroom, or dining room, this fixture is an excellent choice.

The JONATHAN Y JYL9930 is a stylish and versatile lighting fixture that can enhance the ambiance of any room. It features a 12.5-inch diameter and 19-inch height, making it suitable for a variety of spaces. The fixture comes with all the necessary hardware for easy installation, including mounting screws, a canopy nut, and a closable link. The JYL9930 is designed to be durable and long-lasting, with a sturdy construction that ensures years of reliable use. Whether you're looking to illuminate your living room, bedroom, or dining room, this fixture is an excellent choice.

WARNING
WE RECOMMEND INSTALLATION OF THIS LIGHTING FIXTURE BE DONE BY A LICENSED ELECTRICIAN.
WARNING *** SWITCH OFF THE MAIN ELECTRICAL SUPPLY FROM THE MAIN FUSE BOX/CIRCUIT
BREAKER BEFORE INSTALLATION.
INSPECT ITEM CAREFULLY BEFORE ATTEMPTING TO INSTALL. IF THERE IS ANY DAMAGE OR
OBVIOUS DEFECT, DO NOT INSTALL. ITEM MAY NOT BE RETURNED ONCE IT HAS BEEN INSTALLED.
CARE AND MAINTENANCE
Model#: JYL9930
Product Dimensions: Ø12.5”X19”H
To clean the outside of the fixture, use a dry or slightly dampened clean cloth (use clean water, never a solvent) to wipe the
surface of the fixture.
To clean the inside of the fixture, first disconnect power to the fixture by turning off the circuit breaker or by removing the fuse
at the fuse box. Next, use a dry or slighly damperned clean clorth (use clean water, never a solvent) to wipe the interior
surface of the fixture.
Do not use any cleaners with chemical, solvents or harsh abrasives. Use only a dry soft cloth to dust or wipe carefully.
NOTICE& IMPORTANT SAFETY INSTRUCTIONS
* Please make sure that you have all parts indicated before you begin assembly of this item
* This item should be assembled on a soft surface to prevent scratching the finish during assembly
* To reduce the risk of fire, electrical shock or injury to persons or property, please follow the guideline below for safe use and
installation
*The external flexible cable or cord of this luminaire cannot be replaced
If the cord is damaged, the luminaire shall be destroyed
Part List and Hardware List
1/2
PREPARATION
Before beginning assembly of product, make sure all parts are present. Compare parts with package contents list and
hardware contents list. If any part is missing or damaged, do not attempt to assemble the product.
Estimated Assembly Time: 20 minutes.
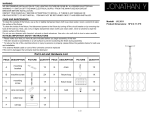
1. Fix the Mounting Plate(A) to the junction box with Mounting Screw (H).
2. Carefully remove the Lamp Body (J) from the Lamp Shade (L) by turning the Nut (G) counter clockwise
3. Turn clockwise to fix the lifting Loop (K) to the Lamp Body (J),
4. Chain (E) Through special Canopy (B) and Canopy Nut (D), Closable Link (F) is used to connect one
end of
Chain (E) to the Hanging Loop (C) and the other end to the Loop (K).
5. Connect the main line and ground wire on the lamp body with the main line and ground wire in the
junction box
with the Wire Nut ( I )
Connect, Hot, Black or Red Outlet Supply Wire to:
Connect, Neutral, White Outlet Supply Wire to:
Black
White
* Parallel Cord (round & smooth) * Parallel Cord (square & ridged)
Clear, Brown, Gold or Black without Tracer (colored stripes) Clear, Brown, Gold or Black with Tracer (colored stripes)
Insulated Wire (not green) with copper metal conductor Insulated Wire (not green) with Silver metal conductor.
*Note: When parallel wire ( SPT I & SPT II ) is used. The neutral wire is square shaped
and ridged and the hot wire will be round in shape and smooth. ( See Illustration on left. )
Grounding Instructions:
a) For installation in the United States: Wrap ground wire from outlet box around green
ground screw on mounting bracket, no less than 2" from wire end. Tighten ground screw. If
fixture is supplied with a ground wire, connect to outlet ground wire with a wire connector.
b) For installation in Canada: If fixture is supplied with ground wire, wrap ground wire
around green grounding screw on mounting bracket. Tighten ground screw.
6. Push the Canopy(B) up to the ceiling and turn the Canopy Nut (D) clockwise to secure it
7. Insert the bulb (M) into the Sockets. Be sure to use light bulb(M) with wattage no greater than specified
on this
fixture. Always make sure that electrical current is turned off before changing bulb.
8. Carefully place the Lamp Body (J) into the Lamp Shade (L) and turn the Nut (G) clockwise to secure it
PLEASUE USE TYPE"A" BULB MAX 40-WATT OR CFL BULB MAX 13-WATT OR LED MAX 9-WATT
THERE ARE 1 X 4W LED BULBS IN THE BOX.
ENJOY YOUR LAMP
2/2
  • Page 1 1
  • Page 2 2

JONATHAN Y JYL9930 User manual

Type
User manual

The JONATHAN Y JYL9930 is a stylish and versatile lighting fixture that can enhance the ambiance of any room. It features a 12.5-inch diameter and 19-inch height, making it suitable for a variety of spaces. The fixture comes with all the necessary hardware for easy installation, including mounting screws, a canopy nut, and a closable link. The JYL9930 is designed to be durable and long-lasting, with a sturdy construction that ensures years of reliable use. Whether you're looking to illuminate your living room, bedroom, or dining room, this fixture is an excellent choice.

Ask a question and I''ll find the answer in the document

Finding information in a document is now easier with AI