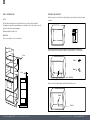
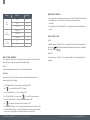
Caple CM130 is an intuitive and practical built-in microwave with grill that combines 900W of microwave power with 1000W of grill power to offer a variety of options for heating and cooking all types of food. It features 5 power levels, defrost by weight or time, a child safety lock, and an easy-to-use control panel with a digital display for precise cooking.
Caple CM130 is an intuitive and practical built-in microwave with grill that combines 900W of microwave power with 1000W of grill power to offer a variety of options for heating and cooking all types of food. It features 5 power levels, defrost by weight or time, a child safety lock, and an easy-to-use control panel with a digital display for precise cooking.


-
 1
1
-
 2
2
-
 3
3
-
 4
4
-
 5
5
-
 6
6
-
 7
7
-
 8
8
-
 9
9
-
 10
10
-
 11
11
-
 12
12
-
 13
13
-
 14
14
-
 15
15


Caple CM130 is an intuitive and practical built-in microwave with grill that combines 900W of microwave power with 1000W of grill power to offer a variety of options for heating and cooking all types of food. It features 5 power levels, defrost by weight or time, a child safety lock, and an easy-to-use control panel with a digital display for precise cooking.
Ask a question and I''ll find the answer in the document
Finding information in a document is now easier with AI
Related papers
Other documents
-
RAMTONS RM/551 User manual
-
Blaupunkt 5MG16199IN User manual
-
COOKOLOGY BIM20LWG User manual
-
Aspes AMWI1500X Owner's manual
-
Cello AM823A2AM User manual
-
Haier HWO38MG6HXB User manual
-
COOKOLOGY TCM20BGL User manual
-
-
Igenix IGM0821SS User manual
-