Caple CM123 User manual

Category
Microwaves
Type
User manual
Contact Caple on 0117 938 7420 for spare parts or www.caple.co.uk
Combination Microwave
Instruction Manual
CM123 &
CM123BK
Instruction manual CM123 & CM123BK
2
Please keep this instruction manual for future reference
CONTENTS
Warnings 3
Environmental Protection 10
Warranty 10
Cleaning 12
Utensils 12
Setting up your Microwave 15
Installation 16
Operation Instructions 21
Troubleshooting 28
Technical Data 29
Caple Contact Details 30
3
Please keep this instruction manual for future reference
Instruction manual CM123 & CM123BK
SAFETY INSTRUCTIONS
Read carefully all the instructions contained in this
manual. It provides you with important information
regarding the safe installation, use and maintenance of
the appliance as well as useful advice for getting the best
out of your microwave oven. Keep this booklet in a safe
place for future reference. After removing the packing,
check that the appliance is not damaged in any way.
Be careful not to leave the packing materials (plastic
sheeting, expanded polystyrene etc.) where children can
get at them, as they can be dangerous.
IMPORTANT:
Do not use the microwave oven door handle to move the
appliance, such as to remove it from the packaging.
ATTENTION:
The microwave oven is an appliance which, for its nature,
becomes hot during use, especially the glass door.
It is therefore a good rule that children do not approach
the microwave oven when it is functioning, particularly
when the grill is in use.
Before you use the microwave oven for the first time, heat
the empty oven at max. temperature for 1 hour, removing
any unpleasant smells and smoke caused by working
residues and thermal insulation. Make sure you do this in
a well ventilated area.
Instruction manual CM123 & CM123BK
4
Please keep this instruction manual for future reference
Never roast or bake on the oven base.
This product is not designed for commercial use, it is a
household appliance only. It is not intended to be used in:
- Staff kitchen areas in shops, offices and other working
environments.
- Bed and breakfast type environments.
- By clients in hotels, motels and other residential
type environments.
The electrical system of this appliance may be used safely
only when it is correctly connected to an efficient earthing
system in compliance with the safety standards currently
in effect.
The manufacturer will not be held liable for any damages
that might arise out of incorrect or improper use of
the appliance.
The following items are potentially dangerous, and
therefore, appropriate measures must be taken to prevent
children and the disabled from coming into contact
with them:
- Controls and the appliance in general.
- Packaging (bags, polystyrene, nails, etc.).
- The appliance immediately after use of the oven or grill
due to the heat generated.
- The appliance when no longer in use (potentially
dangerous parts must be made safe).
5
Please keep this instruction manual for future reference
Instruction manual CM123 & CM123BK
WARNING:
Accessible parts will become hot when in use. To avoid
burns and scalds children should be kept away.
During use the appliance becomes hot, care should be
taken to avoid touching heating elements inside the oven.
- If the door or door seals are damaged, the oven must
not be operated until it has been repaired by a Caple
approved engineer.
- It is hazardous for anyone other than a competent person
to carry out any service or repair operation that involves
the removal of a cover which gives protection against
exposure to microwave energy.
- Liquids and other foods must not be heated in sealed
containers since they are liable to explode.
- Only use utensils that are suitable for use in
microwave ovens.
- When heating food in plastic or paper containers, keep an
eye on the oven due to the possibility of ignition.
- The microwave oven is intended for heating food and
beverages. Drying of food or clothing and heating of
warming pads, slippers, sponges, damp cloth and similar
may lead to risk of injury, ignition or fire.
- The oven should be cleaned regularly and any food
deposits removed.
- Failure to maintain the oven in a clean condition could
lead to deterioration of the surface that could adversely
affect the life of the appliance and possibly result in a
hazardous situation.
Instruction manual CM123 & CM123BK
6
Please keep this instruction manual for future reference
WARNING:
To reduce the risk of burns, electric shock, fire, injury to
persons or exposure to excessive microwave energy:
- Make sure that all the packing materials are removed
from the inside of the door.
WARNING:
- Check the oven for any damage, such as misaligned
or bent door, damaged door seals and sealing surface,
broken or loose door hinges and latches and dents inside
the cavity or on the door. If there is any damage, do not
operate the oven and contact Caple service immediately.
- This microwave oven must be placed on a flat, stable
surface to hold its weight and the heaviest food likely to
be cooked in the oven.
- Do not place the microwave oven where heat, moisture,
or high humidity are generated, or near
combustible materials.
- Do not operate the microwave oven when empty.
- Do not operate this appliance if it has a damaged cord
or plug, if it is not working properly or if it has been
damaged or dropped. If the supply cord is damaged, it
must be replaced by Caple or an approved engineer in
order to avoid a hazard.
- Microwave heating of liquids can result in delayed
eruptive boiling, therefore care has to be taken when
handling the container.
7
Please keep this instruction manual for future reference
Instruction manual CM123 & CM123BK
- Do not fry food in the microwave oven. Hot oil can
damage oven parts and utensils and even result in
skin burns.
- Eggs in their shell and whole hard-boiled eggs should
not be heated in microwave ovens since they may
explode even after microwave heating has ended.
- Pierce foods with heavy skins such as potatoes, whole
squashes, apples and chestnuts before cooking.
- The contents of feeding bottles and baby jars should
be stirred or shaken and the temperature should be
checked before serving in order to avoid burns.
- Utensils should be checked to ensure that they are
suitable for use in a microwave oven.
WARNING:
Liquid or other food must not be heated in sealed
containers since they are liable to explode.
It is hazardous for anyone other than a trained person to
carry out any service or repair operation which involves
the removal of any cover which gives protection against
exposure to microwave energy.
- This appliance is not intended for use by persons
(including children) with reduced physical, sensory
or mental capabilities, or lack of experience and
knowledge, unless the have been given supervision or
instruction concerning use of the appliance by a person
responsible for their safety.
- Children should be supervised to ensure that they do
not play with the appliance.
Instruction manual CM123 & CM123BK
8
Please keep this instruction manual for future reference
- When heating food in plastic or paper containers, check
the oven frequently for the possibility of ignition.
- Remove wire ties from paper or plastic bags before
placing bag in oven.
- If smoke is observed, switch off or unplug the appliance
and keep the door closed in order to stifle any flames.
- Do not leave paper products, cooking utensils or food in
the cavity when not in use.
WARNING:
The appliance and its accessible parts become hot
during use.
Care should be taken to avoid touching heating elements.
Children less than 8 years of age shall be kept away unless
continuously supervised.
This appliance can be used by children aged from 8 years
and above and persons with reduced physical, sensory or
mental capabilities or lack of experience and knowledge if
they have been given supervision or instruction concerning
use of the appliance in a safe way and understand
the hazards involved. Children shall not play with the
appliance. Cleaning and user maintenance shall not be
made by children without supervision.
During use the appliance becomes hot. Care should be
taken to avoid touching heating elements inside the oven.
Accessible parts may become hot during use. Young
children should be kept away.
9
Please keep this instruction manual for future reference
Instruction manual CM123 & CM123BK
Electric shock hazard: Touching some of the internal
components ccan cause serious personal injury or death.
Do not disassemable this appliance.
Improper use of the grounding can result in electric
shock. Do not plug into an outlet until appliance is
properly installed and grounded.
This appliance must be grounded. In the event of an
electrical short circuit, grounding reduces the risk of
electric shock by providing an escape wire for the electric
current. This appliance is equipped with a cord having
a grounding wire with a grounding plug. The plug must
be plugged into an outlet that is properly installed and
grounded.
Consult a qualified electrician or appliance engineer if
the grounding instructions are not completely understood
or in doubt as to whether the appliance is properly
grounded. If it is necessary to use an extension cord, use
only a 3-wire extension cord.
A short power-supply cord is provided to reduce the risks
resulting from becoming entangled in or tripping over a
longer cord.
If a long cord set or extension cord is used:
The marked electrical rating of the cord set or extension
cord should be at least as great as the electrical rating of
the appliance.
The extension cord must be a grounding-type 3-wire cord.
The long cord should be arranged so that it will not drape
over the counter top or tabletop where it can be pulled on
by children or tripped over unintentionally.
Instruction manual CM123 & CM123BK
10
Please keep this instruction manual for future reference
ENVIRONMENTAL PROTECTION
Waste electrical products should not be disposed of with household waste. Please recycle where
facilities exist. Check with your Local Authority or retailer for recycling advice. This appliance is
marked according to the European Directive on Waste Electrical and Electronic Equipment (WEEE).
By ensuring this product is disposed of correctly, you will help prevent potential negative
consequences for the environment and human health, which could otherwise be caused by
inappropriate waste handling of this product. The symbol on the product indicates that this
product may not be treated as household waste. Instead it shall be handed over to the applicable
collection point for the recycling of electrical and electronic equipment. Disposal must be carried
out in accordance with local environmental regulations for waste disposal.
For more detailed information about treatment, recovery and recycling of this product, please
contact your local council, your household waste disposal service or the retailer where you
purchased the product.
CE DECLARATIONS OF CONFORMITY
This appliance has been manufactured to the strictest standards and complies with all applicable
legislation, Low Voltage Directive (LVD) and Electromagnetic Compatibility (EMC).
WARRANTY:
Your new appliance is covered by warranty. The warranty card is enclosed - if it is missing, you
must provide the following information to your retailer in order to receive a replacement: date
of purchase, model and serial number (placed on the inside of the appliance storage drawer).
Registration can also be completed online by visiting www.caple.co.uk.
Ensure you keep your warranty card safe, you may need to show it to Caple Service together with
proof of purchase.
If you fail to show your warranty card you will incur all repair charges.
Spare parts are only available from Caple Service and spare parts authorised centres.
11
Please keep this instruction manual for future reference
Instruction manual CM123 & CM123BK
ATTENTION:
» Before use, remove all plastic films protecting some parts of the appliance (fascia - panel,
parts in stainless steel, etc.)
» Do not use the appliance to heat a room.
» When the appliance is not in use, we recommend you turn it off, isolate it from the
electrical supply.
Instruction manual CM123 & CM123BK
12
Please keep this instruction manual for future reference
UTENSILS
Be sure to unplug the appliance from the power supply before any cleaning.
» Clean the cavity of the oven after using with a slightly damp cloth.
» Clean the accessories in the usual way in soapy water.
» The door frame and seal and neighbouring parts must be cleaned carefully with a damp cloth
when they are dirty.
» Do not use harsh abrasive cleaners or sharp metal scrapers to clean the oven door glass since
they can scratch the surface, which may result in shattering of the glass.
» For easier cleaning of the cavity walls: Place half a lemon in a bowl, add 300ml (1/2 pint)
water and heat on 100%microwave power for 10 minutes. Wipe the oven clean using a soft,
dry cloth.
CLEANING
UTENSIL TEST:
1. Fill a microwave-safe container with 1 cup of cold water (250ml) along with the utensil
in question.
2. Cook on maximum power for 1 minute.
3. Carefully feel the utensil. If the empty utensil is warm, do not use it for microwave cooking.
4. Do not exceed 1 minute cooking time.
CAUTION:
Personal injury hazard: It is hazardous for anyone other than a competent service engineer to carry
out any service or repair operation that involves the removal of a cover which gives protection
against exposure to microwave energy.
There may be certain non-metallic utensils that are not safe to use for microwaving. If in doubt,
you can test the utensil in question following the procedure below.
13
Please keep this instruction manual for future reference
Instruction manual CM123 & CM123BK
UTENSILS REMARKS
ALUMINIUM FOIL
Shielding only. Small smooth pieces can be used to cover thin parts of meat or poultry to
prevent overcooking. Arcing can occur if foil is too close to oven walls. The foil should be
at least 1 inch (2.5cm) away from oven walls.
BROWNING DISH
Follow manufacturer’s instructions. The bottom of the browning dish must be at least 5mm
above the turntable. Incorrect usage may cause the turntable to break.
DINNERWARE
Microwave-safe only. Follow manufacturer’s instructions. Do not use cracked or
chipped dishes.
GLASS JAR
Always remove lid. Use only to heat food until just warm. Most glass jars are not heat
resistant and may break.
GLASSWARE
Heat-resistant oven glassware only. Make sure there is no metallic trim. Do not use
cracked or chipped dishes.
OVEN
COOKING BAGS
Follow manufacturer’s instructions. Do not close with a metal tie. Make slits to allow
steam to escape.
PAPER PLATES
AND CUPS
Use for short–term cooking/warming only. Do not leave oven unattended while cooking.
PAPER TOWELS
Use to cover food for reheating and absorbing fat. Use with supervision for a short-term
cooking only.
PARCHMENT PAPER Use as a cover to prevent splattering or a wrap for steaming.
PLASTIC
Microwave-safe only. Follow the manufacturer’s instructions. Should be labelled
“Microwave Safe”. Some plastic containers soften, as the food inside gets hot. “Boiling
bags” and tightly closed plastic bags should be slit, pierced or vented as directed
by package.
PLASTIC WRAP
Microwave-safe only. Use to cover food during cooking to retain moisture. Do not allow
plastic wrap to touch food.
THERMOMETERS Microwave-safe only (meat and candy thermometers).
WAX PAPER Use as a cover to prevent splattering and retain moisture.
ALUMINIUM TRAY May cause arcing. Transfer food into microwave-safe dish.
FOOD CARTON
WITH METAL
HANDLE
May cause arcing. Transfer food into microwave-safe dish.
MATERIALS YOU CAN USE IN A MICROWAVE OVEN:
Instruction manual CM123 & CM123BK
14
Please keep this instruction manual for future reference
METAL OR
METAL-TRIMMED
UTENSILS
Metal shields the food from microwave energy. Metal trim may cause arcing.
METAL TWIST TIES May cause arcing and could cause a fire in the oven.
PAPER BAGS May cause a fire in the oven.
PLASTIC FOAM Plastic foam may melt or contaminate the liquid inside when exposed to high temperature.
WOOD Wood will dry out when used in the microwave oven and may split or crack.
MATERIALS TO BE AVOIDED IN A MICROWAVE OVEN:
UTENSILS REMARKS
ALUMINIUM TRAY May cause arcing. Transfer food into microwave-safe dish.
FOOD CARTON WITH
METAL HANDLE
May cause arcing. Transfer food into microwave-safe dish.
METAL OR METAL-
TRIMMED UTENSILS
Metal shields the food from microwave energy. Metal trim may cause arcing.
METAL TWIST TIES May cause arcing and could cause a fire in the oven.
PAPER BAGS May cause a fire in the oven.
PLASTIC FOAM
Plastic foam may melt or contaminate the liquid inside when exposed to
high temperature..
WOOD Wood will dry out when used in the microwave oven and may split or crack.
15
Please keep this instruction manual for future reference
Instruction manual CM123 & CM123BK
SETTING UP YOUR MICROWAVE
PARTS AND ACCESSORIES:
Remove the oven and all materials from the carton and oven cavity. Your oven comes supplied
with the following accessories:
CONTENTS
QUANTITY
Glass Tray 1
Turntable Ring Assembly 1
Instruction Mw anual 1
A) Control panel
B) Turntable shaft
C) Turntable ring assembly
D) Glass tray
E) Observation window
F) Door assembly
G) Safety interlock system
Materials to be avoided in a microwave oven
Utensils Remarks
Aluminum tray
Food carton with
metal handle
Metal or metal-
trimmed utensils
Metal twist ties
Paper bags
Plastic foam
Wood
SETTING UP YOUR OVEN
Parts and accessories
Remove the oven and all materials from the carton and oven cavity.
Your oven comes supplied with the following accessories:
1
1
Glass tray
Turntable ring assembly
Instruction Manual
1
Metal shields the food from microwave energy. Metal trim may
cause arcing.
May cause a fire in the oven.
Plastic foam may melt or contaminate the liquid inside when exposed
to high temperature.
Wood will dry out when used in the microwave oven and may split
or crack.
May cause arcing. Transfer food into microwave-safe dish.
May cause arcing and could cause a fire in the oven.
Grill Rack ( Only to be used in the grill function
and to be placed on the glass tray )
9
G
E D
C
B
F
A
A. Control panel
B. Turntable shaft
C. Turntable ring assembly
D. Glass tray
E. Observation window
F. Door assembly
G. Safety interlock system
A) Control panel
B) Turntable shaft
C) Turntable ring assembly
D) Glass tray
E) Observation window
F) Door assembly
G) Safety interlock system
Materials to be avoided in a microwave oven
Utensils Remarks
Aluminum tray
Food carton with
metal handle
Metal or metal-
trimmed utensils
Metal twist ties
Paper bags
Plastic foam
Wood
SETTING UP YOUR OVEN
Parts and accessories
Remove the oven and all materials from the carton and oven cavity.
Your oven comes supplied with the following accessories:
1
1
Glass tray
Turntable ring assembly
Instruction Manual
1
Metal shields the food from microwave energy. Metal trim may
cause arcing.
May cause a fire in the oven.
Plastic foam may melt or contaminate the liquid inside when exposed
to high temperature.
Wood will dry out when used in the microwave oven and may split
or crack.
May cause arcing. Transfer food into microwave-safe dish.
May cause arcing and could cause a fire in the oven.
Grill Rack ( Only to be used in the grill function
and to be placed on the glass tray )
9
Grill Rack (Only to be used in the grill function and
to be placed on the glass tray)
UTENSILS REMARKS
ALUMINIUM TRAY May cause arcing. Transfer food into microwave-safe dish.
FOOD CARTON WITH
METAL HANDLE
May cause arcing. Transfer food into microwave-safe dish.
METAL OR METAL-
TRIMMED UTENSILS
Metal shields the food from microwave energy. Metal trim may cause arcing.
METAL TWIST TIES May cause arcing and could cause a fire in the oven.
PAPER BAGS May cause a fire in the oven.
PLASTIC FOAM
Plastic foam may melt or contaminate the liquid inside when exposed to
high temperature..
WOOD Wood will dry out when used in the microwave oven and may split or crack.
Instruction manual CM123 & CM123BK
16
Please keep this instruction manual for future reference
TURNTABLE INSTALLATION
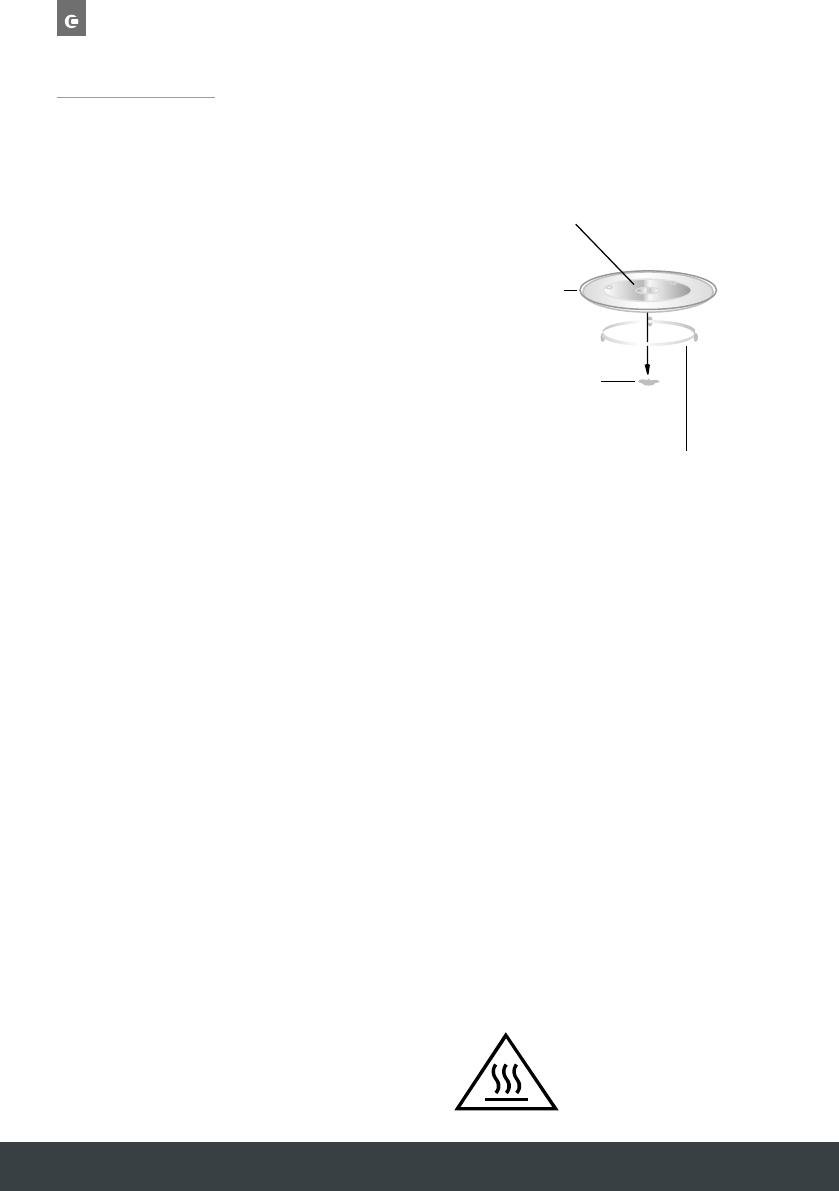
Hub (underside)
Glass tray
Turntable ring assembly
a. Never place the
glass tray
upside down.
The glass tray should never be
restricted.
b. Both the
glass tray
and
turntable ring
assembly
must always be used during
cooking.
c.
All food and containers of food must
always be placed
on the
glass tray
for
cooking.
d. If
glass tray
or
turntable ring assembly
cracks or breaks, contact your nearest
authorized Caple service center.
Turntable Installation
Turntable shaft
The accessible surface
may be hot during
operation.
Installation and connection
1.This appliance is only intended for domestic use. The guarantee is void if used in
any commercial application.
2.This oven is intended for built-in use only. It is not intended for counter-top use or for
use inside a cupboard.
3. Please observe the detailed installation instructions.
4.The appliance can be installed in a 60cm wide wall-mounted cupboard (at least 55cm
deep and 85cm off the floor).
5.The appliance is fitted with a plug and must only be connected to a properly installed
earthed socket.
6.The mains voltage must correspond to the voltage specified on the rating plate.
7.The socket must be installed and connecting cable must only be replaced by a
qualified electrician.If the plug is no longer to accessible following installation,an
all-pole disconnecting device must be present on the installation side with a contact
gap of at lease 3mm.
8.Adapters,multi-way strips and extension leads must not be used. Overloading can
result in a risk of fire.
10
» Never place the glass tray upside down. The
glass tray should never be restricted.
» Both the glass tray and turntable ring assembly
must always be used during cooking.
» All food and containers of food must always be
placed on the glass tray for cooking.
» If glass tray or turntable ring assembly cracks or
breaks, contact your nearest authorised Caple
Service centre.
INSTALLATION AND CONNECTION
» This appliance is only intended for domestic use. The guarantee is void if used in any
commercial application.
» This oven is intended for built-in use only. It is not intended for counter-top use or for use
inside a cupboard.
» Please observe the detailed installation instructions.
» The appliance can be installed in a 60cm wide wall-mounted cupboard (at least 55cm deep
and 85cm off the floor).
» The appliance is fitted with a plug and must only be connected to a properly installed
earthed socket.
» The mains voltage must correspond to the voltage specified on the rating plate.
» The socket must be installed and the connecting cable must only be replaced by a qualified
electrician. If the plug is no longer accessible following installation, an all-pole disconnecting
device must be present on the installation side with a contact gap of at lease 3mm.
» Adapters, multi-way strips and extension leads must not be used. Overloading can result in a
risk of fire.
WARNING:
The accessible surface may be hot during operation.
Hub (underside)
Glass tray
Turntable ring assembly
a. Never place the
glass tray
upside down.
The glass tray should never be
restricted.
b. Both the
glass tray
and
turntable ring
assembly
must always be used during
cooking.
c.
All food and containers of food must
always be placed
on the
glass tray
for
cooking.
d. If
glass tray
or
turntable ring assembly
cracks or breaks, contact your nearest
authorized Caple service center.
Turntable Installation
Turntable shaft
The accessible surface
may be hot during
operation.
Installation and connection
1.This appliance is only intended for domestic use. The guarantee is void if used in
any commercial application.
2.This oven is intended for built-in use only. It is not intended for counter-top use or for
use inside a cupboard.
3. Please observe the detailed installation instructions.
4.The appliance can be installed in a 60cm wide wall-mounted cupboard (at least 55cm
deep and 85cm off the floor).
5.The appliance is fitted with a plug and must only be connected to a properly installed
earthed socket.
6.The mains voltage must correspond to the voltage specified on the rating plate.
7.The socket must be installed and connecting cable must only be replaced by a
qualified electrician.If the plug is no longer to accessible following installation,an
all-pole disconnecting device must be present on the installation side with a contact
gap of at lease 3mm.
8.Adapters,multi-way strips and extension leads must not be used. Overloading can
result in a risk of fire.
10
INSTALLATION
17
Please keep this instruction manual for future reference
Instruction manual CM123 & CM123BK
ELECTRICAL CONNECTION:
NOTE:
The oven is fitted with a plug and must only be connected to a properly installed earthed socket.
The socket must only be installed and the connecting cable must only be replaced by a qualified
electrician, and in accordance with the appropriate regulations.
If the plug is not longer accessible following installation, an all-pole isolating switch must be
present on the installation side with a contact gap of at least 3mm.
WARNING:
Do not trap or bend power cable.
Screw A
Trim-kit plastic cover
Bracket
12
Screw B
Instruction manual CM123 & CM123BK
18
Please keep this instruction manual for future reference
BUILT IN FURNITURE
NOTE:
The fitted cabinet the appliance is being installed into must not have a back wall behind
the appliance. A gap must be maintained between a wall and the base of the unit above. Specific
gap size can be referenced by the diagrams.
Minimum installation height: 85cm
WARNING:
Do not cover a ventilation slot or air intake points.
Instruction manual CM12618
Please keep this instruction manual for future reference
ELECTRICAL CONNECTION
NOTE:
The oven is fitted with a plug and must only be connected to a property installed earthed socket.
The socket must only be installed and the connecting cable must only be replaced by a qualified
electrician, and in accordance with the appropriate regulations. If the plug is no longer accessible
following installation, an all-pole isolating switch must be present on the installation side with a
contact gap of at least 3mm.
BUILT-IN FURNITURE
» The fitted cabinet the appliance is being installed into must not have a back wall behind
the appliance.
» Minimum height 85cm. A gap must be maintained between the wall and the base of the unit
above. Specific gap size can be referenced by the diagrams.
» Do not cover any ventilation slots or air intake points.
11
(min)
500mm
450mm
600mm
+8
+
2
560mm
45mm
45mm
Installation Instructions
Please Read the Manual Carefully Before Installation
 

        
   
 
      
  
   
       
          
           

     
      
   
   
      


       
A. Built-in furniture
B.Prep are the cabi inet
put the template on the bottom plane of cabinet.
1. Read the instruction on the BOTTOM CA INET TEMPLATE ,
2. Make the marks on the bottom plane of cabinet according to marks"a" of
of the template
a
a
CENTER LINE
FRONT EDGE
LEFT EDGE
T EDGE RIGH
3. Remove the bottom cabinet template and fix the bracket with screw A.
a
a
Screw A
Bracket
Bracket
Screw A
Centre line
12
B
19
Please keep this instruction manual for future reference
Instruction manual CM123 & CM123BK
PREPARE THE CABINET:
Read the instruction on the bottom of cabinet template, put the template on the bottom plane
of cabinet.
B.Prep are the cabi inet
put the template on the bottom plane of cabinet.
1. Read the instruction on the BOTTOM CA INET TEMPLATE ,
2. Make the marks on the bottom plane of cabinet according to marks"a" of
of the template
a
a
CENTER LINE
FRONT EDGE
LEFT EDGE
T EDGE RIGH
3. Remove the bottom cabinet template and fix the bracket with screw A.
a
a
Screw A
Bracket
Bracket
Screw A
Centre line
12
B
Make the marks on the bottom plane of cabinet according to marks”a” of the template.
Remove the bottom cabinet template and fix the bracket with screw A.
B.Prep are the cabi inet
put the template on the bottom plane of cabinet.
1. Read the instruction on the BOTTOM CA INET TEMPLATE ,
2. Make the marks on the bottom plane of cabinet according to marks"a" of
of the template
a
a
CENTER LINE
FRONT EDGE
LEFT EDGE
T EDGE RIGH
3. Remove the bottom cabinet template and fix the bracket with screw A.
a
a
Screw A
Bracket
Bracket
Screw A
Centre line
12
B
Instruction manual CM123 & CM123BK
20
Please keep this instruction manual for future reference
INSTALL THE MICROWAVE OVEN:
Install the microwave oven to the cabinet:
» Make sure the back of the microwave oven is locked by bracket.
» Do not trap or kink the power cord.
C .Install the oven
4. Install the oven to the cabinet
- Make sure the back of the oven is locked by bracket.
- Do not trap or kink the power cord.
5. Open the door, fix the oven to the cabinet with Screw B, at the installation hole.
Then fix the Trim-kit plastic cover to the installation hole.
Screw B
Installation Hole
13
bracket
Open the door, fix the microwave oven to the cabinet with Screw B at the installation hole.
Then fix the Trim-kit plastic cover to the installation hole.
  • Page 1 1
  • Page 2 2
  • Page 3 3
  • Page 4 4
  • Page 5 5
  • Page 6 6
  • Page 7 7
  • Page 8 8
  • Page 9 9
  • Page 10 10
  • Page 11 11
  • Page 12 12
  • Page 13 13
  • Page 14 14
  • Page 15 15
  • Page 16 16
  • Page 17 17
  • Page 18 18
  • Page 19 19
  • Page 20 20
  • Page 21 21
  • Page 22 22
  • Page 23 23
  • Page 24 24
  • Page 25 25
  • Page 26 26
  • Page 27 27
  • Page 28 28
  • Page 29 29
  • Page 30 30
  • Page 31 31
  • Page 32 32

Caple CM123 User manual

Category
Microwaves
Type
User manual

Ask a question and I''ll find the answer in the document

Finding information in a document is now easier with AI