PAGE 12 OF 20
E2-03-SSS
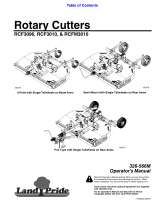
1 Secure Top Down Mount (A) to worksurface.
(see page 14)
2 Insert and secure Pole (C) into mount (A).
(see page 16)
3 Slide Dual Yoke (F) over pole and secure it in place
at desired height with the 3/32" Hex Key (V),
apply 30 in-lbs torque.
(see page 17)
4 2x Insert 12" Extension (L) to Dual Yoke (F).
Secure it with Dog Washer (R) and Screw (S).
5 2x Insert 8" Extension (K) to 12" Extension (L) with
Rotational Stop Slot. Secure it with Dog Washer (R)
and Screw (S).
6 2x Insert 4" Extension (J) to 8" Extension (K) with
Rotational Stop Slot. Secure it with Dog Washer (R)
and Screw (S).
7 Slide Center Arm Yoke (G) over pole and secure it in
place at desired height with the 3/32" Hex Key (V),
apply 30 in-lbs torque.
8 2x Insert Slider (M) to 4" Extension (J). Secure it with
Dog Washer (R) and Screw (S).
9 3x Attach Quick Connect VESA Plate (N) to monitor
using Screws (T) and insert it to Slider (M) or Tilter (O).
(see page 18)
10 Snap Cable Clip (Q) on the Pole (C)
Q
R
R
R
R
R
R
R
R
J
K
L
S
S
S
R
S
G
O
N
N
M
N
M
F
S
S
S
S
S
C
10
9
8
6
5
4
7
2
3
A1
L
J
K