Rough Country XP1000 Installation guide

Type
Installation guide

Rough Country XP1000: Elevate your Ranger's performance with these heavy-duty control arms, engineered to withstand rugged terrains and enhance handling. Experience increased ground clearance, improved stability, and precise steering control. Conquer obstacles with confidence and tackle off-road adventures like never before.

Rough Country XP1000: Elevate your Ranger's performance with these heavy-duty control arms, engineered to withstand rugged terrains and enhance handling. Experience increased ground clearance, improved stability, and precise steering control. Conquer obstacles with confidence and tackle off-road adventures like never before.

Thank you for choosing Rough Country for all your vehicle needs.
Please read instructions before beginning installation. Check the kit hardware against the kit contents shown below. Be
sure you have all needed parts and know where they go.
If question exist, please call us @1-800-222-7023. We will be happy to answer any questions concerning this product.
Check all fasteners for proper torque. Check to ensure for adequate clearance between all components.
Periodically check all hardware for tightness.
Torque Specs:
Size Grade 5 Grade 8 Size Class 8.8 Class 10.9
5/16” 15 ft/lbs 20ft/lbs 6MM 5ft/lbs 9ft/lbs
3/8” 30 ft/lbs 35ft/lbs 8MM 18ft/lbs 23ft/lbs
7/16” 45 ft/lbs 60ft/lbs 10MM 32ft/lbs 45ft/lbs
1/2” 65 ft/lbs 90ft/lbs 12MM 55ft/lbs 75ft/lbs
9/16” 95 ft/lbs 130ft/lbs 14MM 85ft/lbs 120ft/lbs
5/8” 135ft/lbs 175ft/lbs 16MM 130ft/lbs 165ft/lbs
3/4” 185ft/lbs 280ft/lbs 18MM 170ft/lbs 240ft/lbs
Tools Needed:
7mm Socket/Wrench
15mm Socket/Wrench
Kit Contents:
Control arm bushing x16
Control arm sleeve x8
Dr upper control arm x1
Pass upper control arm x1
Dr lower control arm x1
Pass lower control arm x1
90° Grease Fitting x8
Ball Joint Hardware Bag x4
POLARIS 2018-20 Ranger XP1000 1.5” Fwd Offset HC Control Arms
921930920
Grease ball joints and control arm eyelets before use.
1. Jack up the Ranger and rest the frame on jack stands.
2. Remove the front wheels.
3. Remove the brake calipers. See Photo 1.
4. Remove the axle nut. See Photo 2.
5. Remove the rotor. See Photo 3.
6. Remove the two bolts holding on the knuckle. See Photo 4.
7. Pull the knuckle down to remove it from the upper and lower control arms. Let it hang to the side. See Photo 5.
8. Remove the bottom of swaybar links using 15mm socket/wrench. See Photo 6.
Photo 1 Photo 2
Photo 3 Photo 4
Photo 5 Photo 6
Remove brake calipers. Remove axle nut.
Remove rotor. Remove bolts holding on knuckle.
Pull knuckle down from control arms. Let hang. Remove bottom of swaybar links.
INSTALLATION INSTRUCTONS
9. Remove the bottom of the strut using a 15mm socket/wrench. See Photo 7.
10. Remove the two bolts for the upper control arm using a 15mm socket/wrench. See Photo 8.
11. Remove the two bolts for the lower control arm. See Photo 9.
12. Install the bushings, sleeves, and grease fittings in each control arm eyelet.
13. Install the RC upper control arm with stock hardware. DO NOT fully tighten. See Photo 10.
14. Install the stock bolts for the lower strut and sway bar link. See Photo 11.
NOTE: Tighten the upper control arm bolts before tightening strut and sway bar link bolts.
15. Install the RC lower control arms with stock hardware. DO NOT fully tighten. See Photo 12.
Photo 7 Photo 8
Photo 9 Photo 10
Remove bottom of strut. Remove upper control arm bolts.
Remove lower control arm bolts. Install upper control arm with stock hardware.
Photo 11 Photo 12
Install bolts for lower strut and sway bar link. Install lower control arms with stock hardware.
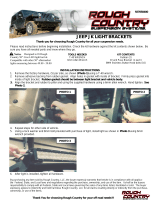
16. Install the knuckle to the RC control arms. See Photo 13.
17. Install and tighten the bolts holding the knuckle to the control arms. See Photo 14.
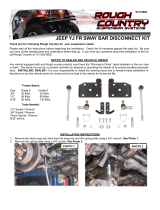
18. Install the rotor and axle nut. See Photo 15.
19. Install the brake caliper. See Photo 16.
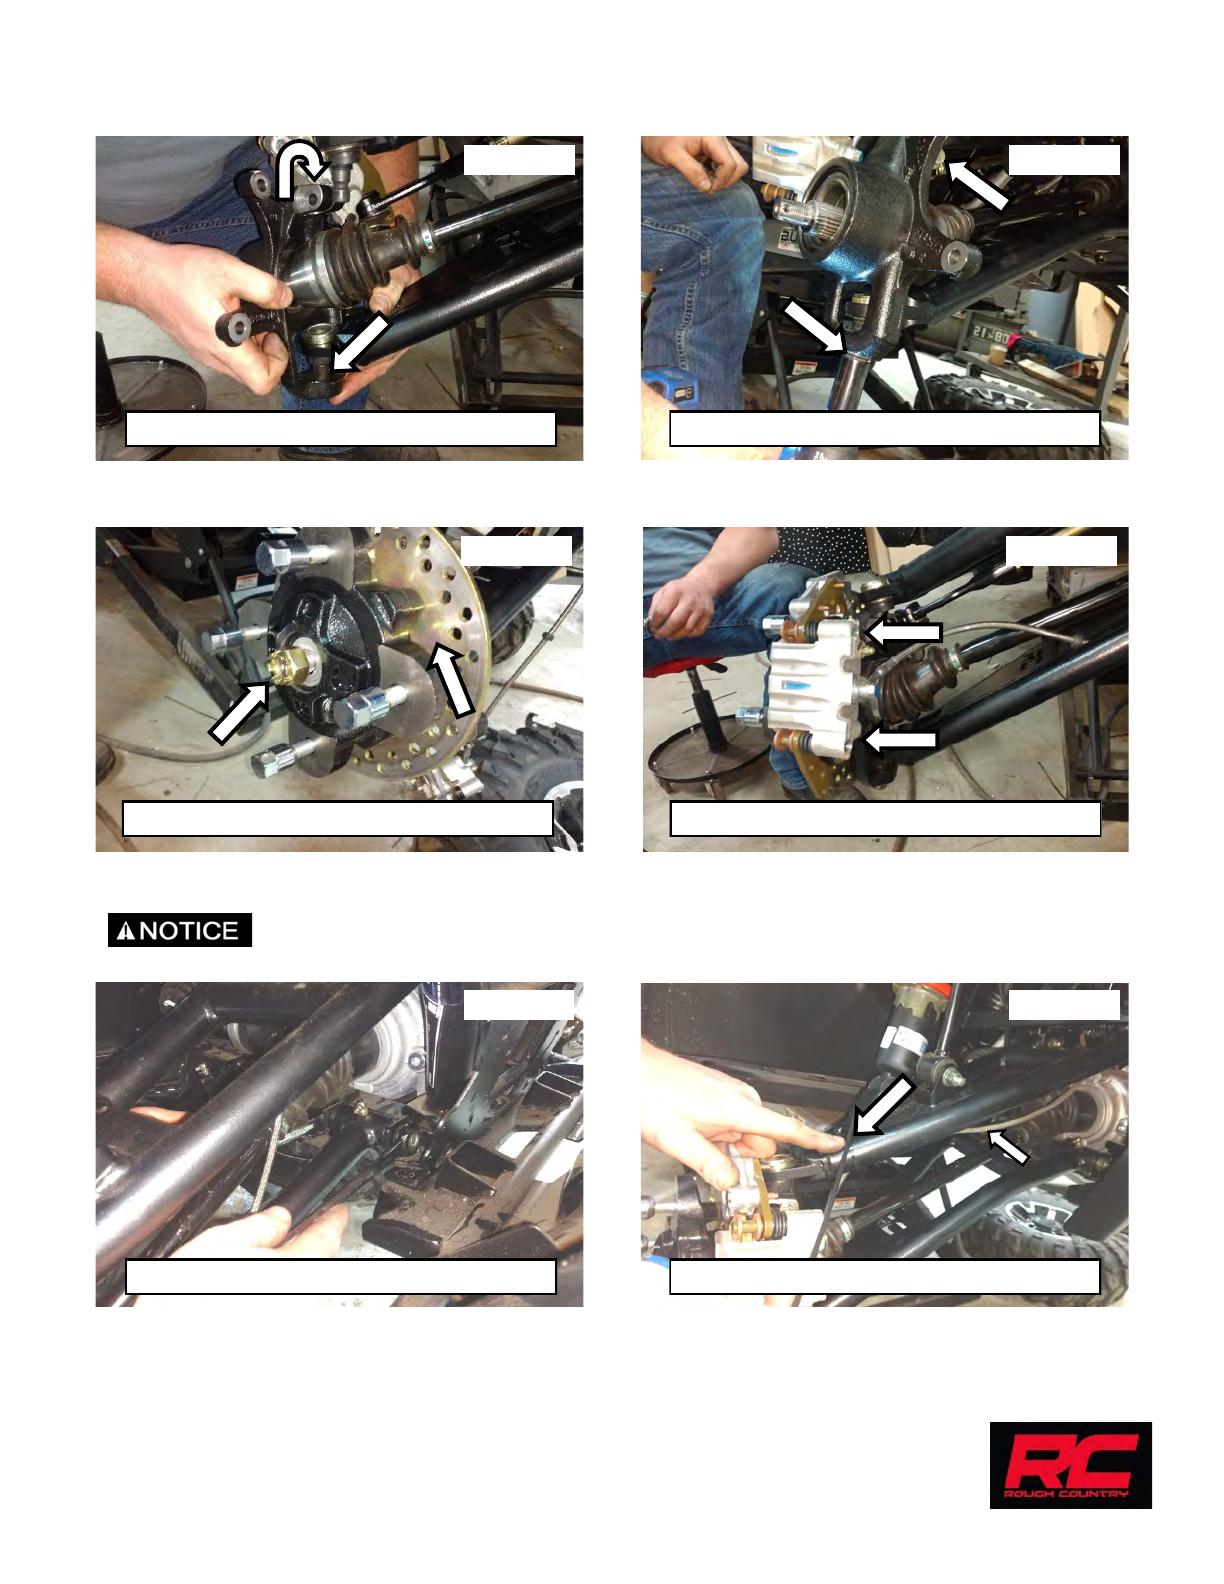
20. Fully tighten the lower control arm. See Photo 17.
21. Use zip tie to secure the brake line to the upper control arm. See Photo 18.
22. Grease ball joints and control arm eyelets before use.
23. Install wheels and lower the vehicle to the ground.
Photo 13 Photo 14
Photo 15 Photo 16
Install knuckle to RC control arms. Install bolts holding knuckle to control arm.
Install rotor and axle nut. Install brake caliper.
Photo 17 Photo 18
Fully tighten lower control arm. Use zip tie to secure brake line.
By purchasing any item sold by Rough Country, LLC, the buyer expressly warrants that he/she is in compliance with all
applicable, State, and Local laws and regulations regarding the purchase, ownership, and use of the item. It shall be the
buyers responsibility to comply with all Federal, State and Local laws governing the sales of any items
listed, illustrated or sold. The buyer expressly agrees to indemnify and hold harmless Rough Country,
LLC for all claims resulting directly or indirectly from the purchase, ownership, or use of the items.
  • Page 1 1
  • Page 2 2
  • Page 3 3
  • Page 4 4

Rough Country XP1000 Installation guide

Type
Installation guide

Rough Country XP1000: Elevate your Ranger's performance with these heavy-duty control arms, engineered to withstand rugged terrains and enhance handling. Experience increased ground clearance, improved stability, and precise steering control. Conquer obstacles with confidence and tackle off-road adventures like never before.

Ask a question and I''ll find the answer in the document

Finding information in a document is now easier with AI