Tivoli Audio TivoliAudio SongBookTM User manual

Category
Radios
Type
User manual

This manual is also suitable for

CAUTION
RISK OF
ELECTRIC SHOCK
DO NOT OPEN
ATTENTION
RISQUE DE CHOC ELECTRIQUE,
NE PAS OUVRIR
PRECAUCION
RIESGO DE CHOQUE ELECTRICO
NO ABRIR
CAUTION: TO REDUCE THE RISK OF
ELECTRIC SHOCK, DO NOT
REMOVE COVER (OR BACK).
NO USER-SERVICEABLE PARTS
INSIDE.
REFER SERVICING TO QUALIFIED
SERVICE PERSONNEL.
This symbol is intended to alert the user to the presence
of uninsulated “dangerous voltage” within the product’s
enclosure that may be of sufficient magnitude to consti-
tute a risk of electric shock to persons.
This symbol is intended to alert the user to the presence
of important operating and maintenance (servicing)
instructions in the literature accompanying the appliance.
IMPORTANT SAFETY INSTRUCTIONS
READ INSTRUCTIONS
All the safety and operating instructions should be read before operating this product.
RETAIN INSTRUCTIONS
The safety and operating instructions should be retained for future reference.
HEED WARNINGS
All warnings on the product and in the operating instructions should be adhered to.
FOLLOW INSTRUCTIONS
All operating and use instructions should be followed.
CLEANING
Unplug the product from the wall outlet before cleaning. Do not use liquid cleaners or aerosol
cleaners. Use a damp cloth for cleaning.
ATTACHMENTS
Do not use attachments not recommended by the product manufacturer as they may cause hazards.
WATER AND MOISTURE
Do not use this product near water – for example, near a bath tub, wash bowl, kitchen sink, laundry
tub, in a wet basement, or swimming pool and the like.
ACCESSORIES
Do not place this product on an unstable cart, stand, tripod, bracket or table. The product may fall,
causing serious damage to a child or adult, and serious damage to the product. Use only with a
cart, stand, tripod, bracket or table recommended by the manufacturer, or sold with the product.
Any mounting of the product should follow the manufacturer's instructions, and should use a
mounting accessory recommended by the manufacturer.
VENTILATION
Slots and openings in the cabinet are provided for ventilation and to ensure reliable operation of
the product and to protect it from over-heating. These openings must not be blocked or covered.
The openings should never be blocked by placing the product on a bed, sofa, rug or other similar
surface. This product should not be placed in a built-in installation such as a bookcase or rack un
-
less proper vwntillation is provided or the manufacturer's instructions have been adhered to.
2
SongBook Instructions
Congratulations on your purchase of Tivoli Audio’s SongBook portable FM/AM radio.
We believe the SongBook to be one of the most sensitive and finest sounding portable digital radios
on the market. It’s convenient Alarm, Sleep, and Clock features make it perfect for both travel and
home use.
In order to take full advantage of what your new radio is capable of, please take a moment to read
this owners manual and the Safety Instructions. If you have any questions, please do not hesitate
to contact your dealer or Tivoli Audio.
Please save the carton and original packing should you ever need to ship your radio, as shipping
damage is not covered by the factory warranty.
On behalf of all of us, thank you for choosing Tivoli Audio and enjoy your new SongBook!
About Tivoli Audio
Tivoli Audio was started by Tom DeVesto with the goal of bringing simple to use, high-quality audio
products to the consumer at reasonable prices. His long professional association with Henry Kloss
includes co-founding Cambridge SoundWorks*. As the CEO and head of research and development
at his former company, Tom was responsible for the development of many of the best-selling home
entertainment and multi-media products on the market today. He also held senior management
positions in product development for both Advent and Kloss Video.
*Cambridge SoundWorks is a registered trademark of Creative Labs, Singapore.
3
8
6
7
3
5
4
1
2
English
Guide to features (front panel):
1. VOLUME KNOB: Rotate the volume knob to the right to increase the volume or to the left to
decrease the volume. This knob also controls the volume of the headphone output.
2. OFF/FM/AM/AUX KNOB: Turn the source knob one click to the right to hear the FM band, two
clicks to the right to hear the AM band, or three clicks to the right for the auxiliary input. When
the SongBook is switched to FM or AM the display will show the station which was last tuned.
When switched to the auxiliary input the display will show “AU”.
3. TUNE
ˆ
/
ˇ
BUTTONS: Press the Tune Up button briefly to increase the frequency steps or the
Tune Down button briefly to decrease the frequency steps. Press and hold the Tune Up/Down
buttons to rapidly scan through the stations. To Auto Search, press, hold for over .5 seconds
and release the Tune Up or Down button and the tuner will automatically stop on the next strongly
received station. When the tuner locks on to an FM stereo signal the display will show a pair of
headphones with the letters “ST”. These buttons are also used to set the clock and alarm times.
4. #1-5: With the SongBook set to FM or AM, press and hold to set the currently tuned radio station.
The Preset number at the bottom of the LCD will flash and then a beep will be heard confirming
the station has been successfully stored. Once stored, press the Preset button briefly to recall
the station associated with that Preset. There are 5 presets for the FM band and 5 for the
AM band.
4
English
5. LIGHT: Press briefly to engage the blue backlight. The backlight will turn off automatically after
10 seconds to preserve battery life, or press again to cancel the backlight.
Figure 1
6. SLEEP: With the SongBook tuned to an FM or AM station and the volume set to the desired
level, press and hold for over 1.5 seconds to play the radio for approximately 20 minutes.
An icon showing a figure in bed will appear on the display and the number “20” will appear
momentarily. (Figure 1) A confirmation beep will also be heard. After approximately 20 minutes
the radio will shut Off and the display will show “Standby”. You may now press the Sleep button
for another 20 minutes of playback, turn the SongBook Off, or switch to a different input. To
prematurely deactivate the Sleep function during playback, press and hold the Sleep button.
The bed icon will disappear from the display and a confirmation beep will be heard. The Sleep
function will not work when the source knob is set to the Off position.
Figure 2 Figure 3 Figure 4
7. TIME SET: Press and hold until a beep is heard to confirm you have entered the Time Set mode.
The Time Set icon (Figure 2) will flash along with the hour. Press the Tune Up/Down buttons
briefly to change the hour or press and hold to rapidly change the hours. The “PM” designation
will appear for afternoon/evening hours but there is no “AM” designation for morning hours.
Now press the Time Set button to adjust the minutes (Figure 3) using the Tune Up/Down buttons.
The minutes will not affect the hour setting. Press the Time Set button a third time to store the
settings. (Figure 4) When the unit is On, the clock will appear in small format in the upper right
NOTE: Non-US models use a 24 hour clock format.
Figure 5 Figure 6 Figure 7
5
English
8. ALARM:
A. To set the Alarm time: Press the Alarm button briefly. The word “Alarm” will flash on the display.
(Figure 5) Press and hold the Time Set Button to set the Alarm time until a beep is heard to
confirm you have entered the Alarm Time Set mode. The hour will blink. (Figure 6) Tune Up/
Down buttons briefly to change each hour or press and hold to rapidly change the hours.
PM” will appear for afternoon/evening hours but there is noAM” designation for morning
hours. Now press the Time Set button to adjust the minutes using the Tune Up/Down buttons.
(Figure 7) The minutes will not affect the hour setting. Press the Time Set button again to save
the settings.
NOTE: Non-US models use a 24 hour alarm format.
Figure 8 Figure 9
B. To set the Alarm to wake: Set the SongBook to the FM or AM station you wish to wake to
and that will be broadcasting during the time you wish to wake (or set to Off or Aux to wake
to an increasing beep) and adjust the volume level accordingly. Press and hold the Alarm
button. A beep tone will be heard confirming the Alarm is set to wake and the word “Alarm”
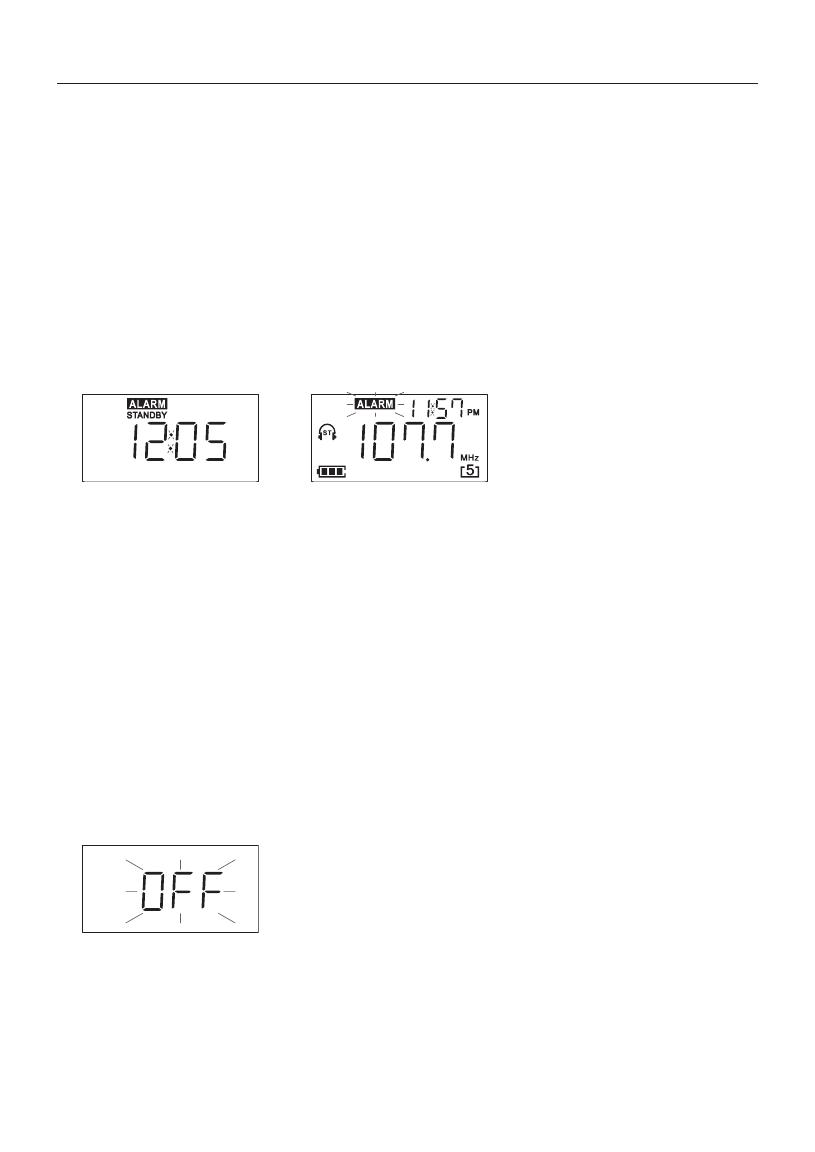
will show on the display. The SongBook will go into Standby mode and the display will show
“Standby. (Figure 8) If the Alarm has been set and the SongBook is in the Off position, the
alarm wake time will show in the upper right hand corner. When the alarm activates, the LCD
will light up and the word “Alarm” will flash. (Figure 9) Should you opt to wake to the beep,
the beep will sound for 60 seconds, then pause for 60 seconds, then resume for another 60
seconds. This pattern will repeat for up to one hour or until the Alarm button is pressed.
If the alarm is set and activates but the batteries are too weak to play the radio, the beep will
sound instead, provided there is enough battery power remaining. The LCD will show an E”
to indicate the batteries are empty. (Figure 8)
Figure 10
C. To Cancel the Alarm: When the alarm activates, press the Alarm button to cancel the alarm
and the word Alarmwill disappear from the display, the display will flash the word “Off”(Figure
10) for several seconds, and the unit will go into Standby. Changing the source knob to another
position will cancel Standby mode. Once the alarm activates, if it is not manually turned off, the
Alarm will shut off automatically after approximately 60 minutes to preserve the batteries and
the display will say “Standby”.
6
English
Guide to features (rear panel):
1. BATTERY COVER: Loosen the bottom screw with a coin until the battery cover is released.
The screw will not come off the cover completely. Slide down and lift the cover up to access
the battery compartment. Note the cover is on hinges and cannot be removed completely.
2. AM STEP SWITCH: Select 10k for AM reception in the USA or 9k for use outside North and
South America.
3. BATTERIES/CHARGER SWITCH: Set to “Alkaline” if using standard “AA” alkaline batteries, or
set to NiMH for Nickel Metal Hydride or NiCAD if using Nickel Cadmium batteries. Batteries are
not included. Do NOT set the switch to NiMH/NiCAD if using Alkaline batteries, as the charger
will try to charge the alkaline batteries when the external power supply is connected which could
damage the SongBook. Such damage is not covered by the factory warranty.
4. FM ANTENNA: For FM, extend and rotate the telescoping antenna for best FM reception. In
strong FM signal locations, reducing the antenna’s length usually provides better reception.
Keep the antenna retracted in its locked position when not being used to avoid damage.
For AM, rotate the radio for best AM reception.
English
CHARGING: The SongBook’s internal charger will charge the six NiMH or NiCAD batteries if
the adapter is connected, the Batteries/Charger switch is correctly set, and the SongBook is
switched Off. All six NiMH/NiCAD batteries must be correctly installed for charging to take
place. While charging, the LCD will show the battery icon with the signal bars cycling. This
will disappear from the display once the batteries have fully charged. It is normal for the battery
compartment and external power supply to become warm while the batteries are charging.
The SongBook operates solely from the external power adapter whenever it is connected.
Installed rechargeable batteries do not receive a charge while the unit is operating from the power
supply. The SongBook may be used with the AC adapter alone and no batteries installed.
The LCD will show battery strength whenever the SongBook is on. The battery strength meter
accuracy is approximate. Three bars represent full strength, two bars represent roughly 50%
strength, and one bar represents about 25% remaining strength. The signal strength meter
will show full power when there are no batteries installed and the unit is being operated using
the external power supply.
Figure 11 Figure 12
An “E” (“Empty”) on the LCD (Figure 11) represents batteries which are just about dead and
should be replaced if Alkaline, or charged if NiMH/NiCAD, within approximately 10 minutes
or the display will go blank and all memory settings will be lost. If the display shows “E” and
batteries are replaced while the SongBook is On, the “E” will reappear on the LCD (Figure 12)
after the batteries are replaced until the unit is switched Off and then turned back On to reset
the microprocessor. Batteries should be replaced with the SongBook Off.
OTHER IMPORTANT BATTERY NOTES:
It may take 5-6 complete charge/recharge cycles for new rechargeable batteries to become
conditioned and for normal playback times to be realized.
Remove all of the batteries if the SongBook is not to be used for an extended period of time.
Dispose of spent batteries according to your state/country’s regulations.
Do NOT mix battery types or different battery strengths.
Change batteries while the SongBook is OFF.
Total battery playback time depends on volume level and program material.
Charging time may vary depending upon battery condition.
8
Specifications
Model: Tivoli Audio SongBook™
Type: FM/AM digital portable radio
Driver: 2.5" full range
Receiving bands: FM: 87.5–108MHz
AM: 520–1710kHz (522-1629kHz using 9k Step)
De-Emphasis: 75uSec UL/50uSec CE
Dimensions: 7 1/4" W x 6 3/16" H x 2 1/16" D
Weight: 1.75 lbs
All specifications subject to change without notice.
Tivoli Audio reserves the right to make product changes without notice.
Tivoli Audio, the Tivoli Audio logo, and the SongBook are trademarks of Tivoli Audio, LLC.
Tivoli Audio shall not be held liable for operational, technical, or editorial errors/omissions.
For more information about other exciting audio products by Tivoli Audio,
please visit our web site at www.tivoliaudio.com
WARNING
1. For your safety, keep the SongBook a safe distance away from a naked flame, such
as a lit candle.
2. The recommended operating temperature range for the SongBook is 5 degrees C
- 40 degrees C.
3. The 12-16VDC input is suited for operating the SongBook in a boat or camper using
an optional 12VDC, 2A fused adaptor.
4. The apparatus shall not be exposed to dripping and splashing and that no objects filled
with liquids, such as vases, shall be placed on the apparatus.
9
For more information about other exciting
products from Tivoli Audio, please visit our
web site at www.tivoliaudio.com
For warranty and information outside of USA,
please contact your local distributor.
A list of distributors is available at our web site.
www.tivoliaudio.com
  • Page 1 1
  • Page 2 2
  • Page 3 3
  • Page 4 4
  • Page 5 5
  • Page 6 6
  • Page 7 7
  • Page 8 8
  • Page 9 9
  • Page 10 10
  • Page 11 11
  • Page 12 12
  • Page 13 13
  • Page 14 14
  • Page 15 15
  • Page 16 16
  • Page 17 17

Tivoli Audio TivoliAudio SongBookTM User manual

Category
Radios
Type
User manual
This manual is also suitable for

Ask a question and I''ll find the answer in the document

Finding information in a document is now easier with AI