Page is loading ...

Polycom 2-Line
Desk Phone Quick Reference
Guide
ACC-1142 PUG

1
Table of Contents
INTRODUCTION TO YOUR POLYCOM 2-LINE DESK PHONE .................................................................. 2
WELCOME .................................................................................................................................................... 2
DESK PHONE ................................................................................................................................................ 2
HOW TO USE YOUR POLYCOM 2-LINE DESK PHONE ............................................................................ 3
Answering and making calls ................................................................................................................... 3
Answering a Second Call ........................................................................................................................ 4
Placing a second call .............................................................................................................................. 4
Call Transfer ............................................................................................................................................ 5
At this point, the call is connected to the number to which you are transferring them. ........................... 5
Alternate Method for Transferring Calls- ................................................................................................. 5
Conferencing Calls .................................................................................................................................. 6
Call Park .................................................................................................................................................. 6
Paging (Intercom) .................................................................................................................................... 7
Forwarding All Incoming Calls ................................................................................................................ 7
Do Not Disturb ......................................................................................................................................... 8
Voicemail ................................................................................................................................................. 9

2
Introduction to your Polycom 2-Line Desk Phone
Welcome
The AccessLine Hosted PBX phone system and service is a very
powerful communication system that provides a comprehensive solution
for your small business communications needs. This guide highlights
some of the most commonly used features of the 2-Line Desk Phone.
For a complete list of features and capabilities, please refer to the
Polycom 2-Line Desk Phone Owner’s Manual.
Phones may be plugged into your existing network or connected
wirelessly if your system includes the optional Base Unit.
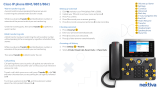
Desk Phone
Handset
Numeric Keys
Volume
Headset
Mute
Speaker
Message Lamp
Line Keys
Softkeys
Dial
Hold
Menu
Navigation keys

3
How to use your Polycom 2-Line Desk Phone
Answering and making calls
Answer a ringing call using the handset
Pick up the handset
Answer a ringing call using the speakerphone
Press the Speaker Key , the “Answer” soft key under the display or the Line
key
Place an external call
1. Pick up the handset or use the speakerphone key
2. Dial the 10-digit number
Place an internal call
1. Pick up the handset or use the speakerphone key
2. Dial the 3-digit extension number
Redialing a call
The Redial function places a call to the last number dialed. To use the Redial
function,
1. With the handset on the hook, press the Redial soft key
Placing a Call on Hold
During a call, press or the Hold soft key. The hold icon will display on the Call
Key label. The caller will hear the standard hold music or your custom hold
music/message.

4
Retrieving a Call on Hold
Press again or the Resume soft key to retrieve the call
Answering a Second Call
If you are on a call and another call comes in to your phone you will hear a tone
from the phone and see the word “calling” on the top line of the display. The next
available Call Key will flash green. There are two ways to answer the second call:
Method 1
1. Press to place the original call on hold.
2. Press to access the new call.
3. Soft key labels are updated on the display showing Ignore, Answer, and
Reject.
4. Press the Answer soft key to answer the incoming call.
5. This places the original call on hold and refreshes the soft key labels.
Method 2
Answer the call by pressing or associated with the
second incoming call.
The first call is put on hold and the second call is answered.
Placing a second call
While on a call, you may place that call on hold and make a second call. There are
two ways to place another call:
Method 1
1. Press to place the original call on hold.
2. Press the New Call soft key or or to access the
new call.
3. Dial the phone number or extension
Method 2
1. Press the New Call soft key or or to access the
new call AND place the original caller on hold
2. Dial the phone number or extension

5
Call Transfer
You can transfer calls from your Desk Phone to another Desk Phone in your office
or to any other phone number outside your office. You may perform both Blind
and Consultative Call Transfer.
To Consultative Transfer a Call-
Note: The following instructions assume you are on a call and that your
phone only has one call active.
1. During a call press the Trnsfer soft key. The active call will be placed on hold
2. Enter the number to which you want to transfer the call.
3. As soon as you hear the ring-back sound or after the party answers (and you
speak to the party), press the Trnsfer soft key.
You can talk privately to the party to which you are transferring the call
before the transfer is completed.
If you are using a handset, the transfer can be completed by putting the
handset on the cradle.
You can cancel the transfer before the call connects by pressing the Cancel
soft key.
To Blind Transfer a Call-
Note: The following instructions assume you are on a call and that your
phone only has one call active.
1. During a call press the Trnsfer soft key. The active call will be placed on hold
2. Press the Blind softkey
3. Enter the phone number or extension you wish to transfer to
At this point, the call is connected to the number to which you are transferring
them.
Alternate Method for Transferring Calls-
This call transfer method is used when you want to transfer a call without tying up
two lines on your phone system. It uses the Intermedia network to transfer the call
instead of the phone system.
1. Receive a call on your Desk Phone
2. Touch #5 to start the transfer (this will place your caller on hold)
3. At the dial tone, enter the extension or phone number you want to transfer
the caller to
4. When the transfer party picks up the phone, touch #5 again.
5. All three of you will be connected.
6. Hang up and the two parties are connected (without tying up any of your
lines)

6
Note- If the transfer party does not pick up the phone, touch #6 to return back to
the original caller.
Call Transfer to Voicemail
You may transfer any caller to a specific voicemail box belonging to any other user
on the system.
1. Receive or place a call on your Desk Phone
2. Press the TRANSFER soft Key
3. Press the Blind soft key
4. Dial *99 followed by the extension number of the desired person. DO NOT
HANG UP
5. Once the call has transferred to the desired voicemail box, your line will
hang up. Do not hang up the phone until the line has disconnected.
Conferencing Calls
You may join two calls already on your phone or add an additional party to an
existing call.
Joining Calls (allowed only when you have two calls on your phone)
1. When you are on an active call, use the to go to the call on hold, then
press the Join soft key.
2. A conference is created with the active call, the call on hold and yourself.
To Setup a Conference Call (with two other parties)
1. Call the first party.
2. Press Conf soft key to create a new call.
3. The active call is placed on hold.
4. You will receive a dial tone. Dial the second party.
5. When the second party answers, press the Conf soft key again to join all
parties in the conference.
Call Park
To Park a call
Parking a call is very similar to putting a call on hold. The key difference is, when
you put a call on hold you can only retrieve the held call from the phone that put
the call on hold. With Call Park, you can put a call on hold and pick it up from
ANY phone within the same Call Park Group. Through the Admin Portal, Call
Park Groups can be creates so specific groups of phones can park calls for each
other. If you do not create specific Call Park Groups, all phones are automatically
assigned to the Standard Call Park Group.
1. While on a call, press the More soft key

7
2. Press the Park soft key
3. The phone will respond with a voice prompt such as “Call Parked on
9001”. The caller will hear hold music.
4. To pick up the parked call, anyone on any phone may dial the park number
(9001 in this example) to be connected with the caller.
Paging (Intercom)
To page to all phones
Paging allows you to speak to a group or all phones at the same time through the
speaker phone. Paging is used to make announcements such as “Jim, you have a
visitor in the lobby” or to let people know about a parked call such as “Susan, you
have a call waiting on park 2”. Paging will only notify phones not in use or not set
to DND. The Admin Portal is used to create Paging Groups so only specific
phones can hear a page.
1. Either pick up the handset or uses the speaker phone
2. Dial the paging group number or 9100 to page all phones
3. WAIT UNTIL YOU HEAR THE TONE
4. Make your announcement which will be heard on all phones in the paging
group (except phones set to DND or phones in use)
5. Hang up the phone when finished
Answering a Page
1. Either pickup the handset or uses the speaker phone
2. Press the “Answer” soft key on the phone display
3. Talk directly back to the person who initiated the page
Rejecting a Page
1. To ignore a page, press the “Reject” button
Forwarding All Incoming Calls
You can configure your phone so that all incoming calls are forwarded to another
party (known as static forwarding). You can choose to:
• Forward all calls
• Forward calls when your phone is busy
• Forward call when you do not answer your phone
To enable call forwarding to another party:
1. Press and select Features > Forward.
2. Using and , select the forwarding type you want to change and then
press . The options are:

8
• Always—For all incoming calls
• No Answer—Once all options to accept calls have been taken
• Busy—When you are already in a call
3. Depending on your selection:
a. If you select Always, enter a number to forward all future incoming
calls to.
b. If you select No Answer, enter a number to forward all unanswered
incoming calls to and how many rings to wait before forwarding (one
ring is approximately six seconds). A value of 4 is recommended.
c. If you select Busy, enter a number to forward all future incoming calls
to when you are already in another call.
4. Select the Enable soft key to confirm call forwarding.
5. Select the Exit soft key to cancel any changes.
6. The idle display returns with a moving arrow as the line label to confirm
call forwarding is enabled.
Disable Call Forwarding
1. Press and select Features > Forward.
2. Using and , select the forwarding type you want to change and then
press the Select soft key.
3. Press the Disable soft key to turn off call forwarding.
4. The idle display returns and the regular icon appears as the line indicator.
Do Not Disturb
A Desk Phone can be set to Do Not Disturb (DND). When a phone is set to DND,
any internal or external call will immediately route to that phone’s voicemail box
without ringing the phone.
Set DND
1. Press
2. Features will be highlighted, press
3. Press the down arrow and highlight Do Not Disturb
4. Press
5. The word Enable will be displayed. Press the 1 key on the keypad to
enable Do Not Disturb.
An animated icon will display on your phone indicating that Do Not Disturb is
enabled.
Calls received while Do Not Disturb is enabled are logged in the Missed Calls list.

9
Cancel DND
1. Press
2. Features will be highlighted, press
3. Press the down arrow and highlight Do Not Disturb
4. Press
5. The word Disable will be displayed. Press the 1 key on the keypad to
disable Do Not Disturb.
Voicemail
Each phone has a built-in voicemail box. If a call to your phone is not answered or
your phone is busy, the voicemail box will take a message and alert you through
the message-waiting lamp at the top of the phone and optionally via email to your
cell phone or computer. Messages may be retrieved through your Desk Phone,
your Personal Portal or from any phone.
Retrieving Messages from Your Desk Phone
1. Press the Msgs soft key or press ,
2. Select Features > Messages, and then press .
3. Press the CONNCT soft key
4. The system will prompt you to enter your PIN (the default is 0000)
5. The system will then say, “You have x new and y old voicemail messages”
6. The following options are available through the keypad

10
Retrieving messages from any phone
1. Dial your Desk Phone number
2. Allow the phone to ring then forward to your voicemail box
3. Enter your PIN over the greeting
Retrieving messages via the Web
1. Go to www.accessline.com/login
2. Enter your Desk Phone number
3. Enter your PIN
4. Click LOG IN
5. You will be presented with a list of new and listened to voicemail messages
6. Click the play button associated with the desired message and it will play
through your computer speakers
Change Your Voicemail PIN via the Phone
1. Press the Msgs soft key or press ,
2. Select Features > Messages, and then press .
3. Press the CONNCT soft key

11
4. Enter your password when prompted (0000 by default)
5. Touch 8 for User Options
6. Touch 3 to enter a new PIN
7. Enter your new PIN and follow the directions to confirm and save your
new PIN
Enter/Change an Unavailable Greeting via the Phone
1. Press the Msgs soft key or press ,
2. Select Features > Messages, and then press .
3. Press the CONNCT soft key
4. Enter your password when prompted (it is 0000 by default) or over your
current greeting if you have called from another phone.
5. Touch 8 for User Options
6. Touch 1 to record your new Unavailable Greeting
Change the Amount of Time Before Voicemail Picks Up via the Phone
1. Press and select Features > Forward.
2. Using and , select the forwarding type you want to change and then
press . The options are:
• Always—For all incoming calls
• No Answer—Once all options to accept calls have been taken
• Busy—When you are already in a call
3. Select No Answer
4. Use the down arrow and scroll down to below “Forward After Rings:
5. Press .
6. Use the keypad to enter a new number of rings (one ring is approximately
four seconds).
7. Press the OK softkey
/