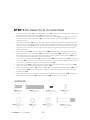
Spirit XE-295 2013 is an elliptical trainer intended for residential use. It has multiple built-in programs, including manual, preset, heart rate control, interval training, and recovery. The display console shows the elapsed time, distance, calories burned, and heart rate. The handlebars have built-in contact heart rate sensors, which can be used for heart rate monitoring during workouts. The stride length is adjustable to accommodate users of different heights. The elliptical trainer is designed to provide a low-impact, full-body workout.
Spirit XE-295 2013 is an elliptical trainer intended for residential use. It has multiple built-in programs, including manual, preset, heart rate control, interval training, and recovery. The display console shows the elapsed time, distance, calories burned, and heart rate. The handlebars have built-in contact heart rate sensors, which can be used for heart rate monitoring during workouts. The stride length is adjustable to accommodate users of different heights. The elliptical trainer is designed to provide a low-impact, full-body workout.


-
 1
1
-
 2
2
-
 3
3
-
 4
4
-
 5
5
-
 6
6
-
 7
7
-
 8
8
-
 9
9
-
 10
10
-
 11
11
-
 12
12
-
 13
13
-
 14
14
-
 15
15
-
 16
16
-
 17
17
-
 18
18
-
 19
19
-
 20
20
-
 21
21
-
 22
22
-
 23
23
-
 24
24
-
 25
25
-
 26
26
-
 27
27
-
 28
28
-
 29
29
-
 30
30
-
 31
31
-
 32
32


Spirit XE-295 2013 Owner's manual
- Type
- Owner's manual
- This manual is also suitable for
Spirit XE-295 2013 is an elliptical trainer intended for residential use. It has multiple built-in programs, including manual, preset, heart rate control, interval training, and recovery. The display console shows the elapsed time, distance, calories burned, and heart rate. The handlebars have built-in contact heart rate sensors, which can be used for heart rate monitoring during workouts. The stride length is adjustable to accommodate users of different heights. The elliptical trainer is designed to provide a low-impact, full-body workout.
Ask a question and I''ll find the answer in the document
Finding information in a document is now easier with AI
Related papers
-
Spirit XE 195 Owner's manual
-
-
-
-
-
-
-
-
Spirit XE 700 User manual
-
 Dyaco International 2AHVL-IEITB1DYACO User manual

Other documents
-
 Sole E20 Owner's manual
-
Sole E95 Owner's manual
-
 Solo Fitness E95 Owner's manual
-
ROOMS TO GO 23131535 Assembly Instructions
-
-
Horizon Fitness 3.1E User guide
-
-
Landice Home Gym 82020 User manual
-
-
Xterra FS4.0e Owner's manual

