Epson SureColor R5070L User guide
- Category
- Print & Scan
- Type
- User guide
This manual is also suitable for

User's Guide
CMP0254-01 EN

Copyrights and Trademarks
No part of this publication may be reproduced, stored in a retrieval system, or transmitted in any form or by any means, electronic, mechanical,
photocopying, recording, or otherwise, without the prior written permission of Seiko Epson Corporation. The information contained herein is
designed only for use with this Epson printer. Epson is not responsible for any use of this information as applied to other printers.
Neither Seiko Epson Corporation nor its affiliates shall be liable to the purchaser of this product or third parties for damages, losses, costs, or expenses
incurred by the purchaser or third parties as a result of accident, misuse, or abuse of this product or unauthorized modifications, repairs, or alterations
to this product, or (excluding the U.S.) failure to strictly comply with Seiko Epson Corporation’s operating and maintenance instructions.
Seiko Epson Corporation shall not be liable for any damages or problems arising from the use of any options or any consumable products other than
those designated as Original Epson Products or Epson Approved Products by Seiko Epson Corporation.
Seiko Epson Corporation shall not be held liable for any damage resulting from electromagnetic interference that occurs from the use of any interface
cables other than those designated as Epson Approved Products by Seiko Epson Corporation.
EPSON and EPSON EXCEED YOUR VISION or EXCEED YOUR VISION and their logos are registered trademarks or trademarks of Seiko Epson
Corporation.
Microsoft
®
, Windows
®
, and Windows Vista
®
are registered trademarks of Microsoft Corporation.
Mac, macOS are registered trademarks of Apple Inc.
Intel
®
is a registered trademark of Intel Corporation.
Adobe and Reader are either registered trademarks of Adobe in the United States and/or other countries.
Bemcot
™
is a trademark of Asahi Kasei Corporation.
YouTube
®
and the YouTube logo are registered trademarks or trademarks of YouTube, LLC.
General Notice: Other product names used herein are for identification purposes only and may be trademarks of their respective owners. Epson disclaims
any and all rights in those marks.
© 2020 Seiko Epson Corporation
Note for North American and Latin American Users
IMPORTANT: Before using this product, make sure you read the safety instructions in the online Notices.
SC-R5000 Series/SC-R5000L Series User's Guide
Copyrights and Trademarks
2

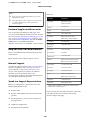
Contents
Copyrights and Trademarks
Note for North American and Latin American
Users................................... 2
Notes on Manuals
Meaning of Symbols........................ 5
Screenshots.............................. 5
Illustrations.............................. 5
Manual Organization....................... 5
Viewing Video Manuals..................... 6
Viewing PDF Manuals...................... 6
Introduction
Printer Parts.............................. 8
Front Section........................... 8
Inside................................ 11
Back................................. 12
Ink Unit.............................. 14
Control panel............................ 16
Understanding and Operating the Display....... 17
Understanding the Display................ 17
Operating procedure..................... 24
Understanding the Signal Lamps.............. 25
Notes on Usage and Storage.................. 26
Installation space....................... 26
Notes when using the printer............... 26
Notes when not using the printer............ 27
Notes on handling the ink supply units. . . . . . . 27
Notes on handling the ink unit............. 28
Precautions When Handling and Storing
Media................................ 28
Introducing the Supplied Software............. 30
Supplied software....................... 30
Pre-installed software.................... 31
Using Epson Edge Dashboard................ 32
Starting Procedure...................... 32
Registering the Printer................... 32
Checking and Managing the Printer's Status. . . . 33
Closing Procedure....................... 34
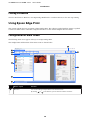
Using Epson Edge Print..................... 34
Configuration of main screen.............. 34
Printing with the appropriate settings for the
media being used (printing using EMX). . . . . . . 37
Dividing a large image into parts to print it
(tiling)............................... 40
Using EPSON Software Updater.............. 44
Checking software update availability......... 44
Receiving update notifications.............. 44
Using Web Config........................ 44
Starting Procedure...................... 44
Closing Procedure....................... 45
Uninstalling Software...................... 45
Basic Operations
Workflow for Correct Printing............... 46
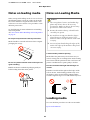
Notes on loading media..................... 47
Notes on Loading Media.................... 47
Loading media........................... 47
Settings for Loaded Media................... 53
Using the Auto Take-up Reel Unit............. 55
Attaching the Roll Core................... 55
Take-up with the Printed Side Facing Out. . . . . 57
Take-up with the Printed Side Facing In....... 59
Optimizing Media Settings (Automatic
Adjustment)............................. 61
Precautions when performing Print
Adjustments........................... 61
Automatic Adjustment Procedure. . . . . . . . . . . 61
If you cannot perform Automatic Adjustment
.................................... 62
Replacing the Media....................... 64
Replacing Expended Media................ 64
Replacing Media that is not Expended ........ 65
Removing the Take-up Roll.................. 66
Before Printing........................... 67
Changing settings during printing............. 68
Changing the temperature for each heater. . . . . 68
Correcting Banding...................... 68
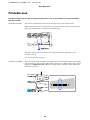
Printable area............................ 70
Maintenance
When to Perform Various Maintenance
Operations.............................. 73
Components Requiring Regular Cleaning and
Cleaning Timing........................ 73
Locations of Consumables and Replacement
Timing............................... 74
Other maintenance...................... 75
SC-R5000 Series/SC-R5000L Series User's Guide
Contents
3

What You’ll Need......................... 76
Precautions regarding maintenance............ 77
Performing Regular Cleaning................ 77
Daily Cleaning......................... 77
Using Cleaning liquid.................... 78
Cleaning Around the Print Head............ 79
Cleaning the anti-drying caps.............. 80
Cleaning the Suction Cap................. 83
Cleaning Around the Flushing Pad.......... 84
Cleaning the Media Cleaner................ 85
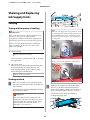
Shaking and Replacing Ink Supply Units. . . . . . . . 87
Shaking.............................. 87
Replacement procedure................... 88
Disposing of Waste Ink..................... 89
Preparing and Replacement Timing.......... 89
Waste Ink Counter...................... 90
Replacing the Waste Ink Bottle............. 90
Replacing the Wiper Unit................... 91
Preparing and Replacement Timing.......... 91
Replacing the Wiper Unit................. 92
Replacing the Media Edge Plates.............. 93
Disposal of used consumables................ 94
Print Head Nozzle Check................... 95
Types of Nozzle Checks................... 95
How to Print a Nozzle Check Pattern......... 95
Print Head Cleaning....................... 96
Types of Cleaning....................... 96
Performing Print Head Cleaning............ 96
Long-term Storage (Pre-storage Maintenance). . . . 97
Pre-storage Maintenance Timing............ 97
Performing Pre-storage Maintenance......... 97
Restarting use of the printer................ 98
Cleaning the inside surface of the printer cover.... 98
Cleaning pressure rollers.................... 99
Control Panel Menu
Menu List.............................. 100
Details of the Menu....................... 106
General Settings menu................... 106
Media Settings menu.................... 112
Maintenance menu..................... 118
Supply Status menu..................... 119
Replacement Part Information menu........ 119
Printer Status/Print menu................ 120
Problem Solver
When a Message is Displayed................ 121
When a Maintenance Call/Printer Error Occurs
..................................... 121
Troubleshooting......................... 122
You cannot print (because the printer does not
work)............................... 122
The printer sounds like it is printing, but
nothing prints......................... 122
The prints are not what you expected. . . . . . . . 123
Media............................... 124
Others.............................. 127
Appendix
Options and Consumable Products........... 128
Ink Supply Unit........................ 128
Maintenance Items..................... 131
Supported Media......................... 133
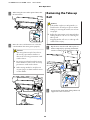
Moving and Transporting the Printer.......... 133
Moving the Printer..................... 133
Transport............................ 136
Print Lengths by Pass Number and Creating a Job
..................................... 137
Table of Print Lengths by Pass Number...... 137
Creating a job......................... 137
System Requirements..................... 138
Epson Edge Dashboard.................. 138
Epson Edge Print...................... 139
Web Config.......................... 139
Specifications Table....................... 141
Where To Get Help
Technical Support Web Site................. 143
Contacting Epson Support.................. 143
Before Contacting Epson................. 143
Help for Users in North America........... 143
Help for Users in Latin America............ 144
Help for Users in Europe................. 145
Help for Users in Taiwan................. 145
Help for Users in Australia/New Zealand. . . . . 146
Help for Users in Singapore............... 146
Help for Users in Thailand................ 146
Help for Users in Vietnam................ 147
Help for Users in Indonesia............... 147
Help for Users in Hong Kong.............. 147
Help for Users in Malaysia................ 148
Help for Users in India.................. 148
Help for Users in the Philippines........... 148
SC-R5000 Series/SC-R5000L Series User's Guide
Contents
4

Notes on Manuals
Meaning of Symbols
Warning:
Warnings must be
followed to avoid serious
bodily injury.
Caution:
Cautions must be
followed to avoid bodily
injury.
c
Important:
Important must be
followed to avoid damage
to this product.
Note:
Notes contain useful or
additional information on
the operation of this
product.
U
Indicates related
reference content.
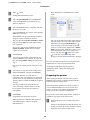
Screenshots
❏ Screenshots used in this manual may differ
slightly from the actual screens.
❏ Unless otherwise stated, the Windows screenshots
used in this manual are from Windows 10.
Illustrations
Unless otherwise specified, the illustrations in this
manual are for the SC-R5000 Series.
The illustrations may differ slightly from the model
you are using. Please be aware of this when using the
manual.
Manual Organization
Regions other than North America and Latin America
The manuals for the product are organized as shown
below.
You can view the PDF manuals using Adobe Reader
or Preview (Mac).
Setup Guide
(booklet)
Provides information on how to
setup the printer after unpacking it
from the box. Make sure you read
this manual to perform operations
safely.
User's Guide (Ex-
cerpt) (PDF)
This manual explains the necessary
basic operations and maintenance
for daily use.
Online Manual
User's Guide
(this guide)
This manual explains basic
operations, necessary items for
daily use, maintenance operations,
and troubleshooting.
Troubleshooti
ng & Tips
This manual provides some
frequently asked questions and
tips to help you use the printer
efficiently.
Epson Video
Manuals
These videos show you how to
load media and perform
maintenance.
Network
Guide (PDF)
This manual provides information
on using the printer over a network.
North America
To view user manuals, visit the support site for your
region and search for your product.
❏ https://www.epson.com/support (U.S.)
❏ http://www.epson.ca/support (Canada)
Latin America
To view user manuals, visit the support site for your
region and search for your product.
❏ http://www.latin.epson.com/support (Caribbean)
❏ http://www.epson.com.br/suporte (Brazil)
SC-R5000 Series/SC-R5000L Series User's Guide
Notes on Manuals
5

❏ http://www.latin.epson.com/soporte (other
regions)
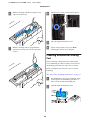
Viewing Video Manuals
We have also posted video manuals on YouTube
showing you how to load media and perform basic
maintenance operations.
You can view the video manuals by clicking Epson
Video Manuals from the top page of the Online
Manual, or by clicking the following blue text.
Epson Video Manuals
You can also access the manuals from a smartphone
or tablet by scanning the QR code attached to the
printer.
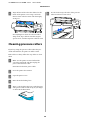
If the subtitles are not displayed when you play the
video, click the subtitles icon shown in the image below.
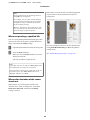
Viewing PDF Manuals
This section uses the Adobe Acrobat Reader DC as an
example to explain the basic operations for viewing
the PDF in Adobe Reader.
A
Click to print the PDF manual.
B
Each time it is clicked the bookmarks are hidden
or shown.
C
Click the title to open the relevant page.
Click [+] to open the titles lower in the hierarchy.
D
If the reference is in blue text, click the blue text to
open the relevant page.
To return to the original page, do the following.
For Windows
While pressing the [Alt] key, press the [ ] key.
For Mac
While pressing the [command] key, press the [ ]
key.
SC-R5000 Series/SC-R5000L Series User's Guide
Notes on Manuals
6

E
You can input and search for keywords, such as
the names of items you want to confirm.
For Windows
Right click on a page in the PDF manual and select
Find in the menu that is displayed to open the
search toolbar.
For Mac
Select Find in the Edit menu to open the search
toolbar.
F
To enlarge the text in the display that is too small
to see well, click
. Click to reduce the size.
To specify a part of an illustration or screenshot to
enlarge, do the following.
For Windows
Right click on the page in the PDF manual and
select Marquee Zoom in the menu that is
displayed. The pointer changes to a magnifying
glass, and you can use it to specify the range of the
place you want to enlarge.
For Mac
Click View menu - Zoom - Marquee Zoom in this
order to change the pointer to a magnifying glass.
Use the pointer as a magnifying glass to specify the
range of the place you want to enlarge.
G
Opens the previous page or next page.
SC-R5000 Series/SC-R5000L Series User's Guide
Notes on Manuals
7

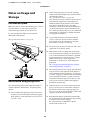
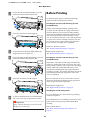
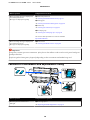
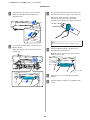
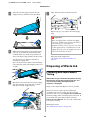
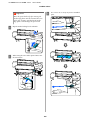
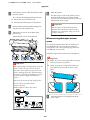
Introduction
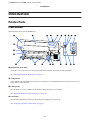
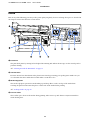
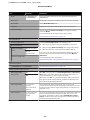
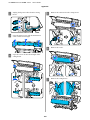
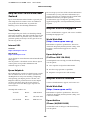
Printer Parts
Front Section
The illustration shows the SC-R5000 Series.
A Maintenance cover (left)
Open this cover to clean the area around the print head. Normally closed when using the printer.
U “Cleaning Around the Print Head” on page 79
B Curing heater
Cures and fixes the ink in the printouts. If you touch print outs containing ink that has not been cured, your
hands will be soiled with ink.
C Cutter groove
Pass the blade of a cutter (available in the market) down this groove to cut media.
U “Replacing Media that is not Expended ” on page 65
D Tension bar
The tensioner maintains tension to prevent the media sagging as it is taken up.
U “Using the Auto Take-up Reel Unit” on page 55
SC-R5000 Series/SC-R5000L Series User's Guide
Introduction
8

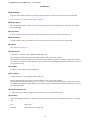
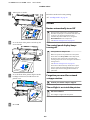
E Media holder
Place the roll core for media take-up on these holders. There are same parts on both the left and the right.
U “Using the Auto Take-up Reel Unit” on page 55
F Media support
Rest media temporarily on these supports when removing the take-up roll. There are same parts on both the
left and the right.
G Auto switch
Use this switch to select the auto take-up direction. If Off is selected, the paper is not taken up.
H Manual switch
Use this switch to take-up manually. You can use this when the Auto switch is in the Off position.
I Ink unit
U “Ink Unit” on page 14
J Optional port
Connect the connection cable supplied with the ink unit.
Regions other than North America and Latin America: U Setup Guide (booklet)
North American and Latin American users: Contact your dealer for product installation. The product must be
installed by an authorized dealer. Damage to the product from unauthorized installation will not be covered by
your Epson warranty.
K USB port
Connect to your computer with a USB cable.
L AC outlet #3
Connect the power cable supplied with the ink unit.
Regions other than North America and Latin America: U Setup Guide (booklet)
North American and Latin American users: Contact your dealer for product installation. The product must be
installed by an authorized dealer. Damage to the product from unauthorized installation will not be covered by
your Epson warranty.
M AC inlet #1/AC inlet #2
Connect the power cable supplied with the printer. Be sure to connect both cables.
N Data lamp
The data lamp lights or flashes to indicate the network connection status and whether the printer is receiving
data.
On : Connected.
Flashing : Connected and receiving data.
SC-R5000 Series/SC-R5000L Series User's Guide
Introduction
9

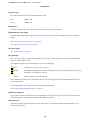
O Status lamp
The color indicates the network's communication speed.
Red : 100Base-TX
Green : 1000Base-T
P LAN port
Connects the LAN cable. Use a shielded twisted pair cable (category 5 or higher).
Q Maintenance cover (right)
Open this when replacing the wiper unit or when cleaning around the caps. Normally closed when using the
printer.
U “Cleaning the anti-drying caps” on page 80
U “Cleaning the Suction Cap” on page 83
R Control panel
U “Control panel” on page 16
S Signal lamp
The status of the printer is indicated by whether or not the three color lamps are lit or flashing. When all of the
lamps are off, the printer is off.
The following explains the basic meanings for the color of the lamps.
Red : Cannot print as an error has occurred.
Yellow : The printer is being operated while a warning message is displayed, maintenance is being
performed, or the printer is paused.
Green : Ready to print or currently printing.
The combination of lamp colors and whether they are lit or flashing provides detailed information about the
status of the printer.
See the following for more details on understanding the signal lamp.
U “Understanding the Signal Lamps” on page 25
T Media loading lever
Once media has been loaded, move the media loading lever to the front to press down on the media. Move the
media loading lever to the back to release the media prior to removal.
U Printer cover
Open when loading media, cleaning the inside of the printer, or removing jammed media. Normally closed
when using the printer.
SC-R5000 Series/SC-R5000L Series User's Guide
Introduction
10

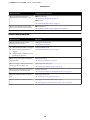
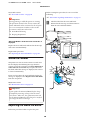
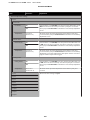
Inside
Dirt on any of the following parts may reduce print quality. Regularly clean or exchange these parts as described in
the chapters listed in the reference sections below.
A Print head
The print head prints by moving left and right while emitting ink. Follow the messages on the control panel to
perform cleaning.
U “Cleaning Around the Print Head” on page 79
B Thermal sheet
Prevents uneven heat distribution in the platen heater thereby preventing poor quality prints. Make sure you
use a thermal sheet if the width of the loaded media is 54 inches or less.
C Media edge plates
The media edge plates prevent the media riding up and keeps fibers on the cut edge of the media from
touching the print head. Position the plates at either side of the media before printing.
U “Loading media” on page 47
D Pressure rollers
These rollers press down on the media during printing. These moves up and down in conjunction with the
media loading lever.
SC-R5000 Series/SC-R5000L Series User's Guide
Introduction
11

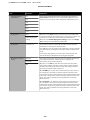
E Platen heater
The platen heater ensures that the ink adheres evenly. If lint, dust, or ink adheres to this, it could cause clogged
nozzles or ink drops to occur, so be sure to clean it daily.
U “Daily Cleaning” on page 77
F Flushing pad
Color ink and Optimizer (OP) are discharged onto this pad during flushing. The right side is for OP, and the
left side is for ink. Check this during regular cleaning and clean it if it is dirty.
U “Cleaning Around the Flushing Pad” on page 84
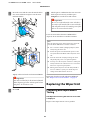
G Wiper Unit
Used to wipe off ink that is stuck to the surface of the print head nozzles. The wiper unit is a consumable item.
Replace when a message is displayed on the control panel prompting you to do so.
U “Replacing the Wiper Unit” on page 91
H Suction Cap
Use this cap to suck the ink out of the print head. Follow the messages on the control panel to perform cleaning.
U “Cleaning the Suction Cap” on page 83
I Anti-drying caps
Except during printing, these caps cover the print head nozzles to prevent them drying out. Clean when a
message is displayed on the control panel prompting you to do so.
U “Cleaning the anti-drying caps” on page 80
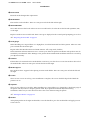
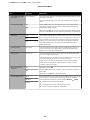
Back
SC-R5000 Series/SC-R5000L Series User's Guide
Introduction
12

A Drive switch
Rewinds media during media replacement.
B Media holder
Place media on these holders. There are same parts on both the left and the right.
C Waste Ink Bottle
Waste ink collects in this bottle. There are two waste ink bottles; for color ink on the left and Optimizer (OP)
on the right.
Replace it with a new waste ink bottle when a message is displayed on the control panel prompting you to do so.
U “Disposing of Waste Ink” on page 89
D Level gauge
When installing on a carpeted floor or a sloping floor, check the horizontal level of the printer. There are same
parts on both the left and the right.
Regions other than North America and Latin America: U Setup Guide (booklet)
North American and Latin American users: Contact your dealer for product installation. The product must be
installed by an authorized dealer. Damage to the product from unauthorized installation will not be covered by
your Epson warranty.
E Lift lever
If the media to be mounted on the media holder seems heavy, use these levers to raise the media to the level of
the media holder. There are same parts on both the left and the right.
F Media support
Rest media on these supports before placing it on the media holder. There are same parts on both the left and
the right.
G Casters
There are two casters on each leg. Once installation is complete, the casters should be kept locked while the
printer is in use.
H Adjusters
There are two adjusters on each leg. When installing on a carpeted floor or a sloping floor, check level gauge of
the printer and adjust these to keep the printer stable. If you perform horizontal adjustment during
installation, make sure you raise the levelers above the casters before moving the printer.
U “Moving the Printer” on page 133
I Handle
After placing media on the right media holder, rotate the handle to press the media holder and apply pressure
to the roll core.
SC-R5000 Series/SC-R5000L Series User's Guide
Introduction
13

J AC outlet #4/AC outlet #5
Connect the power cable supplied with the curing heater. Be sure to connect both cables.
K Media cleaner
Removes lint and dust from the surface of the media.
U “Cleaning the Media Cleaner” on page 85
L Pre-heater
Heats the media before printing so that the print area is not subject to sudden changes in temperature.
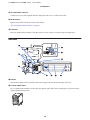
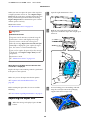
Ink Unit
A Ink unit
The ink unit supplies ink to the printer. Insert ink supply units into all the ink supply unit trays.
B Security cable bracket
Pass a commercially available security cable through the upper and lower mounting parts to prevent the ink
supply unit from being stolen.
SC-R5000 Series/SC-R5000L Series User's Guide
Introduction
14

C Ink unit wire
When in use, be sure to use screws to fasten the ink unit wire to the front and back of the printer's legs. The ink
tube may break if you move the ink unit while it is connected to the printer without being fastened with the ink
unit wire.
D Overturn-prevention plate
Make sure the ink unit is used with an overturn-prevention plate attached to both sides to prevent the ink unit
from overturning.
E LED light
The LED lamp indicates, by lighting or flashing, the ink supply units inserted into their ink supply unit trays
and the ink unit, as shown below.
Lit blue : Ink is being supplied to the printer. Do not pull out the ink supply unit tray.
Flashing blue : It is time to shake the ink supply unit. Pull out the ink supply unit tray and shake it.
U “Shaking” on page 87
Lit or flashing orange: An error or warning has occurred. The type of error or warning is indicated by how the
lamp lights or flashes. You can check the details of the error or warning on the control
panel's screen.
Off : No error. You can pull out the ink supply unit tray if necessary.
F Ink supply unit tray
Insert the ink supply unit for the color indicated on the label. Place all of the ink supply unit trays in the ink unit.
G Lock switch
To pull out an ink supply unit tray, unlock it by moving the lock switch to the right. After placing the ink
supply unit tray in the ink unit, lock it by moving the lock switch to the left.
H Ink tube
This tube supplies ink from the ink supply unit to the printer.
I Ink tube connector
This connector connects the ink tube and the printer. This is used with the ink tube and printer connected
normally, except for when transporting the printer.
J Connector lock levers
Locks the ink tube connector. Do not use this after it is locked during setup.
SC-R5000 Series/SC-R5000L Series User's Guide
Introduction
15

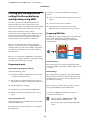
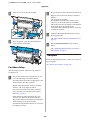
Control panel
A
P light (power light)
The printer's operational status is indicated by a lit or flashing light.
On : The power is on.
Flashing : The printer is operating such as receiving data, shutting down, or performing Print Head
Cleaning.
Off : The power is off.
B
P button (power button)
Turns the power on and off.
C [ ] button (rewind button)
Depending on the status of the media loading lever, operations differ as shown below.
❏ When the media loading lever is moved to the front
You can rewind the media by holding down the button. Rewinding stops when the leading edge of the media reaches
the print start position. Rewind can be resumed by releasing the button and then pressing it again. Press and hold the
button to speed up the rewinding. This is useful when fine-tuning media alignment as you can rewind the media in
increments of 0.4 mm by pressing the button briefly.
❏ When the media loading lever is moved to the back
You can rewind media that has been loaded with the printable side out by holding down the button.
D [ ] button (feed button)
SC-R5000 Series/SC-R5000L Series User's Guide
Introduction
16

Depending on the status of the media loading lever, operations differ as shown below.
❏ When the media loading lever is moved to the front
You can feed the media by holding down the button. Press and hold the button to speed up the feeding. This is useful
when fine-tuning media alignment as you can feed the media in increments of 0.4 mm by pressing the button briefly.
❏ When the media loading lever is moved to the back
You can rewind media that has been loaded with the printable side in by holding down the button.
E (Home)
Press to return to the home screen during menu operations and so on (when is lit).
(Home) is not lit when it cannot be used
F Screen
Displays the printer's status, menus, error messages, and so on.
U “Understanding and Operating the Display” on page 17
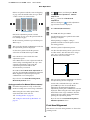
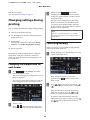
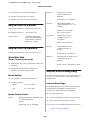
Understanding and Operating the Display
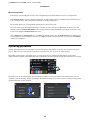
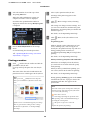
Understanding the Display
This section explains how to view the following two screens.
Home screen
You can check the current status of the printer.
Startup adjustment screen
You can quickly change the major adjustment values. This is useful when you need to make frequent adjustments
to stabilize the print quality, such as when you start using new media.
You can switch between the home screen and the startup adjustment screen each time you press
.
SC-R5000 Series/SC-R5000L Series User's Guide
Introduction
17

Home screen
A (Menu)
The settings menu will be displayed.
U “Control Panel Menu” on page 100
B Status display area
Displays the printer's status and warning messages. Only the most recent notifications are shown in this area.
You can check all warning notifications by pressing
.
When a print job is received, the displayed content changes as shown below. The following provides an explan-
ation of each display.
Displays a preview of the image being printed and the file name.
Displays a progress bar showing the printing progress.
Displays the number of print passes.
Displays the estimated time until printing is complete. This includes the heating time necessary for the
heater to reach the set temperature, the curing time after printing, and, depending on the settings, the
warm-up time for the print head.
SC-R5000 Series/SC-R5000L Series User's Guide
Introduction
18

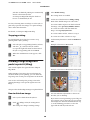
This is the Pause (Suspend) button.
Press this button and select whether to stop printing immediately (Immediate pause) or stop after printing
the current page (or job if it is a single page) (Pause between pages). Pressing Resume on the screen dur-
ing a pause resumes printing. However, if you select Immediate pause, printing may become disrupted
when printing restarts.
Appears as the Cancel button while warming up, until the heater reaches the set temperature. Press this
button to cancel the job. This button appears as Start while warming up when printing an adjustment
pattern, and you can press this to start printing even if the temperature of the heater is low.
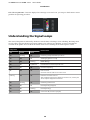
C Media info
Displays the name and number of the currently selected registered media, as well as the width of the currently
loaded media. When Remaining Amount Management is set to On, the remaining amount of the loaded
media is also displayed. Pressing this area displays the Media Settings from the settings menu where you can
change to a different registered media number or change the settings for the media number that is currently
selected.
D Status of consumables
Displays the approximate amount remaining and the status of consumables such as the ink supply unit. Press-
ing this area allows you to check details for the amount remaining and the part number of each consumable.
If you are using the SC-R5000L Series, pressing this area allows you to perform the following checks and settings.
❏ Check which ink supply unit is currently operating or supplying ink
❏ Check the status of non-operational ink supply units
❏ Manually switch the operational ink supply unit
The following provides an explanation of each display.
Ink supply unit status
Indicates the approximate amount of ink remaining. The bar goes lower as the remaining ink runs low.
The letters under the bar are abbreviations of the colors. The relation of the abbreviations and the ink
colors is shown below.
BK : Black
Y:Yellow
M:Magenta
C:Cyan
LM : Light Magenta
LC : Light Cyan
OP : Optimizer
ML : Maintenance Liquid
SC-R5000 Series/SC-R5000L Series User's Guide
Introduction
19

Depending on the status of the ink supply unit, the display of the bar changes as shown below.
: Ink is low. You need to prepare a new ink supply unit.
If you are using the SC-R5000L Series, the ink supply automatically switches to another ink
supply unit of the same color, so make sure that the ink supply unit that is being switched to
has enough ink.
: Ink is expended. Replace the old ink supply unit with a new one.
If you are using the SC-R5000L Series, when ink is expended, the ink supply automatically
switches to another ink supply unit of the same color.
: It is time to shake the ink supply unit. Remove the ink supply unit tray for any ink unit whose
LED light is flashing blue, and then shake the tray. Do not pull out the ink supply unit tray if
the light is lit blue.
: Only displayed when using the SC-R5000L Series.
An ink supply unit tray without an ink supply unit attached has been installed in the ink unit.
Attach the ink supply unit as soon as possible, otherwise the ink unit could malfunction.
: Only displayed when using the SC-R5000L Series.
Make sure all of the ink unit lock switches are locked, and then follow the instructions
displayed on the screen.
: The cleaning ink supply unit is installed.
Waste Ink Bottle status
Indicates the approximate amount of space available in the waste ink bottle. The bar goes lower as the
amount of remaining space decreases. The letters under the bar are identification abbreviations of the
waste ink bottles. The meanings of the abbreviations are shown below.
: Waste ink bottle for color ink
: Waste ink bottle for Optimizer (OP)
Depending on the status of the waste ink bottle, the display of the bar changes as shown below.
: The waste ink bottle is almost full. Ready a new Waste Ink Bottle.
Wiper unit status
Indicates the approximate amount of wiper unit remaining. The bar goes lower as the remaining ink
runs low.
: The wiper unit is running low, so you need to prepare a new wiper unit.
SC-R5000 Series/SC-R5000L Series User's Guide
Introduction
20
Page is loading ...
Page is loading ...
Page is loading ...
Page is loading ...
Page is loading ...
Page is loading ...
Page is loading ...
Page is loading ...
Page is loading ...
Page is loading ...
Page is loading ...
Page is loading ...
Page is loading ...
Page is loading ...
Page is loading ...
Page is loading ...
Page is loading ...
Page is loading ...
Page is loading ...
Page is loading ...
Page is loading ...
Page is loading ...
Page is loading ...
Page is loading ...
Page is loading ...
Page is loading ...
Page is loading ...
Page is loading ...
Page is loading ...
Page is loading ...
Page is loading ...
Page is loading ...
Page is loading ...
Page is loading ...
Page is loading ...
Page is loading ...
Page is loading ...
Page is loading ...
Page is loading ...
Page is loading ...
Page is loading ...
Page is loading ...
Page is loading ...
Page is loading ...
Page is loading ...
Page is loading ...
Page is loading ...
Page is loading ...
Page is loading ...
Page is loading ...
Page is loading ...
Page is loading ...
Page is loading ...
Page is loading ...
Page is loading ...
Page is loading ...
Page is loading ...
Page is loading ...
Page is loading ...
Page is loading ...
Page is loading ...
Page is loading ...
Page is loading ...
Page is loading ...
Page is loading ...
Page is loading ...
Page is loading ...
Page is loading ...
Page is loading ...
Page is loading ...
Page is loading ...
Page is loading ...
Page is loading ...
Page is loading ...
Page is loading ...
Page is loading ...
Page is loading ...
Page is loading ...
Page is loading ...
Page is loading ...
Page is loading ...
Page is loading ...
Page is loading ...
Page is loading ...
Page is loading ...
Page is loading ...
Page is loading ...
Page is loading ...
Page is loading ...
Page is loading ...
Page is loading ...
Page is loading ...
Page is loading ...
Page is loading ...
Page is loading ...
Page is loading ...
Page is loading ...
Page is loading ...
Page is loading ...
Page is loading ...
Page is loading ...
Page is loading ...
Page is loading ...
Page is loading ...
Page is loading ...
Page is loading ...
Page is loading ...
Page is loading ...
Page is loading ...
Page is loading ...
Page is loading ...
Page is loading ...
Page is loading ...
Page is loading ...
Page is loading ...
Page is loading ...
Page is loading ...
Page is loading ...
Page is loading ...
Page is loading ...
Page is loading ...
Page is loading ...
Page is loading ...
Page is loading ...
Page is loading ...
Page is loading ...
Page is loading ...
Page is loading ...
-
 1
1
-
 2
2
-
 3
3
-
 4
4
-
 5
5
-
 6
6
-
 7
7
-
 8
8
-
 9
9
-
 10
10
-
 11
11
-
 12
12
-
 13
13
-
 14
14
-
 15
15
-
 16
16
-
 17
17
-
 18
18
-
 19
19
-
 20
20
-
 21
21
-
 22
22
-
 23
23
-
 24
24
-
 25
25
-
 26
26
-
 27
27
-
 28
28
-
 29
29
-
 30
30
-
 31
31
-
 32
32
-
 33
33
-
 34
34
-
 35
35
-
 36
36
-
 37
37
-
 38
38
-
 39
39
-
 40
40
-
 41
41
-
 42
42
-
 43
43
-
 44
44
-
 45
45
-
 46
46
-
 47
47
-
 48
48
-
 49
49
-
 50
50
-
 51
51
-
 52
52
-
 53
53
-
 54
54
-
 55
55
-
 56
56
-
 57
57
-
 58
58
-
 59
59
-
 60
60
-
 61
61
-
 62
62
-
 63
63
-
 64
64
-
 65
65
-
 66
66
-
 67
67
-
 68
68
-
 69
69
-
 70
70
-
 71
71
-
 72
72
-
 73
73
-
 74
74
-
 75
75
-
 76
76
-
 77
77
-
 78
78
-
 79
79
-
 80
80
-
 81
81
-
 82
82
-
 83
83
-
 84
84
-
 85
85
-
 86
86
-
 87
87
-
 88
88
-
 89
89
-
 90
90
-
 91
91
-
 92
92
-
 93
93
-
 94
94
-
 95
95
-
 96
96
-
 97
97
-
 98
98
-
 99
99
-
 100
100
-
 101
101
-
 102
102
-
 103
103
-
 104
104
-
 105
105
-
 106
106
-
 107
107
-
 108
108
-
 109
109
-
 110
110
-
 111
111
-
 112
112
-
 113
113
-
 114
114
-
 115
115
-
 116
116
-
 117
117
-
 118
118
-
 119
119
-
 120
120
-
 121
121
-
 122
122
-
 123
123
-
 124
124
-
 125
125
-
 126
126
-
 127
127
-
 128
128
-
 129
129
-
 130
130
-
 131
131
-
 132
132
-
 133
133
-
 134
134
-
 135
135
-
 136
136
-
 137
137
-
 138
138
-
 139
139
-
 140
140
-
 141
141
-
 142
142
-
 143
143
-
 144
144
-
 145
145
-
 146
146
-
 147
147
-
 148
148


Epson SureColor R5070L User guide
- Category
- Print & Scan
- Type
- User guide
- This manual is also suitable for
Ask a question and I''ll find the answer in the document
Finding information in a document is now easier with AI
Related papers
-
Epson SureColor F7170 User guide
-
Epson SureColor F7070 User guide
-
Epson TM-T88V Owner's manual
-
Epson SureColor F9370 User guide
-
-
Epson Stylus Photo R3000 User manual
-
Epson SureColor S60600L User guide
-
Epson ColorWorks C3500 User guide
-
-
Other documents
-
Primera LX900 Owner's manual
-
TSC CPX4 Series User's Setup Guide
-
OKI LD670 User manual
-
Sony Printer UP-610 User manual
-
MIMAKI RasterLinkPro User guide
-
Canon imagePROGRAF TX-4000 MFP T36 Installation guide
-
Riso HC5500 User manual
-
Star Micronics TSP800 Series User manual
-
-
Canon PIXMA PRO-200 User manual