Haier HWD100-1297HS Operating Instructions Manual
- Category
- Washing machines
- Type
- Operating Instructions Manual
This manual is also suitable for

Automatic Drum Washer-dryer
Operating Instructions
Please read these instructions carefully before use.
Please save these instructions for future reference.
HWD100-1297HS
HWD10-12HDDR
No.Pendaftaran: I.14.SSI5.00501.0212

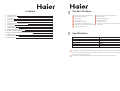
Product Features
DD inverter frequency motor technology Function (Stop just in time upon cleanness)
Hybrid balance technology
Drawer-type box
Inclined drum
Function of Supporter Dry
Large capacity Self-cleaning function
Optimal door height design
Air-wash function
Large-caliber clothes-loading opening
Technology of anti-bacteria and mildew-proof with
JIT function (Stop just in time upon drying) window pad
Large high-brightness LCD
Specifications
zH05/~V022ylppusrewoP
aPM)0.1-30.0(erusserptelniretaW
mpr002,1deepsgninnipS
)A(Bd05esiongnihsaW
)A(Bd86esion gninnipS
mm996×mm936×mm0021)W×D×H(snoisnemidllarevO
The diagrams in this manual are for illustrative purpose only. Due to continuous product improvement, please
see the actual product for appearance, color and accessories which may be inconsistent with those described in
this manual. Here we apologize for this.
This product is classified as Class I appliance. Please pay attention to electrical safety during use.
Contents
1 Safety Precautions
1
2 Precautions for Use
2
3 Components
4
4 Accessories
5
5 Notice before Use
5
6 Control Panel and Program Description
9
7 Display Screen
11
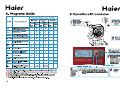
8 Programs Guide
13
9 Operational Procedures
14
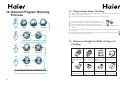
10 General Program Running Process
15
11 Preparations before Washing
16
12 Reference Weight for Different Types of Clothing
16
13 Other Functions
17
14 Cleaning/Maintenance
19
15 Fault Clearance
21

1. Safety Precautions
The plug should be accessible after the washer-dryer is installed in place. Do
not disconnect the plug from the socket by pulling the power cord. If the
power cord needs to be replaced, ask a qualified technician or contact our
After-sales Service Department for replacement. Prevent the power cord
from being pressed by any foot and from such problems as break-off, flattening, etc.
Power supply must use an independent socket, the grounding terminal of which must be
properly grounded. The socket must beaqualified product.
Such overload protective devices as proper fuse must be available at the user’s home. And, the
ammeter, wire and socket must be able to withstand 10A current.
Keep the washer-dryer away from any heat source and direct sunlight to prevent the aging of plastic
and rubber parts.
Do not use such chemicals as flammable detergent and dry-cleaning solvent to wash the clothes. Do
not use any flammable spray near the washer-dryer. In case of flammable gas leakage, do not plug or
unplug the washer-dryer’s power plug.
The washer-dryer’s door and tabletop panel are relatively hot during heating and drying. For
the purpose of safety, keep the children away from the washer-dryer. In addition, when
draining hot water, be careful to avoid scald.
After unpacking the washer-dryer, do not allow the children to play with the disassembled
packaging materials such as carton, plastic packaging bag and foam, etc.
Do not install the washer-dryer outdoors and in excessively humid environment, otherwise moisture on
the electrical components may easily cause damage to the ignition system or other accidents. In case of
inadvertent water spray onto or into the washer-dryer, only after the washer-dryer is thoroughly dried
can you use it.
Neither should you place the washer-dryer directly onto an airproof carpet in order not to block the
bottom vent, nor place it close up to the wall or furniture to avoid accidents. Do not use the
washer-dryer on any platform above the floor, otherwise it may fall off onto the floor and be damaged.
Electrical safety prompt:
Please pay attention to electrical safety during use.
Warning sign:
The contents with this sign involve the safety of both the product and the user. Be
sure to strictly follow these instructions, otherwise the washer-dryer may be
damaged or the user may be injured.
Prohibitory sign:
The contents with this sign indicate the behaviors to be absolutely prohibited.
Failure to follow these instructions may result in damage to the washer-dryer or
personal injury.
2. Precautions for Use
1. Due to the fluctuation of water pressure, please check all the joints of water inlet pipe, water tap and drain pipe
for firm connection before washing every time. In case of loose water pipe connection or water leakage, please turn off the
water tap and take proper measure
s or contact our After-sales Service Department for reconnection. Only after such faults
are cleared can you use it again.
2. When the washer-dryer is not in use, please keep the door slightly open and towel off both the window pad and
door glass to avoid unpleasant smell. Do not cover the washer-dryer with a plastic bag to avoid moisture staying in it.
3. Do not place any heavy object, heat-producing appliance and item liable to water/liquid leakage on the table top
to avoid deformation of the tabletop panel and plastic parts.
4. Do not wash such waterproof articles as raincoat, bicycle
cover and down products as well as carpet to avoid
abnormal vibration or damage to such articles.
5. Please add a proper amount of washing powder, detergent (or bleach) and softener in corresponding chambers of
the distributor box before starting the selected program. Do not open the distributor box during the program running to
avoid some detergent (or bleach) left in its chamber.
6. If a brassiere with steel wire is washed in the washer-dryer, the steel wire may bounce out. Therefore,
do not
wash any brassiere with steel wire in order to protect the washer-dryer.
7. The washer-dryer’s door is equipped with a self-lock safety device. Press the “Start/Pause” button to make the
washer-dryer in pause (if the washer-dryer is operating). Only when the washer-dryer is in the safe state (the water level is
below the lower edge of sight glass, the temperature inside of the drum is below 50°C and the inner drum is not rotating)
and the door lock icon is not illuminated can you open the door by pressing the door-opening button. Never forcibly
open the door before the washer-dryer enters the safe state to avoid damage to the door or scald.
8. Turn off the water supply and power supply af
ter finishing washing every time. Meanwhile, clean the sight glass
window pad interlining to prevent contaminants from tainting the clothes again.
9. The washer-dryer described in this manual is equipped with downward drainage system. Please install the
washer-dryer in a location with floor drainer.
10. Using the washer-dryer at or below 0°C may damage the water inlet valve and drainage system. If the
washer-dryer is stored at or below 0°C be sure to move and leave it in the environment at room temperature for 2-4 hours
before use.
11. Do not put the clothes
tainted with chemicals into the washer-dryer.
12. It is prohibited to dry the clothes with oil stains to avoid fire hazard.
13. When any program other tha
n “drying with rack” is selected, it is prohibited to put the drying rack into the
washer-dryer to avoid damage to the washer-dryer.
14. When using the washer-dryer’s drawer:
Do not put any flammable, explosive and corrosive substance in the drawer. Do not pour detergent and washing
powder into the drawer to prevent the drawer from being contaminated. The maximum weight of all the ite
ms in
the
drawer must not exceed 5kg. Please close the drawer immediately after you use it. Neither should you put wet clothes on
the drawer, nor allow the children to play with and step on the drawer to avoid deformation or damage of the drawer.

15. When washing small articles (e.g. handkerchiefs, gloves, socks, etc.) and those clothes liable to inter-twist and
wear, please put them in net bags for washing, rinsing and spinning to prevent them from falling into between the inner
drum and window pad and further avoid inadequate washing and drying. The weight of articles in each net bag must not
exceed 300g and the net bags should be put in the washer-dryer together with those clothes not in a net bag, otherwise the
washer-dryer will not be balanced and result in abnormal vibration.
Reference weights f
or small articles: handkerchiefs about 30g/piece; gloves about 60g/pair; cotton socks about
30g/pair; silk socks about 20g/pair.
16. When spinning at high speed, the clothes will stick on the washer-dryer’s inner drum wall due to centripetal
force. If the clothes are to be dried, it is recommended to take them out and fluff them out, then put them in the
washer-dryer again for drying to achieve optimal drying effect.
17. During heating or drying, high temperature inside the washer-dryer may cause temperature rise of the tabletop
panel and door, etc. Therefore, do
not touch the tabletop panel and door during heating or drying.
18. During drying, it is recommended not to load the
inner drum with clothes over the height of drying sticker on the
electroplated ring; otherwise inadequate drying may occur.
3
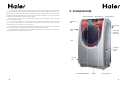
.
C
omponent
s
M
a
i
n contro
l
pane
l
D
rying filter bo
x
Tabletop panne
l
Di
str
ib
uto
r
bo
x
Electro
p
lat
e
ri
n
g
D
oor
D
rain
f
ilte
r
r
co
v
er
F
ront adjusttable
f
oot
(
2
)
Dr
a
w
e
r
D
rain pipe join
t
H
andle
(
2
o
n eac
h
s
ide
)
D
ra
i
n p
i
p
e
h
ook (1 on
e
ach side
)
o
or-opening
t
t
o
n


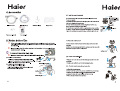
To connect the drain pipe
Ring the drain pipe on the joint;
Fix the pipe clamp to the groove of drain pipe;
Insert the drain pipe into a floor drainer;
Extend the drain pipe.
State of
extension hose
Height Length
Rise midway Within 10cm Within 1m
Not rise
midway
- Within 3m
If the drain pipe is too long, remove the pipe sleeve, cut
off the groove part of drain pipe, and then insert the pipe
sleeve into the front end of drain pipe.
If there is a need to extend the drain pipe or change the direction of drain pipe, please contact our
After-sales Service Department.
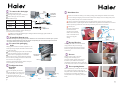
To remove the packaging
bolts
Packaging bolts are used to fix internal components of the
washer-dryer during transport and should be removed before
using the washer-dryer.
Screw off all the packaging bolts with a wrench and pull
them out in the direction as shown in the right figure;
Insert the heave of packaging bolt cover into the
packaging bolt cover hole, and then buckle the packaging
bolt cover into the packaging bolt hole in the direction of
arrow as shown in the ri
ght figure.
Please keep the dismantled packaging bolts in a safe place
for future handling of the washer-dryer.
To adjust the front
adjustable
foot (2)
Loosen the adjusting nut, and then
adjust the adjustable foot (as shown in Fig.
1) until the air bubble of level gauge is in
the red circle (as shown in Fig. 2);
Tighten the adjusting nut (as shown in Fig. 3).
Packaging
bolt hole
Packaging bolt
cover hole
Heave
Fig. 1 Fig. 2 Fig. 3
Loosen
High
Low Tighten
Adjusting
nut
Adjustable foot
Within 10cm
Pipe clamp
Floor
drainer
Floor
Joint Groove Drain pipe
Within 1m
Pipe sleeve
Drain outlet
Stay a space
Groove Pipe sleeve
Pi
T
i
g
ht
e
n
AdAdjju
dd
n
ut
Loo
H
ig
h
Lo
w
en
Before removing the
packaging
blts, please fix the Bottom cover to the bottom of the washer dryer. Lay down
the machine, adjust the Bottom cover with the six holes corresponding the screw holes.Then tighten the screws
and fix it thus securely to the bottom of the machine.
To install the Bottom cover
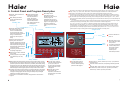
Distributor box
Please select suitable non-foaming or low-foaming washing powder/detergent for automatic drum washer;
As for the dosage of detergent, please refer to the instructions for detergent. Excessive detergent may result
in too many bubbles and spill as well as affect its dissolution;
The level of softener or liquid detergent must not be higher than the “MAX” mark on the siphon cap.
Concentrated softener or liquid detergent should be diluted before being added into the distributor box. Excessive
softener may damage synthetic fiber. As for the dosage of softener, please refer to its instructions.
There may be a
little water in the distributor
box after the selected
program ends. It is normal
and the water is the makeup
water or condensate water in
the process of program
running.
Drying filter box
daerhtehtretlifotdesusixobretlifgniyrdehT
scraps produced in the process of drying.
ecalpnixobretlifgniyrdehtllatsnioteruseB
mralalliwrehsawehtesiwrehto;gniyrderofeb
to remind you.
Drawer
The drawer may be used to store spare
washing powder and detergent, etc.
otnitnegretedroredwopgnihsawruoptonoD
the drawer to prevent the drawer from being
refer
esaelp,rewardehtgnisunehW.detanimatnoc
to the contents in the section of “Precautions for Use”.
Door-opening button
e (the water)tatsefasehtnisireyrd-rehsawehtnehW
t glass, thehgisfoegderewolehtwolebsilevel
temperature inside of the drum is below 50
the inner drum is not rotating) and the door is
y pressing thisbdenepoebnacroodeht,dekcolnu
button.
Add solid
washing power
Add liquid
softener
Add liquid
detergent or
bleach
Siphon cap
°C and

Press the “ Wash ” button to set
washing time.
Display washing program,
washing time, remaining
time,delay time,times of
rinsing, spinning time,
temperature setting value,
child lock state,door lock
state ,program progress and
alarm message,etc.
After setting relevant
parameters, press the
“Start/Pause” button once, the
selected program will
automatically start running. If
this button is pressed when the
program is running,the program
will pause;to continue the
program,just press this button
again.
Note: Washing time doesn’t
include water-feed time and
heating time.
Press the “Rinse”button to select
the times of rinsing and the
maximum allowable times of
running is 8.When the display
screen doesn’t display the times of
rinsing, it indicates that the
washer-dryer will not perform
rinsing.
Press the “Spin” button to select
spinning time. The maximum
allowable spinning time waries with
programs.When the display screen
doesn’t display the spinning time, it
indicates that the washer-dryer will
not perform spinning.
The spinning time means the time
for spinning at high speed.
Press the “Dry” button to select the
“Dry” program.
The “Dry” program is only available
in the “Wash & Dry” and “Dry”
modes.
Press the “Temp.” button to
select the heating temperature
(30, 40, 50, 60, 70, 80 or
90).The maximum allowable
heating temaperature varies
with program.
When the display screen
doesn’t display the
temperature, it indicates that
the washer-dryer will not heat
for washing.
6. Control Panel and Program Description
“Washing” time
Display screen
“Delay” selection
“Temp.” selection
“Start/Pause” button
Before starting the selected washing program,press the “Delay” button once and
set the delay time by turnng the program knob. the delay time (0.5-24h) increases
(decreases) with the increment of 30 minutes by clockwise (anticlockwise) turning
the program knob. Press the “Start/Pause” button, the selected program will start
and the delay time will start counting down. After selecting the “Delay” function but
before starting the selected program,press the “Delay” function will be canclled.
The delay time is the end time of washing. For example,6:00 means the washing
ends after 6 hours (if the delay time is shorter than the time required by program
running,the washing program will start running immediately after pressing the
“Start/Pause” to start the “Delay” program).
This function is not available for “Air-wash”,”Drying with rack” and “Self-clean”
program.
Press the “Speed” button to
select spinning speed.The
maximum allowable spinning
speed varies with program.
Three modes (i.e. “Wash”, “Wash & Dry” and “Dry” ) are optional for
this washer-dryer.
Press the desired mode button, corresponding indecator light will be
on.
Select the “Wash” mode to wash, rinse and spin the clothes; select
the “Wash & Dry” mode to wash, rinse, spin ahd dry the clothes;
select the “Dry” mode to spin and dry the clothes.
nottub ”edoM“noitceles ”deepS“
“OFF”
button
“ON”
button
Press the “ON” button to
power on.
When the power is on,press
and hold the “OFF” button for
3s to power off.
If no button is pressed within
5 minutes after power-on or
the autumatic program
running ends, the
washer-dryer will
automatically shut down.
After turning on the washer-dryer,select the desired washing program by turning the knob.Press any function button (e.g. “Speed”,
“Temp.”, “Delay”, “Dry”, “Spin”, “Rinse”, “Wash” button ) once and turn the program knob within 3s to set televant parameters.
After turning on the washer-dryer,the “Spin” program can be selected by anticlockwise turning the program knob.
This washer-dryer is set with the “Auto” function.In this mode, turn on the washer-dryer,put the clothes to be washed in it,close the
door and set other relevant parameters,then press the “Start/Pause” button, the display screen will display “AUTO”; about 2 minutes
later, the washer-dryer will finish weighing and the display screen will display the position of clothes weigh (”AL-1”~”AL-5”); and the
washer-dryer will automatically select the optimal washing program.This function allows the washer-dryer to save water,electricity and
time significantly.
If you do not want the washer-dryer to weigh the clothes automatically,turn the program knob when the washer-dryer is weighing
automatically and the diaplay screen display “AUTO” to switch to manual selection of clothes weight position
(”AL-1”,”AL-2”,”AL-3”,”AL-4”,”AL-5”). When “AL-1” displayed on the display screen is flashing,you may select another position by
turning the program knob again within 4s. If you don’t do so within 4s, the program will automatically confirm the “AL-1” position.
(1) In manual mode, it is recommended that “AL-4” or “AL-5” be selected to wash large amount of clothes (more than a half drum);
(2)If the washer-dryer automatically weighs the clothes,it will automatically set the position as “AL-1”,”AL-2”,”AL-3”,”AL-4” or “AL-5”.
(3)Please adjust the dosage of washing powder according to the position displayed on the display screen.
Program knob

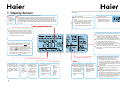
7. Display Screen
)
Washing time (The
time does not include
water-feed time and
heating time. After
the “Wash” program
ends, this area will go
out.)
Times of
rinsing
(After the
“Rinse”
program
ends, this
area will go
out.)
Spinning time
(After the “Spin”
program ends,
this area will go
out.)
Spinning time
means the time
for spinning at
high speed.
“Dry” program (It is
available in the
“Wash & Dry” and
“Dry” modes.)
Press the “Dry”
button, the program
will switch among
the options listed on
the right:
Standard
Low
Temperature
Iron
150mins
120mins
90mins
60mins
30mins
It illuminatcs when the “delay” function is selected.
After selecting the “delay” function and start the program, the program will analyze
according to the parameter settings and detected clothes weight and may start
running ahead of time. It is normal (for example, if the delay time is set as 6:00, press
the “Start/Pause” button to start the program, the program will analyze according to
parameters settings and detected clothes weight and may immediately start running
from 5:18).
It illuminates
when the
washer-dryer
starts without
selecting the
“delay”
function.
Program progress indication area (including four
parts: “Wash”, “Rinse”, “Spin” and “Dry”. When a
program running ends, corresponding word such
as “Wash” in this zone will go out. Full triangles
indecate the program is running.)
Numerical display area (The program with
automatic weighing function) :” ” diaplays
when the program is not running and in the
process of weighing;remaining time or deplay
time (e.g. “ ”) diaplays when the program is
running. The program without automatic
weighing fuction: only remaining time or delay
time diaplays. In abnormal conditions, various
alarm codes (e.g. “ ” ) diaplay.
Ironing
Heating temperature
(Maximum allowable
heating temperature
varies with programs.
When no temperature
value displays, it
indicates that the
washer-dryer will not
heat.)
Spinning speed
(The setting value of
spinning speed
displays. Maximum
allowable spinning
speed varies with
program.)
After starting the washer-dryer, to prevent
washing process from external interference,
activater the child lock function by
simultaneously pressing and holding the
“Temp.”and “Speed” button for more than 3s; to
deactivate the child lock function, simultaneously
press and hold the same two button for more
than 3s again.
After the child lock is activated, all the function
buttons (escept the “OFF” button) are out of
function.
After the program running ends and the
washer-dryer antomatically shuts down, the child
lock function will automatically cancel. If power
failure occure in the process of program running,
the child lock function will not automatically
cancel and must be manually cancelled after
turning on the washer-dryer again.
Washing program (The washer-dryer described in
this manual is set with 12 washing programs. Three
modes i.e. “Wash”, “Wash&Dry” and “Dry” are
corresponding to defferent washing programs.
In the “Wash” mode, Cotton, Memory, Synthetics,
Wool, Silk, Heavy, Quick, Night Wash, High Temp
and Tub Clean program are effective.
In the “Wash & Dry” mode, Cotton, Memory,
Synthetics, Heavy, Quick, Night Wash, High Temp
and Tub Clean program are effective.
In the “Dry” mode, Cotton, Memory, Synthetics, Night
Wash, Heavy, Air wash and Supporter Dry programs
are effective.)
High
Temp
Caution
Prompt information
(Including: alarm messages
related to Drain filter, Dry
Filter,Imbalance, High Temp
Caution and Overload.)
Mark of locking door
(After door locks up, the diagram marks
bright.
Under the safe status and the procedure
being circulated, the mark of locking
door will be put out after pressing
"start/pause" , then the door can be
openning pressing the "Open" button.)
Note: The time displayed on the display screen is only for reference and may be slightly different from the
actual time.
Synthetics
Heavy
Night Wash


1
5
1
0.
G
eneral Pro
g
ram Runnin
g
P
r
ocess
B
eat
i
n
g
R
o
lli
n
g
S
oakin
g
H
al
f
wa
y
spinnin
g
High-e
ff
iciency rinsing
D
i
d
tri
bu
ti
on
Final spinnin
g
H
ot a
ir
C
old ai
r
Wash
R
in
se
Spi
n
Dr
y
is pressed within 5 mins a
f
ter the pro
g
ram ends,the washer-dr
y
er wil
l
automatically shut down.
11. Preparations before Washing
Check the articles to be washed for special washing requirements and make sure that they are machine washable and
dryable to avoid deformation and damage.
For those articles tainted with much mud and dust, please remove them before washing.
Wash those articles liable to color fading separately from others.
Check pockets and remove coins, sand, hairpin and other things from them.
Tie the ties, buckle the buttons, zip the zippers and sew the openings.
To avoid the sound from buttons, please turn those articles with buttons inside out before putting them in the
washer-dryer.
Do not overload the washer-dryer. Furthermore, please unfold and fluff out the articles before putting them in the
washer-dryer.
When washing small articles and those articles liable to inter-twist and wear, please put them in net bags for
washing, rinsing and spinning to avoid damage.
12. Reference Weight for Different Types of
Clothing
A suit of work clothes
Blended fabric, about
800g
A suit of pajamas
Cotton, about 300g
Shirt
Blended fabric,
about 200g
Undershirt
Cotton, about 130g
Bath towel
Cotton, about 300g
Briefs
Cotton, about 70g
Socks
Cotton, about 30g
Jeans
Cotton, about 600g

13.
Other Functions
Power-down memory
With the power-down memory function, the washer-dryer can memorize the program’s running state in case of power
failure or loose plug during washing and continue the selected program after resuming the power supply and turning on the
washer-dryer by pressing the “ON” button.
Cancel or reselect a program in the process of running
If the child lock function is activated, please deactivate it before performing the following operations.
If there is a need to reset the mode (including the “Wash”, “Wash & Dry” and “Dry” modes) and washing program
(e.g. cotton, chemical fiber…), gently press and hold the “OFF” button for 3s to shut down the washer-dryer, turn on
the washer-dryer again by pressing the “ON” button, then reset the desired mode, washing program and washing
parameters.
If only washing parameters (including washing time, times of rinsing, spinning time and spinning speed) need to be
reset, gently press the “Start/Pause” button, then press the “Wash”, “Rinse”, “Spin” and “Speed” buttons respectively
to set washing parameters, then gently press the “Start/Pause” button again to start the selected program.
Eccentric protection
When spinning, if the clothes are not evenly distributed, the washer-dryer will fluff out and redistribute the clothes
and continue spinning after the clothes distribution becomes even. If the clothes distribution does not become even within
the specified time, the washer-dryer will not spin to avoid abnormal vibration. In this case, please check the clothes for
intertwist and rearrange them, then select the “spin” program to spin the clothes. When there are few articles, the
washer-dryer may not spin due to eccentric protection. In this case, you can put more articles in the washer-dryer and make
them evenly distributed, then continue spinning. In addi
tion, it is normal that the program time will prolong for the
washer-dryer rearranges and fluffs out the clothes.
Drying
With the function of drying ramie cotton and chemical fiber fabrics, the washer-dryer can automatically determine the
degree of dryness and end the drying program in time. Pay attention to the following when drying:
Whether the clothes suitable for drying depends on their texture. Make sure that the clothes are suitable for drying
with washing machine before drying.
Before drying, make sure that the water tap is turned on and the water must be cold.
As for the spun clothes, take and fluff them out, and then put them in the drum for drying.
If too many clothes are dried at a time, not only the drying effect is not ideal but also the clothes are liable to wrinkle.
The drying time may be longer than the pre-set time.
The drying time may be shorter than the pre-set time when drying few clothes or light clothes.
It is normal that the drying time may be longer when selecting low-temperature drying program.
Automatic weighing function
In the “Wash” and “Wash/Dry” modes, the “Cotton”, “Memory”, “Chemical Fiber”, “High Temperature” and “Mute”
programs all have automatic weighing function.
After setting a program, press the “Start/Pause” button, the drum will start rotating and detecting the clothes weight.
Overweight may be detected in case of wet clothes. In addition, it is normal that low impact sound may be heard from the
washer-dryer.
Buzzer mute function
Select the self-clean program, simultaneously press and hold the “Delay” and “Temp.” buttons for 3s to mute the
buzzer for all the programs (excluding the alarm sound), and the display screen will display “BEEP OFF”. Simultaneously
press and hold the “Delay” and “Temp.” buttons for 3s to resume the beep for all the programs, and the display screen will
display “BEEP ON”.
Memory program
When selecting the “Memory” program, all the washing parameters set by the user will be memorized after the
program ends. If the user wants to wash with the same settings, just select the “Memory” program after turning on the
washer-dryer.
(This program does not memorize the “delay” function set by the user.)
“Spin” program
bonkmargorpehtnrutesiwkcolcitnatsuj,ylnomargorp”nipS“ehttcelesoT
”nipS“ehtsserP.nottub”NO“ehtgnisserpybreyrd-rehsawehtnogninrutretfa
.deepsgninnipsehttesotnottub”deepS“ehtsserp;emitgninnipsehttesotnottub
Air Wash function
This function is available in the “Dry” mode. The inner drum rotates during air-wash and removes the moisture and
unpleasant smell from the clothes via hot air. Please turn on the water tap before starting air-wash.
Tub Clean function
This function is available in the “Wash” and “Wash & Dry” modes and used to wash away the dirt from inner and outer
drums. Note that clothes must not be put in the washer-dryer when using this function.
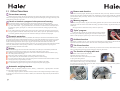
The function of drying with rack
This function is used to dry those articles liable to
deformation such as hat, cloth doll , etc.
Make sure that the articles in the washer-dryer are suitable
for drying with washing machine.
When using the function of drying with rack, put the drying
rack in the drum as shown in Fig. 1. Insert the protuberance
at the front end of drying rack into the hole of inner drum cover, place the back end of drying rack on the gimbals and keep
the drying rack level as shown in Fig. 2.
Gimbals
Fig. 1 Fig. 2

14.
Cleaning/Maintenance
Please unplug the power plug from the socket before cleaning and maintenance.
After finishing washing, please turn off the water tap and remove the water inlet pipe.
Unplug the power plug and put back the drain pipe.
If the washer-dryer is not to be used for a long time, please keep the door slightly open and dry the window pad to
avoid unpleasant smell.
Do not use organic solvent or corrosive liquid to wipe the washer-dryer’s exterior and rubber parts.
Frequently clean both the water inlet pipe joint and water inlet valve filter screen to prevent them from being clogged
by dirt.
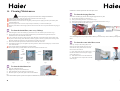
To clean the drain filter (once every 30 days)
(1) After draining the water in the washer-dryer, press the filter cover with a hand to open it as shown in Fig. 1.
(2) Press the push switch to the end to prevent the hand from being wounded when turning the filter knob, then
anticlockwise screw out the drain filter with a hand.
Note: A little water may flow out when screwing out the filter knob (if Err2 alarm appears, relatively much water
may flow out when screwing out the filter knob). Therefore, prepare a container (e.g. basin) before screwing out the
filter knob and make the water flow in the container but not onto the ground or floor.
(3) Remove the thrums and impurities on the filter and rinse the filter with clean water.
(4) Insert the filter along the groove and tighten it by turning clockwise; otherwise water leakage may occur. Be careful
not to distort the filter.
Note: The drain filter must be tightened to avoid water leakage.
(5) Press the push switch again with a hand to make it bounce out, then close the filter cover.
To clean the distributor box
(1) Fully pull out the distributor box.
(2) Slightly lift up and pull out the distributor box.
(3) Rinse the distributor box and siphon cap with clean water.
rotubirtsidehtesolcdnanihsup,tresnineht,pacnohpisehtelkcuB)4(
box.
Note: Please buckle the siphon cap in the correct position of distributor box; otherwise the detergent and softener in the
3 .giF 2 .giF 1 .giF
Push
switc
Drain
filter knob
Drain
filter
cover
Loosen
Groove
distributor box cannot be siphoned into the washer-dryer’s drum.
To clean the drying filter box
Note: Please clean the drying filter box after using the drying function every time.
(1) Pull out the drying filter box as shown in Fig. 1.
(2) Gently open the drying filter box cover as shown in Fig. 2.
(3) Remove the flocking in the drying filter box with a soft bristle brush as shown in Fig. 3.
(4) Close the drying filter box and install it in place.
Fig. 1 Fig. 2 Fig. 3
Note: The flocking must not be piled up around the washer-dryer to avoid its entry into the washer-dryer and poor drying
effect.
To clean the water inlet filter screen
Warm tips: To improve the washing effect, do not
throw away the water inlet filter screen. In case of
unsmooth water feed, please clean the water inlet
filter screen in time as follows:
detawehtffowercS)1( na,1.giFninwohssaepiptelnir
then take out the filter screen with a pair of nipper
pliers as shown in Fig. 2.
(2) Wash the filter screen with a soft bristle brush.
(3) Install the filter screen in place and connect the
water inlet pipe.
Fig. 1 Fig. 2

21
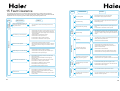
15 Fault Clearance
State Phenomenon
Solution
Before
operation
There is a small amount of water in
the drain pipe and washer-dryer when
using for the first time
The washer-dryer does not operate
Check whether power failure or abnormal power supply occurs
Check whether the power plug is firmly plugged in the socket
Check whether the fuse of power supply or the current breaker
is in good condition
Check whether the power switch is pressed
Check whether the water tap is turned on
Check whether the “delay” function is activated
Check whether the “Start/Pause” button is pressed
Check whether the water tap is tured on and whether water
supply cut-off occurs
Check whether the washer-dryer inclines or shakes
Abnormal noise
Check whether there are foreign bodies such as coins and
zippers in the washer-dryer
Check whether the noise is from the draining pump or motor in
normal operation
Check whether the water inlet filter screen is clogged (If
necessary clean it)
Check whether the water tap and water inlet pipe are frozen
Check whether the “Delay” program is selected
Check whether the “Start/Pause” button is pressed
Check whether the water inlet pipe is bent
Check whether the water pressure is too low
Buttons cannot be operated
No water feed or slow water feed
Water leakage occurs at the water tap
Check whether the“child lock”function is activated
Check whether the shape of water tap is suitable
Check whether the water inlet pipe joint is installed in place
Check whether the water tap is damaged
Refer to the instructions under the title of “Cancel or reselect a
program in the process of running” in the sectionof “13.Other
Functions”
When wash
It is normal and the water is the remaining water of factory
inspection
The following phenomena are not necessarily faults of the washer-dryer. Please check against the
following table before call for servicing. If any fault actually exists, please contact our After-sales Service
Department and do not repair by yourself. Please unplug the power plug before check.
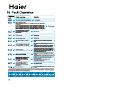
22
State
When
rinse
Dewatering
When
drain
Others
noituloSnonemonehP
Poor washing effect
Forceless washing
Stop operation during washing
Repeated rinsing
No spinning
Loud noise when spinning
Vibration and displacement
The clothes are not spun dry agter
finishing the spinning progran
No water discharge or slow water
discharge
The control panel is partially hot
The washing does not end after the
preset delay time
The washer-dryer’s program is set with discharge time and the
spinning starts after a period of time
Check whether the clothes intertwist
Check whether all the packaging bolts are removed
Check whether the clothes intertwist
Check whether the washer-dryer collides with other objects
Check whether there are forergn bodies in the washer-dryer
The spinning effect varies with type of clothes
Check whether eccentric protection functions due to few clothes
Check whether thedrain pipe is bent, clogged or frozen
Check whether the outlet of drain pipe is 10cm above the floor
Check whether the filter is clogged
It is normal that electronic components are a bit hot
Poor water feeding/drainage conditions or unbalanced clothes
distribution results in longer time
Check whether the washer-dryer is level (The feet can be
adjusted to level the washer)
Check whether sudden power failure or power supply cut-off
occurs
Check whether the “Srart/Pause” button is pressed
The washer-dryer with the function of automatic shutdown upon
clean detected automatically increases or decreases the times
of rinsing (1-2 times) according to the degree of dirtiness of the
clothes
Check the detergent for proper type and dosage
Check whether a proper program is selected
Check whether the clothes weight exceeds the washer-dryer’s
rated washing capacity

-
 1
1
-
 2
2
-
 3
3
-
 4
4
-
 5
5
-
 6
6
-
 7
7
-
 8
8
-
 9
9
-
 10
10
-
 11
11
-
 12
12
-
 13
13
-
 14
14


Haier HWD100-1297HS Operating Instructions Manual
- Category
- Washing machines
- Type
- Operating Instructions Manual
- This manual is also suitable for
Ask a question and I''ll find the answer in the document
Finding information in a document is now easier with AI