Toro 24" Dual Action Hedge Trimmer User manual
- Category
- Power hedge trimmers
- Type
- User manual
This manual is also suitable for
Page is loading ...

EN-1
The Toro Company – 1997
All Rights Reserved
Printed in USA
Contents
Page
Introduction 1. . . . . . . . . . . . . . . . . . . . . . . . . . . .
Safety 2. . . . . . . . . . . . . . . . . . . . . . . . . . . . . . . . .
Safety and Instruction Decals 5. . . . . . . . . .
Assembly 6. . . . . . . . . . . . . . . . . . . . . . . . . . . . . .
Installing Front Handle 6. . . . . . . . . . . . . . .
Operation 6. . . . . . . . . . . . . . . . . . . . . . . . . . . . . .
Features 6. . . . . . . . . . . . . . . . . . . . . . . . . . .
Electrical Connection 6. . . . . . . . . . . . . . . . .
Lock-off Button 6. . . . . . . . . . . . . . . . . . . . .
Switch 7. . . . . . . . . . . . . . . . . . . . . . . . . . . . .
Extension Cord Retainer 7. . . . . . . . . . . . . .
Preparing For Operation 7. . . . . . . . . . . . . .
Trimming A Hedge 8. . . . . . . . . . . . . . . . . .
Maintenance 9. . . . . . . . . . . . . . . . . . . . . . . . . . . .
Blade Lubrication 9. . . . . . . . . . . . . . . . . . . .
Lubrication 10. . . . . . . . . . . . . . . . . . . . . . . . .
Front Handle Replacement 10. . . . . . . . . . . . .
Blade Replacement 10. . . . . . . . . . . . . . . . . .
General 11. . . . . . . . . . . . . . . . . . . . . . . . . . . .
Guard Against Electric Shock Hazard 12. . . .
Servicing Double-insulated Appliance 12. . .
Product Specifications 12. . . . . . . . . . . . . . . . . . . .
Warranty 13. . . . . . . . . . . . . . . . . . . . . . . . . . . . . . .
Introduction
Thank you for purchasing a Toro product.
All of us at Toro want you to be completely satisfied
with your new product, so feel free to contact your
local Authorized Service Dealer for help with service,
genuine Toro parts, or other information you may
require.
Whenever you contact your Authorized Service
Dealer or the factory, always know the model and
serial numbers of your product. These numbers will
help the Service Dealer or Service Representative
provide exact information about your specific
product. You will find the model and serial number
decal located in a unique place on the product
(Fig. 1).
For your convenience, write the product model and
serial numbers in the space below.
Model No.
Serial No.
Read this manual carefully to learn how to operate
and maintain your product correctly. Reading this
manual will help you and others avoid personal injury
and damage to the product. Although Toro designs,
produces and markets safe, state-of-the-art products,
you are responsible for using the product properly
and safely. You are also responsible for training
persons who you allow to use the product about safe
operation.
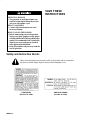
The Toro warning system in this manual identifies
potential hazards and has special safety messages that
help you and others avoid personal injury, even death.
DANGER, WARNING and CAUTION are signal
words used to identify the level of hazard. However,
regardless of the hazard, be extremely careful.
DANGER signals an extreme hazard that will cause
serious injury or death if the recommended
precautions are not followed.
WARNING signals a hazard that may cause serious
injury or death if the recommended precautions are
not followed.
CAUTION signals a hazard that may cause minor or
moderate injury if the recommended precautions are
not followed.
Two other words are also used to highlight
information. “Important” calls attention to special
mechanical information and “Note” emphasizes
general information worthy of special attention.

EN–2
Safety
WARNING: Always follow these basic
safety precautions when using electric hedge
trimmers to reduce the risk of fire, electric shock and
personal injury.
Read All Instructions
POTENTIAL HAZARD
• To guard against injury, basic safety
precautions should be observed.
WHAT CAN HAPPEN
• If safety precautions are not followed,
serious personal injury could occur.
HOW TO AVOID THE HAZARD
• Read thoroughly and understand
completely the following rules for safe
operation and all instructions.
Before Operating
• KNOW YOUR HEDGE TRIMMER – READ
AND FOLLOW ALL INSTRUCTIONS. Read
owner’s manual carefully. Learn its applications
and limitations as well as the specific potential
hazards related to this tool.
While Operating
• DRESS PROPERLY. Do not wear loose
clothing or jewelry. They can be caught in
moving parts. Use of sturdy gloves, non-skid
footwear and safety goggles or safety glasses
with side shields is recommended. Wear
protective hair covering to contain long hair. Tie
up any clothing drawstrings so that they cannot
become entangled in unit.
• STAY ALERT. Watch what you are doing and
use common sense. Do not operate trimmer
when fatigued or under the influence of drugs,
alcohol or medication.
POTENTIAL HAZARD
• Blades are sharp.
WHAT CAN HAPPEN
• Contact with blades can cause serious
personal injury.
HOW TO AVOID THE HAZARD
• Keep hands away from blades.
• Keep both hands on handles when power is
on.
• Do not attempt to remove cut material or
hold material to be cut when blades are
moving.
• Make sure your trimmer is unplugged and
the switch is off when clearing jammed
material from blades.
• Do not grasp the exposed cutting blades or
cutting edges of trimmer.
POTENTIAL HAZARD
• Blades will coast after trimmer is turned
off.
WHAT CAN HAPPEN
• Contact with moving blades can cause
serious personal injury.
HOW TO AVOID THE HAZARD
• Unplug unit and wait for all moving parts
to stop before setting trimmer down or
handling blades.

EN-3
POTENTIAL HAZARD
• Use of trimmer can cause electric shock.
WHAT CAN HAPPEN
• Electric shock can cause serious personal
injury or death.
HOW TO AVOID THE HAZARD
• Don’t use trimmer in rain, in wet locations,
or on wet hedges or shrubbery.
• Use only extension cords in good condition
and marked “suitable for use with outdoor
appliances” having electrical rating not less
than rating of trimmer.
• Do not use damaged extension cords.
Inspect cords periodically and replace if
damaged.
• Do not abuse cord.
• Never carry trimmer by cord.
• Do not yank cord to disconnect from
receptacles.
• Keep cord away from heat, oil, sharp edges,
and moving blades.
• WARNING – DO NOT USE WITHOUT
HANDLE AND GUARD.
• WHEN OPERATING YOUR TRIMMER
KEEP EXTENSION CORD BEHIND
TRIMMER.
Never drape it over hedge being
trimmed.
• KEEP CHILDREN AWAY.
Do not permit
children to contact trimmer or extension cord.
Keep children a safe distance from work area.
• USE TRIMMER PROPERLY. Use only for
trimming the type of shrub, growth, etc.,
described in the operating instructions. Do not
abuse trimmer.
• DON’T OVERREACH OR STAND ON
UNSTABLE SUPPORT. Keep good footing
and balance at all times. Do not use on a ladder.
Avoid overhead use where both hands can’t be
used. Hold unit as shown in Figure 6.
• AVOID UNINTENTIONAL STARTING OF
TRIMMER. Before plugging in trimmer, be
sure trimmer switch is off. Don’t carry trimmer
with finger on switch.
• DISCONNECT (UNPLUG) TRIMMER
FROM POWER SUPPLY when not in use,
before servicing, cleaning, etc.
• MAINTAIN TRIMMER WITH CARE. Keep
blades sharp at all times, and clean for best and
safest performance. Follow customer
responsibility instructions. Always use a clean
cloth when cleaning. Never use brake fluids,
gasoline, petroleum-based products, or any
strong solvent to clean your tool. Keep handles
dry, clean, and free from oil and grease.
• STORE IDLE HEDGE TRIMMER
INDOORS – When not in use, hedge trimmer
should be stored indoors in dry, and high or
locked-up place – out of the reach of children.
• DO NOT ATTEMPT TO REPAIR. For
service or repair call 1-800-237-2654 in the
United States. See that only original Toro
replacement parts are used.
• KEEP WORK AREA CLEAN. Cluttered areas
and benches invite accidents.
• PROTECT YOUR LUNGS. Wear a face or
dust mask if the operation is dusty.
• PROTECT YOUR HEARING.
Wear hearing
protection during extended periods of operation.
• WARNING – To reduce the risk of electric
shock, use only with an extension cord intended
for outdoor use, such as SW-A, SOW-A,
STW-A, STOW-A, SJW-A, SJOW-A, SJTW-A
or SJTOW-A.
• EXTENSION CORD – Make sure your
extension cord is in good condition. When using
an extension cord, be sure to use one heavy
enough to carry the current your product will
draw. An undersized extension cord will cause a
drop in line voltage resulting in loss of power
and overheating. Follow the recommended cord

EN–4
sizes on the following chart when using
extension cords. If in doubt, use the next heavier
gage. The smaller the gage number, the heavier
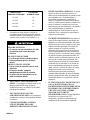
the cord. For tools rated 6 amps or less:
EXTENSION CORD WIRE SIZE
LENGTH A.W.G.
25 FEET 16
50 FEET 16
100 FEET 16
150 FEET 14
• To reduce the disconnection of the hedge
trimmer cord from the extension cord during
operation, secure cord as shown in
Figures 4 & 5.
POTENTIAL HAZARD
• Contact with a damaged area on an
extension cord could cause electric shock.
WHAT CAN HAPPEN
• Electrical shock could cause serious
personal injury or death.
HOW TO AVOID THE HAZARD
• Check extension cords before each use.
• If damaged, replace extension cord
immediately.
• Never use tool with a damaged extension
cord.
• DON’T FORCE HEDGE TRIMMER – It will
do the job better and with less likelihood of a
risk of injury at the rate for which it was
designed.
• NEVER USE IN AN EXPLOSIVE
ATMOSPHERE. Normal sparking of the motor
could ignite fumes.
• WHEN SERVICING USE ONLY
ORIGINAL TORO REPLACEMENT
PARTS.
• CHECK DAMAGED PARTS – Before further
use of the hedge trimmer, a guard or other part
that is damaged should be carefully checked to
determine that it will operate properly and
perform its intended function. Check for
alignment of moving parts, binding of moving
parts, breakage of parts, mounting, and any other
condition that may affect its operation. A guard
or other part that is damaged should be porperly
repaired or replaced by an Authorized Toro
Service Dealer unless indicated elsewhere in this
manual.
• POLARIZED PLUGS. To reduce the risk of
electric shock, this appliance has a polarized
plug (one blade is wider than the other) and will
require the use of a polarized extension cord.
The appliance plug will fit into a polarized
extension cord only one way. If the plug does
not fit fully into the extension cord, reverse the
plug, If the plug still does not fit, obtain a
correct polarized extension cord. A polarized
extension cord will require the use of a polarized
wall outlet. This plug will fit into the polarized
wall outlet only one way. If the plug does not fit
fully into the wall outlet, reverse the plug. If the
plug still does not fit, contact a qualified
electrician to install the proper wall outlet. Do
not change the equipment plug, extension cord
receptacle, or extension cord plug in any way.
• GROUND FAULT CIRCUIT
INTERRUPTER (GFCI) PROTECTION
SHOULD BE PROVIDED ON THE
CIRCUIT(S) OR OUTLET(S) TO BE USED
FOR THE HEDGE TRIMMER. Receptacles
are available having built-in GFCI protection
and may be used for this measure of safety.
• SAVE THESE INSTRUCTIONS. Refer to
them frequently and use them to instruct others
who may use this tool. If you loan someone this
tool, insist they read these instructions also.

EN-5
POTENTIAL HAZARD
• The operation of any hedge trimmer can
result in foreign objects being thrown into
your eyes or bystander’s eyes.
WHAT CAN HAPPEN
• Contact with thrown objects can cause
severe eye damage.
HOW TO AVOID THE HAZARD
• Before commencing power tool operation,
always wear safety goggles or safety glasses
with side shields and a full face shield when
needed. We recommend Wide Vision Safety
Mask for use over eyeglasses or standard
safety glasses with side shields.
• Keep all bystanders and pets away from the
area of operation.
SAVE THESE
INSTRUCTIONS
Safety and Instruction Decals
Safety decals and instructions are easily visible to the operator and are located near
any area of potential danger. Replace any decal that is damaged or lost.
ON HOUSING
(Part No. 92–3339)
ON BLADE GUARD
(Part No. 92–3338)

EN–6
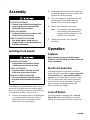
Assembly
POTENTIAL HAZARD
• Trimmer is operational when plugged into
a power supply source. Someone could
accidentally start the trimmer.
WHAT CAN HAPPEN
• Accidental starting of your trimmer could
result in serious personal injury.
HOW TO AVOID THE HAZARD
• Your hedge trimmer should never be
plugged in while you are assembling parts
or making adjustments.
Installing Front Handle
POTENTIAL HAZARD
• If front handle is not installed, trimmer
could be operated with only one hand.
WHAT CAN HAPPEN
• Operating trimmer with only one hand
could cause serious personal injury.
HOW TO AVOID THE HAZARD
• Do not use without front handle in place.
• Keep both hands on handles when tool is
on.
After removing your hedge trimmer from its carton,
remove the front handle and screw from the plastic
bag. Using a flat blade screwdriver, which is the only
tool needed for assembly, install as follows.
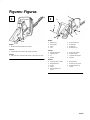
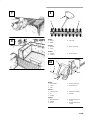
1. Place the front handle parallel to the blade guard
of your hedge trimmer as shown in Figure 2,
then fit the ears of the front handle into the
handle slots on the motor housing.
2. Rotate handle back and forth until recessed key
slot in handle engages and locks in position with
raised key slot in motor housing.
3. Place your trimmer on a workbench and insert
screw through the front handle and motor
housing. See the arrow shown in Figure 3.
4. Start the screw threads into the hex nut.
Note: For convenience and ease of starting
screw threads, the hex nut has been
trapped inside the molded slot on the
opposite side of the handle.
5. Tighten screw securely with a flat blade
screwdriver.
Operation
Features
Before attempting to use your hedge trimmer,
familiarize yourself with all operating features and
safety requirements.
Electrical Connection
Your hedge trimmer has a precision-built electric
motor. It should be connected to a power supply that
is 120 volts, 60 Hz, AC only (normal household
current). Do not operate this tool on direct current
(DC). A voltage drop of more than 10 percent will
cause a loss of power and overheating. If your tool
does not operate when plugged into an outlet,
double-check the power supply.
Lock-off Button
Your hedge trimmer is equipped with a “lock-off
button” that reduces the possibility of accidental
starting. You must depress the button located on top

EN-7
of the handle in order to be able to pull the switch
trigger (Fig. 3). The lock resets each time the trigger
is released.
Switch
To turn your hedge trimmer “ON”, depress and hold
the “lock-off” button, pull the switch trigger, then
release the “lock-off” button. Release the switch
trigger to turn your hedge trimmer “OFF” (Fig. 3).
POTENTIAL HAZARD
• If switch trigger is depressed in the “ON”
position and the trimmer is plugged into a
power supply source, trimmer will be
running.
WHAT CAN HAPPEN
• Accidental starting of your trimmer could
result in serious personal injury.
HOW TO AVOID THE HAZARD
• Before connecting your hedge trimmer to
power supply source, always make sure you
do not have the switch trigger depressed in
the “ON” position.
Extension Cord Retainer
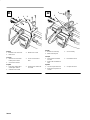
An extension cord retainer has been provided to
prevent extension cord from becoming disconnected
from your trimmer during use. It is molded into the
switch handle of your hedge trimmer. Plug extension
cord into switch handle, then snugly fit cord into
retainer as shown in Figure 4.
Extension cord retainer works only with 16 A.W.G.
extension cords. When using 14 A.W.G. extension
cords the cord will be tight in extension cord retainer.
We suggest an alternate method as shown in Figure 5
for securing 14 A.W.G. extension cords.
POTENTIAL HAZARD
• Trimmer could operate improperly if any
parts are missing, damaged or broken.
WHAT CAN HAPPEN
• An improperly operating trimmer could
cause serious personal injury.
HOW TO AVOID THE HAZARD
• If any parts are missing, damaged, or
broken, do not operate your trimmer until
they have been replaced.
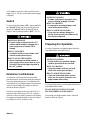
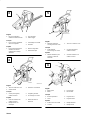
Preparing For Operation
For ease of operation your hedge trimmer has both a
front handle and a rear handle (Fig. 6).
POTENTIAL HAZARD
• If front handle is not installed, trimmer
could be operated with only one hand.
WHAT CAN HAPPEN
• Operating trimmer with only one hand
could cause serious personal injury.
HOW TO AVOID THE HAZARD
• Check the front handle before each use.
Make sure it is securely fastened to your
hedge trimmer before using.
For your protection there is a blade guard between the
front handle and the blade.
DO NOT OPERATE IF BLADE GUARD
BECOMES BROKEN OR DAMAGED.
When using your hedge trimmer, hold it with both
hands as shown in Figure 6.

EN–8
DO NOT USE BLADE GUARD AS A GRIPPING
SURFACE.
POTENTIAL HAZARD
• Trimmer has sharp blades.
WHAT CAN HAPPEN
• Contact with moving trimmer blades can
cause serious personal injury or damage.
HOW TO AVOID THE HAZARD
• Stay alert and watch what you are doing.
• Do not operate trimmer when you are
fatigued or under the influence of drugs,
alcohol or medication.
• Do not operate trimmer if guards are
missing.
POTENTIAL HAZARD
• The operation of any hedge trimmer can
result in foreign objects being thrown into
your eyes or bystander’s eyes.
WHAT CAN HAPPEN
• Contact with thrown objects can cause
severe eye damage.
HOW TO AVOID THE HAZARD
• Before commencing power tool operation,
always wear safety goggles or safety glasses
with side shields and a full face shield when
needed. We recommend Wide Vision Safety
Mask for use over eyeglasses or standard
safety glasses with side shields.
• Keep all bystanders and pets away from the
area of operation.
Trimming A Hedge
1. USE TRIMMER PROPERLY. Hold the
trimmer with both hands and with the cutter blade
away from you BEFORE turning the switch on
(Fig. 7).
2. Push the lock-off button and squeeze the switch
trigger.
Note: Lock-off button is located on top of the
handle (Fig. 3).
POTENTIAL HAZARD
• When trimmer is in operation, sharp parts
are moving.
WHAT CAN HAPPEN
• Any part of body coming in contact with
moving parts could result in serious
personal injury.
HOW TO AVOID THE HAZARD
• Keep hands and fingers away from moving
parts.
3. Always keep cord behind your hedge trimmer
when in use. Do not place it over the hedge
where it may be cut by the blade.
POTENTIAL HAZARD
• Extension cord can be damaged by moving
blade.
WHAT CAN HAPPEN
• Touching the damaged area on an extension
cord could cause electrical shock resulting
in serious personal injury or death.
HOW TO AVOID THE HAZARD
• Never use tool with a damaged cord.
• Replace a damaged cord immediately.

EN-9
POTENTIAL HAZARD
• If blade jams on the extension cord, do not
touch the blade!
WHAT CAN HAPPEN
• Blade can become electrically charged and
very dangerous! Contact with charged
blade could cause serious personal injury
or death.
HOW TO AVOID THE HAZARD
• Continue to hold your trimmer by the
insulated handles and immediately unplug
extension cord from power supply.
4. Do not try to trim hedges which are above your
normal reach. You must hold trimmer with both
hands at all times while operating.
POTENTIAL HAZARD
• Trimmer is operational when plugged into
a power supply source. Someone could
accidentally start the trimmer.
WHAT CAN HAPPEN
• Accidental starting of your trimmer could
result in serious personal injury.
HOW TO AVOID THE HAZARD
• Disconnect your trimmer from power
supply and carry by the front handle when
not in use.
Trimming Techniques
• If desired, you can use a string to help cut your
hedge level. Decide how high you want the
hedge. Then, stretch a piece of string along the
hedge at this height. Trim the hedge just above
this guide line of string (Fig. 7).
• Trim the side of a hedge so that it will be
slightly narrower at the top as shown in Figure 8.
More of the hedge will be exposed to light when
shaped this way and its growth will be more
uniform.
• Wear gloves when trimming thorny or prickly
growth.
• When trimming new growth, use a wide,
sweeping action so that the stems are fed directly
into the cutter blade. Older growth will have
thicker stems and will be trimmed easiest by
using a sawing movement.
• Do not try to cut stems that are larger than 3/8
in. thick or those obviously too large to feed into
the cutter blade. Use a non-powered hand saw or
pruning saw to cut the larger stems.
Maintenance
POTENTIAL HAZARD
• Use of non-Toro replacement parts could
cause product damage.
WHAT CAN HAPPEN
• Using a damaged product could cause
serious personal injury.
HOW TO AVOID THE HAZARD
• When servicing use only original Toro
replacement parts.
• Never use “will-fit” replacement parts.
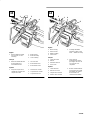
Blade Lubrication
For easier operation and longer blade life, lubricate
the hedge trimmer blade before and after each use.

EN–10
1. DISCONNECT TRIMMER FROM POWER
SUPPLY.
2. Apply light machine oil along the edge of the
top strap as shown in Figure 9.
Your trimmer should be stopped, disconnected, and
oiled occasionally during use.
Lubrication
All of the bearings in this tool are lubricated with a
sufficient amount of high grade lubricant for the life
of the unit under normal operating conditions.
Therefore, no further lubrication is required.
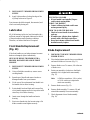
Front Handle Replacement
(Fig. 10)
If the front handle on your hedge trimmer becomes
broken or damaged, replace immediately.
NEVER USE HEDGE TRIMMER WITH A
BROKEN, DAMAGED OR LOOSE FRONT
HANDLE.
1. DISCONNECT TRIMMER FROM POWER
SUPPLY.
2. Using a flat blade screwdriver, remove screw
securing handle.
3. Spread ears of handle and remove broken or
damaged handle from your trimmer.
4. Fit the ears of the replacement front handle into
the handle slots in motor housing.
5. Rotate handle back and forth until recessed key
slot in handle engages and locks in position with
raised key slot in motor housing.
6. Insert screw through the handle and motor
housing.
7. Start screw threads into the hex nut using a flat
blade screwdriver and tighten securely.
POTENTIAL HAZARD
• If front handle is not installed, fingers
could contact moving blade.
WHAT CAN HAPPEN
• Contact with moving blade could cause
serious personal injury.
HOW TO AVOID THE HAZARD
• Check to be sure handle is secure before
each use.
• If handle screw vibrates loose, tighten it
securely with a flat blade screwdriver.
• Do not use trimmer without front handle
installed securely in place.
Blade Replacement
1. DISCONNECT HEDGE TRIMMER FROM
POWER SUPPLY.
2. Place hedge trimmer upside down on workbench
and remove blade cover screws (Fig. 11).
3. Remove blade cover: To remove, lift at the rear
of blade cover.
4. Rotate cam assembly clockwise so that blade
assembly slot is aligned with cam assembly
(Fig. 12).
Note: A Phillips screwdriver, 1/4 in. socket,
or 1/4 in. nut driver is required to
rotate cam assembly.
5. Remove blade screws (Fig. 13).
6. Remove blade assembly. To remove, lift and
rotate blade assembly from cam assembly.
7. Check alignment of new blade assembly
(Fig. 14).

EN-11
Note: If alignment is needed, manually slide
blade assembly back and forth until
slots in blade assembly are aligned and
will fit over cam assembly.
POTENTIAL HAZARD
• Blades are sharp.
WHAT CAN HAPPEN
• Contact with sharp blades can cause
serious personal injury.
HOW TO AVOID THE HAZARD
• Make sure unit is unplugged. Wear gloves
while making adjustment. When manually
sliding blade assembly, do not place your
hand or fingers between blades or in any
position where they could get pinched or
cut.
8. Position new blade assembly over cam assembly,
then continue to manually slide blade assembly
until screw holes in blade assembly align with
screw holes in motor housing (Fig. 14).
Note: When properly aligned, blade
assembly fits in recessed slot in motor
housing.
9. Replace blade screws. Tighten screws securely.
10. Replace blade cover. Reposition tabs on front of
blade cover under front blade guard and lower
rear of blade cover into place (Fig. 15 & 16).
11. Replace blade cover screws.
12. Tighten screws securely.
POTENTIAL HAZARD
• If blade cover is not securely fastened in
place, internal parts will be exposed.
WHAT CAN HAPPEN
• Contact with exposed internal parts could
cause serious personal injury or death.
HOW TO AVOID THE HAZARD
• Make sure blade cover is replaced before
connecting your hedge trimmer to power
supply.
General
Avoid using solvents when cleaning plastic parts.
Most plastics are susceptible to various types of
commercial solvents and may be damaged by their
use. Use clean cloths to remove dirt, carbon dust, etc.
POTENTIAL HAZARD
• Plastic parts can be damaged, weakened or
destroyed by many cleaning solvents and
other fluids.
WHAT CAN HAPPEN
• Damaged parts can cause trimmer to
operate improperly which could lead to
serious personal injury.
HOW TO AVOID THE HAZARD
• Do not at any time let brake fluids,
gasoline, petroleum-based products,
penetrating oils, etc., come in contact with
plastic parts. They contain chemicals that
can damage, weaken or destroy plastics.

EN–12
Guard Against Electric Shock
Hazard
• Don’t use trimmer in rain, in wet locations, or on
wet hedges or shrubbery.
• Use only extension cords in good condition and
marked “suitable for use with outdoor
appliances” having electrical rating not less than
rating of trimmer.
• Do not use damaged extension cords.
• Inspect cords periodically and replace if
damaged.
• Do not abuse cord.
• Never carry trimmer by cord.
• Do not yank cord to disconnect from receptacles.
• Keep cord away from heat, oil, sharp edges, and
moving blades.
• Wear non-skid footwear.
Servicing Double-insulated
Appliance
In a double-insulated appliance, two systems of
insulation are provided instead of grounding. No
grounding means is provided on a double-insulated
appliance, nor should a means for grounding be added
to the appliance. Servicing a double-insulated
appliance requires extreme care and knowledge of the
system, and should be done only by qualified service
personnel. Replacement parts for a double-insulated
appliance must be identical to the parts they replace.
A double-insulated appliance is marked with the
words “DOUBLE INSULATION” or “DOUBLE
INSULATED.” The symbol (square within a square)
may also be marked on the appliance.
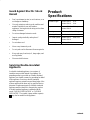
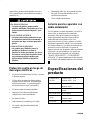
Product
Specifications
Blade Length Model 51815 20 In.
Model 51819 24 In.
Input Model 51815 3.0 Amperes
Model 51819
Rating 120 volts, 60 Hz, AC Only
Cutting Action Double Action
No Load Speed Model 51815 3000 SPM
Model 51819
Net Weight 3.5 kg. (7 lbs.)
Page is loading ...
Page is loading ...
Page is loading ...
Page is loading ...
Page is loading ...
Page is loading ...
Page is loading ...
Page is loading ...
Page is loading ...
Page is loading ...
Page is loading ...
Page is loading ...
Page is loading ...
Page is loading ...
Page is loading ...
Page is loading ...
Page is loading ...
Page is loading ...
Page is loading ...
Page is loading ...
Page is loading ...
Page is loading ...
Page is loading ...
Page is loading ...
Page is loading ...
Page is loading ...
Page is loading ...
Page is loading ...
Page is loading ...
Page is loading ...
Page is loading ...
Page is loading ...

ii
1
2
3
English
1. Hex nut is trapped in
molded slot of front handle
2. Lock-off button
3. Switch trigger
Français
1. Ecrou six pans immobilisé
dans son logement
2. Verrouillage de sécurité
3. Gâchette
Español
1. La tuerca hexagonal está
retenida en la ranura
moldeada de la manija
delantera
2. Boton de seguridad
3. Gatillo interruptor
GRAPHIC #
3
1
2
English
1. 16 A.W.G.extension cord
2. Switch handle
3. Extension cord retainer
Français
1. Cordon prolongateur,
calibre 16 A.W.G.
2. Poignée à gâchette
3. Accrochage du cordon
Español
1. Cable de extensión de
calibre 16 A.W.G.
2. Manija trasera con
interruptor
3. Retén del cable de
extensión
2
1
English
1. Alternate method for
securing extension cords
2. 14 A.W.G. extension cord
Français
1. Autre méthode
d’accrochage du cordon
2. Cordon prolongateur,
calibre 14 A.W.G.
Español
1. Método alternativo para
sujetar los cables de
extensión
2. Cable de extensión con
calibre 14 A W.G.
2
3
4
1
English
1. Blade guard
2. Blade
3. Front handle
4. Rear handle
Français
1. Bouclier protecteur
2. Lame
3. Poignée avant
4. Poignée arrière
Español
1. Protección de la cuchilla
2. Cuchilla
3. Manija delantera
4. Manija trasera
3
4
5
6

iii
GRAPHIC #
GRAPHIC #
1
2
3
English
1. Oil can
2. Blade
3. Top strap
Français
1. Burette
2. Lame
3. Barre supérieure
Español
1. Aceitera
2. Cuchilla
3. Borde superior
5
4
3
1
2
English
1. Front handle
2. Screw
3. Ears
4. Recessed key slot
5. Raised key slot
Français
1. Poignée avant
2. Vis
3. Oreilles
4. Rainure de clavette
5. Clavette
Español
1. Manija delantera
2. Tornillo
3. Orejas
4. Ranura dentada con
receso
5. Ranura dentada con
resalte
7
8
9
10

iv
1
2
3
English
1. Lift blade cover to remove
2. Blade cover
3. Blade cover screws
Français
1. Soulever le couvercle de
la lame pour le retirer
2. Couvercle de la lame
3. Vis du couvercle de la
lame
Español
1. Levante la cubierta de la
cuchilla para retirarla
2. Cubierta de la cuchilla
3. Tornillos de la cubierta de
la cuchilla
1
2
3
English
1. Rotate cam assembly
2. Blade assembly slot
3. Cam assembly
Français
1. Faire pivoter l’ensemble
de came
2. Rainure de l’ensemble de
lame
3. Ensemble de came
Español
1. Gire el conjunto de la leva
2. Ranura del conjunto de la
cuchilla
3. Conjunto de la leva
11 12

v
1
2
3
4
English
1. Remove blade assembly
from eccentric on cam
assembly
2. Blade screws
3. Blade assembly
4. Cam assembly
Français
1. Retirer l’ensemble de lame
de l’excentrique sur
l’ensemble de came
2. Vis de la lame
3. Ensemble de lame
4. Ensemble de came
Español
1. Saque el conjunto de la
cuchilla del excéntrico del
conjunto de la leva
2. Tornillo de la cuchilla
3. Conjunto de la cuchilla
4. Conjunto de la leva
4
4
1
2
3
5
English
1. Motor housing
2. Recessed slot
3. Blade assembly
4. Screw holes
5. Carefully slide blade
assembly to align screw
holes — blades are sharp
Français
1. Carter du moteur
2. Rainure
3. Ensemble de lame
4. Trous de vis
5. Faire coulisser
prudemment les lames
pour aligner les trous de
vis, les lames sont
coupantes!
Español
1. Cárter del motor
2. Ranura con receso
3. Conjunto de la cuchilla
4. Orificios de los tornillos
5. Deslice cuidadosamente
el conjunto de la cuchilla
para alinear los orificios
de los tornillos–las
cuchillas están afiladas
13 14

vi
1
3
2
English
1. Tabs
2. Blade cover
3. Blade guard
Français
1. Pattes
2. Couvercle de la lame
3. Bouclier protecteur
Español
1. Lengüetas
2. Cubierta de la cuchilla
3. Protección de la cuchilla
1
2
3
English
1. Blade cover
2. Blade cover screws
3. Lower blade cover to
replace
Français
1. Couvercle de la lame
2. Vis du couvercle de la
lame
3. Rabattre le couvercle de
la lame.
Español
1. Cubierta de la cuchilla
2. Tornillos de la cubierta de
la cuchilla
3. Baje la cubierta de la
cuchilla para volver a
colocarla
15 16
Page is loading ...
Page is loading ...
-
 1
1
-
 2
2
-
 3
3
-
 4
4
-
 5
5
-
 6
6
-
 7
7
-
 8
8
-
 9
9
-
 10
10
-
 11
11
-
 12
12
-
 13
13
-
 14
14
-
 15
15
-
 16
16
-
 17
17
-
 18
18
-
 19
19
-
 20
20
-
 21
21
-
 22
22
-
 23
23
-
 24
24
-
 25
25
-
 26
26
-
 27
27
-
 28
28
-
 29
29
-
 30
30
-
 31
31
-
 32
32
-
 33
33
-
 34
34
-
 35
35
-
 36
36
-
 37
37
-
 38
38
-
 39
39
-
 40
40
-
 41
41
-
 42
42
-
 43
43
-
 44
44
-
 45
45
-
 46
46
-
 47
47
-
 48
48
-
 49
49
-
 50
50
-
 51
51
-
 52
52


Toro 24" Dual Action Hedge Trimmer User manual
- Category
- Power hedge trimmers
- Type
- User manual
- This manual is also suitable for
Ask a question and I''ll find the answer in the document
Finding information in a document is now easier with AI
in other languages
Related papers
-
Toro 51490 User guide
-
Toro 22in Electric Hedge Trimmer User manual
-
-
-
-
-
-
-
-
Other documents
-
Remington HEDGE WIZARD User manual
-
-
MTD 22K User manual
-
 Menards HONGK001 Owner's manual
-
Greenworks 22102 Owner's manual
-
 Lawn Master 8769705 Owner's manual
-
Craftsman 315798890 User manual
-
Simplicity 18" HEDGE TRIMMER User manual
-
Sun Joe SJH902E User manual
-
Martha Stewart MTS-EPHT18 Operating instructions

