Stick Logger Quick Guide
Model:LSW-3/LSW-3-C
Notice:
Please read this manual carefully before using products and keep it
in the place where O&M providers can easily find.
Due to product upgrade and other factors, the content of this manual
might change from time to time. Please take actual product as standard
and get latest manual from www.solarman.cn or sales. Unless other-
wise agreed herein, this manual will only be used as guidance. Any
statement, information or suggestion in this manual will not take any
form of responsibility.
Without written permission, any content of this document (partly or en-
tirely) cannot be extracted, copied or transmitted in any form by any
company or individual.
Warning:
Please remove logger after power off.
SOLARMAN Smart
for end user
SOLARMAN Business
for business
iPhone:Search “SOLARMAN Smart” in Apple Store.
Android:Search “SOLARMAN Smart” in Google Play.
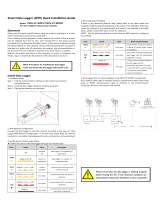
1. Stick Logger Installation
Type 1
Step1: Assemble logger to the inverter communication interface as shown
in the diagram.
Warning:
Please do not hold the logger body to rotate while
install or remove the logger.
Type 2
Step1: Assemble logger to the inverter communication interface as shown
in the diagram.
2. Logger Status
2.1 Check Indicator light
Implication Lights Status Description(All lights are single green lights.)
Communication
with router
Communication
with inverter
Logger running
status
1.Light off: Connection to the router failed.
2.On 1s/Off 1s(Slow flash): Connection to the router succeeded.
3.Light keeps on: Connection to the server succeeded.
4.On 100ms/Off 100ms(Fast flash): Distributing network fast.
1.Light keeps on: Logger connected to the inverter.
2.Light off: Connection to the inverter failed.
3.On 1s/Off 1s(Slow flash): Communicating with inverter.
1.Light off: Running abnormally.
2.On 1s/Off 1s (Slow flash): Running normally.
3.On 100ms/Off 100ms(Fast flash): Restore factory settings.
NET
COM
READY
The normal operation status of the stick logger, when router connected
to the network normally:
1.Connection to the server succeeded: NET light keeps on after the
logger powered on.
2.Logger running normally: READY light flashes.
3.Connection to the inverter succeeded: COM light keeps on.
3. Abnormal State Processing
If the data on platform is abnormal when the stick logger is running,
please check the table below and according to the status of indicator
lights to complete a simple troubleshooting. If it still can not be resol-
ved or indicator lights status do not show in the table below, please
contact Customer Support.
(Note: Please using the following table query after power-on for 2mins
at least.)
NET COM READY
Fault Cause Fault Description
Solution
OFF
Slow
flash
Slow
flash
ON
ON
1.Stick logger does
not have a network.
2.Antenna abnormal
3.Router WiFi signal
strength weak.
1.Router networking
abnormal.
2.The server point
of logger is modified.
3.Network limitation,
server cannot be
connected.
1.Connection betw-
een stick logger and
inverter loosen.
2.Inverter does not
match with stick log-
ger’s communication
rate.
1.Check if the wireless network
configured.
2.Check the antenna, if there is any
damage or loose.
3.Enhance router WiFi signal
strength.
4.Long press Resetbutton for 10s,
reboot stick logger and networking
again.
1.Check if the router has access to
the network.
2.Check the router’s setting, if the
connection is limited.
3.Contact our customer service.
1.Check the connection between
stick logger and inverter. Remove
the stick logger and install again.
2.Check inverter’s communication
rate to see if it matches with stick
logger’s.
3.Long press Reset button for 5s,
reboot stick logger.
Connection between
logger and router
abnormal
Connection betwe-
en logger and router
normal, connection
between logger and
remote server
abnormal.
Communication with
inverter abnormal
NET COM READY
OFF
Any
state
Slow
flash
Slow
flash
1.Connection betw-
een stick logger and
inverter loosen or
abnormal.
2.Inverter power in-
sufficient.
3.Stick Logger abn-
ormal.
1.Check the connection, remove the
stick logger and install again.
2.Check inverter output power.
3.Contact our customer service.
Power supply
abnormal
Fast
flash
Restore
factory settings
Normal
1.Exit automatically after 1mins.
2.Long press Reset button for 5s,
reboot stick logger.
3.Long press Reset button for 10s,
restore factory settings.
OFF OFF OFF
Any
state
Any
state
Fast
flash
SMARTLINK
networking status
Normal
1.Exit automatically after 5mins.
2.Long press Reset button for 5s,
reboot stick logger.
3.Long press Reset button for 10s,
restore factory settings.
Any
state
Any
state
Usage: Press
Notice:
Do not remove waterproof plug.
Key-press Status Description Light Status
Short press 1s
Long press 5s
Long press 10s
SMARTLINK rapid networking status.
Rebooting the stick logger.
Resetting the stick logger.
NET light flashes fast for 100ms.
All lights are extinguished immediately.
1.All lights are extinguished after 4s.
2.READY light flashes fast for 100ms.
4.2 Notices for Reset button
4. Usage methods and notices for Reset button
4.1 Usage methods and key-press descriptions for Reset button
1.Registration
Go to SOLARMAN Smart and register.
Click "Register" and create your account here.
2.Create a Plant
Click "Add Now" to create your plant.
Please fill in plant basic info and other info here.
USER MANUAL for SOLARMAN Smart APP