Page is loading ...


1
……… Searchlight
Operation Manual
Table of Contents
Overview ..................................................................................................................... 2
Characteristics
Applications
Theory of Operation
Safety Warnings .......................................................................................................... 3
Searchlight Operation .................................................................................................. 4
Searchlight Programming ............................................................................................ 5
Rechargeable Battery Systems .................................................................................... 8
MBP-1308 Lithium Iron Phosphate Batteries
Searchlight Accessories ............................................................................................. 11
Searchlight Maintenance ........................................................................................... 12
Focusing the Lamp
Lamp and Lens Replacement
Technical Assistance ................................................................................................. 16
Remote Control Operation
Control Connector Pin-Outs
Input Power Requirements
Troubleshooting
Warranty and Repairs ................................................................................................ 20
Warranty
Returns to the Factory
© 2018 Peak Beam Systems, Inc.

2
Overview
Characteristics
Maxa Beam Searchlights are lightweight, compact, high intensity illuminators that
use a field replaceable Xenon short arc lamp and a precision electroformed reflector
to provide the ultimate solution for long range, portable and remote-controllable
illumination. All Searchlights feature:
• 12,000,000 Peak Beam CandlePower Output
• Motorized Beam Width Adjustment from 1° Spot to 40° Flood*
• Strobe Function with Variable Rate and Duty Cycle**
• Three Beam Intensity Levels**
• Field-Programmable Beam Settings (start-up beam width, strobe rate, etc.)
• Visible and Infrared Illumination Capability
• Flexible Mounting Options
• Remote Control of Intensity, Beam Size, Strobe Function and Programming
• Color temperature similar to daylight (5600°K)
*Searchlight models used for weapon-mounted or extreme shock applications feature 1° spot to 25° flood.
**MBS-430-W(-RS) weapon lights feature a factory-set sweep strobe and two beam intensity levels.
Handheld Searchlight Systems include rechargeable Lithium Iron Phosphate
(LiFePO4) batteries that offer up to 150 minutes of continuous operation from a
single battery. The searchlight and battery weigh just 6.5 lbs.
Remote-Controlled Searchlights feature an optional RS-232 interface that allows the
operator to control all functions of the searchlight from a computer. Remote-
controlled searchlights are frequently integrated into camera and sensor systems for
escalation of force applications.
The Maxa Beam Searchlight Product Line consists of four basic searchlight models:
• MBS-410 Handheld Searchlights with Remote Control Capability
• MBS-430-W Rail-Mounted Remote-Controlled Searchlights
• MBS-430-Y Mounted Remote-Controlled Searchlights
• MBPKG-E Computer-Controlled Searchlights in Environmental Housing
Applications
For 30 years military, law enforcement, and private end-users around the world have
relied on the Maxa Beam Searchlight for:
• Force Protection
• Perimeter Security
• Search and Rescue
• Border Protection
• Tactical Operations
• Escalation of Force / Ocular Disruption
• Shipboard Protection / Maritime Security
• Night Vision Equipment Enhancement
• Crew-Served Weapon Illumination
• Infrared / Covert Surveillance

3
Theory of Operation
The Maxa Beam Searchlight produces light by passing an arc of electricity between
two electrodes in a quartz tube filled with a pressurized atmosphere of Xenon gas. A
plasma ball is formed and precisely positioned within an electroformed reflector by
an internal microprocessor controlling a servo motor.
When the ignition button is pressed, a high voltage RF igniter produces up to 20,000
volts to ionize the Xenon gas within the lamp, allowing DC current to flow through
the lamp. Once the arc is established, gas temperature and pressure start to climb,
forcing the Xenon into a plasma state. The light will come on with a constant high
beam for approximately 2 seconds to assure reliable ignition of a cold lamp and will
then go to the programmed intensity. After lamp has ignited, the internal
microprocessor takes control of the operation of the electronic focus, power settings
and the user programmable options.
The searchlight’s switch mode power supply is factory set and requires no
adjustment (even after a lamp change) as the control circuitry is self-calibrating.
Internal power regulation keeps both the intensity and color of the beam constant as
the voltage from the battery drops.
Safety Warnings
ANSI Risk Group 3. Warning.
Visible and infrared radiation emitted from this searchlight.
Permanent eye damage can result. Avoid direct exposure to the beam.
• Do not look directly into the searchlight beam. Exposure of the eye to either the
direct searchlight beam or a beam reflected from a flat mirror-like surface can cause
permanent eye injury to the unprotected eye. Follow the same precaution even when
an Infrared Filter is installed on the searchlight.
o Nominal Ocular Hazard Distance (NOHD), Visible Light: 10 meters
o NOHD, Infrared Light: 30 meters for exposures greater than 10 seconds
• Do not operate searchlight if the front lens is damaged or removed. Ultraviolet
injury to skin and cornea can occur if the searchlight is operated with a damaged
front lens or if the lens is removed.
• Do not allow the concentrated beam of light to be focused on flammable
materials at close distances for prolonged periods of time.
• Do not operate light in an explosive environment.
• Do not touch lamp connections during operation as high voltage is present.
• Do not touch the quartz envelope of the lamp. If the lamp is accidentally touched,
clean with alcohol or the solution supplied in the replacement lamp kit.
• Always wear protective eyewear, long sleeves, and gloves if removing the front
lens cover. The lamp is under positive pressure and should be handled with care.
• Always disconnect searchlight from power cord when not in use, when placed in
storage or when being transported to prevent accidental activation.

4
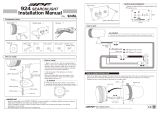
Searchlight Operation
1. Locate searchlight, battery and power cable.
2. Attach Searchlight
to Battery by lining
up the four feet of the
searchlight over holes
in top of battery (a).
Lower the searchlight
into the holes, then
slide the searchlight
towards the connector
end of the battery (b)
until searchlight locks
in place. To detach
searchlight, lift the
Lock Release Lever under the searchlight handle, then slide searchlight forward
away from battery connector end.
3. Attach female end of power cable to 4-pin connector on searchlight (c). Attach
male end of power cable to connector on battery (d). To lock, rotate only the
locking ring clockwise. All connections are keyed; never force connections.
4. If desired, attach a battery shoulder strap to diagonally opposite tabs on battery.
5. To Turn Searchlight On, press the red ON/OFF SWITCH. Searchlight starts
on high power, holds setting for 2 seconds, then drops to normal power.
6. To Adjust Beam Width, pull the black 4-WAY SWITCH back to increase
beam width to flood. Push the 4-way switch forward to decrease beam width to
spot. The default beam width on start up is 9 degrees. To set a different beam
width on start up, please see the Programming section of this manual.
7. To Activate Strobe, rock and hold the 4-way switch to the left. The default
setting is momentary strobe, which means that the searchlight will strobe when
the 4-way switch is held to the left. To set continuous strobe or low beam mode,
please see the Programming section of this manual.
8. To Activate High Beam, rock and hold the 4-way switch to the right. The
default setting is momentary high beam, which means that the searchlight will
stay on high beam when the 4-way switch is held to the right. To set continuous
high beam mode, please see the Programming section of this manual.

5
9. To Attach a Filter, line up the three tabs on the filter with the slots on the front
of the searchlight. Place filter over front of searchlight and turn filter counter-
clockwise until fully seated. Filter will lock in place. For filter options, see the
Filters and Accessories section of this manual.
Searchlight Programming
The Maxa Beam Searchlight’s operational characteristics can be modified using a
series of simple programming sequences. This capability allows the light to be
customized for specific applications. For example, if the searchlight will be utilized
for an extended search operation, the searchlight can be programmed to start up in
low beam mode with the beam width at full flood. Other scenarios include a
surveillance operation where the light must start up at normal power with the beam
set to the size of the area under surveillance or a tactical application where the
searchlight is programmed to start up in strobe mode with a narrow beam spread.
Factory Default Settings:
MBS-410, MBS-430-W4, MBS-430-Y and MBPKG-E Series Searchlights
Automatic Beam Intensity at Start-Up Normal Beam Level
Rock 4-Way Switch Forward Decrease Beam Width to Spot
Rock 4-Way Switch Back Increase Beam Width to Flood
Rock 4-Way Switch Left Momentary Strobe Mode
Rock 4-Way Switch Right Momentary High Beam
MBS-430-W(-RS) Crew-Served Weapon Lights
Automatic Beam Intensity at Start-Up High Beam Level
Rock 4-Way Switch Forward Decrease Beam Width to Spot
Rock 4-Way Switch Back Increase Beam Width to Flood
Rock 4-Way Switch Left Latching Sweep Strobe Mode*
Rock 4-Way Switch Right Toggles Latching High/Low Beam
*The Sweep Strobe function is not user-programmable on MBS-430-W(-RS) lights.
To modify these characteristics follow the instructions on the following pages.

6
Explanation of Programming Symbols:
(A) Changing High Beam from Momentary to Timed and Continuous Modes:
Factory default activates high beam when the 4-way switch is held to the right. To
change function to timed high beam mode follow the below sequence. Once this
programming is complete, the light will stay on high beam for 16 seconds when
switch is rocked to the right.
To change to continuous high beam mode, repeat the above sequence. Once this
programming is complete, the light will stay on “latched” high beam when the
switch is rocked to the right. Repeat the sequence a third time to return the right
switch function to default momentary high beam mode.
Note: Continuous high beam only available on searchlights with serial numbers ending “G3-26.”
(B) Changing from Momentary Strobe Mode to Continuous Strobe and Low
Beam Modes:
Factory default activates momentary strobe mode when the 4-way switch is held to
the left. To change the left switch function to continuous strobe mode, follow the
below sequence.
To change to low beam mode, repeat the above sequence. Repeat the sequence a
third time to return the left switch function to default momentary strobe mode.
Note: If you have programmed the light to start up on strobe or low beam mode (see (D)), performing the
programming changes in this section will reset the light back to starting up on normal (default) beam
mode. When the searchlight is in continuous strobe mode, all other programming sequences will not
function with the exception of (G) Changing Strobe Rate or Duty Cycle. To perform other programming
sequences, first take searchlight out of continuous strobe mode by rocking the 4-way switch left.
(C) Setting Beam Width on Start Up:
With searchlight already turned on, press and hold the red switch down.
Rock the 4-way switch one time in the indicated direction, then release.
Release the power switch. Light will turn off and new setting is saved.

7
(D) Setting Beam Intensity on Start Up (after 2 second warm up):
To set light to start up in low beam mode (also sets left button to low beam mode):
To set light to start up in normal mode (this is the factory default setting):
To set light to start up in strobe mode (also sets left button to continuous strobe
mode):
(E) Setting the Smallest Spot of the Searchlight:
(F) Setting the Widest Flood of the Searchlight:
(G) Changing the Strobe Rate or Duty Cycle:
To follow this procedure the light must be in continuous strobe mode (see (B)).
(H) To Lock Out Programming Functions:
This will prevent modifications from being made to programming settings after they
are preset. To unlock use the Restore Factory Settings procedure in (I), below.
Note for (E) and (F): If there
is a delay between when the 4-
way switch is rocked and
when the lamp begins to move
after setting spot or flood
position, this indicates that the
spot or flood limit is set
beyond the point at which the
lamp is physically able to
move. If this occurs, simply
reset the spot or flood position
at or within the physical limits
of the lamp's travel.

8
(I) Restore Factory Settings:
This procedure restores all of the programmable functions to their factory defaults.
It is useful to set the searchlight back to a known state for troubleshooting purposes.
Rechargeable Battery Systems
Handheld Maxa Beam Searchlights are powered by rechargeable battery packs that
attach to the bottom of the searchlight. Maxa Beam Batteries are for use with Maxa
Beam Searchlights only and should never be used with any other device.
This Operation Manual covers the use of Peak Beam’s current Lithium Iron
Phosphate (LiFePO4) batteries. To view information regarding operation of older
battery chemistries including MBP-1207 NiCad and MBP-1307 Li-Ion Batteries,
please visit http://www.peakbeam.com/downloads/.
MBP-1308 Series Lithium Iron Phosphate (LiFePO4) Batteries
The MBP-1308 7.5Ah Lithium Iron Phosphate (LiFePO4) Battery is the most
powerful battery option for the Maxa Beam Searchlight, offering a longer run time,
faster charge time, and more life cycles than any previous Maxa Beam battery.
MBP-1308 Series Batteries are available with an optional fuel gauge. For details on
using the battery fuel gauge, see page 9.
MBP-1308 Series 7.5Ah Lithium Iron Phosphate Battery
Run Time
75 minutes (high)
115 minutes (default)
150 minutes (low)
Charge Time
110 minutes
Life Cycles
2,500
Capacity
7.5 Amp-hours / 96 Watt-hours
Dimensions
5 x 7.25 x 3.5 inches
Weight
3.0 lbs.
Compatible
Chargers
MBP-3200 Series: Smart AC/DC LiFePO4 Charger
MBP-3205: 100-240VAC Charger
MBP-3230: 12VDC Charger
Charging Adapters
(compatible with
MBP-3200)
MBP-5010: 100-240VAC 10A Supply
MBP-5004: 100-240VAC 4A Supply
MBP-5230: 12VDC Vehicle Adapter
MBA-7110: 12VDC Searchlight Adapter
MBP-7406: 28VDC NATO Slave Adapter
The LiFePO4 is compatible with all Maxa Beam Searchlights, however, the LiFePO4
battery’s connector differs from the connectors on older Maxa Beam batteries.
Therefore, a LiFePO4-specific power cord (signified with “-L” suffix) must be used
to connect this battery to a searchlight.

9
Battery Safety Warnings:
• Do not expose to fire or open flame.
• Do not puncture, deform, incinerate or heat above 85°C (185°F).
• Do not open or disassemble. Batteries are sealed in a waterproof case with no
user-serviceable components. Do not attempt to use a battery that has a
damaged case; please contact the factory about our re-casing service.
• Do not dispose in fire. Disposal must be conducted in accordance with
applicable local, state, or national regulations. Batteries contain recyclable
materials; recycling is encouraged over disposal.
• A Safety Data Sheet (SDS) for this battery is available upon request.
Battery Storage and Transport:
Always disconnect battery from the searchlight before storing or transporting. If
storing battery for long periods of time, store battery at 75% charge level and
recharge once every six months. Do not store batteries above 60°C (140°F) or below
-20°C (-4°F). Store in a cool, dry location not subject to frequent temperature
fluctuations. Elevated temperatures can result in reduced battery service life.
All Lithium Ion batteries are classified as Class 9 Dangerous Goods for air, sea and
surface transport and must be packaged and transported according to applicable
regulations. However, small, “excepted” batteries such as the MBP-1308 LiFePO4
Battery are not subject to certain provisions of the regulations (e.g. Class 9 labeling
and UN specification packaging).
• Batteries shipped within the United States via ground transport methods must be
packed, marked and labeled in accordance with the exceptions for small lithium
batteries per 49 CFR 173.185(c).
• Batteries shipped via air transport methods without searchlights are classified as
UN3480 Lithium ion batteries and must be packed, marked and labeled in
accordance with Sec II or Sec IB of IATA/ICAO PI 965 – Cargo Aircraft Only.
• Batteries shipped via air transport methods with searchlights are classified as
UN3481 Lithium ion batteries packed with equipment and must be packed,
marked and labeled in accordance with Sec II of IATA/ICAO PI 966.
Fuel Gauge Operation:
MBP-1308-FG Batteries incorporate a five level LED fuel gauge which indicates the
battery’s State of Charge (SoC) and State of Health (SoH).
• To view the battery’s SoC, press and release the white button at the top of the
fuel gauge display. SoC will be displayed, steady, for 4 seconds.
• To view the battery’s SoC during charging, fuel gauge will flash the current
SoC while battery is charging. Display will turn off when charge is complete.
• To view the battery’s SoH, press and hold the white button until SoC display
turns off. Release button. After 2 seconds SoH will be displayed, flashing, for 4
seconds.

10
Battery Charging:
Use only approved Peak Beam chargers. Improperly charging a battery may reduce
service life and, in extreme cases, may cause the product to flame or leak.
Warning: Never charge a COLD battery that is cooled below 32°F (0°C). Allow
battery to return to room temperature first before connecting it to charger.
Charging with MBP-3205 or MBP-3230 Chargers:
1. To charge battery from a 100-240VAC Power Source, locate the MBP-3205
AC Charger. Connect charger’s power cord to a 100-240VAC power source.
Connect charger to battery.
2. To charge battery from a 12VDC Vehicle, locate the MBP-3230 DC Charger.
Connect charger’s 12V cigarette lighter plug to vehicle’s 12V receptacle.
Connect charger to battery.
3. Battery will automatically begin to charge. Charger’s LED will turn RED
during charging and will turn GREEN when charge is complete. The MBP-
3205 AC Charger’s LED may pulse green during final charge stage.
4. Do not leave battery connected to charger for longer than 24 hours.
Charging with MBP-3200 Series Smart AC/DC LiFePO4 Chargers:
1. Locate the MBP-3200 Smart Charger and compatible charging adapter (see
adapters on page 8). Connect adapter to appropriate input power source.
2. Plug the female end of the charging adapter into the charger’s input connector.
Charger LED will turn steady RED when input power is connected.
3. Connect charger pigtail to battery. Battery will automatically begin to charge.
Charger LED will turn AMBER during charge. LED will pulse GREEN at 99%
of charge and turn steady GREEN when charge is complete. Battery may be
disconnected and used at any point during charge, but it is recommended that a
full charge cycle be completed periodically to maintain optimum battery health.
LED Status Indications for MBP-3200 Series Smart Charger:
Charger LED Behavior
Indication
Steady Red
Input power is connected
Steady Amber
Battery is charging
Pulsing Green
Battery is at 99% of charge
Steady Green
Charge is complete
Flashing Red
Incorrect input voltage to charger
Pulsing Red
Defective battery OR charger output is shorted
Red/Amber Flash
Charger and/or battery is too hot or too cold to charge
Green/Amber Flash
Battery cells are being balanced
Erratic Charger Display
Bad/loose connection to battery OR defective charger

11
Searchlight Accessories
Optical Filters:
MBA-1500 Amber Smoke/Fog Filter
MBA-1715 Semi-Covert Infrared Filter (715nm sharp cut-on)
MBA-1850 Covert Infrared Filter (850nm sharp cut-on)
MBA-1900 Fully Covert Infrared Filter (900nm sharp cut-on)
MBA-3015 Collimating Lens
Power Options:
MBP-4000(-L/S) 100-240VAC Direct Drive Power Supply
MBA-7110 12VDC Vehicle Adapter for Searchlight, 10 Foot Straight Cord
MBA-8210(-L/M) 10 Foot Power Cord (25 Ft. also available)
Remote Control Options:
MBA-8406 Wired Remote Handle with 6 Ft. Cord (25 Ft. also available)
MBA-8406-MP Metal Remote Control Box with 6 Ft. Cord (25 Ft. also available)
Mounting Options:
MBA-3600 Tripod / Flat Mounting Plate
MBA-3605 Fixed Searchlight Mount
MBA-3661 Heavy-Duty Fluid Pan/Tilt Head
Computer-Controlled Searchlight Accessories:
MBA-8310-DB(-M) 10 Ft. DB9 Serial Cable (25 Ft. also available)
MBA-GUI Maxa Beam Control Software
Other Accessories:
MBA-6200 Small Watertight Storage Case with Die-Cut Foam
MBA-6250 Medium Watertight Storage Case with Die-Cut Foam
MBA-6250-W Wheeled Watertight Storage Case with Die-Cut Foam
Lamp and Lens Replacement:
Compatible with MBS-410, MBS-430-W and MBS-430-Y Series Searchlights:
MBA-2400 Lamp Replacement Kit
MBA-2400/20 Combination Lamp & Lens Replacement Kit
MBA-2400N Combination Lamp, Lens, & Power Connector Kit
MBA-2420 Lens Replacement Kit
Compatible with MBPKG-E Series Searchlights:
MBA-2400-E Lamp Replacement Kit for Watertight Enclosures
Connector Kits:
MBA-2410 Searchlight Power Connector Replacement Kit, Plastic
MBA-2435(-M) Mating Power Connector Kit, Plastic (Metal)
MBA-2445(-M) Mating Control Connector Kit, Plastic (Metal)
MBA-2450-E Mating Power/Control Connector for MPBKG-E(-24/48)
MBA-2450-E2 Mating Power & Control Connectors for MBPKG-E2(-24/48)
For a complete listing of all Maxa Beam accessories, visit www.peakbeam.com.

12
Searchlight Maintenance
For best performance, clean the searchlight’s front lens with window cleaner or
rubbing alcohol. Periodically wipe down the body of the searchlight with a damp
cloth, especially in marine environments where the housing is exposed to salt.
Focusing the Lamp
If the searchlight is dropped or receives a heavy impact from transportation or
shipping, it may be necessary to refocus the lamp to insure proper operation and
maximum output. Refocusing the lamp involves centering the lamp in the reflector.
1. Use the 1/16” Hex Driver that is included
with the Maxa Beam Searchlight to
remove the two focus access screws and
washers that cover the X and Y Focus
Access Points.*
2. Turn the searchlight on and shine the
beam onto a flat surface approximately
25 meters away. (In general, ranges from
15 to 100 meters will suffice but at further
distances it will become more difficult to see
the precise adjustments taking place as the
lamp is focused.)
3. Insert the hex driver into one of the focus access points. A slight rotation and/or
side to side motion may be required until the hex driver becomes properly seated
into the internal adjustment screw hole.
4. After the hex driver has been inserted into the adjustment screw, turn the driver
slightly to rotate the screw. Notice how the hot spot of the beam moves on the
target. Rotate the driver until the hot spot is centered in the beam on this axis.
5. Repeat steps 3 and 4 for the other internal adjustment screw in the other focus
access point. Continue to switch between the X and Y focus access points until
the hot spot is centered on both axes.
6. Adjust the searchlight’s beam width out to flood and then back in to spot. If you
notice that the light’s focus has changed as you bring the beam back into spot,
adjust the focus of the light and then repeat the process of increasing the beam
width to flood and decreasing it to spot until the focus remains consistent.
7. Replace the focus screws and washers when focusing is complete.
*The MBPKG-E Series Searchlight must first be removed from its enclosure in order to access
the X and Y Focus Points. To do so, use a 9/64” Hex Driver to remove the housing screws
and washers around the back plate of the searchlight. Grasp searchlight’s handle and pull the
searchlight straight out of enclosure tube. See diagram on page 13 or consult the Instruction
Sheet included with that MBA-2400-E Lamp Replacement Kit for further details.

13
Lamp and Lens Replacement
All Maxa Beam Searchlights have a field-replaceable Xenon short arc lamp and lens.
The replacement instructions listed below are included as a general reference. For
complete, detailed instructions on how to replace a searchlight’s lamp or lens, please
see the Instruction Sheet that ships with each Replacement Kit.
Safety Precautions:
• ALWAYS wear included protective eyewear, a long-sleeved jacket, and gloves
whenever the searchlight front lens is removed or the lamp is being handled.
• ALWAYS disconnect the searchlight from power when performing
maintenance. Never perform maintenance on a searchlight connected to power.
• NEVER touch the quartz envelope of the lamp. If accidentally touched, clean
the lamp with alcohol wipes and allow it to dry completely before installing.
• NEVER wipe the reflector surface as this will cause scratching on the reflector.
To remove dust or particles from the reflector, follow Step 3, below.
• NEVER look directly into the searchlight when it is turned on. Due to the high
intensity light that is emitted, serious eye injury may occur.
Lens Replacement Instructions:

14
1. Before beginning maintenance, put on protective eyewear, a long-sleeved jacket
and gloves. Disconnect searchlight from power. If searchlight was recently
turned on, allow the searchlight cavity to cool completely before proceeding.
2. Use the 1/16” Hex Driver that is included with the Maxa Beam Searchlight to
remove the three screws holding the lens in place. Remove the old front lens,
O-ring, front lamp support, and spring and discard.
3. If the reflector has visible dust on it, blow away all particles from inside of the
reflector using a can of compressed air. Do not wipe or rub the reflector surface
with anything as this will scratch the surface. If your reflector requires further
cleaning, please contact the factory for further instructions.
4. Insert the new Front Lamp Spring and Front Lamp Support into the open end of
the lamp (see diagram). Locate the new O-ring and Spyder Lens Assembly.
Place the O-ring over the step on the inside of the lens assembly.
5. Line up the three screw holes, then place and hold the lens and O-Ring on the
front of the light. Ensure that the front lamp support seats into the center locator
of the lens. Once the front lens, O-ring and lamp are positioned correctly,
secure the assembly in place with three new Lens Screws. Do not over tighten
screws. When properly installed, the O-ring should not be visible.
6. After replacing the front lens, the searchlight may need to be refocused. Please
see page 12 for details on how to focus the lamp.
Lamp Replacement Instructions:
These instructions describe how to replace a lamp in an MBS-410, MBS-430-W4, or MBS-
430-Y Series Searchlight. For information on how to replace a lamp in an MBPKG-E Series
Searchlight, please see the Instruction Sheet that is included with the MBA-2400-E Lamp
Replacement Kit.
1. Before beginning maintenance, put on protective eyewear, a long-sleeved jacket
and gloves. Disconnect searchlight from power. If searchlight was recently
turned on, allow the searchlight cavity to cool completely before proceeding.
2. Use the 1/16” Hex Driver that is included with the Maxa Beam Searchlight to
remove the three screws holding the lens in place. Remove the old front lens,
O-ring, front lamp support, and spring and discard. Gently unclip the electrical
wire from the front of the lamp and bend the wire aside.

15
3. To remove an intact lamp from the socket, grasp the metal end of the lamp and
pull straight out with a slight twisting motion. Do not put any side-to-side
pressure on the lamp. To remove a lamp that is broken inside of the front cavity,
tip the searchlight over a trashcan and gently shake to dislodge loose glass and
metal fragments. Use needle-nose pliers to carefully remove the broken lamp
from the socket and discard.
4. If the reflector has visible dust on it, blow away all particles from inside of the
reflector using a can of compressed air. Do not wipe or rub the reflector surface
with anything as this will scratch the surface. If your reflector requires further
cleaning, please contact the factory for further instructions.
5. Next, select the appropriate lamp support pieces depending on Lens type.
Current maintenance kits contain two sets of Lamp Supports and Springs, each
paired together and identified with the compatible lens. The Spyder lens is the
current design (pictured) and the Standard lens is an older design that does not
include the 3-pronged metal support. If replacing a lamp on a searchlight that
has a Spyder lens, select the Spyder Lens’ Lamp Support and Spring. If
replacing a lamp on a searchlight with an older Standard lens, select the
Standard Lens’ Lamp Support and Spring. (When in doubt, reuse the existing Lamp
Support and Spring that were previously installed in your searchlight as these should be
compatible with your existing lens.)
6. Remove the new Xenon lamp from
the protective tube, taking care not to
touch the quartz envelope of the lamp.
Insert the appropriate Spring and
Lamp Support into the hollow metal
tube on the front of the lamp as shown
in the diagram on page 14.
7. Grasp the lamp by the metal tube and
insert the short end of the lamp into
the searchlight socket as shown in the
diagram at right. Push the lamp
firmly and squarely into its socket. Ensure that the lamp is pressed completely
into the socket as improper seating may cause the searchlight’s motorized beam
width adjustment to operate improperly.
8. Connect the electrical clip to the new lamp (see above diagram), then locate the
O-ring and front lens. Place the O-ring over the step on the inside of the front
lens assembly.
9. Line up the three screw holes, then place and hold the front lens and O-ring on
the front of the light. Ensure that the front lamp support seats into the center
locator of the lens. Once the front lens, O-ring and lamp are positioned
correctly, secure the assembly in place with three new lens screws. Do not over
tighten screws. When properly installed, the O-ring should not be visible.
10. After replacing the front lens, the searchlight may need to be refocused. Please
see page 12 for details on how to focus the lamp.

16
Technical Details
Remote Control Operation
Wired Remote Control:
All Maxa Beam Searchlights can be remotely controlled via an 8-, 9-, or 10-pin
remote connector on the searchlight housing. This remote control capability allows
the operator to control the functions of the searchlight using a wired remote handle
such as the MBA-8406 or to hard wire the searchlight directly into an auxiliary
control panel. Wired remote controls are available in 6 or 25 foot lengths and
extension cables are available in 10, 25, or 50 foot lengths.
All contact closures (switches) used for remote operation must be momentary,
normally open. During operation, the microprocessor constantly scans the status of
all input lines from the remote control input connector. When the closure of one of
the remote switches is detected, the microprocessor executes the appropriate
command. Input lines for On/Off, High/Low, Focus Narrow/Wide and Strobe/Low
are active high. These lines have internal pull down resistors.
Line 1 (“12VDC” pin) is an output line that provides power for the on/off and other
remote functions. Caution: Power is applied to line 1 any time there is power
supplied to the light, even when the light is off. This line is tied directly to the power
input connector. When wiring the on/off switch and remote control switches, line 1
must be tied to one side of all switches in parallel. The “Ground” pin is chassis
ground and should be wired to the cable shield for long cable runs. The “On/Off”
pin is also scanned during operation. When the on/off switch is closed again after
the light has been turned on, the microprocessor disables all normal operational
modes and is then in the programming mode (see page 5). If one of the other remote
switches is closed while the on/off switch is closed, one of the user functions will be
reprogrammed.
Computer Control via RS-232 Interface:
Several Maxa Beam Searchlights are available with a built-in RS-232 computer
interface. With this capability, the searchlight can be remotely controlled via
computer either as a stand alone illuminator or as part of an integrated computer-
controlled surveillance or security system on a pan and tilt device.
A full Interface Control Document (ICD) with ASCII command set and connector
pin-outs is included with all RS-232-enabled searchlights and is available upon
request. RS-232 Searchlights can be controlled using a terminal emulator such as
HyperTerminal or Peak Beam’s Graphical User Interface (GUI).
The following searchlight models include the built-in RS-232 interface:
MBS-430-RSY
MBS-430-RSMY
MBS-430-W4-RS(P)
MBPKG-E
MBPKG-E2
MBPKG-E-24
MBPKG-E2-24
MBPKG-E-48
MBPKG-E2-48

17
Control Connector Pin-Outs
Standard 8-Pin Plastic Connector
(MBS-410, MBS-430-Y, MBS-430-W4-P)
Pin
Color
Function
1
Red
12VDC Out
2
Blue
Ground
3
Orange
On/Off
4
Brown
High/Normal Beam
5
Black
Focus Narrow
6
Yellow
Focus Wide
7
Green
Strobe/Low Beam Mode
8
-
blank - not normally used
RS-232 9-Pin Plastic Connector
(MBS-430-RSY, MBS-430-W4-RSP)
Pin
Color
Function
1
Red*
12VDC Out
2
Grey†
RS-232 Signal Ground (DB9 Pin-5)
3
Orange*
On/Off
4
Brown*
High/Normal Beam
5
Black*
Focus Narrow
6
Yellow*
Focus Wide
7
Green*
Strobe/Low Beam Mode
8
White†
RS-232 Receive Data (from searchlight to controller)(DB9-2)
9
Purple†
RS-232 Transmit Data (from controller to searchlight)(DB9-3)
10-Pin Metal Connector
(MBS-410-MY, MBS-430-(RS)MY, MBS-430-W(4), MBPKG-E2 Series)
Pin
Color
Function
A
Red*
12VDC Out
B
Black*
Focus Narrow
C
Green*
Strobe/Low Beam Mode
D
Orange*
On/Off
E
Grey†
RS-232 Signal Ground (DB9 Pin-5)
F
Blue*
Ground (not connected on MBPKG-E2 Series)
G
Brown*
High/Normal Beam
H
Yellow*
Focus Wide
J
White†
RS-232 Receive Data (from searchlight to controller)(DB9-2)
K
Purple†
RS-232 Transmit Data (from controller to searchlight)(DB9-3)
12-Pin Metal Power and Remote Connector
(MBPKG-E Series)
Pin
Color
Function
A
Green**
Strobe/Low Beam Mode
B
Black**
Focus Narrow
C
Black
Negative Supply Voltage
D
Orange**
On/Off
E
Grey†
RS-232 Signal Ground (DB9 Pin-5)
F
Brown**
High/Normal Beam
G
Red
Positive Supply Voltage
H
Yellow**
Focus Wide
J
White†
RS-232 Receive Data (from searchlight to controller)(DB9-2)
K
Purple†
RS-232 Transmit Data (from controller to searchlight)(DB9-3)
L
Red
Positive Supply Voltage
M
Black
Negative Supply Voltage
*/**Used for Hand Controller only; **not connected on MBPKG-E-48 48VDC systems
†Used for Serial Communication Only; only connected on RS-232 enabled searchlights

18
Input Power Requirements
Please contact Peak Beam Systems, Inc. if you would like assistance sourcing an appropriate
AC power supply for your searchlight: 1-610-353-8505 / [email protected].
12VDC Input Searchlight Systems:
MBS-410 Series, MBS-430-W/-Y Series, MBPKG-E, MBPKG-E2
Parameter
Min
Typ
Max
Unit
Notes
Operating Voltage
10.0
13.5
13.5
Volts
Over Voltage/Reverse Polarity
Protected to ±36V
Lamp Off, Standard
Lights
<1
1
µAmp
25°C, 12VDC Input
Lamp Off, RS-232 Lights
0.12
0.14
Amps
25°C, 12VDC Input
Low Beam Mode
3.37
3.60
Amps
25°C, 12VDC Input
Normal Beam Mode
4.34
4.60
Amps
25°C, 12VDC Input
High Beam Mode
8.52
9.30
Amps
25°C, 12VDC Input
Peak Current at Start Up
18.5
20.0
Amps
25°C, 12VDC Input
Peak Current Pulse
Duration
10
12
mS
Pulse duration is the time the searchlight
draws more than 10A. The waveform
for this current pulse resembles half a
cycle of a sine wave.
24VDC Input Searchlight Systems:
MBPKG-E-24, MBPKG-E2-24
Parameter
Min
Typ
Max
Unit
Notes
Operating Voltage
18.0
24.0
36.0
Volts
Reverse Polarity Protected to -50V
Lamp Off
0.20
0.23
Amps
25°C, 24VDC Input
Low Beam Mode
1.89
2.02
Amps
25°C, 24VDC Input
Normal Beam Mode
2.44
2.58
Amps
25°C, 24VDC Input
High Beam Mode
4.79
5.22
Amps
25°C, 24VDC Input
48VDC Input Searchlight Systems:
MBPKG-E-48, MBPKG-E2-48
Parameter
Min
Typ
Max
Unit
Notes
Operating Voltage
37.0
48.0
75.0
Volts
Reverse Polarity Protected to -60V
Lamp Off
0.14
0.16
Amps
25°C, 48VDC Input
Low Beam Mode
0.94
1.00
Amps
25°C, 48VDC Input
Normal Beam Mode
1.21
1.28
Amps
25°C, 48VDC Input
High Beam Mode
2.37
2.58
Amps
25°C, 48VDC Input
Power Connector Pin-Out
Pin
(Plastic Connector)
Pin
(Metal Connector)
Color
Function
1
A
Red
Positive Supply Voltage
2
B
Red
Positive Supply Voltage
3
C
Black
Negative Supply Voltage
4
D
Black
Negative Supply Voltage
If you have a technical question not covered in this manual, please contact Peak Beam’s
Technical Support Department and we will be happy to assist you:
1-610-353-8505 / techsupport@peakbeam.com.

19
Troubleshooting
Symptom
Probable Cause
Remedy
Searchlights, All
Searchlight ignites but then
flashes repeatedly or turns
off after 1-2 seconds
(also described as
“searchlight stuck in strobe
mode”)
Low/Dead Battery OR
Insufficient Input Voltage
Charge Battery OR
Check Power Source
If Battery/Input Voltage are OK,
Bad Lamp
Replace Lamp
For Gen. 2* Searchlights only,
Failed Ignition Circuit
Contact Peak Beam for an RMA #
Searchlight ignites but turns
off when switched to high
beam
Low Battery OR
Low Input Voltage
Charge Battery OR
Check Power Source
Nothing happens when
power button is pressed
No Power
Check Power Source and Cable
Searchlight turns on but
motorized focus will not
work
Spot/Flood Limits not set
correctly
Adjust Spot/Flood Limits (p. 7) or
Restore Factory Settings (p. 8)
If Restore Settings does not
resolve issue, Defective Servo or
Switch/Controller
Contact Peak Beam for an RMA #
Searchlight turns on but
high/strobe and focus will
not work
Defective Switch/Controller
Contact Peak Beam for an RMA #
Searchlight beam will not
focus to the full flood
position
Flood Limit not set correctly OR
Lamp is not fully seated in socket
Reprogram Flood Limit (p. 7) OR
Reseat Lamp (p. 14-15)
Searchlight turns on but
will not change power level
Supply Voltage is too high
Ensure Supply Voltage is within
correct range (p. 18)
Searchlights, RS-232 Computer-Controlled
Error during GUI Software
Installation
Permissions not properly granted
to installer file
Follow instructions in “ReadMe
Before Install” document included on
software CD
“Device Not Found” error
upon software launch
Searchlight not connected OR
COM Port not assigned
Check Searchlight connection and
power OR Consult “ReadMe Before
Install” for instructions on how to
configure COM Port
MBP-1308 Lithium Iron Phosphate (LiFePO4) Battery Systems**
Battery will not run
Searchlight
Battery discharged OR short
circuited
Connect battery to charger
Fuel Gauge does not
respond when pressed
Battery is over-discharged
Connect battery to charger
All Fuel Gauge LEDs flash
continuously during charge
Battery is too hot or cold to be
safely charged
Allow battery temperature to
stabilize before charging
Fuel Gauge LEDs scroll up
and down 3X when pressed
Internal Communication Error
Contact Peak Beam for assistance;
Battery may still operate normally
Power cord will not connect
to battery
Older style cable is being used
LiFePO4-specific cable must be used;
older cables are not compatible
Charger’s LED does not
light (all charger models)
No Power OR
Defective Charger
Check Power Source OR
Contact Peak Beam for an RMA #
MBP-3200 Series Smart AC/DC LiFePO4 Chargers
Please see complete list of Charger LED Status Indications on page 10.
MBA-7100 and MBA-7110 Vehicle Power Adapters
Light will not turn on when
powered from adapter
No Power OR Blown Fuse in
Adapter
Check Power Source OR Replace
adapter’s 3AG 15A fuse
*Gen. 2 searchlights were manufactured prior to 2005; indicated by “G2” in searchlight’s serial number.
**This section covers troubleshooting for Peak Beam’s current LiFePO4 Battery systems. To view
information regarding older battery chemistries, visit http://www.peakbeam.com/downloads/.
/