Page is loading ...

Revision nr: F1.1
Revision date: 2020-04-08
SEARCHLIGHT SYSTEM
BY LUMINELL
INSTALLATION & USER'S MANUAL
AC&DC versions (3GS)
Revision nr: F1.1
Revision date: 2020-04-08

Page 2 INSTALLATION & USER'S MANUAL SL2
Dear Customer.
Thank you for choosing a searchlight from Luminell.
Our products are assembled in Sweden by a dedicated team of technicians and the
components we use are chosen with highest focus on both performance and quality.
We hope that you will be totally satisfied with your searchlight.
If you have a question or if there is a problem with the product, please don't hesitate to contact
our support team in Sweden.
Luminell Sweden AB
Service & Technical Support
service.sweden@luminell.com
Phone: +46 35 38280
All information in this manual was correct at time of publication. However, as our engineers are
always updating and improving our products, your system's software might provide a slightly
different appearance or modified functionality than presented in this manual.
If your system lacks any function presented in this manual, there is possibly a software update
available to resolve this, please contact Luminell for more information.
COPYRIGHT LUMINELL © 2020. All rights reserved

INSTALLATION & USER'S MANUAL SL2 Page 3
CONTENT
DOCUMENT REVISIONS AND APPROVALS .................................................................. 6
Document approvals ................................................................................................ 6
WARNINGS AND INFORMATION .................................................................................... 7
WARRANTY CONDITIONS SL2 ....................................................................................... 8
MAINTENANCE AND SERVICE PLAN ............................................................................. 9
LUMINELL SEARCHLIGHT SYSTEM ............................................................................. 10
Short system info ................................................................................................... 10
External control interface ....................................................................................... 11
Luminell Unity Hub ................................................................................................. 12
OPERATOR PANEL, OVERVIEW .................................................................................. 13
DISPLAY SYMBOLS AND MESSAGES ......................................................................... 14
Ebox alarm relay .................................................................................................... 15
Errors that trigger the alarm output. ....................................................................... 15
INSTALLATION............................................................................................................... 16
Lifting the searchlight ............................................................................................. 16
CLI-30001, ANTI VIBRATION KIT .................................................................................. 17
ELECTRICAL SYSTEM ................................................................................................... 20
Electrical box mounting position ......................................................................... 20
Electrical box installation .................................................................................... 21
Cabinet card ...................................................................................................... 22
SL2 electrical-box overview (24VDC) ................................................................. 23
10.4.1 Selecting/adjusting the insulation monitoring device, 24VDC network ........................ 24
10.4.2 SL2 electrical-box connection (24VDC) ........................................................................ 25
SL2 electrical-box overview (100-240VAC) ........................................................ 26
10.5.1 SL2 electrical-box connection (100-240VAC) .............................................................. 27
Operator panel connections ............................................................................... 28
External switch panel ......................................................................................... 29
A or B (activated) ......................................................................................................................... 29
10.7.1 Connecting the switch panel to the ebox ...................................................................... 29
Searchlight NMEA Tracking (optional) ............................................................... 30
10.8.1 NMEA Priority ............................................................................................................... 30
Ethernet wiring ................................................................................................... 31
ACTIONS AFTER INSTALLATION AND POWER FAILURE .......................................... 32
Automatic recovery of stored searchlight position in panel. ................................ 32
11.1.1 If panel position indicator differs from the actual position of the searchlight. ............... 32
Synchronize the system ..................................................................................... 33
STARTING SYSTEM ....................................................................................................... 34

Page 4 INSTALLATION & USER'S MANUAL SL2
JOYSTICK FUNCTIONS ................................................................................................. 35
LIGHT CONTROL ........................................................................................................... 36
Light ON/OFF .................................................................................................... 36
Spot & flood control ............................................................................................ 36
Dim adjustment .................................................................................................. 37
QUICK START MENU ..................................................................................................... 38
Fixed positions ................................................................................................... 38
15.1.1 Go to fixed position ....................................................................................................... 38
15.1.2 Store fixed position ....................................................................................................... 39
Sweep ................................................................................................................ 40
15.2.1 New Sweep ................................................................................................................... 40
15.2.2 Modify sweep parameters............................................................................................. 41
Surveillance ....................................................................................................... 43
15.3.1 Setting a new surveillance sweep ................................................................................ 43
15.3.2 Changing surveillance settings ..................................................................................... 45
Switch ................................................................................................................ 47
Synchronized control ......................................................................................... 48
15.5.1 Set the master control searchlight on/off ...................................................................... 50
15.5.2 Add and remove slaves ................................................................................................ 51
Off and park ....................................................................................................... 52
MAIN MENU .................................................................................................................... 53
Off and Park ....................................................................................................... 53
Switch system .................................................................................................... 53
Light Position ..................................................................................................... 53
Sweep ................................................................................................................ 53
Surveillance ....................................................................................................... 53
Info .................................................................................................................... 53
Status ................................................................................................................ 54
Settings .............................................................................................................. 55
16.8.1 Backlight brightness (adjust the button´s/ display light intensity) ................................. 55
16.8.2 Language ...................................................................................................................... 55
16.8.3 Joystick direction .......................................................................................................... 56
16.8.4 Maximum rotation speed .............................................................................................. 57
16.8.5 Installation ..................................................................................................................... 57
16.8.5.1 Store origin ............................................................................................................. 57
16.8.5.2 Store park position ................................................................................................. 58
16.8.5.3 Name system .......................................................................................................... 59
16.8.5.4 Start test sequence ................................................................................................ 60
16.8.5.5 Single lamp mode ................................................................................................... 60

INSTALLATION & USER'S MANUAL SL2 Page 5
16.8.5.6 OP Rotation ............................................................................................................. 61
16.8.5.7 Options setup ......................................................................................................... 63
CABINET CARD MENU SYSTEM ................................................................................... 64
Menu navigation ................................................................................................ 64
17.1.1 Down Button ................................................................................................................. 64
17.1.2 Right Button .................................................................................................................. 64
17.1.3 OK Button ..................................................................................................................... 64
Category 1: About .............................................................................................. 65
17.2.1 (1.1) MAC Address ....................................................................................................... 65
17.2.2 (1.2) IP Address ............................................................................................................ 65
17.2.3 (1.3) Light Model ........................................................................................................... 65
17.2.4 (1.4) SW Version .......................................................................................................... 65
Category 2: Diagnostics (support tool) ............................................................... 66
17.3.1 (2.1) Start ...................................................................................................................... 66
17.3.2 (2.2) View Results ......................................................................................................... 66
Category 3: Usage Stats .................................................................................... 67
17.4.1 (3.1) Left Light ............................................................................................................... 67
17.4.2 (3.2) Right Light ............................................................................................................ 67
17.4.3 (3.3) Reset Left ............................................................................................................. 67
17.4.4 (3.4) Reset Right ........................................................................................................... 67
Category 4: Settings .......................................................................................... 68
17.5.1 (4.1) OP WDT ............................................................................................................... 68
17.5.2 (4.2) OP WDT Stats ...................................................................................................... 69
17.5.3 (4.3) OP WDT Reset ..................................................................................................... 69
TECHNICAL DATA ......................................................................................................... 70
SL2 searchlight .................................................................................................. 70
SL2 Electrical box .............................................................................................. 71
Operator Panel .................................................................................................. 72
Optional Hardware ............................................................................................. 73
Optional software functions ................................................................................ 73
Mechanical drawings ......................................................................................... 74
18.6.1 Operator Panel ............................................................................................................. 74
18.6.2 Electrical box SL2, 100-240VAC .................................................................................. 75
18.6.3 Electrical box SL2, 24VDC ........................................................................................... 76
18.6.4 Searchlight SL2 (standard) ........................................................................................... 77
18.6.5 Searchlight SL2 IR (with camera) ................................................................................. 78
SL2 SEARCHLIGHT WITH THERMAL CAMERA ........................................................... 79
Thermal camera introduction ............................................................................. 79
SL2IR additional Specifications .......................................................................... 80
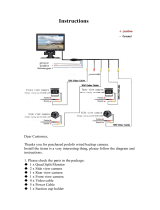
SL2IR - VIDEO CONNECTION ........................................................................................ 82

Page 6 INSTALLATION & USER'S MANUAL SL2
SET CAMERA VIDEO FORMAT STANDARD ................................................................ 83
Menu navigation ................................................................................................ 83
21.1.1 Down Button ................................................................................................................. 83
21.1.2 Right Button .................................................................................................................. 83
21.1.3 OK Button ..................................................................................................................... 83
Factory setup, how to change between PAL and NTSC. .................................... 84
USING THE THERMAL CAMERA IN CAM MODE ......................................................... 85
Activate the thermal camera .............................................................................. 85
Camera tilt ......................................................................................................... 87
22.2.1 Tilt up ............................................................................................................................ 87
22.2.2 Tilt down........................................................................................................................ 88
Spot meter ......................................................................................................... 89
MENU – CAMERA SETTINGS ........................................................................................ 90
Palette ............................................................................................................... 91
Zoom ................................................................................................................. 92
SUPPORT ....................................................................................................................... 93
DOCUMENT REVISIONS AND APPROVALS
Document approvals
Approvals
written by:
Anders Holst
reviewed by:
Jonas Boslander
approved by:
Mattias Svensson
Date
Rev.
Document changes
Required
firmware
20-03-27
F1.0
Initial release
V 0.6.3.21
20-04-08
F1.1
Added Insulation monitor note (Page 24)
V 0.6.3.21

INSTALLATION & USER'S MANUAL SL2 Page 7
WARNINGS AND INFORMATION
CAUTION!
Before servicing any part of the searchlight system, make sure all power is
switched off!
Cleaning
Never wash the searchlight with water under high pressure because this can
penetrate through the seals and cause damage to mechanical and electrical
components.
Do not use strong solvents such as thinner or acetone to clean the searchlight
body or the operator panel.
Deicing
Removal of ice should be done with caution. Physical violence can damage the
LED-lamp modules or the searchlight driving mechanics.
Safety reminder
Remember to break all electrical power to system before
starting any work in the electrical box or the searchlight
unit.

Page 8 INSTALLATION & USER'S MANUAL SL2
WARRANTY CONDITIONS SL2
Luminell General Terms and Conditions can be found on our website www.luminell.com.
These terms govern the contractual relationships between Luminell and the Purchaser.
In the event of any conflict between this document and our General Terms and Conditions, the
General Terms and Conditions shall take precedence.
Warranty period
LUMINELL offer a warranty for the following products:
- LED-based lamps: warranty period: 60 months
- HMI-based lamps: warranty period: 24 months
- Spare parts: warranty period: 12 months
Warranty period starts from the date the goods is shipped from LUMINELL factory.
Product specific conditions
A correctly installed searchlight system from Luminell requires no planned regular maintenance
or service other than regular cleaning and care during the first 10 years of operation.
The “Maintenance and Service plan” describes how to keep the product in good condition.
The warranty is conditioned by below mentioned key points.
Before powering up the unit, make sure that:
Vibration dampers are mounted correctly according to this installation manual.
The mechanical fundament where the searchlight is placed is robust.
Warranty seal on the service hatch is unbroken.
Outgoing cable radius from the searchlight is smooth and not stressed.
All cables used for the installations are as per Luminell’s specifications or as per
separate made agreement.
Signal cables are not placed together with high power cables.
Electrical connections are made according to electrical scheme and wiring diagram.
Length of cables are not exceeding the recommended maximum lengths as stated
below:
• Power/signal cables between searchlight and E-box for 100-240VAC-system: Max
30 meter
• Power cables between searchlight and E-box for 24 VDC-system: Max 7 meter
• Remote cable / Ethernet cable between E-box and remote control: Max 100 meter
(longer distance requires an amplifier or fibre optic version).
E-box (EB) is placed in a non-condense environment with a minimum temperature of +5
C (indoor) if not customised for other installation.
The remote panel (OP) is bridge mounted in an IP56 environment. If placed outside, it
must be under a protection hood when not in use.
Remote panel is screwed in bridge panel, properly grounded and correct installed.
After above checkpoints are verified the system should be started up as per this manual
to verify the functionalities.
In case of any questions related to the warranty, please contact us at
service.sweden@luminell.com for additional support.

INSTALLATION & USER'S MANUAL SL2 Page 9
MAINTENANCE AND SERVICE PLAN
Although the system does not require regular maintenance to function, we recommend,
however, that this preventive maintenance plan is followed in order to keep the searchlight in
good condition and in time detect if something is wrong and needs to be corrected.
Recommended inspection on a weekly basis
1. Make visual inspection of the searchlight housing and cabling. Look for any potential
mechanical damage caused by external force. A damage can lead to reduced or non-
functionality.
2. Make a visual inspection of the searchlight glasses. Verify that they are without any
crack or broken in any way. A crack can lead to water penetration inside the housing
followed by potential electrical and mechanical problem.
3. Perform a function test. Start up the searchlight system, rotate the searchlight in
horizontal and vertical direction.
4. Clean the searchlight. Rinse with fresh water to wash away the salt deposits. If dirtier,
use a very soft sponge and soap that is not caustic, contains strong solvents such as
acetone or thinner base. The house can be both polished and waxed for a shiny and
durable surface, but the glass should under no circumstances be waxed. Under no
circumstances can the searchlights be washed with high pressure water as this can lead
to penetration inside the housing followed by potential electrical and/or mechanical
problem.
5. Deicing. Wintertime the system should be deiced with caution. First turn the lights on to
let the heat melt the ice before operating the system horizontally and vertically.

Page 10 INSTALLATION & USER'S MANUAL SL2
LUMINELL SEARCHLIGHT SYSTEM
Short system info
Luminell control system for searchlights is a flexible and future-proof system in which several
searchlight assemblies (SL2, CLITE2, CLED, CL20, CL25 and CL35/38) and operator panels
can be connected to a dedicated network and communicate via the Ethernet infrastructure.
Internal communication between the box and searchlight is using the stable CAN bus
technology.
The searchlights drive motors (horizontal and vertical) are of the type brushless servo motors,
with excellent performance, long lifetime and high reliability.
The motor drivers are located inside the searchlight and are of an "intelligent" type, which
constantly analyzes the motor condition, and if problems arise, such as tripped over current
protection; this will be presented as an alarm in the operator panel.

INSTALLATION & USER'S MANUAL SL2 Page 11
External control interface
Control-computers and navigation equipment can be connected directly to the serial port on the
electrical boxes and communicate by RS232/RS485 (half duplex).
Contact Luminell for a free ICD protocol documentation, a windows-based debugger tool for
integration development is also available.

Page 12 INSTALLATION & USER'S MANUAL SL2
Luminell Unity Hub
If several searchlights are connected in a network, then the Luminell Unity Hub can be an
appropriate part of the integration.
The Hub computer acts like a firewall between external controlling part and the LumiNet
searchlight network which ensures the best system performance and stability.
With a single connection the system integrator is now able to reach all searchlights for external
control, whether this is done via UDP over Ethernet or RS232/RS422/RS485.

INSTALLATION & USER'S MANUAL SL2 Page 13
OPERATOR PANEL, OVERVIEW
1. "Soft button": the function appears in the display window next to the button.
2. Both lamps ON/OFF.
3. Spot beam (restarted at last used setting).
4. Flood beam (restarted at last used setting).
5. Both lamps ON/OFF.
6. Increase light intensity (Dim up in five steps, restarted at last used level *).
7. Decrease light intensity (Dim down in five steps, restarted at last used level *).
8. Joystick (”Hall effect” proportional).
9. Display (TFT 2,4”).
* LED intensity levels are 20% - 40% - 60% - 80% - 100%.
Note: Several sections of the manual refer to the above figures
8
7
6
5
1
2
1
3
4
9

Page 14 INSTALLATION & USER'S MANUAL SL2
DISPLAY SYMBOLS AND MESSAGES
Symbol for switched off white light.
Symbol for switched on white light.
Symbol for any electro-mechanic error. Might be referred as an over voltage or
over current for motor drivers. Communication error with motor drivers will result in
the same symbol. This error symbol can be reset by simply enter the main menu
and select status. Then press “dismiss”. If over current have occurred the problem
might be referred as a stucked lamp housing – check for any icing issues. Each
axis has its own symbol showing in upper left or right corner of the display.
This symbol and a similar symbol indicate the direction of the lamp housing both
for the vertical axis and for the horizontal axis. The arrows in the shown symbol
indicate the elevation angle for the vertical axis according to the horizontal-plane.
For the horizontal symbol and axis these small arrows indicate if the housing is
directed to the left, front, right or back of the centerline.
If the arrows are replaced by questionmarks then the system needs to be internally
calibrated. The easiest way to do the internal calibration is by simply choose the
“Park” in the quick start menu, please see 15.6 Off and park.

INSTALLATION & USER'S MANUAL SL2 Page 15
Ebox alarm relay
The searchlights electrical and mechanical condition are constantly monitored and if there is a
malfunction in the system this is indicated by icons in the panel display with clarifying warning
messages found in the panels status menu, see 16.7 Status.
The control box also has a relay output that can be connected to the alarm monitoring system;
see below and the wiring diagram for connection details
Errors that trigger the alarm output.
Status Message
Error
Remedy
Communication
error
Transmission issues on the CAN bus
Check for loose CAN-wires in
the electrical box or junction
points (if any) and contact
Luminell.
Over current
Overcurrent protection triggered;
movement blocked
Check that the searchlight is
able to rotate freely.
In winter, heavy icing can be the
cause of this error.
Over voltage
Overvoltage protection triggered, voltage
to searchlight motordriver/s have
exceeded 40Vdc.
Reset the error, if error recurs
repeatedly, please contact
Luminell.
Under voltage
Undervoltage protection triggered, voltage
to searchlight motordriver/s has fallen
below 8,5Vdc
Reset the error, if error recurs
repeatedly, please contact
Luminell.
OPWDT
(message in
box only)
Ethernet communication broken to all
panels, see (4.1) OP WDT.
Fault auto-resets if contact is restored with
at least one panel.
Check Ethernet wires and
connections to panel(s) and
switch.

Page 16 INSTALLATION & USER'S MANUAL SL2
INSTALLATION
Lifting the searchlight
SL2IR (camera house)
The picture on the right shows
how to place the lifting slings
when there is no lift loop
available.
Also in this case the searchlight
cables must be secured to the
hook to avoid straining and
damage on the cable glands.
SL2 Standard
Preferable lift the searchlight by
the temporary lift loop on top of
the center house. After safely
fixed the searchlight, remove the
lift loop.
During the lift, the searchlight
cables must be secured to the
hook to avoid straining and
damage on the cable glands.

INSTALLATION & USER'S MANUAL SL2 Page 17
CLI-30001, ANTI VIBRATION KIT
Service instruction no: CLI-30001
Revision date: 2016-02-10
Applicable models: SL2, CLITE2, CL20-11, CL25-**, CL35/38-**
Spareparts needed (refer to CL spareparts list)
1
: CLS-25130 Anti vibration-kit × 1 (included in delivery)
2
Tools and supplies required:
1
17mm ratchet wrench × 1
2
17mm wrench × 1
3
4
Important information
This instruction shows how to install the anti-vibration kit which consists of four dampers with
integrated stainless-steel tubes.
The dampers main function is to absorb the harmful vibrations that can damage the mechanics
and shorten the life of the bulbs (CL20, CL25 CL35/38). Searchlight installations without
dampers will uncompromisingly, void the warranty.
Figure 1
1. Overview of the damper assembly and its parts.

Page 18 INSTALLATION & USER'S MANUAL SL2
2. Push the dampers tube part thru the mounting holes in the foundation.
3. Mount the dampers rubber part from other side of the foundation.
4. Lower the searchlight on top of dampers and mount bolt washers and nuts as shown in
figure 1.

INSTALLATION & USER'S MANUAL SL2 Page 19
5. The lock nut is tightened with two wrenches size 17mm, tighten nut firmly.
The dampers rubber part will be compressed slightly, after assembly the searchlight will be
rigidly secured but still resistant to vibrations.

Page 20 INSTALLATION & USER'S MANUAL SL2
ELECTRICAL SYSTEM
IMPORTANT!
The electric supply to the e-box must be disconnected before beginning any work inside
the box; it’s not enough to turn off the internal main switch.
Electrical box mounting position
The electrical control box must be mounted on a wall as shown below, do not mount horizontally
on the floor or in ceiling as this leads to reduced airflow with increased risk of overheated
components.
/