Page is loading ...

Digital Wireless Headphone System
RS 195
Instruction Manual

RS 195 |1
Contents
Contents
Important safety information .......................................................................... 2
The RS 195 digital wireless headphone system ........................................... 5
Package includes ................................................................................................. 6
Product overview ................................................................................................ 7
Overview of the HDR 195 headphones ..................................................... 7
Overview of the TR 195 transmitter .......................................................... 8
Overview of LED indicators .......................................................................... 9
Putting the RS 195 into operation ................................................................ 12
Setting up the transmitter ......................................................................... 12
Connecting the transmitter to an audio source .................................... 13
Connecting the transmitter to an AC wall outlet .................................. 17
Inserting or replacing the rechargeable batteries ................................ 18
Charging the rechargeable batteries ....................................................... 19
Adjusting the headband ............................................................................ 20
Using your RS 195 headphone system ........................................................ 21
Switching your wireless headphone system on .................................... 21
Selecting an audio input ............................................................................. 22
Adjusting the volume ................................................................................. 22
Muting/unmuting the headphones ......................................................... 22
Adjusting the balance ................................................................................. 23
Activating/deactivating “personal hearing” ......................................... 24
“Personal hearing” – Selecting a hearing profile for hearing
enhancement ................................................................................................ 25
“Personal hearing” – Selecting additional sound
optimization options for speech or music listening ............................. 26
Pairing headphones to the transmitter .................................................. 27
Switching your wireless headphones off ................................................ 28
Cleaning and maintaining the RS 195 .......................................................... 29
Replacing the ear pads ............................................................................... 29
Troubleshooting ................................................................................................ 30
Sound problems ........................................................................................... 30
Other problems ............................................................................................ 31
Leaving the range of the transmitter ...................................................... 32
Clearing the pair settings on the headphones ....................................... 32
Specifications ..................................................................................................... 33
Manufacturer declarations .............................................................................. 34

Important safety information
2|RS 195
Important safety information
왘 Read this instruction manual carefully and completely before using the
product.
왘 Always include this safety guide when passing the product on to third
parties.
왘 Do not use an obviously defective
product.
Preventing damage to health and accidents
왘 Protect your hearing from high volume levels. Permanent
hearing damage may occur when headphones are used at
high volume levels for long periods of time. Sennheiser
headphones sound exceptionally good at low and medium
volume levels.
왘 Note that these headphones allow you to adjust a hi
gher volume than
conventional headphones. This can cause hearing damage in persons
with healthy hearing and especially in children.
왘 Do not use the product in situations which require special attention
(e.g
. in traffic or when performing skilled jobs).
왘 Keep the headphones at least 10 cm/3.94” from cardiac pacemakers or
implanted defibrillators. The headphones contain magnets that gener-
ate a magnetic field which could cause interference with cardiac pace-
makers and implanted defibrillators.
왘 Do not use the product near water and d
o not expose it to rain or mois-
ture to reduce the risk of fire or electric shock.
왘 Keep the product, accessories and packaging parts out of reach of chil-
dren and pets to prevent accidents and choking hazards.
왘 Use only power supply units provided by Sennheiser.
Preventing damage to the product and malfunctions
왘 Always keep the product dry and do not expose it to extreme tempera-
tures to avoid corrosion or deformation. The normal operating tem-
perature is from 0 to 40°C/32 to 104°F.
왘 Use the product with care and store it in a clean, dust-free environ-
ment.
왘 Do not use the product if it is obviousl
y defective, if it has been dropped
or if liquids or objects have gotten inside the product. In this case, con-
tact a qualified specialist workshop or your Sennheiser service partner
to have the product checked.
왘 Switch the headphones off after use to conserve battery power.
Remo
ve the batteries if the product will not be used for extended peri-
ods of time.
왘 Unplug the power supply unit from the AC wall outlet
–
to completely disconnect the product from the power source,
– during lightning storms, or
– when unused for long periods of time.
왘 Ensure that the power supply unit is
– in a safe operating condition and easily accessible,
– properly plugged into the AC wall outlet,
– operated only within the permissible temperature range,
– not exposed to direct sunlight for longer periods of time in order to
prevent heat accumulation.

Important safety information
RS 195 |3
왘 Do not place your headphones on a glass dummy head, chair armrest or
similar objects for long periods as this can widen the headband and
reduce the contact pressure of the headphones.
왘 Varnish or furniture polish may degrade the f
eet of the transmitter,
which could stain your furniture. You should therefore place the trans-
mitter on a non-slip pad to avoid potential staining of furniture.
왘 Do not operate the product near heat sources.
왘 Clean the product only with a soft, dry cloth.
왘 Use only attachments/accessories/spare parts sup
plied or recom-
mended by Sennheiser.
Intended use/Liability
This wireless headphone system is suitable for use with hi-fi systems, TV
sets, and home cinema systems and supports both analog and digital sig-
nals simultaneously.
This product is intended for private domestic use only. It is not suitable for
commercial use. This product is also not intended to be used with portable
audio devices.
It is considered improper use when this product is used for any application
not named in this instruction manual and the associated product guides.
Sennheiser does not accept liability for damage arising from abuse or mis-
use of this product and its attachments/accessories.

Important safety information
4|RS 195
Safety instructions for standard/rechargeable batteries
WARNING
In extreme cases, the standard/rechargeable batteries may leak and may
cause the following hazards if abused or misused:
•explosion
•fire
•heat
•smoke/gas
Keep away from
children.
Do not heat above 70°C/158°F,
e.g. do not expose to sunlight
or throw into a fire.
Do not expose to
moisture.
When not using rechargeable
batteries for extended periods
of time, charge them regularly
(about every 3 months).
Do not mutilate or
dismantle.
When not using the product
for extended periods of time,
remove the standard/
rechargeable batteries.
Observe correct polarity. Use only rechargeable batteries
and chargers recommended by
Sennheiser.
Pack/store standard/
charged rechargeable
batteries so that the
terminals cannot
contact each other –
danger of shorting out/
fire hazard.
Do not continue using defective
standard/rechargeable
batteries and dispose of them
immediately
Switch battery-powered
products off after use.
Immediately remove standard/
rechargeable batteries from an
obviously defective product.
Charge rechargeable
batteries at ambient
temperatures between
10 and 40°C/50 and
104°F.
Dispose of standard/
rechargeable batteries at
special collection points or
return them to your specialist
dealer.
Do not charge standard
batteries.
Do not mix standard and
rechargeable batteries in the
battery compartments.
LR03
HR03

The RS 195 digital wireless headphone system
RS 195 |5
The RS 195 digital wireless headphone
system
The RS 195 is your personal hearing and ultimate audio companion, pro-
viding you with all of the unparalleled sound quality, ease of use and wear-
ing comfort that you expect from a Sennheiser product.
Whether you are watching television or listening to music, the RS 195
ensures that you won’t miss a thing: Highly innovative digital wireless
technology guarantees crystal clear signal transmission with low latency
even while you move from room to room, and the various listening modes
allow you to adapt the sound according to your individual needs and pref-
erences. With the RS 195 you’ll be able to hear the subtle nuances of dia-
logues and the slight details of your favorite music like never before.
And although these headphones deliver state-of-the-art performance,
their user-friendly design keeps things simple. The convenient controls
make it easy to take advantage of the host of features, and the ergonomic
design provides a comfortable fit, even after hours of listening.
Sennheiser’s RS 195: Personal and adaptable to your listening needs!
Features
• Closed, circumaural headphones with excellent digital wireless audio
transmission
• Exceptional digital audio clarity and transmission range of up to
100 m/328 ft (line of sight)
• Selectable hearing boost presets and an additional noise suppression
mode for clearer dialogues and superior speech intelligibility
• Or choose the music listening mode which reproduces music with an
increased dynamic range to preserve the sound image in the best pos-
sible way
• Supports analog and digital audio inputs and allows toggling between
the inputs
• Multi-purpose transmitter – also functions as “easy-charge“ cradle and
docking station
• Balance control for right/left volume adjustment
• Ergonomic design for enhanced wearing comfort
•2-year warranty
Digital
Analog

Package includes
6|RS 195
Package includes
HDR 195 headphones
TR 195 transmitter
Power supply unit with multi-country adapters
(EU, UK, US, AU)
Low self-discharge NiMH rechargeable batteries, AAA size
Optical digital cable, 1.5 m
Stereo audio cable with 3.5 mm jack plugs, 2 m
Quick guide in 19 languages
Brief instruction manual in German, English and French
Safety guide in 19 languages
US
EU
UK
AU
Quick
Guide
Brief
Instruction
Manual
Safety Guide
Safety Guide

Product overview
RS 195 |7
Product overview
Overview of the HDR 195 headphones
1 Headband
2 Charging contacts
3 Ear pads
4 Ear cups/Battery compartments
5 Volume + button
6 Volume – button
7 MODE button
for per
sonal hearing
8 HDR status LED
9 HDR power button
1
3
2
4
6
5
7
9
8

Product overview
8|RS 195
Overview of the TR 195 transmitter
7
1
2
3
5
4
0
9
8
A
6
1 TR status LED
2 BAL control
for adjusting the balance
3 A-G rotary switch
for selecting the hearing profile
4 LEDs for personal hearing,
indicating the selected sound
optimization
5 MODE button
for personal hearing
6 Charge status LED
7 Charging contacts
8 DIGITAL OPTICAL IN Digital
optical audio input
9 AUDIO INPUT SELECTION switch,
for digital or analog audio input
selection
0 ANALOG 3.5 mm IN analog
audio input (3.5 mm jack)
A DC 9V 0.3A socket
for the power supply unit

Product overview
RS 195 |9
Overview of LED indicators
The LED indicators on the headphones and on the transmitter indicate the
current operating state. If you are not using the headphones, the LED indi-
cators automatically dim after approx. 30 seconds to not disturb you.
LED indicators on the headphones
HDR status LED Meaning
The headphones are switched off.
The transmitter and headphones are
connected.
The transmitter and headphones are
connected and the rechargeable
batteries are almost empty.
The headphones are disconnected from
or cannot connect to the transmitter.
The headphones are disconnected from
or cannot connect to the transmitter and
the rechargeable batteries are almost
empty.
1s1s
1s1s

Product overview
10 | RS 195
LED indicators on the transmitter
After taking the headphones from the holder of the transmitter, the charge
status LED indicates the approximate operating time of the headphones:
1
2
3
1
Charge status LED Meaning
The transmitter is not charging.
The rechargeable batteries are being
charged.
The rechargeable batteries are fully charged.
A charging/battery fault has been detected.
Charge status LED Operating time Battery capacity
up to 4 hours 0-25%
approx. 4 to 9 hours 25-50%
approx. 9 to 14 hours 50-75%
approx. 14 to 18 hours 75-100%
2
Personal hearing LED Meaning
One of the hearing profiles A-G for hearing
enhancement is selected.
In addition to the selected hearing profile,
speech intelligibility is improved as annoying
noise is reduced.
The selected hearing profile reproduces music
with an increased dynamic to preserve the
sound image in the best possible way.

Product overview
RS 195 |11
Personal hearing is switched off and the
selected hearing profile is deactivated; the
sound from the audio source is reproduced
unchanged (normal hearing).
If all three LEDs flash three times, more than
one pair of headphones is connected to the
transmitter. Switch off the other headphones
in order to activate personal hearing.
Personal hearing LED Meaning
3
TR status LED
Meaning
The transmitter is connected to the AC wall
outlet.
The transmitter is in standby mode.
The transmitter and headphones are
connected.
The transmitter detects an incompatible
digital audio streaming input (see page 30).
1 s
1.5 s1.5 s

Putting the RS 195 into operation
12 | RS 195
Putting the RS 195 into operation
Setting up the transmitter
왘 Choose a suitable place near your audio source.
왘 Separate the transmitter from other wireless devices in the room by at
least 50 cm/20” to avoid interference.
왘 Do not place the transmitter close to metal objects such as shelf bars,
reinforced concrete walls, etc. as this can decrease the transmission
range of the transmitter.
MOD
E
R
L

Putting the RS 195 into operation
RS 195 |13
Connecting the transmitter to an audio source
You can simultaneously connect 2 different audio sources (e.g. a TV and a
stereo hi-fi system) to the transmitter. The transmitter features a digital
as well as an analog audio input. If you connect 2 audio sources, you can
toggle between them using the AUDIO INPUT SELECTION switch (see
page
22).
왘 Switch your audio source off before connecting the transmitter.
왘 Check the connection options available for your audio source (audio
output, usually marked “OUT”).
왘 Select the corresponding connection cable and, if necessary, a suitable
adapter.
왘 Depending on the connection option selected, go to the respective
chapter and follow the instructions on how to connect the transmitter
to an audio source.
You can also refer to the beginner’s video guides on how to connect
your digital wireless headphone system to a TV at
www.sennheiser.com/how-to-videos.
Connection options available
for your audio source
Connection cable Page
Optical (digital) Optical digital cable 14
3.5 mm or 6.3 mm/ ¼“
jack socket (analog)
Stereo audio cable;
in case of a 6.3 mm/ ¼“ jack
socket: with adapter 3.5 mm jack
socket to 6.3 mm/ ¼“ jack plug
(to be ordered separately)
15
RCA (analog)
Stereo audio cable with adapter
3.5 mm jack socket to 2 RCA plugs
(to be ordered separately)
16
You can purchase accessories and adapters from your local
Sennheiser partner.
A
B
C

Putting the RS 195 into operation
14 | RS 195
Connection option A: Optical (digital)
To achieve the best possible listening experience, we recommend that you
connect your RS 195 headphone system to your home cinema or hi-fi sys-
tem using the supplied optical digital cable.
Your wireless headphone system allows digital audio streaming using only
PCM audio output from devices connected through the optical digital input
DIGITAL OPTICAL IN. Refer to the sound menu or the instruction manual of
y
our device to change from another audio stream (e.g. Bitstream) to PCM.
왘 Switch your audio source off before connecting the transmitter.
왘 Pull off the clear protective caps from both plugs before connecting the
cable.
왘 Connect one end of the optical digital cable to the DIGITAL OPTICAL IN
input of the transmitter and the other end to the optical output of your
a
udio source.
A
Digital sound output
PCM
Bitstream
Sound menu
*
*Sound menu may vary
Digital
O
PT
ICAL OUT
OFF
Digital

Putting the RS 195 into operation
RS 195 |15
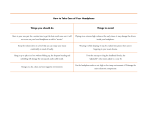
Connection option B: 3.5 mm or 6.3 mm/¼“ jack socket (analog)
Some TV models mute the loudspeakers when you connect the transmitter
to the headphone socket. Check in the menu of your TV to see if the muting
function can be deactivated. Alternatively, connect the TV and the trans-
mitter using a different option (A or C).
왘 Switch your audio source off befor
e connecting the transmitter.
왘 If necessary, connect the adapter 6.3 mm/¼“ jack plug onto the stereo
audio cable.
왘 Connect the stereo audio cable to the 3.5 mm jack socket of the trans-
mitter and to the headphone socket of your audio source.
B
Adjust the volume of the headphone socket on your audio source to
at least about the medium level.
*
P
HONES
OFF
*
A
dapter not included
Analog
VOLUME

Putting the RS 195 into operation
16 | RS 195
Connection option C: RCA (analog)
왘 Switch your audio source off before connecting the transmitter.
왘 Plug the RCA adapter onto the stereo audio cable.
왘 Connect the stereo audio cable to the 3.5 mm jack socket of the
transmitter.
왘 Connect the RCA plugs to the RCA outputs of your audio source (in most
cases “AUDIO OUT“). Connect the red RCA plug to the red RCA socket
and the white RCA plug to the white or black RCA socket.
C
A
UDIO OUT
R
L
OFF
*
* Adapter not included
Analog

Putting the RS 195 into operation
RS 195 |17
Connecting the transmitter to an AC wall outlet
1 Select a suitable country adapter and slide it onto the power supply
unit until it locks firmly in place.
2 Connect the power supply unit connector to the power input socket of
the transmitter.
3 Plug the power supply unit into an AC wall outlet.
The TR status LED lights up for a second. The transmitter is in
standby mode.
1
US
EU
UK
AU
3
2
STANDBY

Putting the RS 195 into operation
18 | RS 195
Inserting or replacing the rechargeable batteries
1 Lightly twist the ear pads counterclockwise until you overcome a slight
resistance.
2 Lift the ear pads off the ear cups to reveal the battery compartments.
3 Insert the rechargeable batteries into the compartments. To replace the
batteries, pull the batteries out of the compartments and insert the
new ones. Be sure to observe correct polarity when inserting the bat-
teries. Dispose of old batteries as special waste or return them to your
specialist dealer.
4 Hook the ear pads onto the ear cups. As yo
u put back the ear pads,
observe the L (left) and R (right) markings on the rear of the ear pads.
5 Twist the ear pads clockwise until you hear a click sound. Ensure that
they are locked firmly onto the ear cups.
You can also power the headphones using standard batteries (AAA
size, 1.5 V). Note however, that standard batteries are not recharge-
able, and if you are using non-rechargeable batteries, you must not
place the headphones on the headphones holder.
1
2
3
4
5
NEW

Putting the RS 195 into operation
RS 195 |19
Charging the rechargeable batteries
In general, a complete charging cycle takes about 8.5 hours. However,
before using the headphones for the first time, charge the rechargeable
batteries for at least 16 hours without interruption to optimize the perfor-
mance of the batteries.
When the rechargeable batteries are almost empty, the HDR status LED
turns red and you hear beeps in the headphones. The headphones switch
off after a few minutes.
왘 Place the headphones on the headphones holder of the transmitter.
Y
ou may place the headphones on either side provided that the
charging contacts of the headphones and the transmitter connect.
The headphones automatically switch off and the Charge status LED
on the transmitter lights up red. When the rechargeable batteries are
fully charged, the Charge status LED turns green.
CAUTION
Danger of damage to the headphones!
If you insert non-rechargeable batteries into the battery
compartments, the batteries may leak during charging and
can damage your headphones.
왘 Do not place the headphones on the headphones holder if
you are using non-rechargeable batteries.
8.5h
When not in use, place the headphones on the headphones holder to
ensure that batteries are fully charged when needed. The transmit-
ter utilizes an intelligent battery charging technology that prevents
overcharging.
After taking the headphones from the holder of the transmitter, the
charge status LED indicates the approximate operating time of the
headphones (see page 10).
100%
HDR 195
/