Instruction Manual
SKU: O00QH-0499
All product with the Easy Chime Logo work together
1byone Products Inc.
1230 E Belmont Street, Ontario, CA 91761
Customer Service: +1 909-391-3888
www.1byone.com

Thanks for purchasing 1byone Wireless PIR Alert
Doorbell. Please read this instruction manual
before use to ensure safe operation.
1. Package Contents:
1 x Doorbell Receiver
2 x PIR sensors
2 x Wall plugs and 2 x Screws
1 x Instruction manual
If any package contents are visibly damaged or
missing, please immediately contact 1byone
Support Center at https://www.1byone.com/Sup-
port for assistance.
2. Parts Name:
1. LED indicator 2. Speaker
3. Sound and flash switch 4. Volume button
5. Ringtone selector button 6. Pairing button
7. Plug 8. PIR detector
9. LED indicator 10. Wall mounting hole
11. Battery compartment cover
Voltage of receiver
Voltage of PIR sensor
PIR sensor’s frequency
PIR sensor’s detecting angle
PIR sensor’s detecting distance
Operating range
Power consumption
Receiver’s ring volume
Working temperature
AC 110~120V
DC4.5V ( 3 x AAA batteries)
433.92MHz+100KHz
45 degree
5-8m/12-15ft
100m/300ft (without obstacles)
Receiver: 1.2W PIR sensor: 0.06W
Over 100dB within 0.5m/1.6ft
-20°C ~ 50 °C
Parameters:
(1)
(2)
(3)
(5)
(6)
(4)
(7)
(11)
(10)
(8)
(9)
- 01 - - 02 -

3. Power Supply:
Doorbell receiver : Please plug into a power outlet
(AC110-120V).
PIR sensor: The PIR sensor is powered by 3x AAA
batteries,please insert the battery using the
following procedure:
Remove the screw on the back of the PIR sensor
with screwdriver. Next remove the battery
compartment cover.
Insert 3 x AAA batteries into the battery
compartment, be sure using the correct polarity
to eliminate the danger of fire.
Replace the battery compartment cover and
tighten the screw.
Safety Note:
Doorbell receiver:
Please plug it into a safe power outlet.
Do not expose the receiver to water spray or
water drops and do not place liquid-filled
objects such as vases or opened drink
containers on or near the receiver and the
outlet.
Unplug the receiver immediately if you sense a
burning smell or smoke. Have qualified
personnel check the receivier before using it
again.
Unplug the receiver from the outlet if the
doorbell system is not to be used for a long
time.
PIR sensor:
The PIR sensor is powerd by 3x AAA battery.
when exhausted, replace it using the same type
and voltage battery.
Always insert the battery using the correct
polarity to eliminate the danger of fire.
Keep old and new batteries away from children.
Old batteries should be properly disposed using
safe environmental practices.
Remove the batteries from the PIR sensor if you
do not intend to use the Alarm kit for an
extended period of time.
4. Operation:
A. Selecting the notification mode:
The doorbell receiver can notify after the PIR
sensor has detected a car or someone passing
by playing a ringing sound, flashing an LED, or
ringing and flashing an LED at the same time.
These are referred to as Sound, Flash, and
Sound+ Flash mode.
To select , switch the Sound and flash switch to
one of the following position:
Sound only mode Flash only mode
Sound +Flash mode.
B. Selecting the ringtone:
There are 36 programmable ringtones to
choose from.
Press the Ringtone selector button to
change the ringtone.
Stop pressing this button when you reach the
desired ringtone.
C. Adjusting ringtone volume:
Press the Volume button until the desired
volume is set. There are 3 volume levels for
selection.
D. Pairing additional PIR sensors to the alarm
doorbell system:
Up to 5 PIR sensors can be paired with one
receiver, pair additional PIR sensors using the same
pairing process as described below:
The following pairing instruction is relevant to PIR
sensor SKU O00QH-0508
After power the PIR sensor, press the Paring button
on the side of the receiver. Next trigger the PIR
sensor. If pairing is successful, the receiver should
ring. It normally takes about 30 seconds for the PIR
sensor and receiver to pair. If there is no pairing
within 30 seconds, the receiver will automatically
exit pairing mode. Please try pairing again.
E. Re-pairing Function:
If a receiver ring but nothing trigger the PIR
sensor, or when you wish wipe some PIR sensor
from a receiver, or when the PIR sensor
interferes with another receiver, it may be
necessary to wipe the current pairings and pair
again:
For wiping the PIR sensors, please cut down the
power supply of the receiver and PIR sensor,
remove the batteries from the PIR sensor and
unplug the receiver.
Reattach the receiver and push button to power
after 30 seconds, then re-pair the wanted PIR
sensor.
5. Installation:
For the receiver, plug in the receiver into any safe
power outlet.
For the PIR sensor, it can be mounted on a wall or
just put it on a flat place.
To mount on the wall:
Drill holes on the wall. Next push the wall plug into
the drilled holes, and then insert the screw into
the wall plugs. Finally, mount the PIR sensor on the
screw.
Notes:
The recommended installation height for the
PIR sensor is 3.3-4.9ft (1.0-1.5m ).
The PIR sensor detecting angle is 45 degree and
detecting distance is16.4-26.2ft (5-8m). Install
the PIR sensor in key monitoring areas such as
the entrance to a garage, store, or house.
If installing the PIR sensor outside, note that
moving leaves and branches, strong wind, and
drastic changes in temperature can affect and
influence the sensor.
The PIR sensor and receiver can connect up to
300ft/100m without any obstacles.
The PIR sensor’s transmitting frequency is
433MHz and its range can be affected by metal,
walls, concretes, and interfering signals from
other electronic appliances with the same
frequency, including televisions, radios, and
cookers.
Avoid placing the PIR sensor and receiver near
to the above mentioned electronic appliances.
Do not expose the PIR sensor and receiver to
direct sunlight or high temperatures, otherwise
overheating may cause them irreparably
damaged.
Do not install the PIR sensor and receiver near
any source of naked flames such as lighted
candles.
Please test the PIR sensor and receiver at the
potential installation locations before actual
installation to confirm range and transmission
effectiveness.
The receiver will reset all parings after cut off
the power supply, you need to re-pair your PIR
sensors when you want to use them again.
6. Trouble Shooting:
a. The receiver rings without the PIR sensor being
triggered.
The receiver may be matching on the same
frequency with nearby PIR sensor. you should
wipe the pairing and re-pair your PIR sensors.
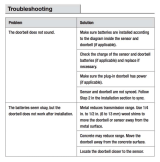
b. There is no ring/LED flash when the PIR senso
r is
triggered.
Check whether the battery (AAA batteries)
is inserted in the PIR sensor
Check whether the power outlet being
used for the receiver is working properly.
Pair the receiver and PIR sensor again.
c. The ringtone/alarm volume is greatly
reduced.
A weak battery can reduce the ring
volume. Change the battery every 10-12
months for the PIR sensor.
Metal constructions, walls, and other
appliances with the same frequency can
also affect the receiver’s ringing. Avoid
mounting the PIR sensor and receiver near
any metal objects.
- 03 - - 04 -

3. Power Supply:
Doorbell receiver : Please plug into a power outlet
(AC110-120V).
PIR sensor: The PIR sensor is powered by 3x AAA
batteries,please insert the battery using the
following procedure:
Remove the screw on the back of the PIR sensor
with screwdriver. Next remove the battery
compartment cover.
Insert 3 x AAA batteries into the battery
compartment, be sure using the correct polarity
to eliminate the danger of fire.
Replace the battery compartment cover and
tighten the screw.
Safety Note:
Doorbell receiver:
Please plug it into a safe power outlet.
Do not expose the receiver to water spray or
water drops and do not place liquid-filled
objects such as vases or opened drink
containers on or near the receiver and the
outlet.
Unplug the receiver immediately if you sense a
burning smell or smoke. Have qualified
personnel check the receivier before using it
again.
Unplug the receiver from the outlet if the
doorbell system is not to be used for a long
time.
PIR sensor:
The PIR sensor is powerd by 3x AAA battery.
when exhausted, replace it using the same type
and voltage battery.
Always insert the battery using the correct
polarity to eliminate the danger of fire.
Keep old and new batteries away from children.
Old batteries should be properly disposed using
safe environmental practices.
Remove the batteries from the PIR sensor if you
do not intend to use the Alarm kit for an
extended period of time.
4. Operation:
A. Selecting the notification mode:
The doorbell receiver can notify after the PIR
sensor has detected a car or someone passing
by playing a ringing sound, flashing an LED, or
ringing and flashing an LED at the same time.
These are referred to as Sound, Flash, and
Sound+ Flash mode.
To select , switch the Sound and flash switch to
one of the following position:
Sound only mode Flash only mode
Sound +Flash mode.
B. Selecting the ringtone:
There are 36 programmable ringtones to
choose from.
Press the Ringtone selector button to
change the ringtone.
Stop pressing this button when you reach the
desired ringtone.
C. Adjusting ringtone volume:
Press the Volume button until the desired
volume is set. There are 3 volume levels for
selection.
D. Pairing additional PIR sensors to the alarm
doorbell system:
Up to 5 PIR sensors can be paired with one
receiver, pair additional PIR sensors using the same
pairing process as described below:
The following pairing instruction is relevant to PIR
sensor SKU O00QH-0508
After power the PIR sensor, press the Paring button
on the side of the receiver. Next trigger the PIR
sensor. If pairing is successful, the receiver should
ring. It normally takes about 30 seconds for the PIR
sensor and receiver to pair. If there is no pairing
within 30 seconds, the receiver will automatically
exit pairing mode. Please try pairing again.
E. Re-pairing Function:
If a receiver ring but nothing trigger the PIR
sensor, or when you wish wipe some PIR sensor
from a receiver, or when the PIR sensor
interferes with another receiver, it may be
necessary to wipe the current pairings and pair
again:
For wiping the PIR sensors, please cut down the
power supply of the receiver and PIR sensor,
remove the batteries from the PIR sensor and
unplug the receiver.
Reattach the receiver and push button to power
VOL
1/2/3
after 30 seconds, then re-pair the wanted PIR
sensor.
5. Installation:
For the receiver, plug in the receiver into any safe
power outlet.
For the PIR sensor, it can be mounted on a wall or
just put it on a flat place.
To mount on the wall:
Drill holes on the wall. Next push the wall plug into
the drilled holes, and then insert the screw into
the wall plugs. Finally, mount the PIR sensor on the
screw.
Notes:
The recommended installation height for the
PIR sensor is 3.3-4.9ft (1.0-1.5m ).
The PIR sensor detecting angle is 45 degree and
detecting distance is16.4-26.2ft (5-8m). Install
the PIR sensor in key monitoring areas such as
the entrance to a garage, store, or house.
If installing the PIR sensor outside, note that
moving leaves and branches, strong wind, and
drastic changes in temperature can affect and
influence the sensor.
The PIR sensor and receiver can connect up to
300ft/100m without any obstacles.
The PIR sensor’s transmitting frequency is
433MHz and its range can be affected by metal,
walls, concretes, and interfering signals from
other electronic appliances with the same
frequency, including televisions, radios, and
cookers.
Avoid placing the PIR sensor and receiver near
to the above mentioned electronic appliances.
Do not expose the PIR sensor and receiver to
direct sunlight or high temperatures, otherwise
overheating may cause them irreparably
damaged.
Do not install the PIR sensor and receiver near
any source of naked flames such as lighted
candles.
Please test the PIR sensor and receiver at the
potential installation locations before actual
installation to confirm range and transmission
effectiveness.
The receiver will reset all parings after cut off
the power supply, you need to re-pair your PIR
sensors when you want to use them again.
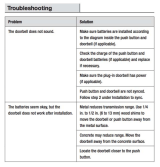
6. Trouble Shooting:
a. The receiver rings without the PIR sensor being
triggered.
The receiver may be matching on the same
frequency with nearby PIR sensor. you should
wipe the pairing and re-pair your PIR sensors.
b. There is no ring/LED flash when the PIR senso
r is
triggered.
Check whether the battery (AAA batteries)
is inserted in the PIR sensor
Check whether the power outlet being
used for the receiver is working properly.
Pair the receiver and PIR sensor again.
c. The ringtone/alarm volume is greatly
reduced.
A weak battery can reduce the ring
volume. Change the battery every 10-12
months for the PIR sensor.
Metal constructions, walls, and other
appliances with the same frequency can
also affect the receiver’s ringing. Avoid
mounting the PIR sensor and receiver near
any metal objects.
- 05 - - 06 -

3. Power Supply:
Doorbell receiver : Please plug into a power outlet
(AC110-120V).
PIR sensor: The PIR sensor is powered by 3x AAA
batteries,please insert the battery using the
following procedure:
Remove the screw on the back of the PIR sensor
with screwdriver. Next remove the battery
compartment cover.
Insert 3 x AAA batteries into the battery
compartment, be sure using the correct polarity
to eliminate the danger of fire.
Replace the battery compartment cover and
tighten the screw.
Safety Note:
Doorbell receiver:
Please plug it into a safe power outlet.
Do not expose the receiver to water spray or
water drops and do not place liquid-filled
objects such as vases or opened drink
containers on or near the receiver and the
outlet.
Unplug the receiver immediately if you sense a
burning smell or smoke. Have qualified
personnel check the receivier before using it
again.
Unplug the receiver from the outlet if the
doorbell system is not to be used for a long
time.
PIR sensor:
The PIR sensor is powerd by 3x AAA battery.
when exhausted, replace it using the same type
and voltage battery.
Always insert the battery using the correct
polarity to eliminate the danger of fire.
Keep old and new batteries away from children.
Old batteries should be properly disposed using
safe environmental practices.
Remove the batteries from the PIR sensor if you
do not intend to use the Alarm kit for an
extended period of time.
4. Operation:
A. Selecting the notification mode:
The doorbell receiver can notify after the PIR
sensor has detected a car or someone passing
by playing a ringing sound, flashing an LED, or
ringing and flashing an LED at the same time.
These are referred to as Sound, Flash, and
Sound+ Flash mode.
To select , switch the Sound and flash switch to
one of the following position:
Sound only mode Flash only mode
Sound +Flash mode.
B. Selecting the ringtone:
There are 36 programmable ringtones to
choose from.
Press the Ringtone selector button to
change the ringtone.
Stop pressing this button when you reach the
desired ringtone.
C. Adjusting ringtone volume:
Press the Volume button until the desired
volume is set. There are 3 volume levels for
selection.
D. Pairing additional PIR sensors to the alarm
doorbell system:
Up to 5 PIR sensors can be paired with one
receiver, pair additional PIR sensors using the same
pairing process as described below:
The following pairing instruction is relevant to PIR
sensor SKU O00QH-0508
After power the PIR sensor, press the Paring button
on the side of the receiver. Next trigger the PIR
sensor. If pairing is successful, the receiver should
ring. It normally takes about 30 seconds for the PIR
sensor and receiver to pair. If there is no pairing
within 30 seconds, the receiver will automatically
exit pairing mode. Please try pairing again.
E. Re-pairing Function:
If a receiver ring but nothing trigger the PIR
sensor, or when you wish wipe some PIR sensor
from a receiver, or when the PIR sensor
interferes with another receiver, it may be
necessary to wipe the current pairings and pair
again:
For wiping the PIR sensors, please cut down the
power supply of the receiver and PIR sensor,
remove the batteries from the PIR sensor and
unplug the receiver.
Reattach the receiver and push button to power
after 30 seconds, then re-pair the wanted PIR
sensor.
5. Installation:
For the receiver, plug in the receiver into any safe
power outlet.
For the PIR sensor, it can be mounted on a wall or
just put it on a flat place.
To mount on the wall:
Drill holes on the wall. Next push the wall plug into
the drilled holes, and then insert the screw into
the wall plugs. Finally, mount the PIR sensor on the
screw.
Notes:
The recommended installation height for the
PIR sensor is 3.3-4.9ft (1.0-1.5m ).
The PIR sensor detecting angle is 45 degree and
detecting distance is16.4-26.2ft (5-8m). Install
the PIR sensor in key monitoring areas such as
the entrance to a garage, store, or house.
If installing the PIR sensor outside, note that
moving leaves and branches, strong wind, and
drastic changes in temperature can affect and
influence the sensor.
The PIR sensor and receiver can connect up to
300ft/100m without any obstacles.
The PIR sensor’s transmitting frequency is
433MHz and its range can be affected by metal,
walls, concretes, and interfering signals from
other electronic appliances with the same
frequency, including televisions, radios, and
cookers.
Avoid placing the PIR sensor and receiver near
to the above mentioned electronic appliances.
Do not expose the PIR sensor and receiver to
direct sunlight or high temperatures, otherwise
overheating may cause them irreparably
damaged.
Do not install the PIR sensor and receiver near
any source of naked flames such as lighted
candles.
Please test the PIR sensor and receiver at the
potential installation locations before actual
installation to confirm range and transmission
effectiveness.
The receiver will reset all parings after cut off
the power supply, you need to re-pair your PIR
sensors when you want to use them again.
6. Trouble Shooting:
a. The receiver rings without the PIR sensor being
triggered.
The receiver may be matching on the same
frequency with nearby PIR sensor. you should
wipe the pairing and re-pair your PIR sensors.
b. There is no ring/LED flash when the PIR senso
r is
triggered.
Check whether the battery (AAA batteries)
is inserted in the PIR sensor
Check whether the power outlet being
used for the receiver is working properly.
Pair the receiver and PIR sensor again.
c. The ringtone/alarm volume is greatly
reduced.
A weak battery can reduce the ring
volume. Change the battery every 10-12
months for the PIR sensor.
Metal constructions, walls, and other
appliances with the same frequency can
also affect the receiver’s ringing. Avoid
mounting the PIR sensor and receiver near
any metal objects.
- 07 - - 08 -

3. Power Supply:
Doorbell receiver : Please plug into a power outlet
(AC110-120V).
PIR sensor: The PIR sensor is powered by 3x AAA
batteries,please insert the battery using the
following procedure:
Remove the screw on the back of the PIR sensor
with screwdriver. Next remove the battery
compartment cover.
Insert 3 x AAA batteries into the battery
compartment, be sure using the correct polarity
to eliminate the danger of fire.
Replace the battery compartment cover and
tighten the screw.
Safety Note:
Doorbell receiver:
Please plug it into a safe power outlet.
Do not expose the receiver to water spray or
water drops and do not place liquid-filled
objects such as vases or opened drink
containers on or near the receiver and the
outlet.
Unplug the receiver immediately if you sense a
burning smell or smoke. Have qualified
personnel check the receivier before using it
again.
Unplug the receiver from the outlet if the
doorbell system is not to be used for a long
time.
PIR sensor:
The PIR sensor is powerd by 3x AAA battery.
when exhausted, replace it using the same type
and voltage battery.
Always insert the battery using the correct
polarity to eliminate the danger of fire.
Keep old and new batteries away from children.
Old batteries should be properly disposed using
safe environmental practices.
Remove the batteries from the PIR sensor if you
do not intend to use the Alarm kit for an
extended period of time.
4. Operation:
A. Selecting the notification mode:
The doorbell receiver can notify after the PIR
sensor has detected a car or someone passing
by playing a ringing sound, flashing an LED, or
ringing and flashing an LED at the same time.
These are referred to as Sound, Flash, and
Sound+ Flash mode.
To select , switch the Sound and flash switch to
one of the following position:
Sound only mode Flash only mode
Sound +Flash mode.
B. Selecting the ringtone:
There are 36 programmable ringtones to
choose from.
Press the Ringtone selector button to
change the ringtone.
Stop pressing this button when you reach the
desired ringtone.
C. Adjusting ringtone volume:
Press the Volume button until the desired
volume is set. There are 3 volume levels for
selection.
D. Pairing additional PIR sensors to the alarm
doorbell system:
Up to 5 PIR sensors can be paired with one
receiver, pair additional PIR sensors using the same
pairing process as described below:
The following pairing instruction is relevant to PIR
sensor SKU O00QH-0508
After power the PIR sensor, press the Paring button
on the side of the receiver. Next trigger the PIR
sensor. If pairing is successful, the receiver should
ring. It normally takes about 30 seconds for the PIR
sensor and receiver to pair. If there is no pairing
within 30 seconds, the receiver will automatically
exit pairing mode. Please try pairing again.
E. Re-pairing Function:
If a receiver ring but nothing trigger the PIR
sensor, or when you wish wipe some PIR sensor
from a receiver, or when the PIR sensor
interferes with another receiver, it may be
necessary to wipe the current pairings and pair
again:
For wiping the PIR sensors, please cut down the
power supply of the receiver and PIR sensor,
remove the batteries from the PIR sensor and
unplug the receiver.
Reattach the receiver and push button to power
after 30 seconds, then re-pair the wanted PIR
sensor.
5. Installation:
For the receiver, plug in the receiver into any safe
power outlet.
For the PIR sensor, it can be mounted on a wall or
just put it on a flat place.
To mount on the wall:
Drill holes on the wall. Next push the wall plug into
the drilled holes, and then insert the screw into
the wall plugs. Finally, mount the PIR sensor on the
screw.
Notes:
The recommended installation height for the
PIR sensor is 3.3-4.9ft (1.0-1.5m ).
The PIR sensor detecting angle is 45 degree and
detecting distance is16.4-26.2ft (5-8m). Install
the PIR sensor in key monitoring areas such as
the entrance to a garage, store, or house.
If installing the PIR sensor outside, note that
moving leaves and branches, strong wind, and
drastic changes in temperature can affect and
influence the sensor.
The PIR sensor and receiver can connect up to
300ft/100m without any obstacles.
The PIR sensor’s transmitting frequency is
433MHz and its range can be affected by metal,
walls, concretes, and interfering signals from
other electronic appliances with the same
frequency, including televisions, radios, and
cookers.
Avoid placing the PIR sensor and receiver near
to the above mentioned electronic appliances.
Do not expose the PIR sensor and receiver to
direct sunlight or high temperatures, otherwise
overheating may cause them irreparably
damaged.
Do not install the PIR sensor and receiver near
any source of naked flames such as lighted
candles.
Please test the PIR sensor and receiver at the
potential installation locations before actual
installation to confirm range and transmission
effectiveness.
The receiver will reset all parings after cut off
the power supply, you need to re-pair your PIR
sensors when you want to use them again.
6. Trouble Shooting:
a. The receiver rings without the PIR sensor being
triggered.
The receiver may be matching on the same
frequency with nearby PIR sensor. you should
wipe the pairing and re-pair your PIR sensors.
b. There is no ring/LED flash when the PIR senso
r is
triggered.
Check whether the battery (AAA batteries)
is inserted in the PIR sensor
Check whether the power outlet being
used for the receiver is working properly.
Pair the receiver and PIR sensor again.
c. The ringtone/alarm volume is greatly
reduced.
A weak battery can reduce the ring
volume. Change the battery every 10-12
months for the PIR sensor.
Metal constructions, walls, and other
appliances with the same frequency can
also affect the receiver’s ringing. Avoid
mounting the PIR sensor and receiver near
any metal objects.
- 09 - - 10 -

Disposal of the appliance
Under no circumstances should you
dispose of the appliance in normal
domestic waste. This product is subject
to the provisions of European Directive
2012/19/EU.
The appliance’s packaging is made
from environmentally friendly material
and can be disposed of at your local
recycling plant.
Dispose of the appliance via an approved disposal
company or your municipal waste facility. Please
observe the currently applicable regulations.
Please contact your waste disposal centre if you
need any further information.
Disposal
Disposal of batteries
Used batteries may not be disposed of
in household waste.
All consumers are statutorily required to dispose
of batteries at a collection point provided by
their local municipality or retail store.
The purpose of this obligation is to ensure
batteries are disposed of in a non-polluting
manner. Only dispose of batteries when they are
fully discharged.
- 11 - - 12 -

Für eine zügige Bearbeitung ihres Problems, melden
Sie sich bei uns wie folgt.
Email: [email protected]
DE
JP
Para garantizar una rápida atención de su problema,
favor envíenos un email para ayudarle.
Email: [email protected]
ES
Customer Service/Kundenservice
Service Clients/Atención al cliente
Assistenza Clienti/
To ensure speedy handling of your issue, please
call or email us for assistance.
Phone: +1 909-391-3888
(Mon-Fri 9:00am - 6:00pm PST)
Email: [email protected]
US
To ensure speedy handling of your issue, please email
us for assistance.
Email: [email protected]
CA
To ensure speedy handling of your issue, please
call or email us for assistance.
Phone: +44 158 241 2681
(Mon-Fri 9:00am - 6:00pm UTC)
Email: uk[email protected]
UK
Per supporto immediato in caso di bisogno, la
invitiamo a contattarci via email.
Email: [email protected]
IT
Pour vous assurez une assistance rapide en cas de
problème, veuillez envoyer un e-mail.
Email: [email protected]
FR
/