Page is loading ...

Wireless 720P HD Video Doorbell
and Indoor Chime with Two-Way Audio,
Motion-Activated Alerts and Night
Vision for IOS and Android App
OWNER’S MANUAL
ER107001
Visit our web site at www.emersonradio.com
UNAUTHORIZED MODIFICATIONS TO THIS DEVICE
COULD VOID MANUFACTURER’S WARRANTY

Download and Install the app from the App Store or
Google Play Store.
-1-
2. Device Overview
Infrared LED
Camera Image Sensor
Microphone
Speaker
Call Button
Reset Button
Power OFF/ON Switch
Micro SD Card Slot
WiFi Signal Indicator
PIR Motion Sensor
Battery Charging Indicator
Photodiode
1.Package Contents
USB Charging Slot
Doorbell Mounting
Plate
Chime USB
Cable
Owner’s
Manual
Screw
Driver
6 Long Screws,
1 Short Screw
and 6 Anchors
-2-
During setup process, the Doorbell and your phone should be
connected to the same 2.4 GHz Wi-Fi platform. In order to
answer your visitor's incoming call at any time, please allow this
App to run in background.
Please refer to the chart below for the information
about the indicator lights:
3. Getting Started with the App
Description
The device is connected to the network
Steady Blue
Off
Steady Red
Steady Blue
Off
Indicator Light
Wifi Signal
Indicator
Battery
Charging
Indicator
Battery is not connected to USB cable
for charging
1.Open the App Store (for iPhone) or Google Play Store (for
TM
Android device).
2.Search "Emerson Doorbell" App and install.
3.Choose your country .
4.The settings of different phones may be different. You may
be asked to allow different kinds of permissions during
installation of the App or during video doorbell setup. Please
allow all the permissions to ensure the device works as
intended.
5.Allow App to run in background.
6.You may be asked to allow float window permissions. Please
tap "set" and allow the app to draw over other apps.
Compatible with IOS 9.0 or above (for iPhone) or
TM
TM
Android 4.2 or above (for Android device).
Please refer to the operating system requirements
as specified on the App Store or Google Play Store.
Note:
Charging Connector Base
(AC 8V 24V
)
~
If a power supply system (AC 8V~24V) for doorbells
is available with your house, you can connect it to
the Charging Connector Base terminals as shown in
section 10.
The device is not connected to the
network or in Standby mode
Battery is charging
Battery charging is completed
Note:
Wireless 720P HD Video Doorbell
and Indoor Chime with Two-Way Audio,
Motion-Activated Alerts and Night
Vision for IOS and Android App
OWNER’S MANUAL
ER107001
Visit our web site at www.emersonradio.com
UNAUTHORIZED MODIFICATIONS TO THIS DEVICE
COULD VOID MANUFACTURER’S WARRANTY

-3- -4-
This section is for iPhone only. For Android device,
please refer to section 5.
TM
1. Fully charge the doorbell by plugging it into a power source
with the USB cable provided. The indicator light will become
steady blue once fully charged (Please refer to Section 2).
2. Power On, then open the App and tap "+"
4 .Follow the in-app instructions . Press and hold the Call
Button for 5 seconds and the doorbell light will start blinking.
OFF ON
4. Video Doorbell Setup for iPhone
3.Tap "Search Network" Tap "Connect to Wifi"
5. In your phone's Settings, select and connect to the Wifi named
"Wifi_Doorbell_AP". Please wait as it may take some time to
detect and show this Wifi.

7. Tap "Next" and select your desired Wifi network
(2.4 GHz Wifi only).
8.Enter Wifi password and tap "OK" to proceed.
6. Please wait until the connection to "Wifi_Doorbell_AP" is
successful. Then go back to Emerson Doorbell App to continue.
9. Enter the password of device and tap OK
(default password is admin ).
" "
" "
10. Please go to Section 7 to update the settings and change
your password.
Note:
This device works with multiple users. Once this
device has been added by the first user, there are
several options for the subsequent users to add the
device (Please refer to Section 6).
-5- -6-
Successfully added the device

TM
5. Video Doorbell Setup for Android Device
TM
This section is for Android device only. For iPhone, please
refer to section 4.
1. Fully charge the doorbell by plugging it into a power source
with the USB cable provided. The indicator light will become
steady blue once fully charged (Please refer to Section 2).
5. Follow the in-app instructions . Press and hold the Call Button
for 5 seconds and the doorbell light will flash. Tap "Next".
6. Enter Wifi password and tap "Next" to proceed. To use different
Wifi network, tap as indicated to search (2.4GHz Wifi only).
OFF ON
2. Power On, then open the App and tap "+"
3. Your phone should be connected to the 2.4 GHz Wifi during
setup.
4. Tap "Search Network" Tap "Connect to Wifi"
-7- -8-

-9-
8. Please refer to Section 7 to update the settings and change
your password.
This device works with multiple users. Once this
device has been added to the first user, there are
several options for the subsequent users to add the
device (Please refer to Section 6).
Note:
7. Please wait until there is pop-up for the password of device.
Enter the password and tap "OK"
(default password is: admin).
Successfully added the device
6. Add Video Doorbell for Multi-Users
This device works with multiple users. Once this device
has been connected to the network, there are more options
for the subsequent users to add the device to their App.
1. Refer to Section 3 to download and install the App.
2. Make sure your phone is connected to the same 2.4 GHz Wifi
network that you will be connecting your device to.
3.Power On, then open the App and tap "+"
OFF ON
4.Option 1:
a. Press the Call Button once and the Wifi signal indicator
wil l become steady blue.
WiFi Signal Indicator
b. Tap "Search Network" Tap "LAN Search (for Multiple Users)
-10 -

c. Select the device and enter password. Then tap "OK".
Note: Default password is "admin" but it may be changed by the
first user. Please check and confirm the password first.
Option 2:
Tap "Scan QR Code" and scan the QR code label
on back of the doorbell. Enter password and tap "OK".
Note: Default password is admin but it may be changed by
the first user. Please check and confirm the password
first.
" "
Note: Default password is "admin" but it may be changed
by the first user. Please check and confirm the
password first.
Option 3:
Tap "Input Manually". Rename the device, enter DID
(case sensitive) and password. Then tap "OK".
DID (uppercase and
lowercase letters
should match)
7. App Settings
1. Press the Call Button and enter intercom state . Tap
"Settings" icon.
Slide to right
-11 - -12 -
Successfully added
the device
Successfully added the device
Successfully added
the device

a. Device name (Refer to point 2 to rename)
b. Device ID (For information only, cannot be changed)
c. Modify password (any characters or numbers and 4-16 in
length) Noted: please alert other users after change of
password
d. Upgrade firmware(Tap to upgrade)
e. Micro SD Card Record (Pictures by motion detection will be
saved here. There is no option if micro SD card is not
inserted in the device)
f. Loop Record if the Micro SD Card is Full.
g. PIR Sensor
h. Push-PIR
I. Wifi Setting (Tap for change)
Note:
2.Tap the below icons shown on device list.
Device List
2.1
2.2 Push Notifications Enable/ Disable push notifications
a
b
c
d
e
f
g
h
i
If PIR sensor is OFF, no push notification even
though Push-PIR is ON. If PIR sensor is ON while
Push-PIR is OFF, only picture will be saved in the
Micro SD card and no push notification.
2.1
2.2
2.3
Rename the device
Device ID(cannot be changed)
If the password is incorrect, you may
not receive calls and notifications.
Please enter correct password here
and tap “Save"
Tap here to remove device from
the list
-13 - -14 -

120m
Doorbell
Chime
1
2
3
4
5
1.LED Indicator
2.Volume Button
3.Ringtone Button
4.Pairing Button
5.Battery Box
8. Settings for Chime
Chime is an optional add-on that alerts you when your
doorbell rings even if your phone is off or not in use.
1. Press (3) to select ringtone
2. Press (2) to set volume
3. Chime is already paired with the doorbell. The following
procedures applies to new chime or additional chime only.
a. Press the paring button (4) under standby mode.
b. Press the call button of doorbell.
c. The LED indicator (1) blinks then OFF if pairing is successful.
2.3
9. Answering Calls and Playback
Enable/Disable Ringtone on phone
App Version
Select Ringtone
Enable/Disable Vibration Notice on
Phone (only for AndroidTM Device)
When a visitor presses the Call Button, press the notification
banners (ring notifications must be Enabled) or tap on the
answer icon if in blue.
or
-15 - -16 -
Slide to left to
hang up
Slide to right to
enter intercom
interface to answer
Tap to take photo
Tap to take video,
tap again to stop
Exit
Battery Indication

Turn On/Off the
image
Noted: Switch off this
function can improve
audio quality.
10. Hardwiring and Installation
USB Charging Slot
Charging Connector Base
Reset Button
OFF ON
Micro SD card slot
Power OFF/ON
(AC 8V 24V)
~
Intercom Interface:
-17 - -18 -
Photos saved in
smartphone.
Videos saved in
smartphone.
Photos by motion detection
saved in Micro SD card.
Hang up
Slide to right and
hold to talk to
visitor
Tap to take video.
Tap again to stop.
Tap to take photo.
Green if micro SD
card has been
inserted.
ON: Talk and hear at the same time (Max. 120 seconds)
OFF: Slide the below icon to the right and hold to talk. Then
release the icon to hear.
Playback:
You may take snapshots and videos when there is incoming call
or during intercom. Snapshots and videos are stored in your
smartphone. Tap the “Snapshots Playback” icon and “Videos
Playback” icon in the main manual to enter the playback
interface.
Event History:
When PIR is enabled and Micro SD card has been inserted to
the device, snapshots will be saved in Micro SD card whenever
motion is detected. Tap the below icon to view the snapshots.

Notice:
Before installation, check that the power switch is on.
OFF ON
11. Specifications
CMOS
500±100mA
1m
about 10 °0
Operating Frequency 433.92MHz
120m
WIFI Operating Frequency 2.4GHz
Operating Temperature
Storage Temperature
Operating Humidity ≤85%RH
Video Resolution 720P
-10℃~ +50℃/ +14℉~+122℉
20℃~ +60℃/+14℉~+140℉
Imaging Sensor Type
View Angle
Supply Voltage
Consumption Current
PIR Range
PIR Angle
Unobstructed Effective Range
level: 0 vertical: 0about 10 ° about 7 °
Operation Temperature
Transmission Frequency
433 MHz
Supply Voltage
AA battery(1.5V×3pcs)
-10℃~+50℃
Unobstructed Effective Range 120m(Min.)
Doorbell
AC 8V 24V / 3.7V 5000mAH(battery)
~
Chime
When mounting the outdoor panel,
ensure that it is located in dry place.
It is important that the camera or the
electronics do not get wet. The
camera should ideally be mounted at
a height of between 1.45-1.50
meters.
-19 - -20 -

13. FCC Statement and Safety Warnings
FCC STATEMENT:
This device complies with Part 15 of the FCC Rules.
Operation is subject to the following two conditions:
1) This device may not cause harmful interference, and
2) This device must accept any interference received,
including interference that may cause undesired
operation.
WARNING: Changes or modifications not expressly approved
by the party responsible for compliance could void
the user’s authority to operate the equipment.
NOTE: This equipment has been tested and found to comply
with the limits for a Class B digital device, pursuant to Part 15
of the FCC Rules. These limits are designed to provide
reasonable protection against harmful interference in a
residential installation. This equipment generates, uses, and
can radiate radio frequency energy and, if not installed and
used in accordance with the instructions, may cause harmful
interference to radio communications. However, there is no
guarantee that interference will not occur in a particular
installation. If this equipment does cause harmful interference
to radio or television reception, which can be determined by
turning the equipment off and on, the user is encouraged to try
to correct the interference by one or more of the following
measures: reorient or relocate the receiving antenna,
increase the separation between the equipment and receiver,
connect the equipment into an outlet on a circuit different from
that to which the receiver is connected, consult the dealer or an
experienced radio/TV technician for help.
RF WARNING STATEMENT:
Installation of this device must not be readily accessible to
human subjects closer than 20 cm (8").
PRODUCT USE AND PROTECTION:
Read and follow all instructions. Use only as intended.
These device is intended to be used indoors only. It is not
-21 - -22 -
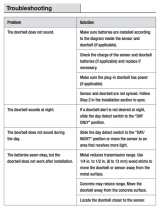
12. Trouble Shooting Guide
Error message "Set up
failed" or "Initial failed,
Please check whether
the current network is
available" appears
There may be trouble connecting to
the server. Please check firewall
settings or try another network.
Doorbell rings but no
notifications
1. Make sure the device password is
correct. Please refer to point 2.1 of
Section 7 to modify if necessary.
2. Make sure the Wifi password
entered during setup is correct. If
you are not sure, please delete the
device from the list and setup again
(Point 2.1 of section 7).
3. If you do not receive notifications
but can answer and enter the
intercom interface, please check if
you allowed notifications for this
App. Please go to phone's settings
and select this App to check.
4. Please check if Push Notifications
is ON (Point 2 of section 7).
When the "Answer" icon
is in gray, cannot enter
the intercom interface.
Tap the blue "Answer"
icon to enter the
interface but cannot see
anything.
Somebody is in front of
the doorbell but there is
no notification.
On standby mode without doorbell
rings or after motion is detected, you
cannot enter the intercom interface.
After doorbell rings or motion detected
for a period of time, the device will
return to standby mode again. There
may be a short period of delay for the
blue icon turns to gray.
1. Please make sure "Push
Notifications", "PIR" and "Push-PIR"
are ON (Section 7).
2. Please check if you allowed
notifications for this App. Please go
to phone's settings and select this
App to check.
Reset to factory settings Power on the doorbell. Press the
Call Button (doorbell ring will sound).
Then press and hold the Reset
button for about 5 seconds until the
doorbell ring stops.

-23 - -24 -
14. LIMITED WARRANTY
Emerson Radio Corp. warrants this product to be free from
manufacturing defects in original material, including original
parts, and workmanship under normal home use and
conditions ( manufacturing defect”) for a period of one (1) year
from date of original purchase in, and if used in the United
States. Should service be necessary under this warranty,
Emerson will provide the following at our Return Repair Facility
provided the manufacturing defect is verified along with the
date of purchase:
* Repair service for one (1) year from date of original
purchase at no charge for labor and parts.
To Receive Authorization to Return a Defective Item, please
contact Emerson Customer Service at 1-800-898-9020. Have
your Model number, Serial Number and dated Proof of
Purchase with you when you call.
In the event the product must be returned to Emerson:
* Pack the unit in a well-padded heavy corrugated box. Please
insure the item is well padded to avoid damage while in
transit back to our facility. If the item incurs damage, it will
NOT be replaced and the consumer will be responsible for
return freight costs to receive their same unit back.
* Enclose your check or money order payable to Emerson
Radio in the amount of $10 to cover return shipping and
handling costs.
* Enclose a note with your name, address, phone number,
Return Authorization number and brief reason for returning
the unit.
* Enclose a copy of your proof of purchase (warranty service
will not be provided without dated proof of purchase).
* Ship the unit prepaid via UPS or parcel post (SHIP INSURED
and obtain a tracking number).
NOTE This warranty does not cover:
(a) Damage to equipment not properly connected to the
product.
water resistant. To prevent fire or shock, do NOT attempt to
power this unit if it is damp.
SAFETY ADVISORY & WARNING:
Read and follow all instructions. Use only as intended.
CAUTION: Do NOT open to repair. A qualified technician
must carry out repair work.
ATTENTION: Do NOT power up while the unit is damp.
Towel dry the unit AND make sure all
connections are dry BEFORE plugging in the
power plug. Failure to do so may result in
electrical damage to the unit and may void the
warranty.
WARNING: This product may contain chemicals listed in
California Proposition 65 (https://oehha.ca.
gov/proposition-65/proposition-65-list)
WARNING: This unit must NOT be used in or near an open
heat source or excessive heat.
ATTENTION: Do NOT dispose of in a landfill. Contact a
certified recycling agent to dispose of the unit.
SAFETY:
You should
1) Never power the unit if you suspect water has entered the
device. Powering up a device with water inside could be
potentially hazardous and cause fire or a spark.
2) Never use the device in a wet environment.
3) Never attempt to fix this device.
CARE, MAINTENANCE, & PRECAUTIONS:
1) If the unit is placed in water, water may enter the unit and
void your warranty.
2) Do NOT use or store the unit in places with high
temperature.
3) Periodically clean the unit with a soft moist cloth. Do NOT
use any oily solvent or chemicals for cleaning.
4) Power the unit to an AC 8V~24V doorbell power supply
system if available in your house, otherwise, power
it to a built-in rechargeable lithium polymer battery.

-25 -
THIS WARRANTY GIVES YOU SPECIFIC LEGAL RIGHTS.
HOWEVER, YOU MAY HAVE OTHER RIGHTS WHICH MAY
VARY FROM STATE TO STATE. SOME STATES DO NOT
ALLOW LIMITATIONS ON IMPLIED WARRANTIES OR
EXCLUSION OF CONSEQUENTIAL DAMAGE, THEREFORE
THESE RESTRICTIONS MAY NOT APPLY TO YOU.
10-01-1402A
The serial number can be found on the package. We suggest
that you record the serial number of your unit in the space
below for reference.
Model Number: ER107001
Serial Number: _______________________________
FOR ADDITIONAL SET-UP
OR OPERATING ASSISTANCE
PLEASE CALL:
1-800-898-9020
FOR CUSTOMER SERVICE, PLEASE E-MAIL TO:
internet@emersonradio.com
OR WRITE TO:
Emerson Radio Corp.
Consumer Affairs Dept.
3 University Plaza,
Suite 405
Hackensack, NJ 07601
Emerson Part No.ER107001-20180315-00 Printed in China
S E R V I C E
-26 -
(b) Cost incurred in the shipping of the product to and from
Emerson’s Return Facility.
(c) Damage or improper operation of unit caused by customer
abuse, misuse, negligence or failure to follow operating
instructions (including cleaning instructions) provided with
the product.
(d) Ordinary adjustments to the product which can be
performed by customer as outlined in the owner’s manual.
(e) Signal reception problems caused by external antenna or
cable systems.
(f) Products not purchased in the United States.
(g) Damage to product if used outside the United States.
THIS WARRANTY IS NON-TRANSFERABLE AND APPLIES
ONLY TO THE ORIGINAL PURCHASER AND DOES NOT
EXTEND TO SUBSEQUENT OWNERS OF THE PRODUCT.
ANY APPLICABLE IMPLIED WARRANTIES, INCLUDING
THE WARRANTY OF MERCHANTABILITY, ARE LIMITED IN
DURATION TO A PERIOD OF THE EXPRESSED
WARRANTY AS PROVIDED HEREIN BEGINNING WITH THE
DATE OF ORIGINAL PURCHASE AT RETAIL AND NO
WARRANTIES, WHETHER EXPRESSED OR IMPLIED,
SHALL APPLY TO THE PRODUCT THEREAFTER.
EMERSON MAKES NO WARRANTY AS TO THE FITNESS
OF THE PRODUCT FOR ANY PARTICULAR PURPOSE OR
USE. THE EXTENT OF EMERSON RADIO CORP’S
LIABILITY UNDER THIS LIMITED WARRANTY IS THE
REPAIR OR REPLACEMENT PROVIDED ABOVE AND, IN
NO EVENT, SHALL EMERSON RADIO CORP’S LIABILITY
EXCEED THE PURCHASE PRICE PAID BY THE
PURCHASER OF THE PRODUCT. UNDER NO
CIRCUMSTANCES SHALL EMERSON RADIO CORP. BE
LIABLE FOR ANY LOSS, DIRECT, INDIRECT, INCIDENTAL,
SPECIAL, OR CONSEQUENTIAL DAMAGE ARISING OUT
OF OR IN CONNECTION WITH THE USE OF THIS
PRODUCT. THIS WARRANTY IS VALID ONLY IN THE
UNITED STATES OF AMERICA.
/